CrowdStrike
CrowdStrike: CrowdStrike Falcon Next-Gen SIEM unifies detection, investigation, and response on the Falcon platform. This destination sends logs to its HTTP Event Data Connector.
To add a CrowdStrike Falcon Next-Gen SIEM destination to Axoflow, complete the following steps. This destination sends data to the HTTP Event Data Connector (HEC) of your Falcon Next-Gen SIEM.
Prerequisites
- Create a HTTP Event Data Connector (HEC) on your Falcon Next-Gen SIEM deployment if needed.
- Record the API key and the ingest URL. You’ll need them to configure Axoflow.
Steps
-
Create a new destination.
- Open the AxoConsole.
- Select Destinations > Add Destination > Destination.
-
Configure the destination.
-
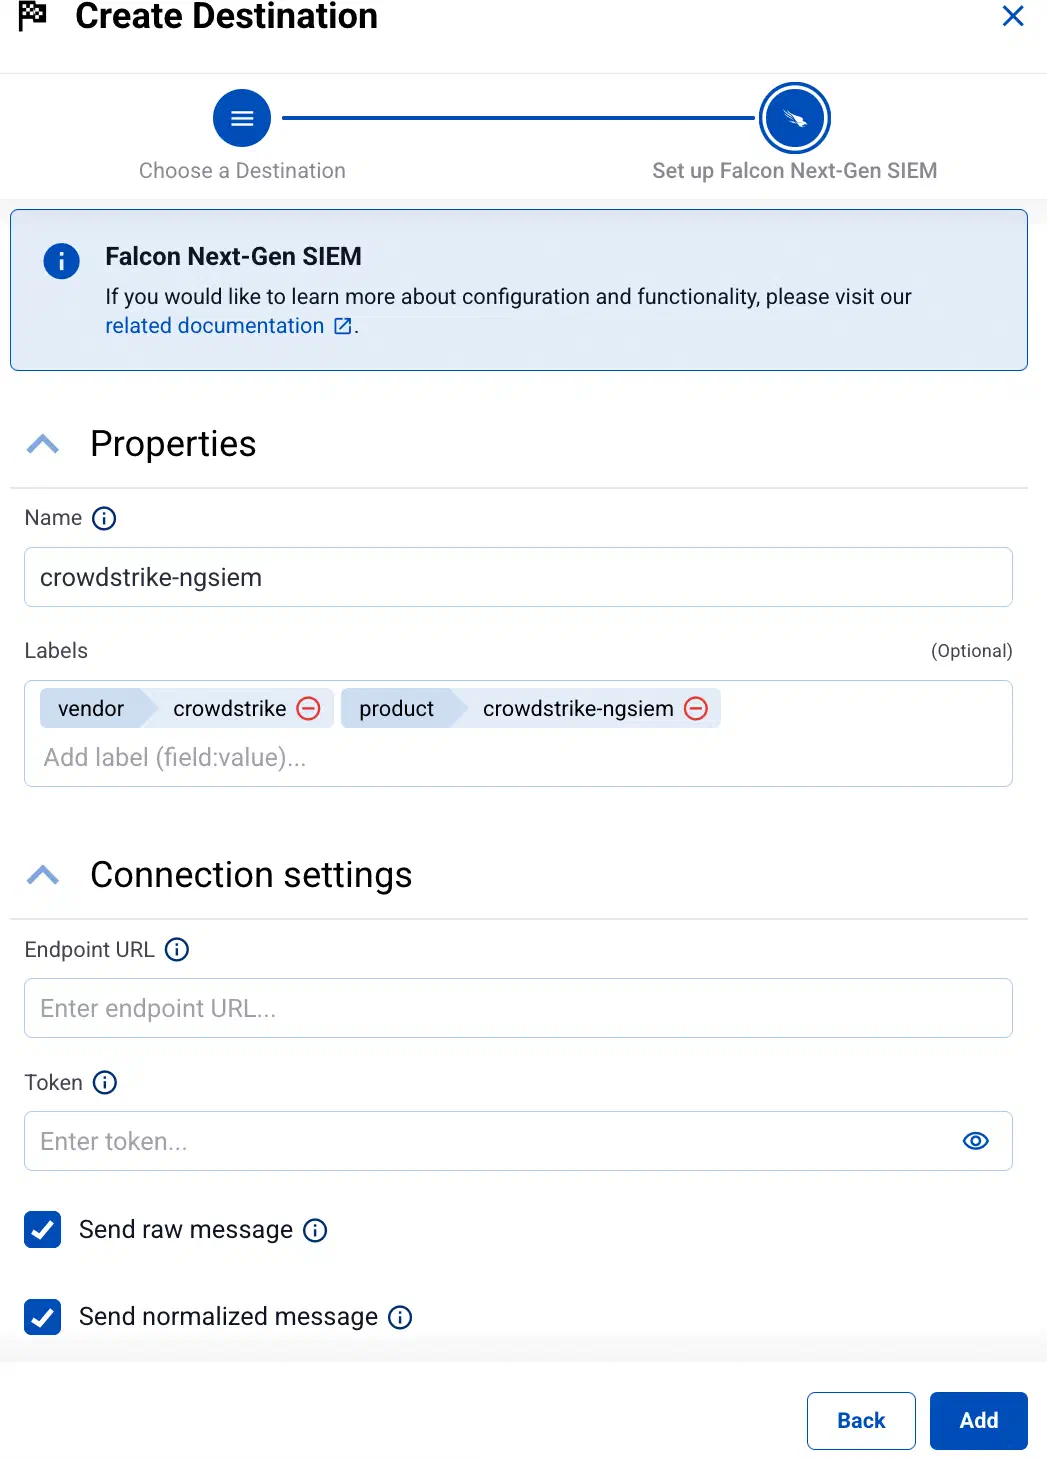
Select Falcon Next-Gen SIEM.
-
Enter a name for the destination.
-
Enter your ingest URL into the Endpoint URL field. Enter the complete URL, because different regional URLs can follow different patterns.
-
Enter the API key you’ve created into the Token field.
-
By default, AxoRouter sends the logs:
- The original raw message in the
eventelement of the payload (Send raw message is enabled). - The ECS-normalized message in the
fieldselement of the payload (Send normalized message is enabled).
- The original raw message in the
-
(Optional) Set other options as needed for your environments.
-
Disk buffer: Explicitly enable or disable disk buffer on AxoRouter. Default value: Enabled.
AxoRouter can store messages on the local disk if the destination or the network connection to the destination becomes unavailable. AxoRouter automatically sends the stored messages (in the order they were received) to the destination when the connection is reestablished. Note that the disk buffer is separate from AxoStore.
Disk buffer capacity (per worker): Size of the disk buffer files in bytes. This value applies for each worker. Default value is 100MiB (104857600 bytes), which is also the recommended minimum.
The disk required for using disk buffering is Disk buffer capacity (per worker) * Number of Workers for each destination of AxoRouter.
-
Batch Size: Sets the maximum size of payload in a batch. If the size of the messages reaches this value, AxoRouter sends the batch to the destination even if the number of messages is less than the value of the batch lines option.
CAUTION:
When setting Batch Size:
- Note that the actual HTTP request will be about 4KB larger because of the request headers.
- Check the configuration of your destination, as SaaS solutions and ingress controllers often limit the maximal size of HTTP requests. If the sum of Batch Size and the request headers exceeds this limit, the data will be rejected. (In case of NGINX, with a
client intended to send too large bodyerror message.)
-
Batch Lines: Number of lines sent to the destination in one batch. AxoRouter waits for this number of lines to accumulate and sends them off in a single batch. Increasing this number increases throughput as more messages are sent in a single batch, but also increases message latency.
Note that Initial window size * Maximum Connections must be greater or equal than Batch lines * Number of workers for all the sources that feeds a given destination. Otherwise, the destination worker might be unable to send data until Batch timeout expires, even if there’s data available.
For more details, see the AxoSyslog documentation.
-
Batch Timeout: Maximal time in milliseconds to wait for a batch to be filled before sending it. The default value (
-1) means that the batch should be full before sending, which may result in a long wait if the incoming traffic is low.For more details, see the AxoSyslog documentation.
-
Content compression: Specifies the compression to use when sending data to the destination.
No compressionexplicitly disables compression. Other possible values:Gzip,Deflate. Select only compression that your destination supports and has enabled. Default value:No compression -
Number of retries: The number of retry attempts when the retry action is triggered. Default:
3.For more details, see the AxoSyslog documentation.
-
Time to reopen: The time to wait before reconnecting when a connection fails. Default:
1second.For more details, see the AxoSyslog documentation.
-
Timeout: The number of seconds to wait for a log-forwarding request to complete, and attempt to reconnect the server if exceeded. If the timeout is exceeded, AxoRouter attempts to reconnect the destination. The default (
0) is unlimited.For more details, see the AxoSyslog documentation.
-
Number of Workers: Used for scaling the destination in case of high message load. Specifies the number of worker threads AxoRouter uses for sending messages to the destination. The default is 1. If high message throughput is not a concern, leave it on 1. For maximum performance, increase it up to the number of CPU cores available on AxoRouter.
For more details, see the AxoSyslog documentation.
-
Response actions: Specifies what AxoRouter does with the log message, based on the response code received from the destination.
- If the status code begins with 2 (for example,
200), AxoRouter assumes the message was successfully sent. - If you’ve configured a custom action in AxoConsole for the status code, AxoRouter performs the specified action.
- If the status code appears in the default response actions table, AxoRouter performs the specified action.
- For other status codes, AxoRouter disconnects.
To add a custom response action, select Add new action, then enter the HTTP status code and the related Action. The following actions are available:
- Disconnect: Keep trying to resend the message indefinitely.
- Drop: Drop the message without trying to resend it.
- Retry: Retry sending the message for a maximum of 3 times.
- Success: Assume the message was successfully sent.
- If the status code begins with 2 (for example,
Show default actions
code explanation action 100 “Continue” disconnect 101 “Switching Protocols” disconnect 102 “Processing” retry 103 “Early Hints” retry 200 “OK” success 201 “Created” success 202 “Accepted” success 203 “Non-Authoritative Information” success 204 “No Content” success 205 “Reset Content” success 206 “Partial Content” success 300 “Multiple Choices” disconnect 301 “Moved Permanently” disconnect 302 “Found” disconnect 303 “See Other” disconnect 304 “Not Modified” retry 307 “Temporary Redirect” disconnect 308 “Permanent Redirect” disconnect 400 “Bad Request” disconnect 401 “Unauthorized” disconnect 402 “Payment Required” disconnect 403 “Forbidden” disconnect 404 “Not Found” disconnect 405 “Method Not Allowed” disconnect 406 “Not Acceptable” disconnect 407 “Proxy Authentication Required” disconnect 408 “Request Timeout” disconnect 409 “Conflict” disconnect 410 “Gone” drop 411 “Length Required” disconnect 412 “Precondition Failed” disconnect 413 “Payload Too Large” disconnect 414 “URI Too Long” disconnect 415 “Unsupported Media Type” disconnect 416 “Range Not Satisfiable” drop 417 “Expectation Failed” disconnect 418 “I’m a teapot” disconnect 421 “Misdirected Request” disconnect 422 “Unprocessable Entity” drop 423 “Locked” disconnect 424 “Failed Dependency” drop 425 “Too Early” drop 426 “Upgrade Required” disconnect 428 “Precondition Required” retry 429 “Too Many Requests” disconnect 431 “Request Header Fields Too Large” disconnect 451 “Unavailable For Legal Reasons” drop 500 “Internal Server Error” disconnect 501 “Not Implemented” disconnect 502 “Bad Gateway” disconnect 503 “Service Unavailable” disconnect 504 “Gateway Timeout” retry 505 “HTTP Version Not Supported” disconnect 506 “Variant Also Negotiates” disconnect 507 “Insufficient Storage” disconnect 508 “Loop Detected” drop 510 “Not Extended” disconnect 511 “Network Authentication Required” disconnect -
-
Select Add.
-
-
Create a flow to connect the new destination to an AxoRouter instance.
-
Select Flows.
-
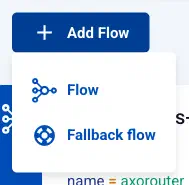
Select Add Flow > Flow.
To create a fallback flow, select Add Flow > Fallback flow.
-
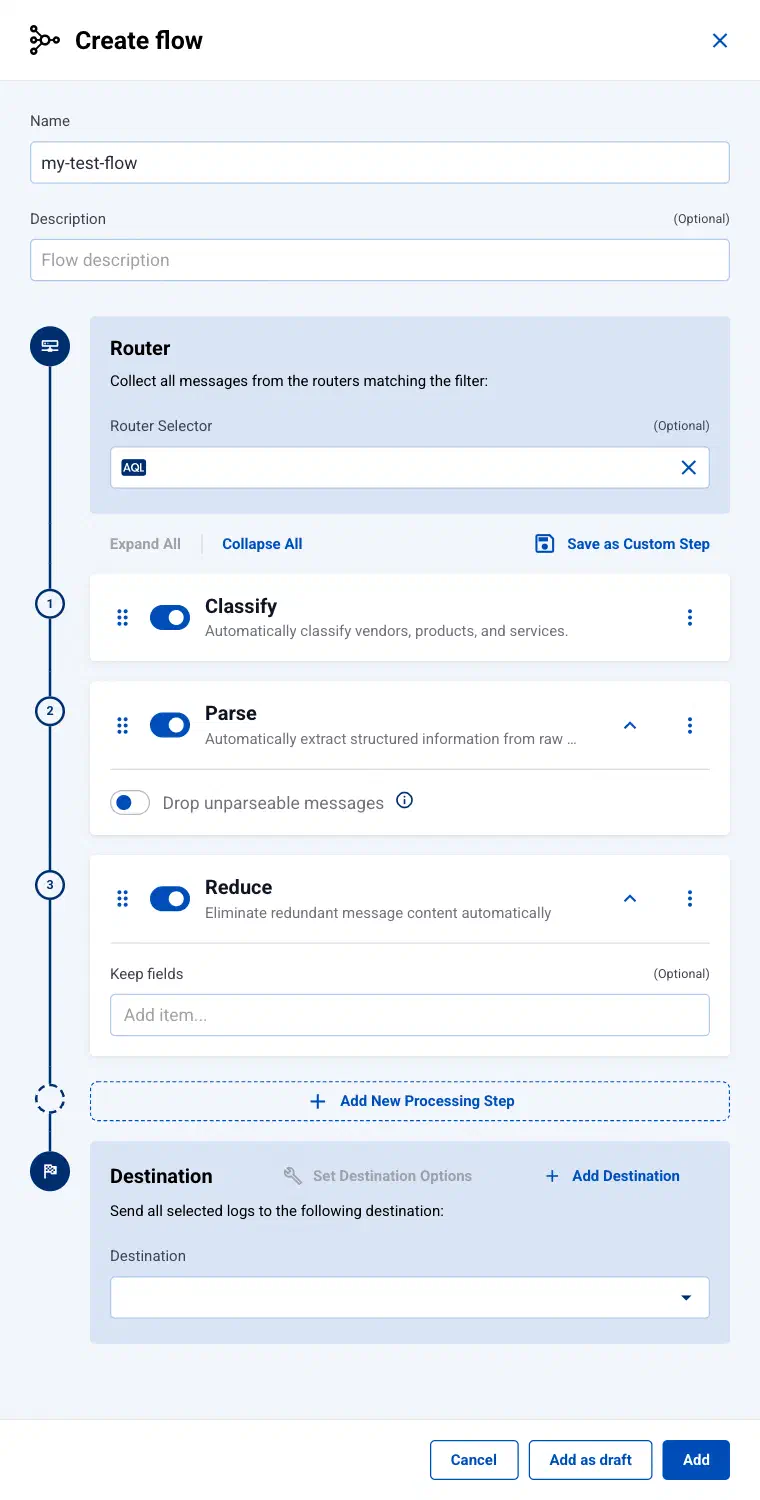
Enter a name for the flow, for example,
my-test-flow.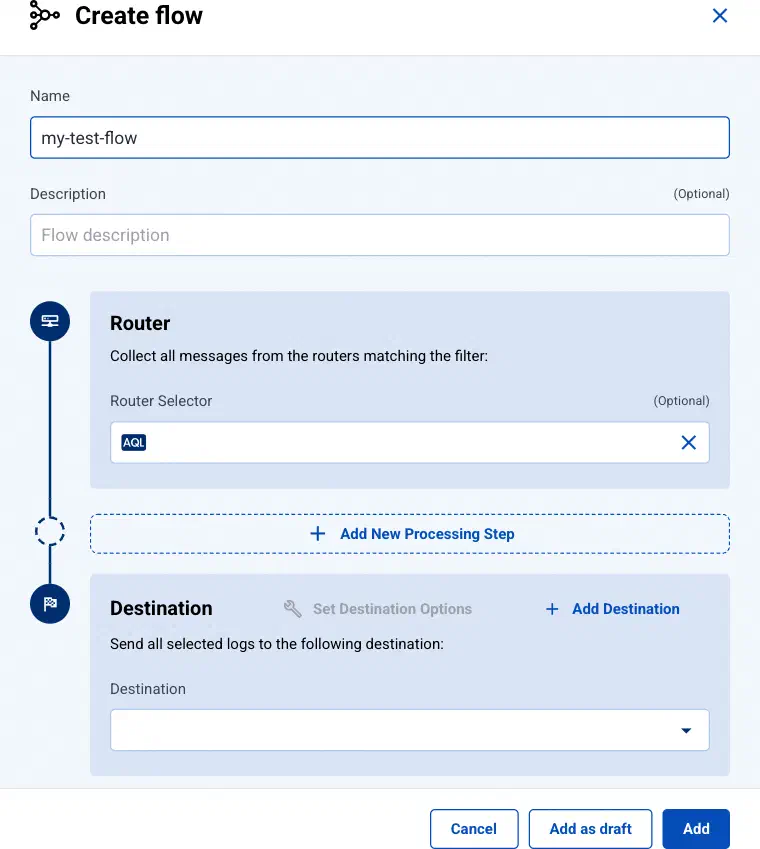
-
In the Router Selector field, enter an expression that matches the routers you want to apply the flow to. To select a specific router, use a name selector, for example,
name = my-axorouter-hostname.You can use any labels and metadata of the AxoRouter hosts in the Router selectors, for example, the hostname of the AxoRouter, or any custom labels.
- If you leave the router selector empty, it matches every AxoRouter instance.
- To select only a specific AxoRouter instance, set the
namefield to the name of the instance as selector. For example,name = my-axorouter. - If you set multiple fields in the selector, the selector will match only AxoRouter instances that match all elements of the selector. (There in an AND relationship between the fields.)
Note You can configure multiple fallback flows, but only one fallback flow can apply to an AxoRouter (so the Router Selector of the fallback flows can’t overlap). -
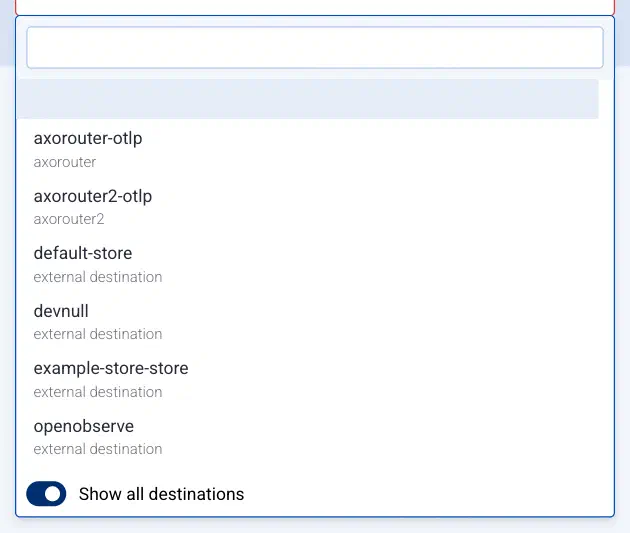
Select the Destination where you want to send your data. If you don’t have any destination configured, you can select Add Destination in the destination section to create a new destination now. For details on the different destinations, see Destinations.
- If you don’t have any destination configured, see Destinations.
- If you’ve already created a store, it’s automatically available as a destination. Note that the Router Selector of the flow must match only AxoRouters that have the selected store available, otherwise you’ll get an error message.
- If you want to send data to another AxoRouter, enable the Show all destinations option, and select the connector of the AxoRouter where you want to send the data.
-
(Optional) To process the data transferred in the flow, select Add New Processing Step. For details, see Processing steps. For example:
- Add a Classify, a Parse, and a Reduce step, in that order, to automatically remove redundant and empty fields from your data.
- To select which messages are processed by the flow, add a Select Messages step, and enter a filter into the AQL Expression field. For example, to select only the messages received from Fortinet FortiGate firewalls, use the
meta.vendor = fortinet AND meta.product = fortigatequery.
-
Select Add, then confirm with Add. To save the flow without provisioning it to the routers yet, select Add as draft instead.
-
The new flow appears in the Flows list.

-
Related message fields
CrowdStrike HEC is a Splunk-compatible ingestion endpoint, so you can use the Splunk-related message fields to modify messages sent to this destination using processing steps.
Troubleshooting
If the data doesn’t arrive at the destination, see the data doesn’t reach the destination. To find the errors that the destination returns, see the destination rejects the data. For other problems, see Troubleshooting Axoflow.