Webhook
Webhook connectors of AxoRouter can be used to receive log events through HTTP(S) POST requests.
You can specify static and dynamic URLs to receive the data. AxoRouter automatically parses the JSON payload of the request, and adds it to the log.body field of the message as a JSON object. Other types of payload (including invalid JSON objects) is added to the log.body field as a string. Note that you can add further parsing to the body using processing steps in Flows, for example, using FilterX or Regex processing steps.
Prerequisites
To receive data via HTTPS, you’ll need a key and a certificate that the connector will show to the clients.
If you want to enable TLS encryption for this connector to encrypt the communication with the sources, you’ll need to set appropriate keys and certificates.
CAUTION:
Copy the keys and certificates to AxoRouter before starting to configure the connector. Otherwise, you won’t be able to make configuration changes that require reloading the AxoRouter service, including starting log tapping or flow tapping.Note the following points:
-
Keys and certificates must be in PEM format.
-
If the file contains a certificate chain, the file must begin with the certificate of the host, followed by the CA certificate that signed the certificate of the host, and any other signing CAs in order.
-
You must manually copy these files to their place on the AxoRouter host, currently you can’t distribute them from AxoConsole.
The files must be readable by the
axorouterservice. -
The recommended path for certificates is under
/etc/axorouter/user-config/(for example,/etc/axorouter/user-config/tls-key.pem). (If you need to use a different path, you have to append an option like-v /your/path:/your/pathto theAXOROUTER_PODMAN_ARGSvariable of/etc/axorouter/container.env.) -
When referring to the key or certificate during when configuring the connector, use absolute paths (for example,
/etc/axorouter/user-config/tls-key.pem).
Add new webhook connector
To add a new connector to an AxoRouter host, complete the following steps:
-
Select Routers > Connector Rules > Add Rule. (Alternatively, you can select Add Connector > Create a connector rule on the Connectors page of an AxoRouter host.)
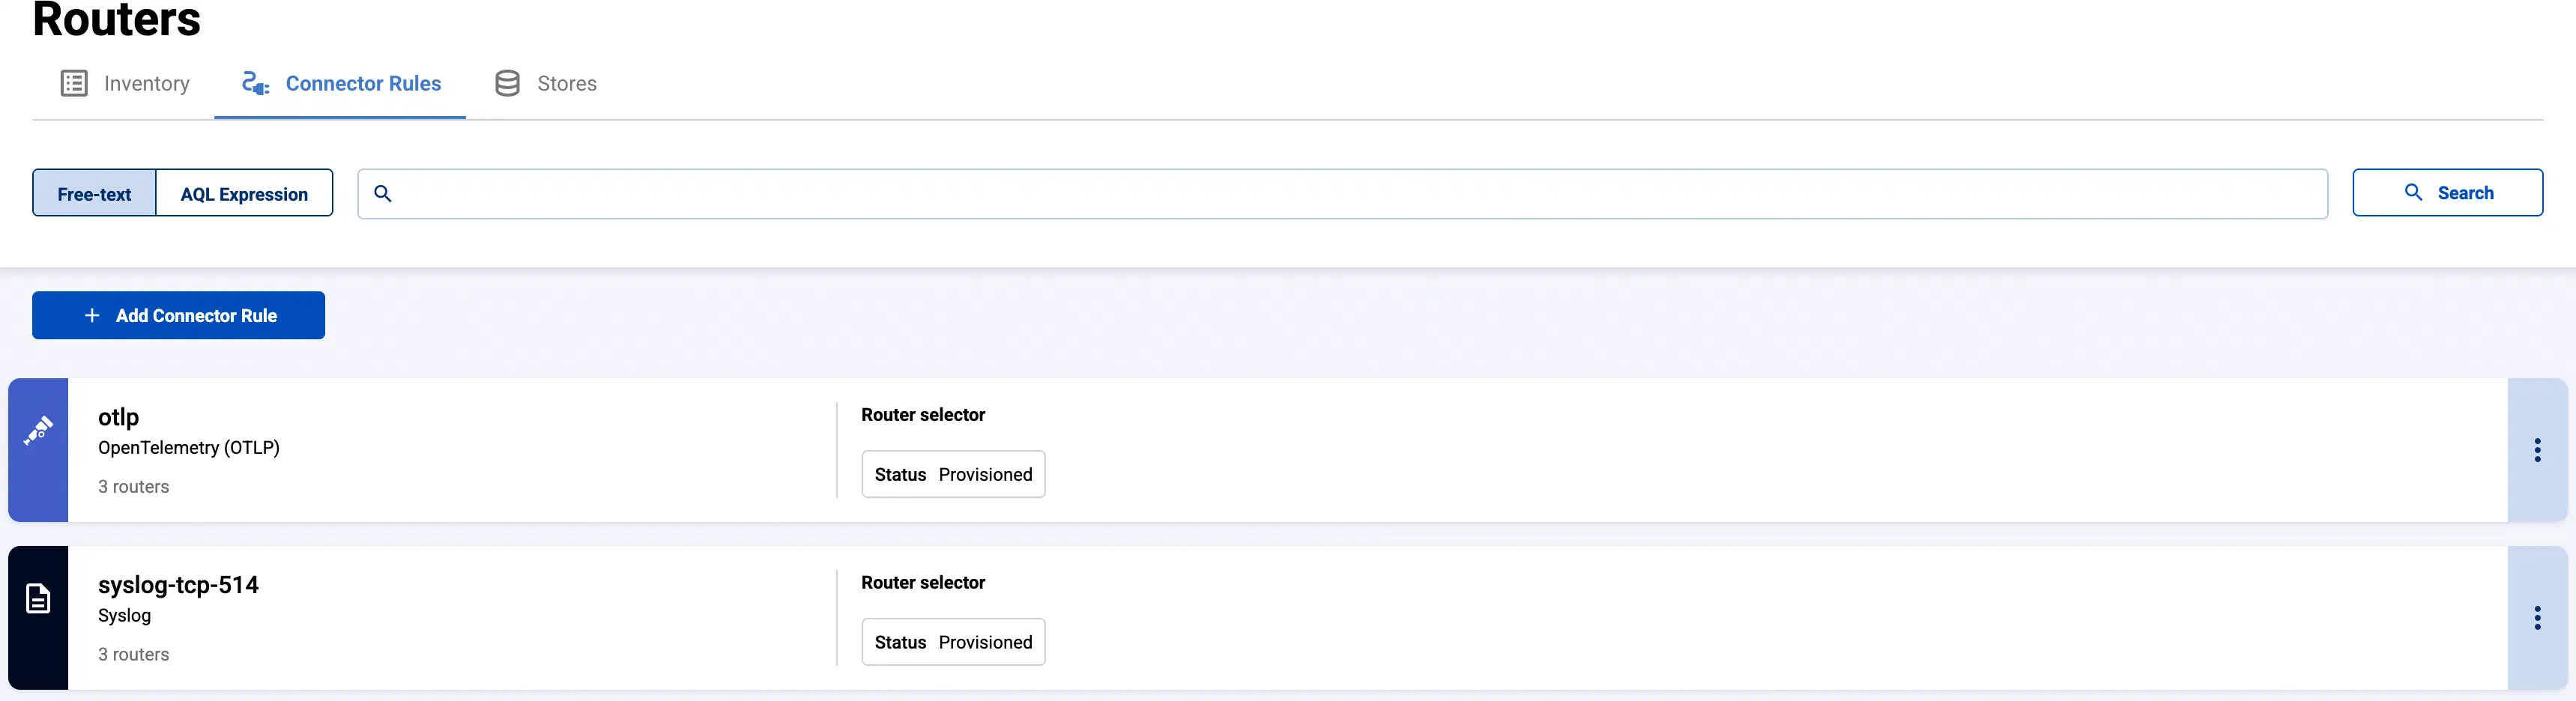
-
Select Webhook.
-
Configure the connector rule.
-
Enter a name for the connector rule into the Rule Name field.
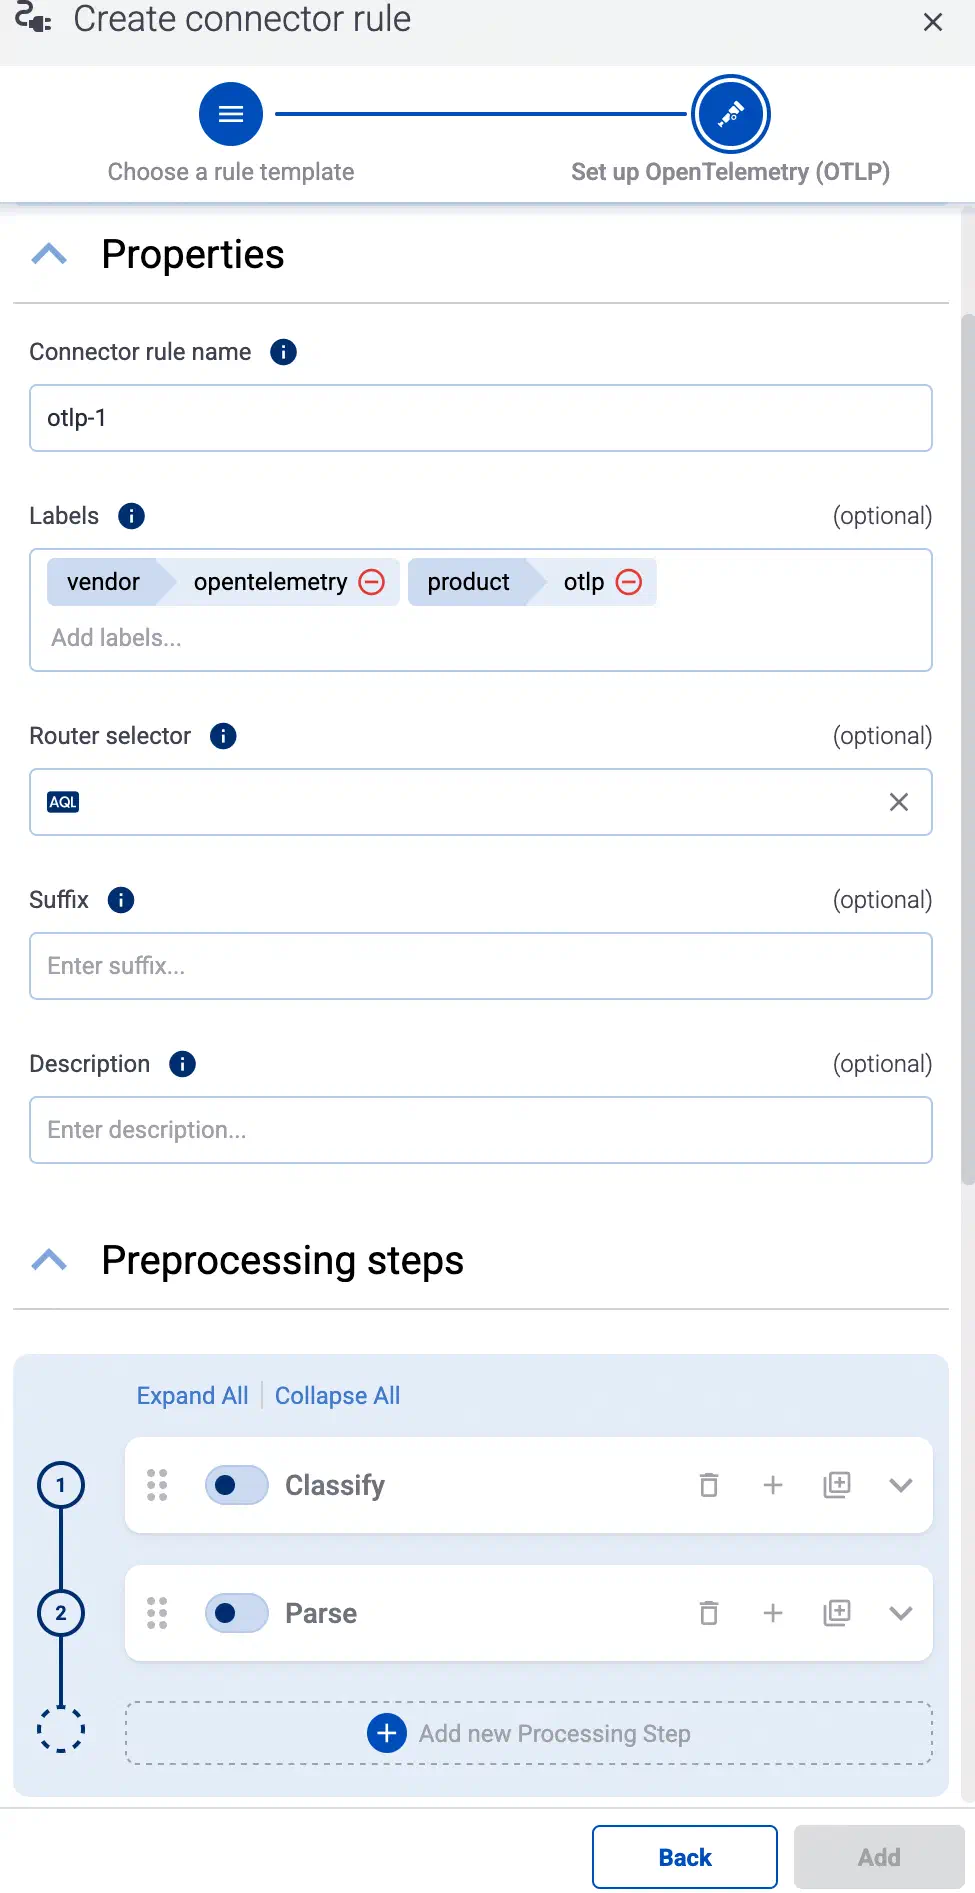
-
(Optional) Add labels to the connector rule. You will be able to use these labels in Flow Processing steps, for example, in the Query field of Select Messages steps. For details about the message schema and the related connector-specific fields, see the
meta.connectorobject. -
Set the Router Selector for the connector rule. The selector determines which AxoRouter instances will have a connector based on this connector rule.
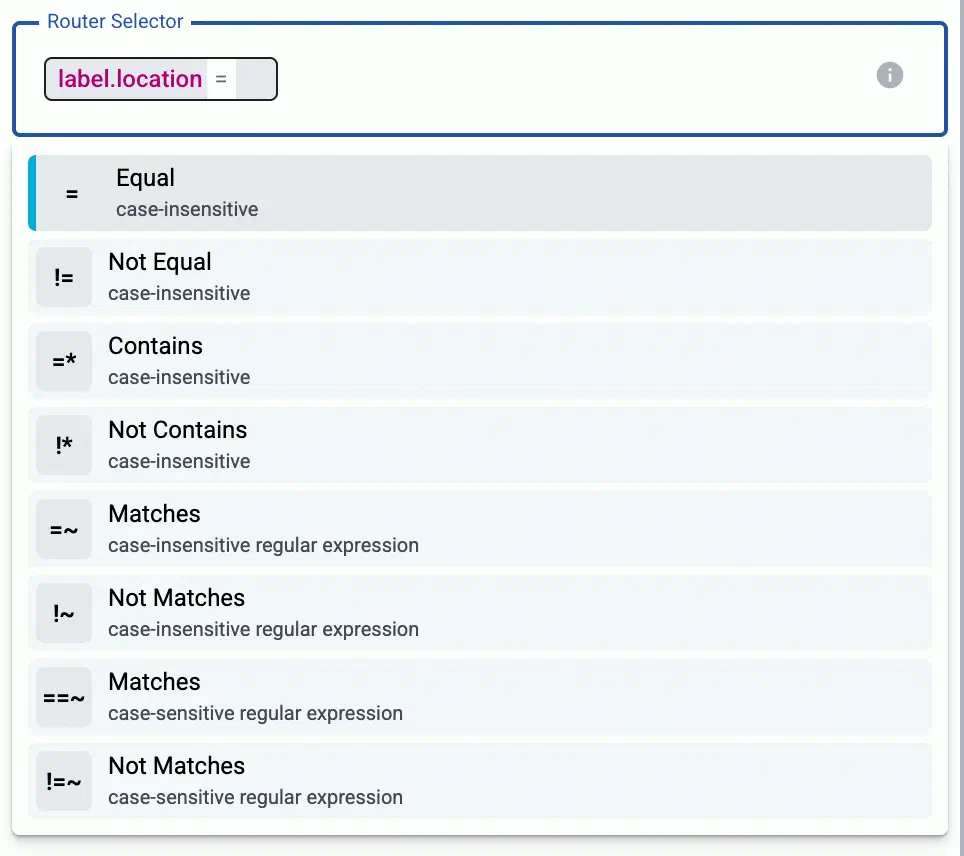
You can use any labels and metadata of the AxoRouter hosts in the Router selectors, for example, the hostname of the AxoRouter, or any custom labels.
- If you leave the Router Selector field empty, the selector will match every AxoRouter instance.
- To select only a specific AxoRouter instance, set the
namefield to the name of the instance as selector. For example,name = my-axorouter. - If you set multiple fields in the selector, the selector will match only AxoRouter instances that match all elements of the selector. (There in an AND relationship between the fields.)
-
(Optional) Enter a Suffix for the connector rule. This suffix will be used in the name of the connector instances created on the AxoRouter hosts. The name of the connector instance follows the
<name-of-AxoRouter>-<name-of-connector-rule>-<suffix>schema. For example, if the name of a matching AxoRouter instance is “my-axorouter”, the name of the connector rule is “otlp-1” and the suffix of the rule is “my-suffix”, the connector created for the AxoRouter will be named “my-axorouter-otlp-1-my-suffix”.If the Suffix field is empty, the name of the connector rule is used instead.
-
(Optional) Enter a description for the rule.
-
If needed, enable the Classify and Parse preprocessing steps so AxoRouter automatically identifies and parses messages sent by supported data sources. If your source is not listed, contact us.
Enabling these options processes all data received by the connectors created based on this connector rule. If you want to apply classification and parsing more selectively, you can use the Classify and Parse processing steps in your Flows.
Note that the Parse processing step requires Classify to be enabled. Parsing automatically parses the data from the content of the message, and replaces the message content (the
log.bodyfield in the internal message schema) with the structured information. -
(Optional) If needed, you can add other preprocessing steps to the connector rule. You can use the same processing steps as in flows. These can be useful if you use a dedicated connector rule to fix or annotate data coming from some specific sources.
-
-
Select the protocol you want to use: HTTPS or HTTP.
-
Set the port number where the webhook will receive the POST requests, for example,
8080. -
Set the endpoints where the webhook will receive data in the Paths field. You can use static paths, or regular expressions. In regular expressions you can use named capture groups to automatically set macro values in AxoRouter. For example, the
/events/(?P<HOST>.*)path sets the hostname for the data received in the request based on the second part of the URL: a request to the/events/my-example-hostURL sets the host field of that message tomy-example-host.By default, the
/eventsand/events/(?P<HOST>.*)paths are active. -
For HTTPS endpoints, set the path to the Key and the Certificate files. AxoRouter uses these to encrypt the TLS channel. You can use absolute paths (for example,
/etc/axorouter/user-config/tls-key.pem). The key and the certificate must be in PEM format.You must manually copy these files to their place, currently you can’t distribute them from Axoflow.
-
Select Add.
Axoflow automatically creates connectors on the AxoRouter hosts that match the Router Selector.
Make sure to enable the ports you’ve configured in the connector on the firewall of the AxoRouter host, and on other firewalls between the AxoRouter host and your data sources.
-
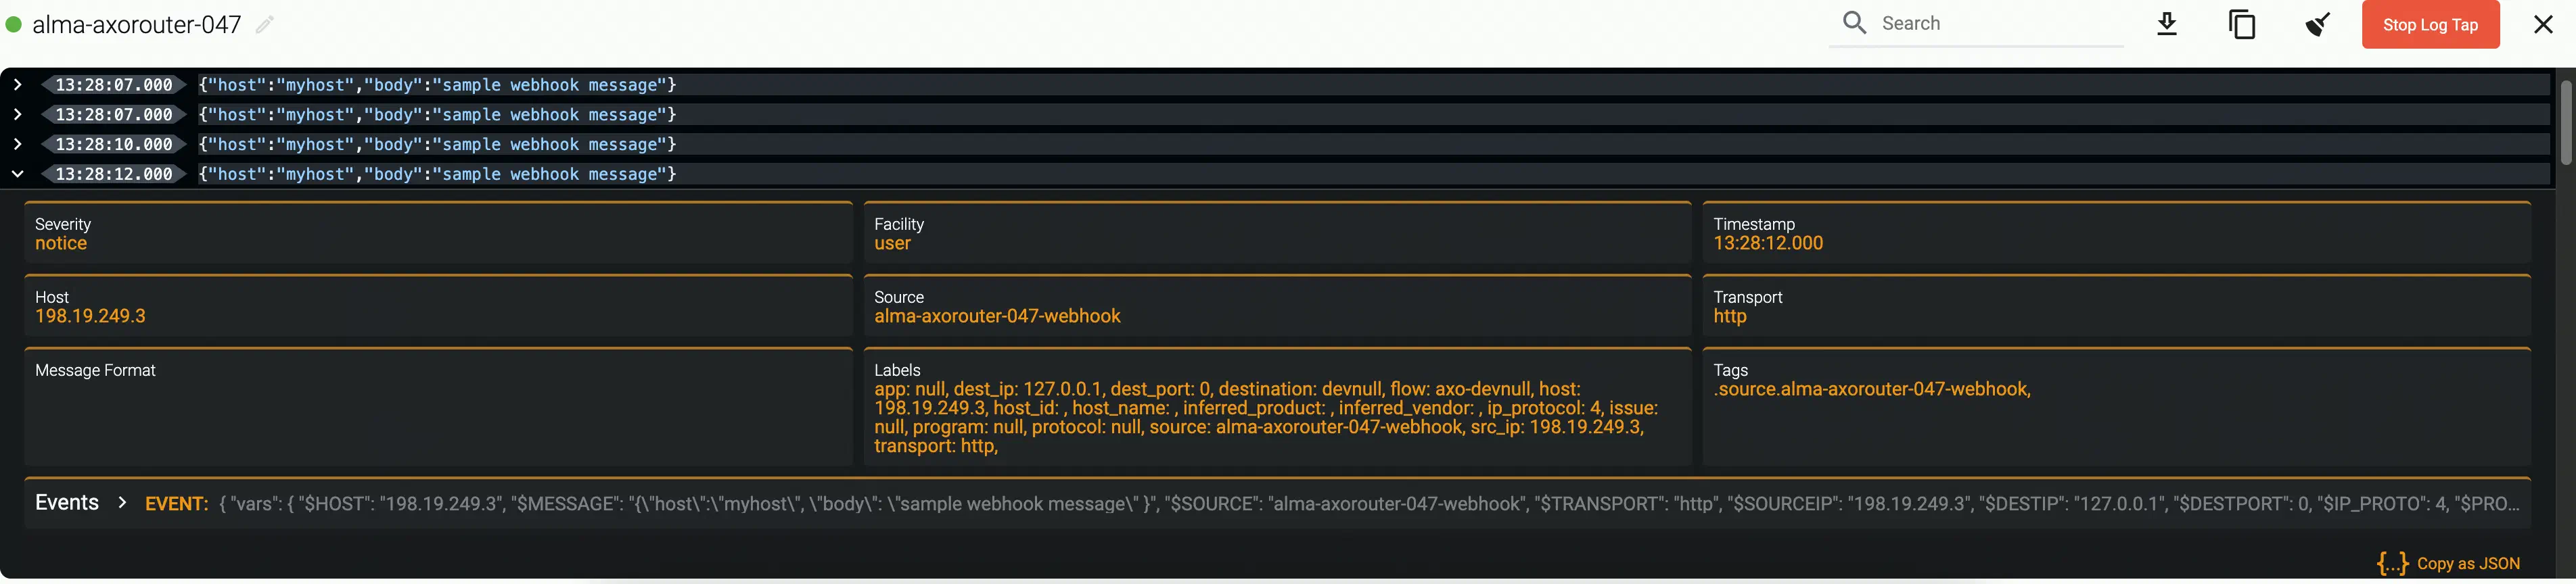
Send a test request to the webhook.
-
Open the Overview tab of the AxoRouter host where you’ve created the webhook connector and check the IP address or FQDN of the host.
-
Open a terminal on your computer and send a POST request to the path you’ve configured in the webhook.
curl -X POST -H 'Content-Type: application/json' --data '{"host":"myhost", "body": "sample webhook message" }' <;router-IP-address>:<webhook-port-number>/<webhook-path>/For example, if you’ve used the default values of the webhook connector you can use:
curl -X POST -H 'Content-Type: application/json' --data '{"host":"myhost", "body": "sample webhook message" }' <;router-IP-address>/events/Expected output:
{"status": "received"}
-
Metadata fields
The AxoRouter webhook connector adds the following fields to the meta variable:
| Analytics label | Message field | Value |
|---|---|---|
connector.type |
meta.connector.type |
webhook |
connector.name |
meta.connector.name |
The Name of the connector |
connector.port |
meta.connector.port |
The port number where the connector receives data |
connector.labels.product |
meta.connector.labels.product |
Default value: webhook |
connector.labels.vendor |
meta.connector.labels.vendor |
Default value: generic |
You can use the labels as:
- Filter labels on the Analytics page,
- in the Filter By Label field during log tapping.
You can use the message fields
- in Flow Processing steps, for example, in the Query field of Select Messages steps,
- in AQL expressions in the search bars.