This is the multi-page printable view of this section.
Click here to print.
Return to the regular view of this page.
Provision pipeline elements
The following sections describe how to register a logging host into the AxoConsole.
Hosts with supported collectors
If the host is running one of the following log collector agents and you can install Axolet on the host to receive detailed metrics about the host, the agent, and data flow the agent processes.
-
Install Axolet on the host. For details, see Axolet.
-
Configure the log collector agent of the host to integrate with Axolet. For details, see the following pages:
1 - AxoRouter
1.1 - Install AxoRouter on Linux
AxoRouter is a key building block of Axoflow that collects, aggregates, transforms and routes all kinds of telemetry and security data automatically. AxoRouter for Linux includes a Podman container running AxoSyslog, Axolet, and other components.
To install AxoRouter on a Linux host, complete the following steps. For other platforms, see AxoRouter.
Note
Note that AxoRouter and Axoflow agent collects detailed, real-time metrics about the data-flows – giving you observability over the health of the security data pipeline and its components. Your security data remains in your self-managed cloud or in your on-prem instance where your sources, destinations, Axoflow agents, and AxoRouters are running, only metrics are forwarded to AxoConsole.
What the install script does
When you deploy AxoRouter, you run a command that installs the required software packages, configures them and sets up the connection with Axoflow.
The installer script installs the axolet packages, then executes the configure-axolet command with the right parameters. (If the packages are already installed, the installer will update them unless the none package format is selected when generating the provisioning command.)
The install script is designed to be run as root (sudo), but you can configure AxoRouter to run as a non-root user.
The installer script performs the following main steps:
- Executes prerequisite checks:
- Tests the network connection with the console endpoints.
- Checks if the operating system is supported.
- Checks if
podman is installed.
- Downloads and installs the
axorouter RPM or DEB package.
- The package contains the
axorouter-ctl and setup-axorouter commands and the axorouter.container unit files for podman-systemd.
CAUTION:
The package uses docker and standard service units. On older systems (e.g. Ubuntu 22.04 or older) this results in the following limitations:
- AxoWec, AxoStore services are not supported.
- Some
axorouter-ctl commands are not fully supported.
- Proxy environment variables need to be added to the docker systemctl configuration manually.
- Executes the
setup-axorouter command, which
- Updates the environment variables used by the axorouter service.
- Enables and starts the AxoRouter service.
- Downloads and installs the
axolet RPM or DEB package.
- The package contains the
axolet and configure-axolet commands, and the axolet.service systemd unit file.
- The
configure-axolet command is executed with a configuration snippet on its standard input which contains a token required for registering into the management platform. The command:
-
Writes the initial /etc/axolet/config.json configuration file.
Note: if the file already exists it will only be overwritten if the Overwrite config option is enabled when generating the provisioning command.
-
Enables and starts the axolet service.
axolet performs the following main steps on its first execution:
- Generates and persists a unique identifier (GUID).
- Initiates a cryptographic handshake process to AxoConsole.
- AxoConsole issues a client certificate to AxoRouter, which will be stored in the above mentioned
config.json file.
- The service waits for an approval on AxoConsole. Once you approve the host registration request, axolet starts to manage the local services and send telemetry data to AxoConsole. It keeps doing so as long as the agent is registered.
Prerequisites
Resource requirements
For a deployment that handles up to 1TB/day log traffic (~14500 EPS) even with complex routing and processing configurations, we recommend:
- 4 vCPU
- 8 GB memory
- 45 GB disk / hour. AxoRouter buffers incoming log data on disk if the destination or the network connection to the destination becomes unavailable. With a 1TB/day throughput, you need at least 45 GB of disk buffer per hour to avoid putting backpressure on your sources. This doesn’t include any disk for using AxoStore.
For more details on hardware sizing, contact our support team.
Resource requirements for AxoStore
If you want to enable AxoStore on the node, you’ll need:
1TB storage for the free tier, or- the storage limit of your AxoStore subscription.
Memory and CPU requirements depend on the incoming data volume, the Config profile you want to use for your AxoStores, the expected rate of events, and the number and complexity of the queries you’ll be running. The Default configuration profile is recommended only for small-scale deployments and evaluation use cases that receive about 1000 events per second.
- For occasional access to the data, when you’re mostly using the storage as a data warehouse, we recommend 1:80 memory to storage ratio and 6:1 GiB of memory to number of CPU cores ratio. That is, 12GiB memory and 2 CPU cores per 1TB of storage. At least 8GiB of RAM is recommended.
- If you’re running frequent analytics and several concurrent queries on the stored data, we recommend 1:60 memory to storage ratio and 4:1 GiB of memory to CPU core ratio. That is, 16GiB memory and 4 CPU cores per 1TB of storage.
For detailed sizing recommendations, contact our support team.
The storage must be available on the volume storing the /var/lib/clickhouse folder. Alternatively, you can set a different directory to store your AxoStores using the AXOSTORE_MOUNT environment variable.
Network access
The host must be able to access the following domains related to the AxoConsole:
-
When using AxoConsole SaaS:
<your-tenant-id>.cloud.axoflow.io: HTTPS traffic on TCP port 443, needed to download the binaries for Axoflow software (like Axolet and AxoRouter).kcp.<your-tenant-id>.cloud.axoflow.io: HTTPS (mutual TLS) traffic on TCP port 443 for management traffic.telemetry.<your-tenant-id>.cloud.axoflow.io: HTTPS (mutual TLS) traffic on TCP port 443, where Axolet sends the metrics of the host.us-docker.pkg.dev: HTTPS traffic on TCP port 443, but only if you’re forcing the installation script to pull the container images from the public repository. The Axolet and AxoRouter for Linux installation scripts download the images directly from AxoConsole.
-
When using an on-premise AxoConsole:
-
When installing Axoflow agent for Windows or Linux:
github.com: HTTPS traffic on TCP port 443, for downloading installer packages.
By default, AxoRouter accepts data on the following ports (unless you’ve modified the default connector rules):
- 514 UDP and TCP for RFC3164 (BSD-syslog) and RFC5424 (IETF-syslog) formatted traffic. AxoRouter automatically recognizes and handles both formats.
- 601 TCP (RFC 3195 - Reliable Delivery for syslog) for RFC5424 (IETF-syslog) and RFC3164 (BSD-syslog) formatted traffic. AxoRouter automatically recognizes and handles both formats.
- 6514 TCP for TLS-encrypted syslog traffic (RFC 5425).
To receive data on other ports or other protocols, configure other connector rules for the AxoRouter host.
For TLS-encrypted syslog connections, create a new connector rule or edit an existing one, and configure the keys and certificates needed to encrypt the connections. For details, see Syslog.
Note
When you create a
connector rule on a new port, open that port in the firewall of of every corresponding AxoRouter as well.
Install AxoRouter
Note
When using AxoRouter with an on-premises AxoConsole deployment, you have to
prepare the hosts before deploying AxoRouter. These steps are specific to on-premises AxoConsole deployments, and are not needed when using the SaaS AxoConsole.
-
Select Routers > Add Router.

-
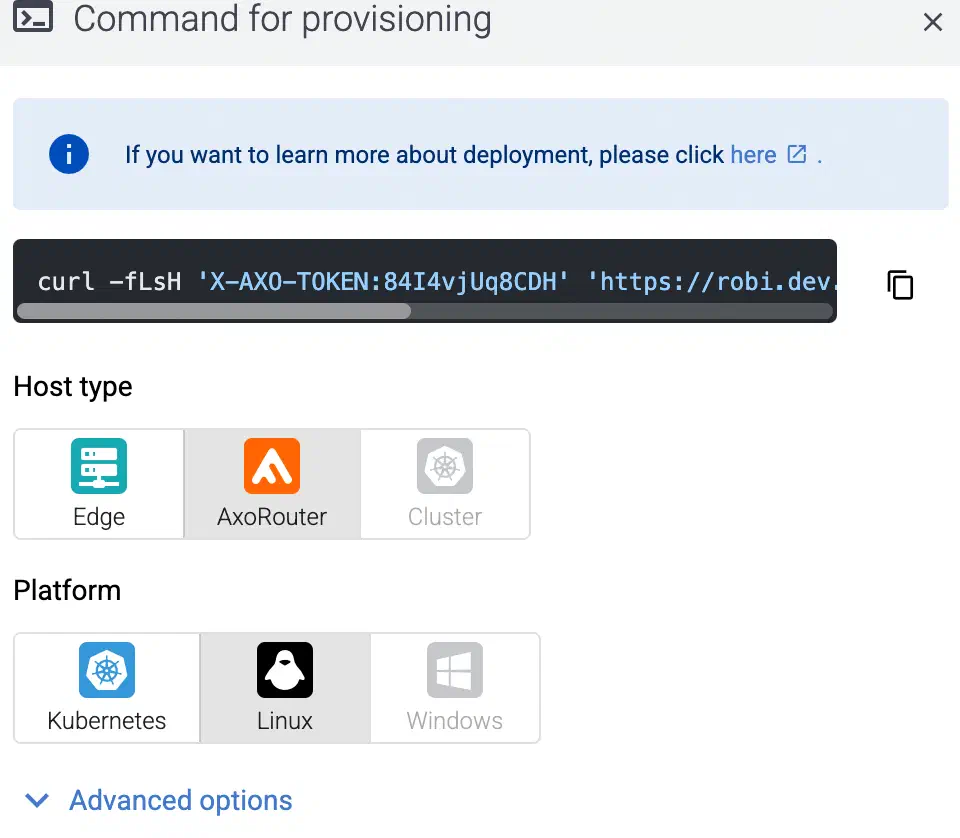
Select the platform (Linux). The one-liner installation command is displayed.
-
(Optional) If you don’t want to store any logs locally on AxoRouter, disable AxoStore, select Advanced options, scroll down, and deselect Enable AxoStore.
-
(Optional)
If needed, set the Advanced options (for example, proxy settings, or External image pull in air-gapped environments) to modify the installation parameters. Usually, you don’t have to use advanced options unless the Axoflow support team instructs you to do so.
-
Open a terminal on the host where you want to install AxoRouter.
-
Run the one-liner, then follow the on-screen instructions.
Note
Running the provisioning command with sudo would mask environment variables of the calling shell. Either start the whole procedure from a root shell, or let the install script call sudo when it needs to. In other words: don’t add the sudo command to the provisioning command.
Example output:
Do you want to install AxoRouter now? [Y]

% Total    % Received % Xferd  Average Speed   Time    Time     Time  Current
                                Dload  Upload   Total   Spent    Left  Speed
100  5480  100  5480    0     0  32076      0 --:--:-- --:--:-- --:--:-- 33414
Selecting previously unselected package axorouter.
(Reading database ... 17697 files and directories currently installed.)
Preparing to unpack axorouter.deb ...
Unpacking axorouter (0.66.0) ...
Setting up axorouter (0.66.0) ...
Low maximum socket receive buffer size value detected: 7500000 bytes (7.2MB).
Do you you want to permanently set the net.core.rmem_max sysctl value to 33554432 bytes (32MB) on this system? [Y]

net.core.rmem_max = 33554432
Created symlink '/etc/systemd/system/multi-user.target.wants/axostore.path' → '/etc/systemd/system/axostore.path'.
Created symlink '/etc/systemd/system/multi-user.target.wants/axorouter-wec.path' → '/etc/systemd/system/axorouter-wec.path'.
% Total    % Received % Xferd  Average Speed   Time    Time     Time  Current
                                Dload  Upload   Total   Spent    Left  Speed
100 42.9M  100 42.9M    0     0  28.1M      0  0:00:01  0:00:01 --:--:-- 28.2M
Selecting previously unselected package axolet.
(Reading database ... 17707 files and directories currently installed.)
Preparing to unpack axolet.deb ...
Unpacking axolet (0.66.0) ...
Setting up axolet (0.66.0) ...
Created symlink '/etc/systemd/system/multi-user.target.wants/axolet.service' → '/usr/lib/systemd/system/axolet.service'.
Now continue with onboarding the host on the Axoflow web UI.
Note
If you get the following errors:
AXOROUTER_FUSE envvar is not set. It may mean that the /usr/local/bin/setup-axorouter script is called without proper configuration.
Failed to configure AxoRouter.
Failed to deploy the AxoRouter.
Set the following (or equivalent) in the sudoers file on the host, and rerun the installation command.
Defaults!/usr/local/bin/setup-axorouter env_keep += "AXO* http_proxy https_proxy no_proxy"
Defaults!/usr/local/bin/axorouter-ctl env_keep += "AXO* http_proxy https_proxy no_proxy"
Defaults!/usr/local/bin/configure-axolet env_keep += "AXO* http_proxy https_proxy no_proxy"
-
Register the host.
-
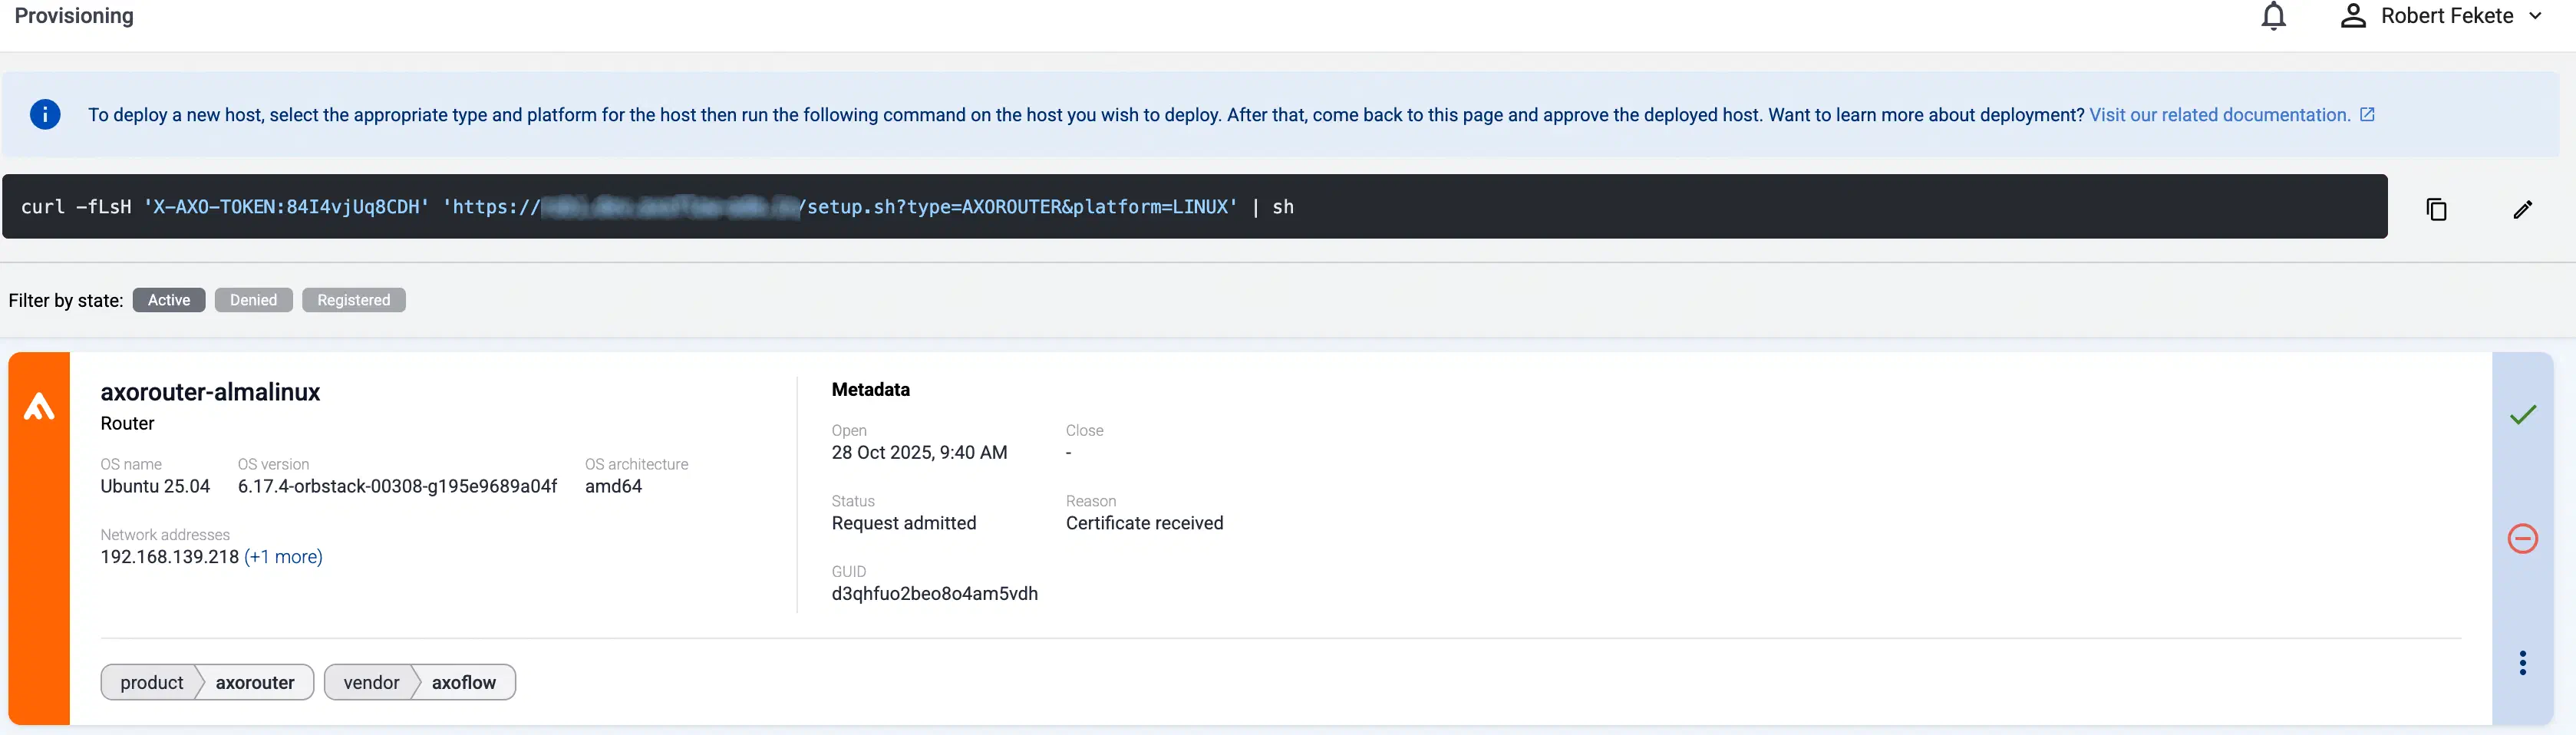
Reload the Provisioning page. There should be a registration request for the new AxoRouter deployment. Select ✓.
-
Select Register to register the host. You can add a description and labels (in label:value format) to the host.
-
If the primary IP address (the first IP address shown in the Network addresses section on the Routers page for each AxoRouter) is not accessible from your edge hosts, set a Network address override (IP address or an FQDN) that’s accessible. Otherwise, data forwarding from edge hosts will fail.
-
Select the Topology page. The new AxoRouter instance is displayed.
Run AxoRouter as non-root
By default, the install script runs AxoRouter as root. To configure it to run under a non-root user instead, see Run AxoRouter as non-root.
Create a flow
- If you haven’t already done so, create a new destination. If you’ve enabled AxoStore on the node and want to send data into AxoStore, see AxoStore.
-
Create a flow to connect the new AxoRouter to the destination.
-
Select Flows.
-
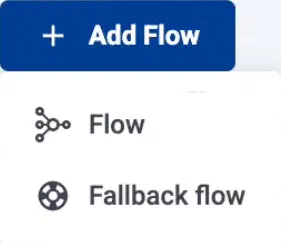
Select Add Flow > Flow.
To create a fallback flow, select Add Flow > Fallback flow.
-
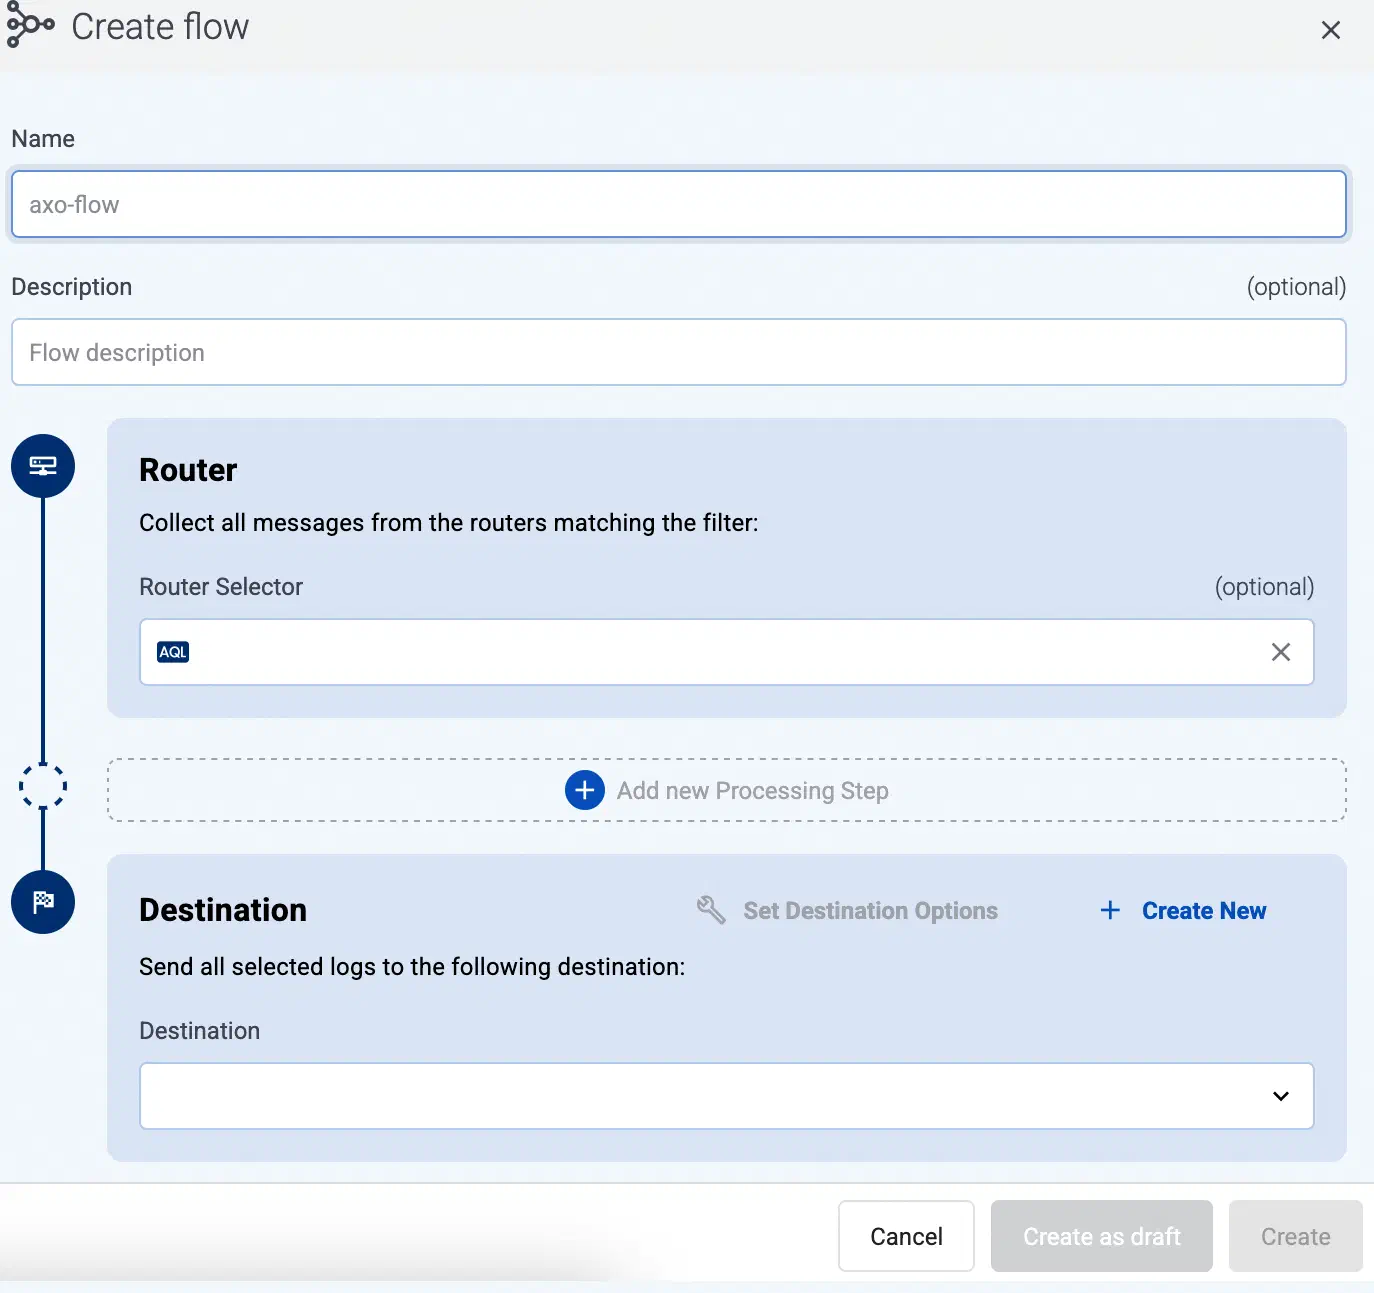
Enter a name for the flow, for example, my-test-flow.
-
In the Router Selector field, enter an expression that matches the router(s) you want to apply the flow. To select a specific router, use a name selector, for example, name = my-axorouter-hostname.
You can use any labels and metadata of the AxoRouter hosts in the Router selectors, for example, the hostname of the AxoRouter, or any custom labels.
- If you leave the Router Selector field empty, the selector will match every AxoRouter instance.
- To select only a specific AxoRouter instance, set the
name field to the name of the instance as selector. For example, name = my-axorouter.
- If you set multiple fields in the selector, the selector will match only AxoRouter instances that match all elements of the selector. (There in an AND relationship between the fields.)
Note
You can configure multiple fallback flows, but only one fallback flow can apply to an AxoRouter (so the Router Selector of the fallback flows can’t overlap).
-
Select the Destination where you want to send your data. If you don’t have any destination configured, you can select + Add in the destination section to create a new destination now. For details on the different destinations, see Destinations.
- If you don’t have any destination configured, see Destinations.
- If you’ve already created a store, it automatically available as a destination. Note that the Router Selector of the flow must match only AxoRouters that have the selected store available, otherwise you’ll get an error message.
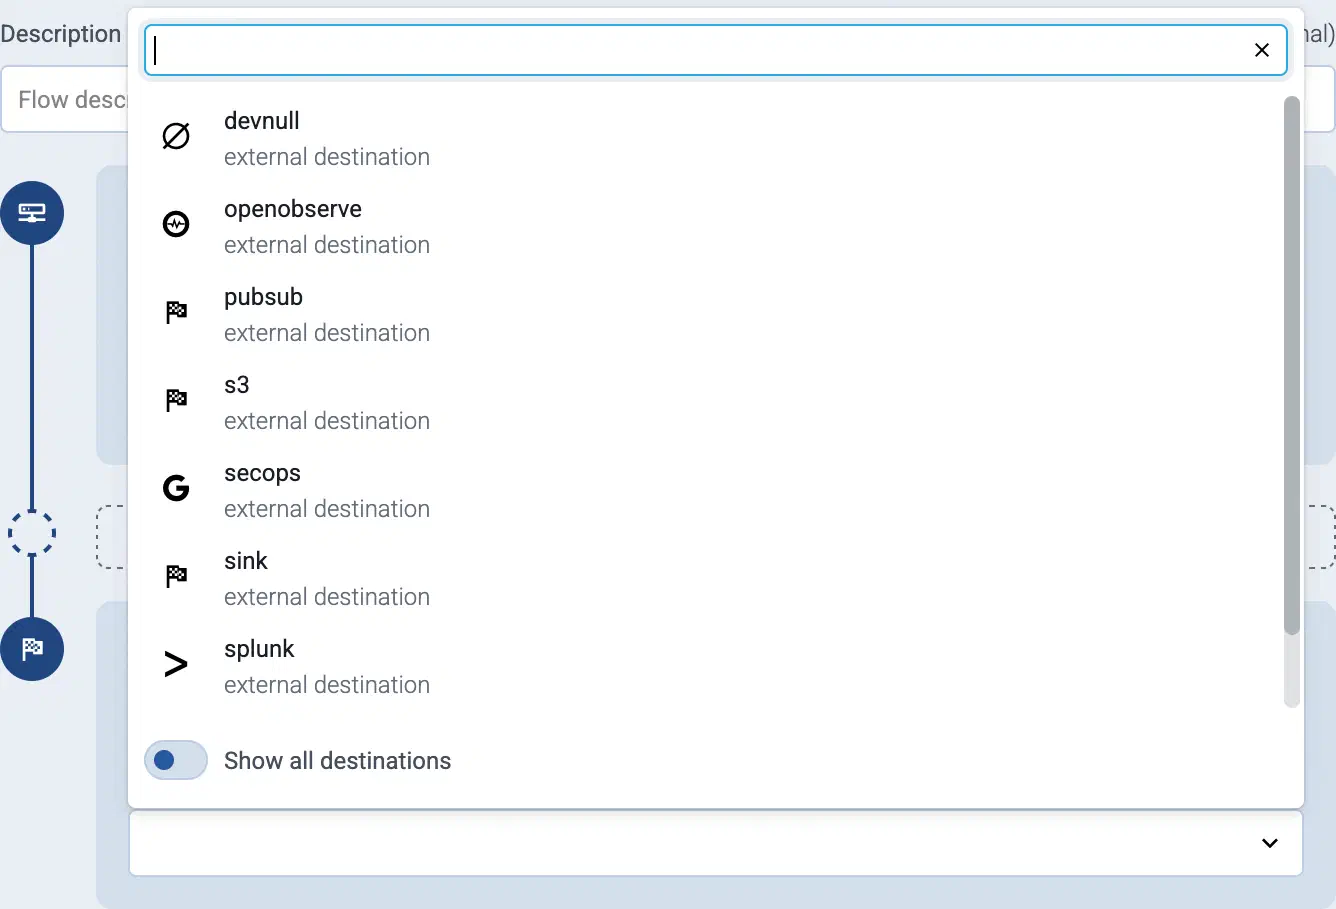
- If you want to send data to another AxoRouter, enable the Show all destinations option, and select the connector of the AxoRouter where you want to send the data.
-
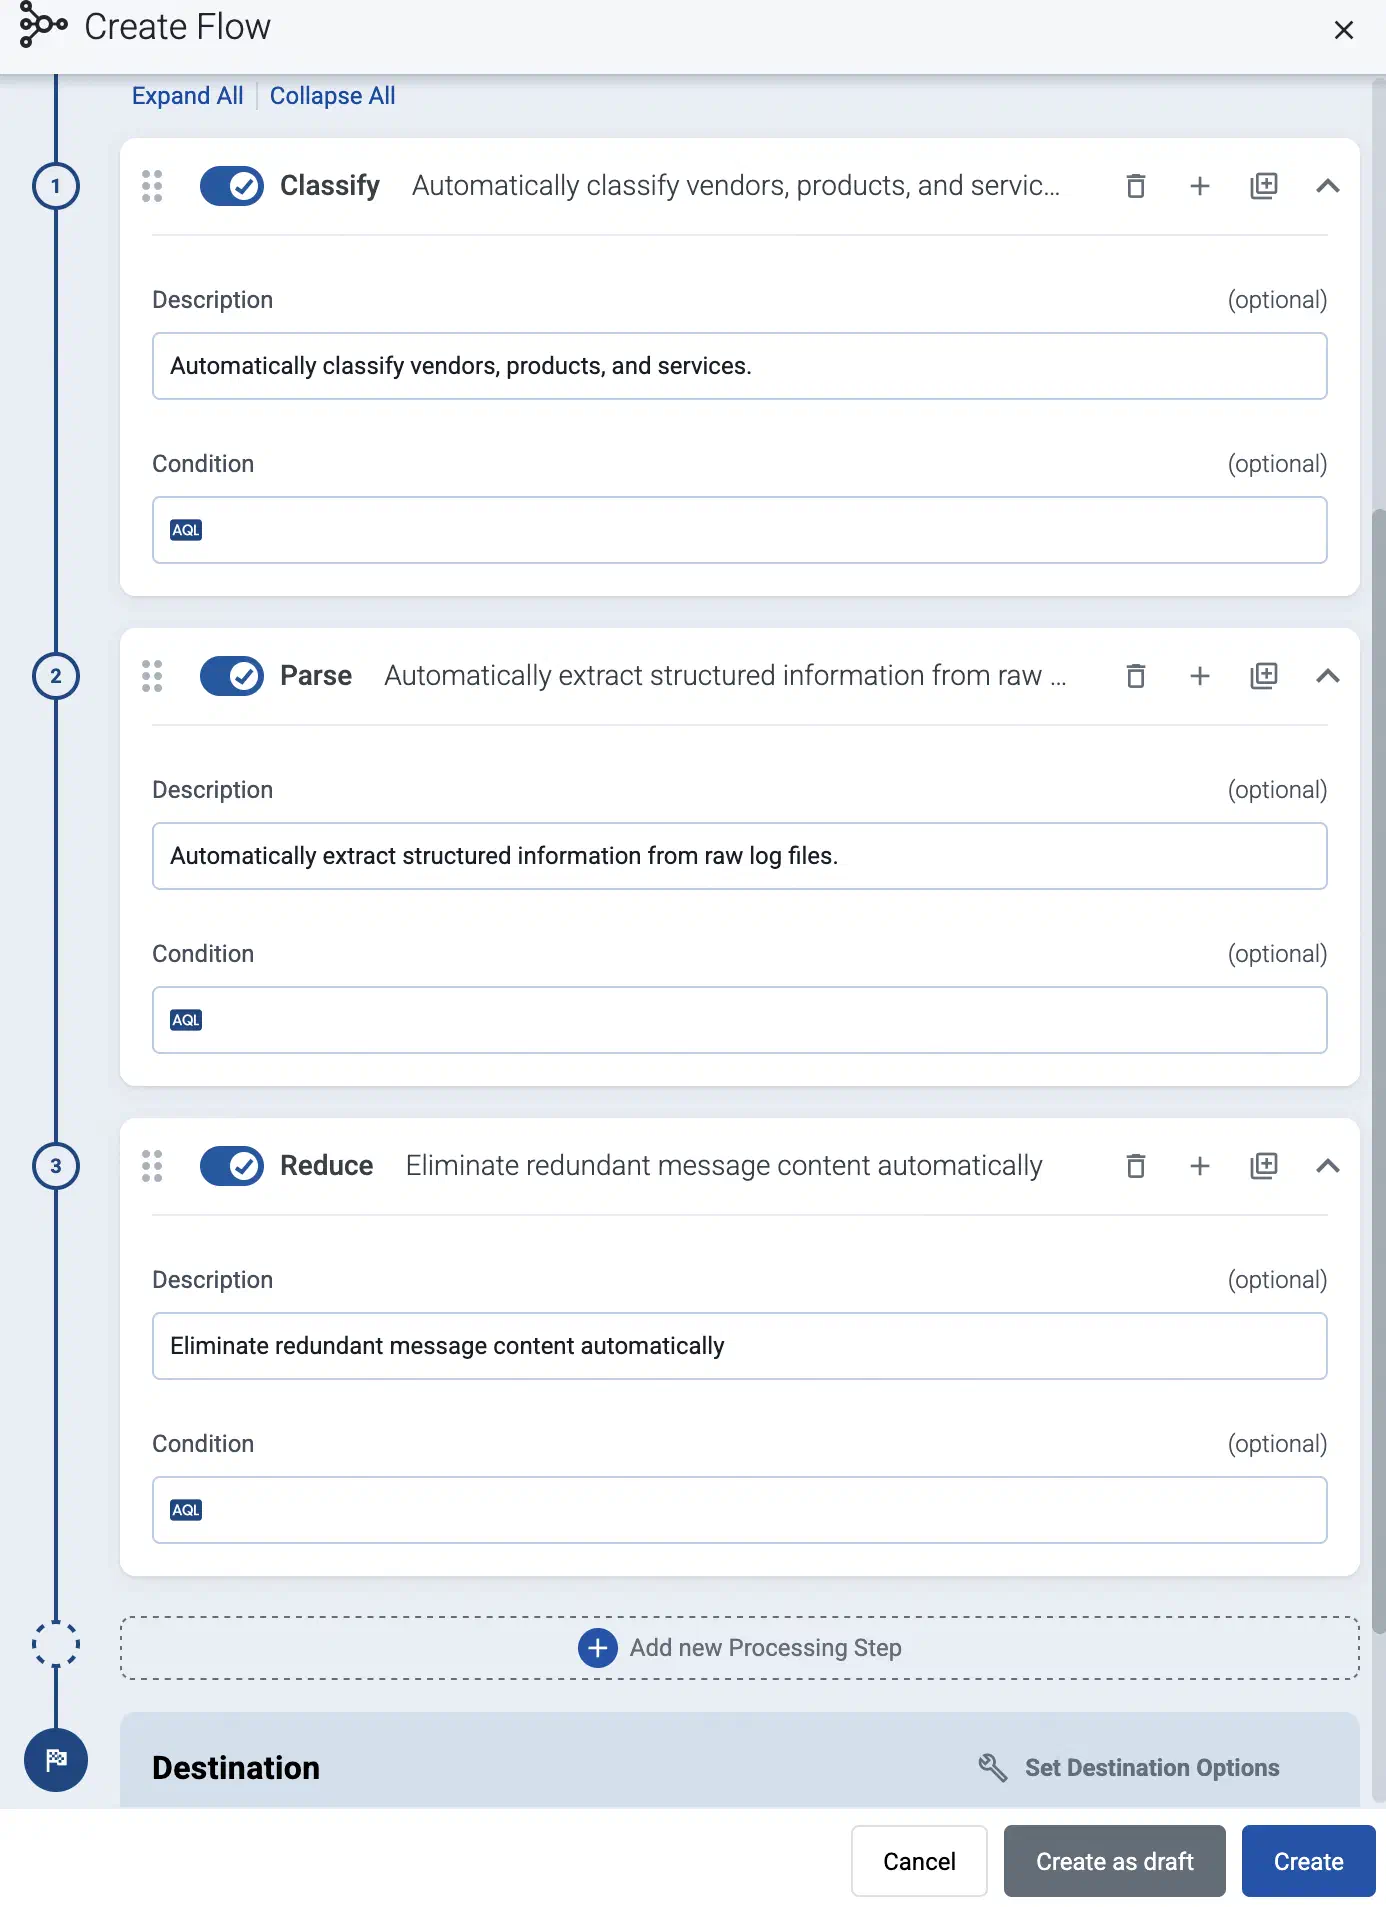
(Optional) To process the data transferred in the flow, select Add New Processing Step. For details, see Processing steps. For example:
- Add a Classify, a Parse, and a Reduce step, in that order, to automatically remove redundant and empty fields from your data.
- To select which messages are processed by the flow, add a Select Messages step, and enter a filter into the AQL Expression field. For example, to select only the messages received from Fortinet FortiGate firewalls, use the
meta.vendor = fortinet AND meta.product = fortigate query.
- Save the processing steps.
-
Select Add.
-
The new flow appears in the Flows list.

Send logs to AxoRouter
Configure your hosts to send data to AxoRouter.
-
For appliances that are specifically supported by Axoflow, see Sources.
-
For other appliances and generic Linux devices, see Generic tips.
-
For a quick test without an actual source, you can also do the following (requires nc to be installed on the AxoRouter host):
-
Open the AxoConsole, select Topology, then select the AxoRouter instance you’ve deployed. Alternatively, select ⌘/Ctrl + K and enter the name of the AxoRouter.
-
Select ⋮ Host Options > Tap log flow > Input log flow. Select Start.
-
Open a terminal on your AxoRouter host.
-
Run the following command to send 120 test messages (2 per second) in a loop to AxoRouter:
for i in `seq 1 120`; do echo "<165> fortigate date=$(date -u +%Y-%m-%d) time=$(date -u +"%H:%M:%S%Z") devname=us-east-1-dc1-a-dmz-fw devid=FGT60D4614044725 logid=0100040704 type=event subtype=system level=notice vd=root logdesc=\"System performance statistics\" action=\"perf-stats\" cpu=2 mem=35 totalsession=61 disk=2 bandwidth=158/138 setuprate=2 disklograte=0 fazlograte=0 msg=\"Performance statistics: average CPU: 2, memory: 35, concurrent sessions: 61, setup-rate: 2\""; sleep 0.5; done | nc -v 127.0.0.1 514
Alternatively, you can send logs in an endless loop:
while true; do echo "<165> fortigate date=$(date -u +%Y-%m-%d) time=$(date -u +"%H:%M:%S%Z") devname=us-east-1-dc1-a-dmz-fw devid=FGT60D4614044725 logid=0100040704 type=event subtype=system level=notice vd=root logdesc=\"System performance statistics\" action=\"perf-stats\" cpu=2 mem=35 totalsession=61 disk=2 bandwidth=158/138 setuprate=2 disklograte=0 fazlograte=0 msg=\"Performance statistics: average CPU: 2, memory: 35, concurrent sessions: 61, setup-rate: 2\""; sleep 1; done | nc -v 127.0.0.1 514
Manage AxoRouter
This section describes how to start, stop and check the status of the AxoRouter service on Linux.
Start AxoRouter
To start AxoRouter, execute the following command. For example:
systemctl start axorouter
If the service starts successfully, no output will be displayed.
The following message indicates that AxoRouter cannot start (see Check AxoRouter status):
Job for axorouter.service failed because the control process exited with error code. See `systemctl status axorouter.service` and `journalctl -xe` for details.
Stop AxoRouter
To stop AxoRouter
-
Execute the following command.
systemctl stop axorouter
-
Check the status of the AxoRouter service (see Check AxoRouter status).
Restart AxoRouter
To restart AxoRouter, execute the following command.
systemctl restart axorouter
Reload the configuration without restarting AxoRouter
To reload the configuration file without restarting AxoRouter, execute the following command.
systemctl reload axorouter
Check the status of AxoRouter service
To check the status of AxoRouter service
-
Execute the following command.
systemctl --no-pager status axorouter
-
Check the Active: field, which shows the status of the AxoRouter service. The following statuses are possible:
active (running) - axorouter service is up and runninginactive (dead) - axorouter service is stopped
Upgrade AxoRouter
AxoConsole raises an alert for the host when a new AxoRouter version is available. To upgrade to the new version, re-run the one-liner installation command you used to install AxoRouter, or select Provisioning > Select type and platform to create a new one.
Note that it can take a few minutes until the version numbers of the different services get updated on AxoConsole.
1.1.1 - Advanced installation options
When installing AxoRouter, you can set a number of advanced options if needed for your environment. Setting the advanced options in the AxoConsole automatically updates the one-liner command that you can copy and run.
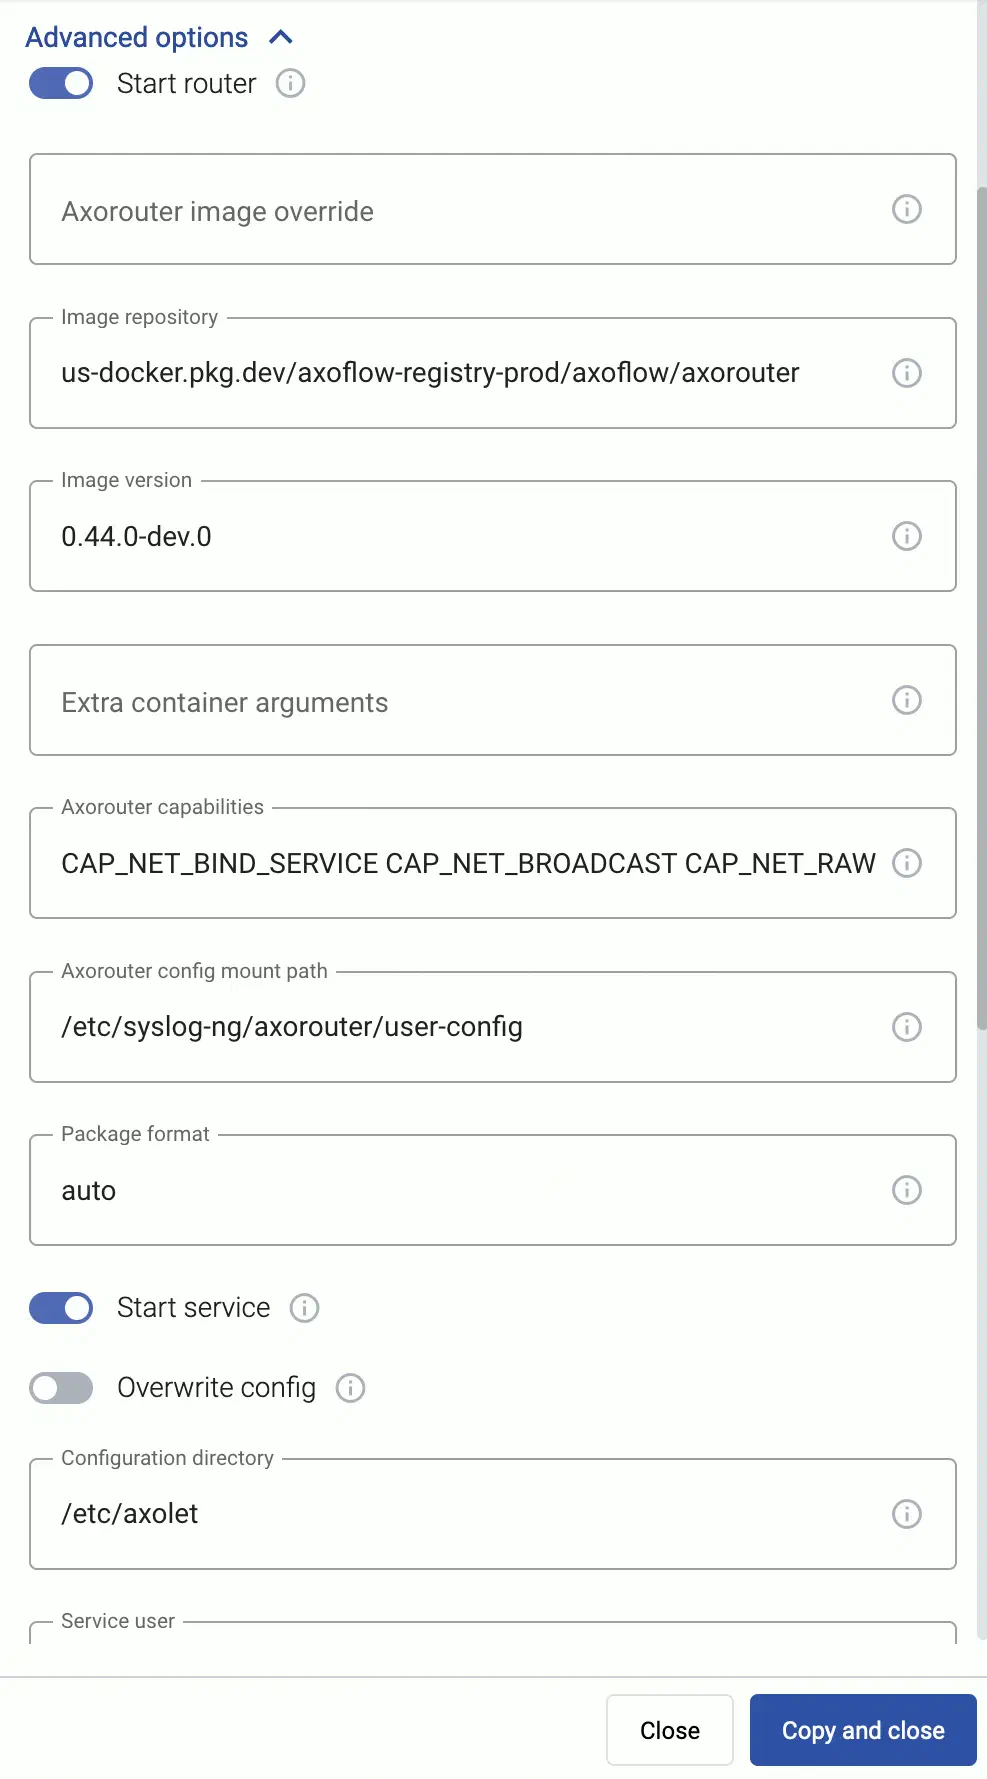
Alternatively, before running the one-liner you can use one of the following methods:
Proxy settings
Use the HTTP proxy, HTTPS proxy, No proxy parameters to configure HTTP proxy settings for the installer. To avoid using the proxy for the Axolet service, enable the Avoid proxy parameter as well. Lowercase variable names are preferred because they work universally.
Installation options
You can pass the following parameters to the installation script as environment variables, or as URL parameters.
Note
Running the provisioning command with sudo would mask environment variables of the calling shell. Either start the whole procedure from a root shell, or let the install script call sudo when it needs to. In other words: don’t add the sudo command to the provisioning command.
External image pull
|
|
| Default value: |
true |
| Environment variable |
AXO_EXTERNAL_IMAGE_PULL |
| URL parameter |
external_image_pull |
Description: If true, the installation script downloads the images from the central Axoflow repository. If false, the script downloads the images from the AxoConsole host. This is useful when deploying AxoRouters in airgapped environments.
AxoRouter capabilities
|
|
| Default value: |
CAP_NET_BIND_SERVICE CAP_NET_BROADCAST CAP_NET_RAW CAP_SYSLOG CAP_BPF |
| Environment variable |
AXO_AXOROUTER_CAPS |
| URL parameter |
axorouter_caps |
Description: Capabilities added to the AxoRouter container.
AxoRouter config mount path
|
|
| Default value: |
/etc/axorouter/user-config |
| Environment variable |
AXO_AXOROUTER_CONFIG_MOUNT_INSIDE |
| URL parameter |
axorouter_config_mount_inside |
Description: Mount path for custom user configuration.
AxoRouter image override
|
|
| Default value: |
us-docker.pkg.dev/axoflow-registry-prod/axoflow/axorouter |
| Environment variable |
AXO_IMAGE |
| URL parameter |
image |
Description: Deploy the specified AxoRouter image.
|
|
| Default value: |
empty string |
| Environment variable |
AXO_PODMAN_ARGS |
| URL parameter |
extra_args |
Description: Additional arguments passed to the AxoRouter container.
Image repository
|
|
| Default value: |
us-docker.pkg.dev/axoflow-registry-prod/axoflow/axorouter |
| Environment variable |
AXO_IMAGE_REPO |
| URL parameter |
image_repo |
Description: Deploy AxoRouter from a custom image repository.
Image version
|
|
| Default value: |
Current Axoflow version |
| Environment variable |
AXO_IMAGE_VERSION |
| URL parameter |
image_version |
Description: Deploy the specified AxoRouter version.
|
|
| Default value: |
auto |
| Available values: |
auto, dep, rpm, tar, none |
| Environment variable |
AXO_INSTALL_PACKAGE |
| URL parameter |
install_package |
Description: File format of the installer package.
Start router
|
|
| Default value: |
true |
| Available values: |
true, false |
| Environment variable |
AXO_START_ROUTER |
| URL parameter |
start_router |
Description: Start AxoRouter after installation.
Axolet parameters
API server host
|
|
| Default value: |
|
| Environment variable |
|
| URL parameter |
api_server_host |
Description: Override the host part of the API endpoint for the host.
Avoid proxy
|
|
| Default value: |
false |
| Available values: |
true, false |
| Environment variable |
AXO_AVOID_PROXY |
| URL parameter |
avoid_proxy |
Description: If set to true, the value of the *_proxy variables will only be used for downloading the installer, but not for the axolet service itself. If set to false, the Axolet service will use the variables from the installer.
Axolet capabilities
|
|
| Default value: |
CAP_SYS_PTRACE CAP_SYS_CHROOT |
| Available values: |
Whitespace-separated list of capability names with CAP_ prefix. |
| Environment variable |
AXO_CAPS |
| URL parameter |
caps |
Description: Ambient Linux capabilities the axolet service will use.
Configuration directory
|
|
| Default value: |
/etc/axolet |
| Environment variable |
AXO_CONFIG_DIR |
| URL parameter |
config_dir |
Description: The directory where the configuration files are stored.
HTTP proxy
|
|
| Default value: |
empty string |
| Environment variable |
AXO_HTTP_PROXY |
| URL parameter |
http_proxy |
Description: Use a proxy to access AxoConsole from the host.
HTTPS proxy
|
|
| Default value: |
empty string |
| Environment variable |
AXO_HTTPS_PROXY |
| URL parameter |
https_proxy |
Description: Use a proxy to access AxoConsole from the host.
Initial labels
|
|
| Default value: |
‘product=axorouter,vendor=axoflow’ |
| Environment variable |
AXO_INITIAL_LABELS |
| URL parameter |
initial_labels |
Description: Comma-separated list of key=value labels. These labels will be suggested for the host when you add the source to AxoConsole. For example, product=windows,team=windows,vendor=microsoft
No proxy
|
|
| Default value: |
empty string |
| Environment variable |
AXO_NO_PROXY |
| URL parameter |
no_proxy |
Description: Comma-separated list of hosts that shouldn’t use proxy to access AxoConsole from the host.
Overwrite config
|
|
| Default value: |
false |
| Available values: |
true, false |
| Environment variable |
AXO_CONFIG_OVERWRITE |
| URL parameter |
config_overwrite |
Description: If set to true, the configuration process will overwrite existing configuration (/etc/axolet/config.json). This means that the agent will get a new GUID and it will require approval on the AxoConsole.
Service group
|
|
| Default value: |
root |
| Environment variable |
AXO_GROUP |
| URL parameter |
group |
Description: Name of the group and Axolet will be running as. It should be either root or the group syslog-ng is running as.
Service user
|
|
| Default value: |
root |
| Environment variable |
AXO_USER |
| URL parameter |
user |
Description: Name of the user Axolet will be running as. It should be either root or the user syslog-ng is running as. See also Run axolet as non-root.
Start service
|
|
| Default value: |
true |
| Available values: |
true, false |
| Environment variable |
AXO_START |
| URL parameter |
start |
Description: Start axolet agent at the end of installation. Use false for preparing golden images. In this case axolet will generate a new GUID on the first boot after cloning the image.
WEC parameters
These parameters are related to the Windows Event Collector server that can be run on AxoRouter. For details, see Windows Event Collector (WEC).
WEC image override
|
|
| Default value: |
`` |
| Environment variable |
WEC_IMAGE |
| URL parameter |
wec_image |
Description: Deploy the specified WEC image.
WEC image repository
|
|
| Default value: |
us-docker.pkg.dev/axoflow-registry-prod/axoflow/axorouter-wec |
| Environment variable |
AXO_WEC_IMAGE_REPO |
| URL parameter |
wec_image_repo |
Description: Deploy the Windows Event Collector server from a custom image repository.
WEC image version
|
|
| Default value: |
Current Axoflow version |
| Environment variable |
AXO_WEC_IMAGE_VERSION |
| URL parameter |
wec_image_version |
Description: Deploy the specified Windows Event Collector server version.
axorouter-resolver parameters
These parameters are related to the resolver service that can be run on AxoRouter.
Enable axorouter-resolver
|
|
| Default value: |
true |
| Available values: |
true, false |
| Environment variable |
AXORESOLVER_ENABLED |
| URL parameter |
axoresolver_enabled |
Description: Install axorouter-resolver for this AxoRouter deployment.
axorouter-resolver image
|
|
| Default value: |
|
| Environment variable |
AXORESOLVER_IMAGE |
| URL parameter |
axoresolver_image |
Description: Deploy the specified axorouter-resolver image.
axorouter-resolver image repository
|
|
| Default value: |
us-docker.pkg.dev/axoflow-registry-prod/axoflow/axoresolver |
| Environment variable |
AXORESOLVER_IMAGE_REPO |
| URL parameter |
axoresolver_image_repo |
Description: Deploy the axorouter-resolver from a custom image repository.
axorouter-resolver image version
|
|
| Default value: |
Current Axoflow version |
| Environment variable |
AXORESOLVER_IMAGE_VERSION |
| URL parameter |
axoresolver_image_version |
Description: Deploy the specified axorouter-resolver version.
axorouter-resolver persistence directory
|
|
| Default value: |
${AXOROUTER_PERSIST_MOUNT}/axoresolver |
| Environment variable |
AXORESOLVER_PERSIST_DIR |
| URL parameter |
|
Description: Directory where axorouter-resolver stores persistent data.
axorouter-resolver configuration directory
|
|
| Default value: |
/etc/axorouter/axoresolver |
| Environment variable |
AXORESOLVER_CONFIG_DIR |
| URL parameter |
|
Description: Directory where axorouter-resolver configuration files are stored.
axorouter-resolver environment file
|
|
| Default value: |
/etc/axorouter/axoresolver.env |
| Environment variable |
AXORESOLVER_ENV_FILE |
| URL parameter |
|
Description: Path to the axorouter-resolver environment file.
axorouter-resolver configuration file
|
|
| Default value: |
${AXORESOLVER_CONFIG_DIR}/resolvers.json |
| Environment variable |
AXORESOLVER_CONFIG_FILE |
| URL parameter |
|
Description: Path to the axorouter-resolver configuration file.
axorouter-resolver socket path
|
|
| Default value: |
${AXORESOLVER_PERSIST_DIR}/axoresolver.sock |
| Environment variable |
AXORESOLVER_SOCKET_PATH |
| URL parameter |
|
Description: Path to the axorouter-resolver socket file.
axorouter-resolver cache file
|
|
| Default value: |
${AXORESOLVER_PERSIST_DIR}/axoresolver-cache.json |
| Environment variable |
AXORESOLVER_CACHE_FILE |
| URL parameter |
|
Description: Path to the axorouter-resolver cache file.
axorouter-resolver cache write interval
|
|
| Default value: |
10 |
| Environment variable |
AXORESOLVER_CACHE_WRITE_INTERVAL |
| URL parameter |
|
Description: Interval for writing the cache to disk. If you don’t specify the unit, it’s treated as seconds: 10 is the same as 10s. You can use other units as well, for example, m for minutes.
axorouter-resolver log level
|
|
| Default value: |
INFO |
| Environment variable |
AXORESOLVER_LOG_LEVEL |
| URL parameter |
|
Description: Log level for axorouter-resolver.
AxoStore parameters
These parameters are related to the AxoStore that can be run on AxoRouter. For details, see Storage.
AxoStore enable
|
|
| Default value: |
true |
| Available values: |
true, false |
| Environment variable |
AXO_AXOSTORE_ENABLED |
| URL parameter |
axostore_enabled |
Description: Install AxoStore for this AxoRouter deployment.
AxoStore Image repository
|
|
| Default value: |
us-docker.pkg.dev/axoflow-registry-prod/axoflow/axostore |
| Environment variable |
AXO_AXOSTORE_IMAGE_REPO |
| URL parameter |
axostore_image_repo |
Description: Deploy the AxoStore from a custom image repository.
AxoStore Image version
|
|
| Default value: |
Current Axoflow version |
| Environment variable |
AXO_AXOSTORE_IMAGE_VERSION |
| URL parameter |
axostore_image_version |
Description: Deploy the specified AxoStore version.
AxoStore storage directory
|
|
| Default value: |
/var/lib/clickhouse |
| Environment variable |
AXOSTORE_MOUNT |
| URL parameter |
N/A |
Description: The directory where the AxoStores are stored. Make sure that there’s sufficient disk space, especially for long-time retention and/or high data volume.
1.1.2 - Run AxoRouter as non-root
To run AxoRouter as a non-root user, set the AXO_USER and AXO_GROUP environment variables to the user’s username and groupname on the host you want to deploy AxoRouter. For details, see Advanced installation options.
Operators must have access to the following commands:
-
/usr/bin/systemctl * axolet.service: Controls the axolet.service systemd unit. Usually * is start, stop, restart, enable, and status. Used by the operators for troubleshooting.
-
/usr/local/bin/configure-axolet: Creates initial axolet configuration and enables/starts the axolet service. Executed by the bootstrap script.
-
Command to install and upgrade the axolet package. Executed by the bootstrap script if the packages aren’t already installed.
- On RPM-based Linux distributions:
/usr/bin/rpm -Uv axo*.rpm
- On DEB-based Linux distributions:
/usr/bin/dpkg -i axo*.deb
-
/usr/bin/systemctl * axorouter.service: Controls the axorouter.service systemd unit. Usually * is start, stop, restart, enable, and status. Used by the operators for troubleshooting.
-
/usr/local/bin/configure-axorouter: Creates the initial axorouter configuration and enables/starts the axorouter service. Executed by the bootstrap script.
-
Command to install and upgrade the axorouter and the axolet package. Executed by the bootstrap script if the packages aren’t already installed.
- On RPM-based Linux distributions:
/usr/bin/rpm -Uv axo*.rpm
- On DEB-based Linux distributions:
/usr/bin/dpkg -i axo*.deb
You can permit the syslogng user to run these commands by running on of the following:
1.2 - Install AxoRouter on Kubernetes
To install AxoRouter on a Kubernetes cluster, complete the following steps. For other platforms, see AxoRouter.
Note
Note that AxoRouter and Axoflow agent collects detailed, real-time metrics about the data-flows – giving you observability over the health of the security data pipeline and its components. Your security data remains in your self-managed cloud or in your on-prem instance where your sources, destinations, Axoflow agents, and AxoRouters are running, only metrics are forwarded to AxoConsole.
Prerequisites
Kubernetes version 1.29 and newer
Resource requirements
For a deployment that handles up to 1TB/day log traffic (~14500 EPS) even with complex routing and processing configurations, we recommend:
- 4 vCPU
- 8 GB memory
- 45 GB disk / hour. AxoRouter buffers incoming log data on disk if the destination or the network connection to the destination becomes unavailable. With a 1TB/day throughput, you need at least 45 GB of disk buffer per hour to avoid putting backpressure on your sources. This doesn’t include any disk for using AxoStore.
For more details on hardware sizing, contact our support team.
Network access
The host must be able to access the following domains related to the AxoConsole:
-
When using AxoConsole SaaS:
<your-tenant-id>.cloud.axoflow.io: HTTPS traffic on TCP port 443, needed to download the binaries for Axoflow software (like Axolet and AxoRouter).kcp.<your-tenant-id>.cloud.axoflow.io: HTTPS (mutual TLS) traffic on TCP port 443 for management traffic.telemetry.<your-tenant-id>.cloud.axoflow.io: HTTPS (mutual TLS) traffic on TCP port 443, where Axolet sends the metrics of the host.us-docker.pkg.dev: HTTPS traffic on TCP port 443, but only if you’re forcing the installation script to pull the container images from the public repository. The Axolet and AxoRouter for Linux installation scripts download the images directly from AxoConsole.
-
When using an on-premise AxoConsole:
-
When installing Axoflow agent for Windows or Linux:
github.com: HTTPS traffic on TCP port 443, for downloading installer packages.
By default, AxoRouter accepts data on the following ports (unless you’ve modified the default connector rules):
- 514 UDP and TCP for RFC3164 (BSD-syslog) and RFC5424 (IETF-syslog) formatted traffic. AxoRouter automatically recognizes and handles both formats.
- 601 TCP (RFC 3195 - Reliable Delivery for syslog) for RFC5424 (IETF-syslog) and RFC3164 (BSD-syslog) formatted traffic. AxoRouter automatically recognizes and handles both formats.
- 6514 TCP for TLS-encrypted syslog traffic (RFC 5425).
To receive data on other ports or other protocols, configure other connector rules for the AxoRouter host.
For TLS-encrypted syslog connections, create a new connector rule or edit an existing one, and configure the keys and certificates needed to encrypt the connections. For details, see Syslog.
Note
When you create a
connector rule on a new port, open that port in the firewall of of every corresponding AxoRouter as well.
Install AxoRouter
-
Open the AxoConsole.
-
Select Provisioning.
-
Select the Host type > AxoRouter > Kubernetes. The one-liner installation command is displayed.
-
Open a terminal and set your Kubernetes context to the cluster where you want to install AxoRouter.
-
Run the one-liner, and follow the on-screen instructions.
Current kubernetes context: minikube
Server Version: v1.28.3
Installing to new namespace: axorouter
Do you want to install AxoRouter now? [Y]
-
Register the host.
-
Reload the Provisioning page. There should be a registration request for the new AxoRouter deployment. Select ✓.
-
Select Register to register the host. You can add a description and labels (in label:value format) to the host.
-
If the primary IP address (the first IP address shown in the Network addresses section on the Routers page for each AxoRouter) is not accessible from your edge hosts, set a Network address override (IP address or an FQDN) that’s accessible. Otherwise, data forwarding from edge hosts will fail.
-
Select the Topology page. The new AxoRouter instance is displayed.
Create a flow
- If you haven’t already done so, create a new destination.
-
Create a flow to connect the new AxoRouter to the destination.
-
Select Flows.
-
Select Add Flow > Flow.
To create a fallback flow, select Add Flow > Fallback flow.
-
Enter a name for the flow, for example, my-test-flow.
-
In the Router Selector field, enter an expression that matches the router(s) you want to apply the flow. To select a specific router, use a name selector, for example, name = my-axorouter-hostname.
You can use any labels and metadata of the AxoRouter hosts in the Router selectors, for example, the hostname of the AxoRouter, or any custom labels.
- If you leave the Router Selector field empty, the selector will match every AxoRouter instance.
- To select only a specific AxoRouter instance, set the
name field to the name of the instance as selector. For example, name = my-axorouter.
- If you set multiple fields in the selector, the selector will match only AxoRouter instances that match all elements of the selector. (There in an AND relationship between the fields.)
Note
You can configure multiple fallback flows, but only one fallback flow can apply to an AxoRouter (so the Router Selector of the fallback flows can’t overlap).
-
Select the Destination where you want to send your data. If you don’t have any destination configured, you can select + Add in the destination section to create a new destination now. For details on the different destinations, see Destinations.
- If you don’t have any destination configured, see Destinations.
- If you’ve already created a store, it automatically available as a destination. Note that the Router Selector of the flow must match only AxoRouters that have the selected store available, otherwise you’ll get an error message.
- If you want to send data to another AxoRouter, enable the Show all destinations option, and select the connector of the AxoRouter where you want to send the data.
-
(Optional) To process the data transferred in the flow, select Add New Processing Step. For details, see Processing steps. For example:
- Add a Classify, a Parse, and a Reduce step, in that order, to automatically remove redundant and empty fields from your data.
- To select which messages are processed by the flow, add a Select Messages step, and enter a filter into the AQL Expression field. For example, to select only the messages received from Fortinet FortiGate firewalls, use the
meta.vendor = fortinet AND meta.product = fortigate query.
- Save the processing steps.
-
Select Add.
-
The new flow appears in the Flows list.
Send logs to AxoRouter
By default, AxoRouter accepts data on the following ports (unless you’ve modified the default connector rules):
- 514 UDP and TCP for RFC3164 (BSD-syslog) and RFC5424 (IETF-syslog) formatted traffic. AxoRouter automatically recognizes and handles both formats.
- 601 TCP (RFC 3195 - Reliable Delivery for syslog) for RFC5424 (IETF-syslog) and RFC3164 (BSD-syslog) formatted traffic. AxoRouter automatically recognizes and handles both formats.
- 6514 TCP for TLS-encrypted syslog traffic (RFC 5425).
To receive data on other ports or other protocols, configure other connector rules for the AxoRouter host.
For TLS-encrypted syslog connections, create a new connector rule or edit an existing one, and configure the keys and certificates needed to encrypt the connections. For details, see Syslog.
Note
When you create a
connector rule on a new port, open that port in the firewall of of every corresponding AxoRouter as well.
Upgrade AxoRouter
AxoConsole raises an alert for the host when a new AxoRouter version is available. To upgrade to the new version, re-run the one-liner installation command you used to install AxoRouter, or select Provisioning > Select type and platform to create a new one.
Note that it can take a few minutes until the version numbers of the different services get updated on AxoConsole.
1.2.1 - Advanced installation options
When installing AxoRouter, you can set a number of advanced options if needed for your environment. Setting the advanced options in the AxoConsole automatically updates the one-liner command that you can copy and run.
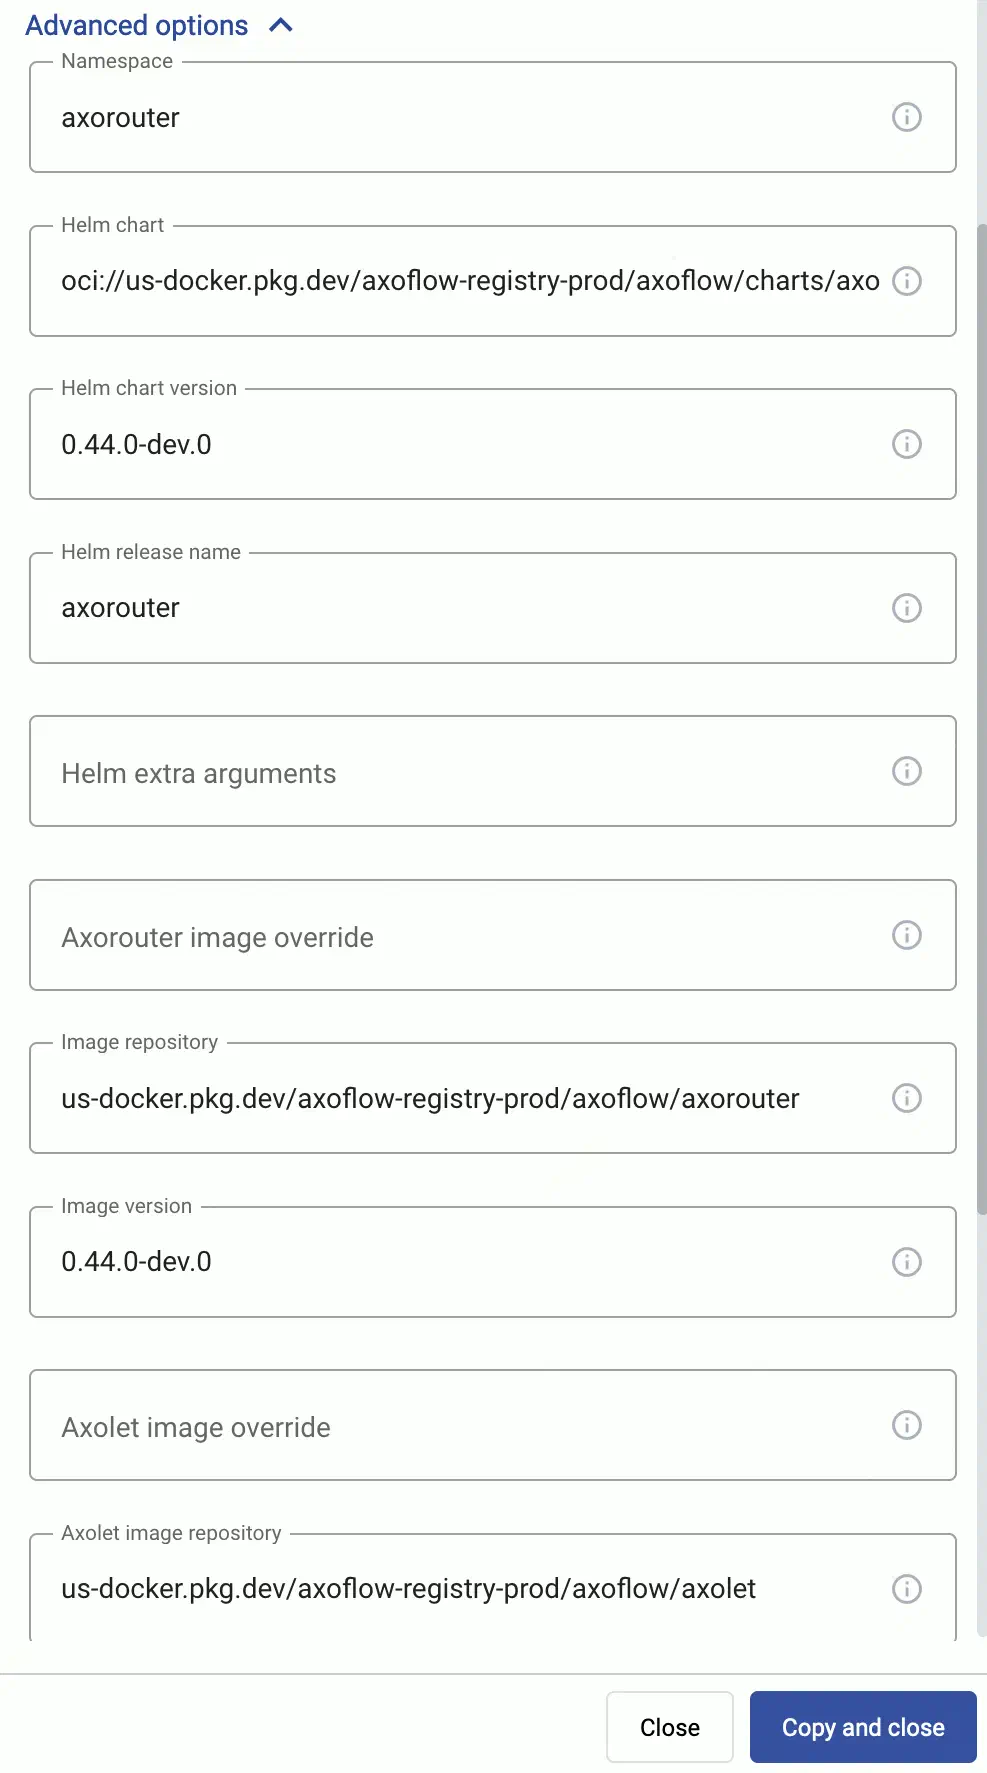
Alternatively, before running the one-liner you can use one of the following methods:
Proxy settings
Use the http_proxy=, https_proxy=, no_proxy= parameters to configure HTTP proxy settings for the installer. To configure the Axolet service to use the proxy settings, enable the AXOLET_AVOID_PROXY parameter as well. Lowercase variable names are preferred because they work universally.
Installation options
You can pass the following parameters to the installation script as environment variables, or as URL parameters.
Note
Running the provisioning command with sudo would mask environment variables of the calling shell. Either start the whole procedure from a root shell, or let the install script call sudo when it needs to. In other words: don’t add the sudo command to the provisioning command.
AxoRouter image override
|
|
| Default value: |
empty string |
| Environment variable |
IMAGE |
| URL parameter |
image |
Description: Deploy the specified AxoRouter image.
Helm chart
|
|
| Default value: |
oci://us-docker.pkg.dev/axoflow-registry-prod/axoflow/charts/axorouter-syslog |
| Environment variable |
HELM_CHART |
| URL parameter |
helm_chart |
Description: The path or URL of the AxoRouter Helm chart.
Helm chart version
|
|
| Default value: |
Current Axoflow version |
| Environment variable |
HELM_CHART_VERSION |
| URL parameter |
helm_chart_version |
Description: Deploy the specified version of the Helm chart.
|
|
| Default value: |
empty string |
| Environment variable |
HELM_EXTRA_ARGS |
| URL parameter |
helm_extra_args |
Description: Additional arguments passed to Helm during the installation.
Helm release name
|
|
| Default value: |
axorouter |
| Environment variable |
HELM_RELEASE_NAME |
| URL parameter |
helm_release_name |
Description: Name of the Helm release.
Image repository
|
|
| Default value: |
us-docker.pkg.dev/axoflow-registry-prod/axoflow/axorouter |
| Environment variable |
IMAGE_REPO |
| URL parameter |
image_repo |
Description: Deploy AxoRouter from a custom image repository.
Image version
|
|
| Default value: |
Current Axoflow version |
| Environment variable |
IMAGE_VERSION |
| URL parameter |
image_version |
Description: Deploy the specified AxoRouter version.
Namespace
|
|
| Default value: |
axorouter |
| Environment variable |
NAMESPACE |
| URL parameter |
namespace |
Description: The namespace where AxoRouter is installed.
Axolet parameters
API server host
|
|
| Default value: |
|
| Environment variable |
|
| URL parameter |
api_server_host |
Description: Override the host part of the API endpoint for the host.
Axolet executable path
|
|
| Default value: |
|
| Environment variable |
AXOLET_EXECUTABLE |
| URL parameter |
axolet_executable |
Description: Path to the Axolet executable.
Axolet image override
|
|
| Default value: |
empty string |
| Environment variable |
AXOLET_IMAGE |
| URL parameter |
axolet_image |
Description: Deploy the specified Axolet image.
Axolet image repository
|
|
| Default value: |
us-docker.pkg.dev/axoflow-registry-prod/axoflow/axolet |
| Environment variable |
AXOLET_IMAGE_REPO |
| URL parameter |
axolet_image_repo |
Description: Deploy Axolet from a custom image repository.
Axolet image version
|
|
| Default value: |
Current Axoflow version |
| Environment variable |
AXOLET_IMAGE_VERSION |
| URL parameter |
axolet_image_version |
Description: Deploy the specified Axolet version.
Initial GUID
|
|
| Default value: |
|
| Environment variable |
|
| URL parameter |
initial_guid |
Description: Set a static GUID.
1.3 - Set up AxoRouter high availability with keepalived
Deploy AxoRouter as a highly available cluster using keepalived and a VRRP-managed virtual IP that fails over between primary and backup nodes without a load balancer.
This guide describes how to deploy multiple AxoRouter hosts as a high availability cluster with keepalived managing a shared virtual IP across the hosts. Instead of relying on a dedicated load balancer, keepalived uses VRRP to keep the virtual IP on a healthy node and fail it over automatically, so this setup needs no external load-balancing hardware. For an overview of other approaches, including putting a load balancer in front of the cluster, see AxoRouter high availability deployment options.
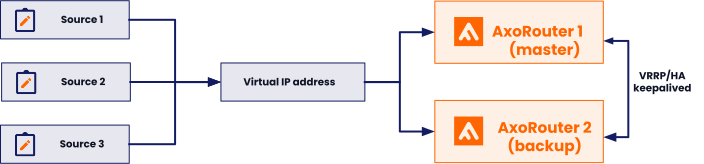
The examples in this guide deploy AxoRouter on AlmaLinux 10, but the procedure also works on other supported platforms.
The hosts running AxoRouter can be physical or virtual machines. The recommended layout depends on which you choose:
- Physical machines: Install two machines with a dedicated HA link between them to keep the HA traffic separate from the production traffic.
- Virtual machines: Set up three VMs with a dedicated (and guaranteed bandwidth) HA link (HA VLAN) spanning across them, to keep the HA traffic separate from the production traffic.
Note
A cluster targeting highly reliable services should ideally consist of at least three nodes to avoid split-brain situations. In a split-brain situation, both nodes think that they are the last surviving node (for example, during a network failure) and bring up their services, leading to several problems.
The setups described here use fewer than the ideal number of nodes for cost reasons. Dedicated HA links provide an additional channel for HA communication independently of the production traffic, and significantly reduce the risk of split-brain scenarios.
At a high level, setting up the cluster involves the following steps:
- Prepare every cluster host: deploy AxoRouter, install
keepalived, and configure SELinux to let keepalived query the AxoRouter service status.
- Configure
keepalived on the primary node with the MASTER state, the shared virtual IP, and the addresses of the peer nodes.
- Configure
keepalived on each secondary node with the BACKUP state and a lower priority than the primary.
- Open TCP port 112 on every host’s firewall so the nodes can exchange VRRP advertisements, then enable and start the
keepalived service.
The following sections walk through each step in detail.
Prepare the hosts and install keepalived
On every AxoRouter host that is a member of the high availability cluster, complete the following steps.
-
Deploy AxoRouter on every host as described in Install AxoRouter on Linux.
-
Install keepalived from the OS repositories.
sudo dnf install keepalived
-
Configure SELinux so keepalived can monitor the status of AxoRouter. For that, create and load a SELinux policy module that allows keepalived to run the systemctl status command.
-
Install the selinux-policy-devel package:
sudo dnf install selinux-policy-devel
-
Create a policy module file.
cat > keepalived-allow-systemctl-status.te <<EOF

module keepalived-allow-systemctl-status 1.0;

require {
        type keepalived_t;
        type syslogd_var_run_t;
        type systemd_systemctl_exec_t;
        type systemd_generator_unit_file_t;
        class file { execute execute_no_trans getattr map open read setattr };
        class dir read;
        class service status;
}

#============= keepalived_t ==============
allow keepalived_t syslogd_var_run_t:dir read;

#!!!! This avc can be allowed using the boolean 'domain_can_mmap_files'
allow keepalived_t systemd_systemctl_exec_t:file { execute execute_no_trans getattr open read setattr };

#!!!! This avc can be allowed using the boolean 'domain_can_mmap_files'
allow keepalived_t systemd_systemctl_exec_t:file map;

allow keepalived_t systemd_generator_unit_file_t:service status;
EOF
-
Build and load the SELinux module:
checkmodule -M -m -o keepalived-allow-systemctl-status.mod keepalived-allow-systemctl-status.te
semodule_package -o keepalived-allow-systemctl-status.pp -m keepalived-allow-systemctl-status.mod
sudo semodule -i keepalived-allow-systemctl-status.pp
-
Repeat these steps on the other AxoRouter hosts.
Configure keepalived as MASTER (primary node)
-
Set up the keepalived configuration on the primary node. See the list of main configuration elements after the command.
sudo mv /etc/keepalived/keepalived.conf{,.old} -v
sudo cat > /etc/keepalived/keepalived.conf <<EOF

vrrp_script check_axorouter {
    script  "/usr/bin/systemctl status axorouter"
    interval 5
    timeout  2
    rise     5
    fall     2
    user     root
}

vrrp_instance axorouter_vip {
    state MASTER
    interface enp0s8
    virtual_router_id 51
    priority 254
    advert_int 1
    unicast_src_ip 192.168.56.10
    unicast_peer {
        192.168.56.11
    }
    authentication {
        auth_type PASS
        auth_pass Ax0R0ut3r
    }
    virtual_ipaddress {
        192.168.10.64/25 dev enp0s9
    }
    track_script {
        check_axorouter
    }
    track_interface {
        enp0s9                      # Fail over if public interface dies
        enp0s8                      # Fail over if dedicated HA interface dies
    }
}
EOF
The main configuration elements are:
state: The default state of the node.interface: The interface keepalived is listening on (in this case the HA interface).virtual_router_id: This ID should match across the nodes belonging to the same cluster.priority: An assigned value belonging to the cluster node. During an election, the node with the highest priority wins. The maximum value is 254.unicast_src_ip: The source IP address keepalived sends its advertisements with (in this case on the HA interface).unicast_peer: IP addresses of the other cluster nodes (in this case the IP addresses on their respective HA interfaces).auth_pass: The password can have any value. Maximum length is 8 characters; longer values are truncated. All members of the cluster must have the same value.virtual_ipaddress: The virtual IP address and the interface it should be configured on (the interface facing the data sources).track_script: A shell script that can be used to verify the status of the service.track_interface: A list of network interfaces the status of which keepalived should monitor (the interface keepalived is listening on is in this list by default).
-
Enable inbound traffic on port 112/TCP on the host’s firewall.
sudo firewall-cmd --permanent --add-port=112/tcp && firewall-cmd --reload
-
Enable and start the keepalived service.
sudo systemctl enable --now keepalived
Configure keepalived as BACKUP (secondary nodes)
Perform the following steps on the secondary hosts.
-
Deploy the following keepalived configuration.
sudo mv /etc/keepalived/keepalived.conf{,.old} -v
sudo cat > /etc/keepalived/keepalived.conf <<EOF

vrrp_script check_axorouter {
    script  "/usr/bin/systemctl status axorouter"
    interval 5
    timeout  2
    rise     5
    fall     2
    user     root
}

vrrp_instance axorouter_vip {
    state BACKUP
    interface enp0s8
    virtual_router_id 51
    priority 253
    advert_int 1
    unicast_src_ip 192.168.56.11
    unicast_peer {
        192.168.56.10
    }
    authentication {
        auth_type PASS
        auth_pass Ax0R0ut3r
    }
    virtual_ipaddress {
        192.168.10.64/25 dev enp0s9
    }
    track_script {
        check_axorouter
    }
    track_interface {
        enp0s9                      # Fail over if public interface dies
        enp0s8                      # Fail over if dedicated HA interface dies
    }
}
EOF
-
Enable inbound traffic at port 112/TCP on the host’s firewall.
sudo firewall-cmd --permanent --add-port=112/tcp && firewall-cmd --reload
-
Enable and start the keepalived service.
sudo systemctl enable --now keepalived
After this, you should have a functional virtual/service IP address so the virtual IP moves to another AxoRouter host if the active one fails.
2 - AxoSyslog
Onboarding allows you to collect metrics about the host, display the host on the Topology page, and to tap into the log flow.
Onboarding requires you to modify the host and the configuration of the logging agent (AxoSyslog) running on the host.
- Level 1: Install Axolet on the host where AxoSyslog is running. Axolet collects metrics from the host and sends them to the AxoConsole, so you can check host-level metrics on the Metrics & Health page of the host, and displays the host on the Topology page.
- Level 2: Instrument the configuration of the logging agent to provide detailed metrics about the traffic flow. This allows you to display data about the host on the Analytics page.
- Level 3: Instrument the configuration of the logging agent to allow you to access the logs of the logging agent and to tap into the log flow from the AxoConsole. The exact steps for this integration depend on the configuration of your logging agent. We provide basic instrumentation instructions for getting started in this guide, but we strongly recommend to contact us so our professional services can help you with a production integration.
To onboard an existing AxoSyslog instance into Axoflow, complete the following steps.
-
Install Axolet on the host, then approve its registration on the Provisioning page of the AxoConsole.
-
The AxoSyslog host is now visible on the Topology page of the AxoConsole as a source.
-
Access the AxoSyslog host and edit the configuration of AxoSyslog. Set the statistics-related global options like this (if the options block already exists, add these lines to the bottom of the block):
options {
    stats(
        level(2)
        freq(0) # Inhibit statistics output to stdout
        );
};
-
(Optional) To get detailed metrics and analytics about the traffic that flows through the host, instrument your AxoSyslog configuration as follows:
Note
You can use Axolet with an un-instrumented AxoSyslog configuration file, but that limits available metrics to host statistics (for example, disk, memory, queue information). You won’t be able to access data about the actual traffic flowing through the host. To collect traffic-related metrics, instrument configuration with
metrics-probe() stanzas. The example below shows how to instrument the configuration to highlight common macros such as
$HOST and
$PROTOCOL. If you want to customize the collected metrics or need help with the instrumentation,
contact us.
-
Download the following configuration snippet to the AxoSyslog host, for example, as /etc/syslog-ng/conf.d/axoflow-instrumentation.conf for AxoSyslog.
# Metrics probe parser definition for a specified destination
# This will yield a reasonable number of metrics for common
# syslog-ng macros
block parser metrics-output(destination(undefined)) {

  # This will probe for the number of *events*.
  # key name is fixed; labels are user-specified
  metrics-probe(
    key("classified_output_events_total")
    labels(
      "host" => "${HOST}"
      "service" => "${PROGRAM}"
      "source" => "${SOURCE}"
      "dest_port" => "$DESTPORT"
      "dest_ip" => "$DESTIP"
      "src_ip" => "$SOURCEIP"
      "protocol" => "$(if ($PROTO == 6) TCP $(if ($PROTO == 17) UDP $PROTO))"
      "ip_protocol" => "$IP_PROTO"
      "transport" => "$TRANSPORT"
      "destination_name" => "`destination`"
      "issue" => "$(or $(tags-head message.parse_error syslog.unexpected_framing syslog.missing_pri syslog.rfc3164_missing_header syslog.invalid_hostname message.utf8_sanitized) 'none')"
    )
  );

  # This will probe for the number of *bytes*.
  # key name is fixed; labels are user-specified
  metrics-probe(
    key("classified_output_event_bytes_total")
    increment("${RAWMSG_SIZE}")
    labels(
      "host" => "${HOST}"
      "service" => "${PROGRAM}"
      "source" => "${SOURCE}"
      "dest_port" => "$DESTPORT"
      "dest_ip" => "$DESTIP"
      "src_ip" => "$SOURCEIP"
      "protocol" => "$(if ($PROTO == 6) TCP $(if ($PROTO == 17) UDP $PROTO))"
      "ip_protocol" => "$IP_PROTO"
      "transport" => "$TRANSPORT"
      "destination_name" => "`destination`"
      "issue" => "$(or $(tags-head message.parse_error syslog.unexpected_framing syslog.missing_pri syslog.rfc3164_missing_header syslog.invalid_hostname message.utf8_sanitized) 'none')"
    )
  );
};


@define AXOTAP_SOCK "/var/lib/syslog-ng/axotap.sock"

block rewrite format_axotap_sock_message(service_type("input")) {
  set("$(substr ${MESSAGE} 0 32768)" value(MESSAGE));
  set("$(substr ${RAWMSG} 0 32768)" value(RAWMSG));
  set("$(format-json --no-cast debug.msg=$(format-json --no-cast --scope all-nv-pairs) log.body=${MESSAGE})" value(".tap.event"));
  set(json('{"note":"message object too long for tapping"}') value(".tap.event") condition("$(length ${.tap.event})" > 131072));

  set("$(format-json --no-cast tap=$(format-json --no-cast tapId='' serviceType='`service_type`' eventId=${UNIQID} labels=$(format-json --no-cast) hostCandidate=$(format-json --no-cast) facility=${FACILITY} format=${MSGFORMAT} hostFrom=${HOST_FROM} message=$(echo ${MESSAGE}) rawMessage=${RAWMSG} severity=${SEVERITY} source=${SOURCE} tags=${TAGS} timestamp=${ISODATE} transport=${TRANSPORT}) event=json(${.tap.event}))" value(".tap.formatted"));
};


# input side tapping
destination "d_axotap_input_static" {
  channel {
    filter {
      rate-limit(key("$SOURCE:$PROGRAM:$HOST:$SOURCEIP:$DESTIP") rate(1));
    };

    rewrite {
      format_axotap_sock_message(service_type("input"));
    };

    destination {
      unix-dgram("`AXOTAP_SOCK`" persist-name("axotap_input_static") template("${.tap.formatted}"));
    };
  };
};


log {
  destination("d_axotap_input_static");
  flags(catchall);
};


# output side tapping
destination "d_axotap_output" {
  channel {
    filter {
      rate-limit(key("$SOURCE:$PROGRAM:$HOST:$SOURCEIP:$DESTIP") rate(1));
    };

    rewrite {
      format_axotap_sock_message(service_type("output"));
    };

    destination {
      unix-dgram("`AXOTAP_SOCK`" template("${.tap.formatted}"));
    };
  };
};
-
Include it in at the top of your configuration file:
@version: current
@include "axoflow-instrumentation.conf"
-
Edit every destination statement to include a parser { metrics-output(destination(my-destination)); }; line (making sure to include the channel construct if your destination block does not already contain it):
destination my-destination {
    channel {
        parser { metrics-output(destination(my-destination)); };
        destination { file("/dev/null"); };
        };
    };
-
Reload the configuration of AxoSyslog.
systemctl reload syslog-ng
-
To enable log tapping for the output logs (traffic that the host sends to its destinations), add the d_axotap_output destination in your log paths. This allows the Axolet agent to collect rate-limited log samples from that specific point in the pipeline.
Tapping the input logs (traffic arriving to the sources of the host) needs only the configuration snippet.
Note
There are multiple ways to add tapping to your configuration, which in some cases can introduce unwanted side effects.
Contact us to help you create a safe tapping configuration for your use case!
-
Find a log path that you want to tap into and add the tap destination in a safe way, for example, by adding it in a separate inner log path:
log {
    source(s_udp514);
    log { destination(d_udp514); };
    log { destination(d_axotap); };
};
-
Reload the configuration of AxoSyslog.
systemctl reload syslog-ng
-
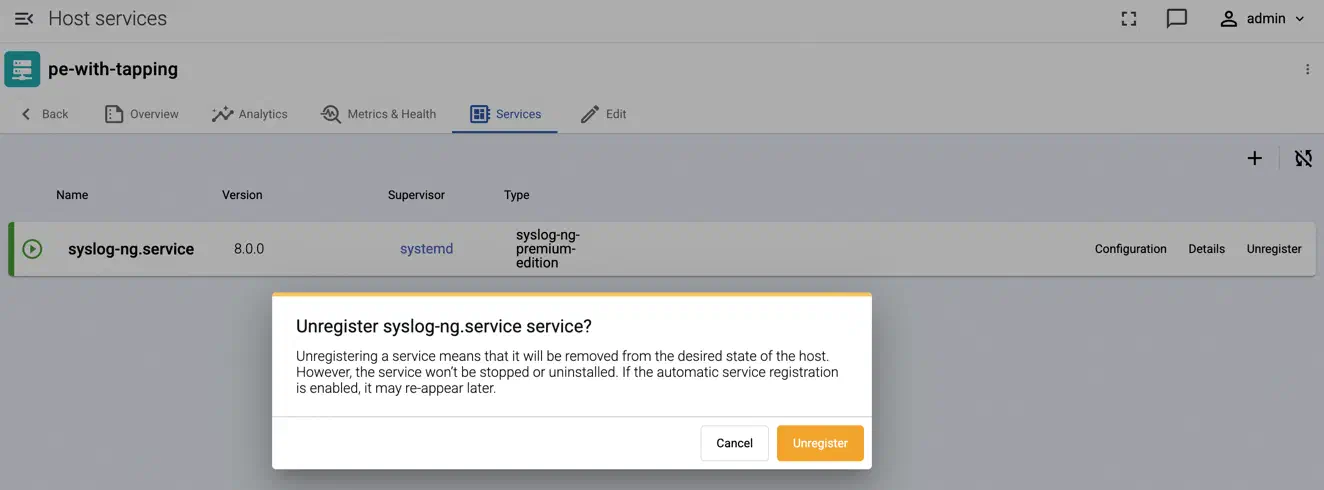
Unregister the service so that auto service registration can discover the new tapping point:
-
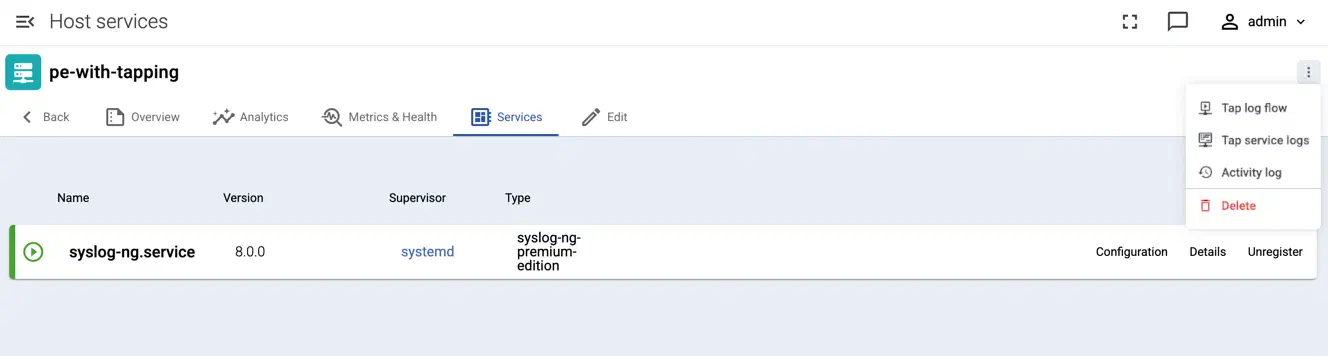
Test log tapping from the top right menu:
-
If AxoSyslog is sending data to an AxoRouter, create a placeholder data forwarding rule where the Edge Selector matches AxoSyslog and the Router connector is the connector of the AxoRouter instance where AxoSyslog is sending the data. This is needed to display AxoSyslog and its data metrics on the Topology page, AxoConsole won’t manage AxoSyslog.
3 - Splunk Connect for Syslog (SC4S)
Onboarding allows you to collect metrics about the host, display the host on the Topology page, and to tap into the log flow.
Onboarding requires you to modify the host and the configuration of the logging agent (SC4S) running on the host.
- Level 1: Install Axolet on the host where SC4S is running. Axolet collects metrics from the host and sends them to the AxoConsole, so you can check host-level metrics on the Metrics & Health page of the host, and displays the host on the Topology page.
- Level 2: Instrument the configuration of the logging agent to provide detailed metrics about the traffic flow. This allows you to display data about the host on the Analytics page.
- Level 3: Instrument the configuration of the logging agent to allow you to access the logs of the logging agent and to tap into the log flow from the AxoConsole. The exact steps for this integration depend on the configuration of your logging agent. We provide basic instrumentation instructions for getting started in this guide, but we strongly recommend to contact us so our professional services can help you with a production integration.
To generate metrics for the Axoflow platform from an existing Splunk Connect for Syslog (SC4S) instance, you need to configure SC4S to generate these metrics. Complete the following steps.
-
If you haven’t already done so, install Axolet on the host, then approve its registration on the Provisioning page of the AxoConsole.
-
Download the following code snippet as axoflow-instrumentation.conf.
@define allow-config-dups 1

block parser classifier-parser() {
  metrics-probe(
    key("classified_events_total")
    labels(
      "app" => "${.splunk.sourcetype}"
      "host" => "${HOST}"
      "program" => "${.splunk.source}"
      "source" => "${SOURCE}"
    )
  );
};

@module confgen context(root) name(dest_hec) exec("`SC4S_ETC`/conf.d/destinations/dest_hec/plugin.py | sed -e '/^destination d_hec/a\    channel { parser { classifier-parser(); }; destination {' -e '/^};/i\ };};'  ")
dest_hec()

@define allow-config-dups 0
-
If you are running SC4S under podman or docker, copy the file into the /opt/sc4s/local/config/destinations directory. In other deployment methods this might be different, check the SC4S documentation for details.
-
Check if the metrics are appearing, for example, run the following command on the SC4S host:
syslog-ng-ctl stats prometheus | grep classified
-
If SC4S is sending data to an AxoRouter, create a placeholder data forwarding rule where the Edge Selector matches SC4S and the Router connector is the connector of the AxoRouter instance where SC4S is sending the data. This is needed to display SC4S and its data metrics on the Topology page, AxoConsole won’t manage SC4S.
4 - syslog-ng
Onboarding allows you to collect metrics about the host, display the host on the Topology page, and to tap into the log flow.
Onboarding requires you to modify the host and the configuration of the logging agent (syslog-ng) running on the host.
- Level 1: Install Axolet on the host where syslog-ng is running. Axolet collects metrics from the host and sends them to the AxoConsole, so you can check host-level metrics on the Metrics & Health page of the host, and displays the host on the Topology page.
- Level 2: Instrument the configuration of the logging agent to provide detailed metrics about the traffic flow. This allows you to display data about the host on the Analytics page.
- Level 3: Instrument the configuration of the logging agent to allow you to access the logs of the logging agent and to tap into the log flow from the AxoConsole. The exact steps for this integration depend on the configuration of your logging agent. We provide basic instrumentation instructions for getting started in this guide, but we strongly recommend to contact us so our professional services can help you with a production integration.
Prerequisites
For syslog-ng PE, version 7.0.33 or newer is required. Note that the 7.0.x product line needs a different configuration snippet than the 8.1.x product line.
For syslog-ng OSE, version 4.1.1 or newer is required, but we recommend using AxoSyslog instead (at least syslog-ng OSE version 4.5.0).
Provision syslog-ng
To onboard an existing syslog-ng instance into Axoflow, complete the following steps.
-
Install Axolet on the host, then approve its registration on the Provisioning page of the AxoConsole.
-
The syslog-ng host will now be visible on the Topology page of the AxoConsole as a source.
-
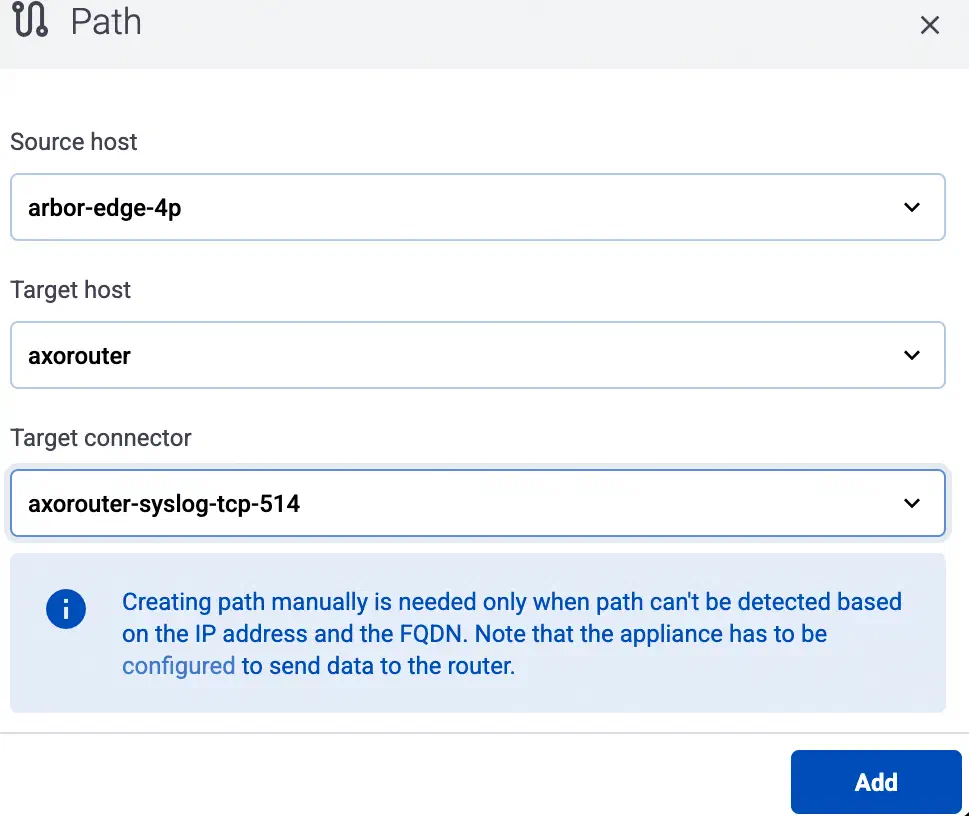
If you've already added the AxoRouter instance or other destination where this newly-registered host is sending data to the AxoConsole, add a path to connect the host to the AxoRouter or the destination.
-
Select Topology > Add Item > Path.
-
If not set automatically, select the beginning of the path in the Source host field.
-
Select the target router or aggregator this source is sending its data to in the Target host field, for example, axorouter.
-
Select the Target connector. The connector determines how the destination receives the data (for example, using which protocol or port).
-
Select Add. The new path appears on the Topology page.

-
Access the syslog-ng host and edit the configuration of syslog-ng. Set the statistics-related global options like this (if the options block already exists, add these lines to the bottom of the block):
options {
    stats-level(2);
    stats-freq(0); # Inhibit statistics output to stdout
};
-
(Optional) To get detailed metrics and analytics about the traffic that flows through the host, instrument your syslog-ng configuration as follows:
Note
You can use Axolet with an un-instrumented syslog-ng configuration file, but that limits available metrics to host statistics (for example, disk, memory, queue information). You won’t be able to access data about the actual traffic flowing through the host. To collect traffic-related metrics, instrument configuration with
metrics-probe() stanzas. The example below shows how to instrument the configuration to highlight common macros such as
$HOST and
$PROTOCOL. If you want to customize the collected metrics or need help with the instrumentation,
contact us.
-
Download the following configuration snippet to the syslog-ng host, for example, as /etc/syslog-ng/conf.d/axoflow-instrumentation.conf for syslog-ng.
For syslog-ng PE, use /opt/syslog-ng/etc/axoflow-instrumentation.conf.
For syslog-ng PE 8.x and newer:
# Metrics probe parser definition for a specified destination
# This will yield a reasonable number of metrics for common
# syslog-ng macros
block parser metrics-output(destination(undefined)) {

  # This will probe for the number of *events*.
  # key name is fixed; labels are user-specified
  metrics-probe(
    key("classified_output_events_total")
    labels(
      "host" => "${HOST}"
      "service" => "${PROGRAM}"
      "source" => "${SOURCE}"
      "dest_port" => "$DESTPORT"
      "dest_ip" => "$DESTIP"
      "src_ip" => "$SOURCEIP"
      "protocol" => "$(if ($PROTO == 6) TCP $(if ($PROTO == 17) UDP $PROTO))"
      "ip_protocol" => "$IP_PROTO"
      "transport" => "$TRANSPORT"
      "destination_name" => "`destination`"
      "issue" => "$(or $(tags-head message.parse_error syslog.unexpected_framing syslog.missing_pri syslog.rfc3164_missing_header syslog.invalid_hostname message.utf8_sanitized) 'none')"
    )
  );

  # This will probe for the number of *bytes*.
  # key name is fixed; labels are user-specified
  metrics-probe(
    key("classified_output_event_bytes_total")
    increment("${RAWMSG_SIZE}")
    labels(
        "host" => "${HOST}"
        "service" => "${PROGRAM}"
        "source" => "${SOURCE}"
        "dest_port" => "$DESTPORT"
        "dest_ip" => "$DESTIP"
        "src_ip" => "$SOURCEIP"
        "protocol" => "$(if ($PROTO == 6) TCP $(if ($PROTO == 17) UDP $PROTO))"
        "ip_protocol" => "$IP_PROTO"
        "transport" => "$TRANSPORT"
        "destination_name" => "`destination`"
        "issue" => "$(or $(tags-head message.parse_error syslog.unexpected_framing syslog.missing_pri syslog.rfc3164_missing_header syslog.invalid_hostname message.utf8_sanitized) 'none')"
    )
  );
};


# For syslog-ng OSE this should be /var/lib/syslog-ng/axotap.sock
@define AXOTAP_SOCK "/opt/syslog-ng/var/axotap.sock"

block rewrite format_axotap_sock_message(service_type("input")) {
  set("$(substr ${MESSAGE} 0 32768)" value(MESSAGE));
  set("$(substr ${RAWMSG} 0 32768)" value(RAWMSG));
  set("$(format-json --no-cast debug.msg=$(format-json --no-cast --scope all-nv-pairs) log.body=${MESSAGE})" value(".tap.event"));
  set(json('{"note":"message object too long for tapping"}') value(".tap.event") condition("$(length ${.tap.event})" > 131072));

  set("$(format-json --no-cast tap=$(format-json --no-cast tapId='' serviceType='`service_type`' eventId=${UNIQID} labels=$(format-json --no-cast) hostCandidate=$(format-json --no-cast) facility=${FACILITY} format=${MSGFORMAT} hostFrom=${HOST_FROM} message=$(echo ${MESSAGE}) rawMessage=${RAWMSG} severity=${SEVERITY} source=${SOURCE} tags=${TAGS} timestamp=${ISODATE} transport=${TRANSPORT}) event=json(${.tap.event}))" value(".tap.formatted"));
};


# input side tapping
destination "d_axotap_input_static" {
  channel {
    filter {
      rate-limit(key("$SOURCE:$PROGRAM:$HOST:$SOURCEIP:$DESTIP") rate(1));
    };

    rewrite {
      format_axotap_sock_message(service_type("input"));
    };

    destination {
      unix-dgram("`AXOTAP_SOCK`" persist-name("axotap_input_static") template("${.tap.formatted}"));
    };
  };
};


log {
  destination("d_axotap_input_static");
  flags(catchall);
};


# output side tapping
destination "d_axotap_output" {
  channel {
    filter {
      rate-limit(key("$SOURCE:$PROGRAM:$HOST:$SOURCEIP:$DESTIP") rate(1));
    };

    rewrite {
      format_axotap_sock_message(service_type("output"));
    };

    destination {
      unix-dgram("`AXOTAP_SOCK`" template("${.tap.formatted}"));
    };
  };
};
For syslog-ng PE 7.0.33 and newer 7.0.x, and syslog-ng OSE version 4.1.1-4.4.0:
# Metrics probe parser definition for a specified destination
# This will yield a reasonable number of metrics for common
# syslog-ng macros
block parser metrics-output(destination(undefined)) {

  # This will probe for the number of *events*.
  # key name is fixed; labels are user-specified
  metrics-probe(
    key("classified_output_events_total")
    labels(
      "host" => "${HOST}"
      "service" => "${PROGRAM}"
      "source" => "${SOURCE}"
      "dest_port" => "$DESTPORT"
      "dest_ip" => "$DESTIP"
      "src_ip" => "$SOURCEIP"
      "protocol" => "$(if ($PROTO == 6) TCP $(if ($PROTO == 17) UDP $PROTO))"
      "ip_protocol" => "$IP_PROTO"
      "transport" => "$TRANSPORT"
      "destination_name" => "`destination`"
    )
  );

  # This will probe for the number of *bytes*.
  # key name is fixed; labels are user-specified
  metrics-probe(
    key("classified_output_event_bytes_total")
    increment("${RAWMSG_SIZE}")
    labels(
        "host" => "${HOST}"
        "service" => "${PROGRAM}"
        "source" => "${SOURCE}"
        "dest_port" => "$DESTPORT"
        "dest_ip" => "$DESTIP"
        "src_ip" => "$SOURCEIP"
        "protocol" => "$(if ($PROTO == 6) TCP $(if ($PROTO == 17) UDP $PROTO))"
        "ip_protocol" => "$IP_PROTO"
        "transport" => "$TRANSPORT"
        "destination_name" => "`destination`"
    )
  );
};


# For syslog-ng OSE this should be /var/lib/syslog-ng/axotap.sock
@define AXOTAP_SOCK "/opt/syslog-ng/var/run/axotap.sock"

block rewrite format_axotap_sock_message(service_type("input")) {
  set("$(substr ${MESSAGE} 0 32768)" value(MESSAGE));
  set("$(substr ${RAWMSG} 0 32768)" value(RAWMSG));
  set("$(format-json --no-cast debug.msg=$(format-json --no-cast --scope all-nv-pairs) log.body=${MESSAGE})" value(".tap.event"));
  set(json('{"note":"message object too long for tapping"}') value(".tap.event") condition("$(length ${.tap.event})" > 131072));

  set("$(format-json --no-cast tap=$(format-json --no-cast tapId='' serviceType='`service_type`' eventId=${UNIQID} labels=$(format-json --no-cast) hostCandidate=$(format-json --no-cast) facility=${FACILITY} format=${MSGFORMAT} hostFrom=${HOST_FROM} message=$(echo ${MESSAGE}) rawMessage=${RAWMSG} severity=${SEVERITY} source=${SOURCE} tags=${TAGS} timestamp=${ISODATE} transport=${TRANSPORT}) event=json(${.tap.event}))" value(".tap.formatted"));
};


# input side tapping
destination "d_axotap_input_static" {
  channel {
    filter {
      rate-limit(template("$SOURCE:$PROGRAM:$HOST:$SOURCEIP:$DESTIP") rate(1));
    };

    rewrite {
      format_axotap_sock_message(service_type("input"));
    };

    destination {
      unix-dgram("`AXOTAP_SOCK`" persist-name("axotap_input_static") template("${.tap.formatted}"));
    };
  };
};


log {
  destination("d_axotap_input_static");
  flags(catchall);
};


# output side tapping
destination "d_axotap_output" {
  channel {
    filter {
      rate-limit(template("$SOURCE:$PROGRAM:$HOST:$SOURCEIP:$DESTIP") rate(1));
    };

    rewrite {
      format_axotap_sock_message(service_type("output"));
    };

    destination {
      unix-dgram("`AXOTAP_SOCK`" template("${.tap.formatted}"));
    };
  };
};
-
Include it in at the top of your configuration file:
@version: current
@include "axoflow-instrumentation.conf"
-
Edit every destination statement to include a parser { metrics-output(destination(my-destination)); }; line (making sure to include the channel construct if your destination block does not already contain it):
destination my-destination {
    channel {
        parser { metrics-output(destination(my-destination)); };
        destination { file("/dev/null"); };
        };
    };
-
Reload the configuration of syslog-ng.
systemctl reload syslog-ng
-
To enable log tapping for the output logs (traffic that the host sends to its destinations), add the d_axotap_output destination in your log paths. This allows the Axolet agent to collect rate-limited log samples from that specific point in the pipeline.
Tapping the input logs (traffic arriving to the sources of the host) needs only the configuration snippet.
Note
There are multiple ways to add tapping to your configuration, which in some cases can introduce unwanted side effects.
Contact us to help you create a safe tapping configuration for your use case!
-
Find a log path that you want to tap into and add the tap destination in a safe way, for example, by adding it in a separate inner log path:
log {
    source(s_udp514);
    log { destination(d_udp514); };
    log { destination(d_axotap); };
};
-
Reload the configuration of syslog-ng.
systemctl reload syslog-ng
-
Unregister the service so that auto service registration can discover the new tapping point:
-
Test log tapping from the top right menu:
-
If syslog-ng is sending data to an AxoRouter, create a placeholder data forwarding rule where the Edge Selector matches syslog-ng and the Router connector is the connector of the AxoRouter instance where syslog-ng is sending the data. This is needed to display syslog-ng and its data metrics on the Topology page, AxoConsole won’t manage syslog-ng.
5 - Axolet
Axolet is the agent software for Axoflow. Its primary purpose is to discover the log collector services that are running on the host (for example, AxoSyslog or SC4S), and report their operating statistics (counters) to Axoflow.
5.1 - Install Axolet
Axolet is the agent software for Axoflow. Its primary purpose is to discover the log collector services that are running on the host (for example, AxoSyslog or SC4S), and report their operating statistics (counters) to Axoflow.
It is simple to install Axolet on individual hosts, or collectively via orchestration tools such as chef or puppet.
What the install script does
When you deploy Axolet, you run a command that installs the required software packages, configures them and sets up the connection with Axoflow.
The installer script installs the axolet packages, then executes the configure-axolet command with the right parameters. (If the packages are already installed, the installer will update them unless the none package format is selected when generating the provisioning command.)
The install script is designed to be run as root (sudo), but you can configure Axolet to run as a non-root user.
The installer script performs the following main steps:
- Executes prerequisite checks:
- Tests the network connection with the console endpoints.
- Checks if the operating system is supported.
- Downloads and installs the
axolet RPM or DEB package.
- The package contains the
axolet and configure-axolet commands, and the axolet.service systemd unit file.
- The
configure-axolet command is executed with a configuration snippet on its standard input which contains a token required for registering into the management platform. The command:
-
Writes the initial /etc/axolet/config.json configuration file.
Note: if the file already exists it will only be overwritten if the Overwrite config option is enabled when generating the provisioning command.
-
Enables and starts the axolet service.
axolet performs the following main steps on its first execution:
- Generates and persists a unique identifier (GUID).
- Initiates a cryptographic handshake process to AxoConsole.
- AxoConsole issues a client certificate to Axolet, which will be stored in the above mentioned
config.json file.
- The service waits for an approval on AxoConsole. Once you approve the host registration request, axolet starts to send telemetry data to AxoConsole. It keeps doing so as long as the agent is registered.
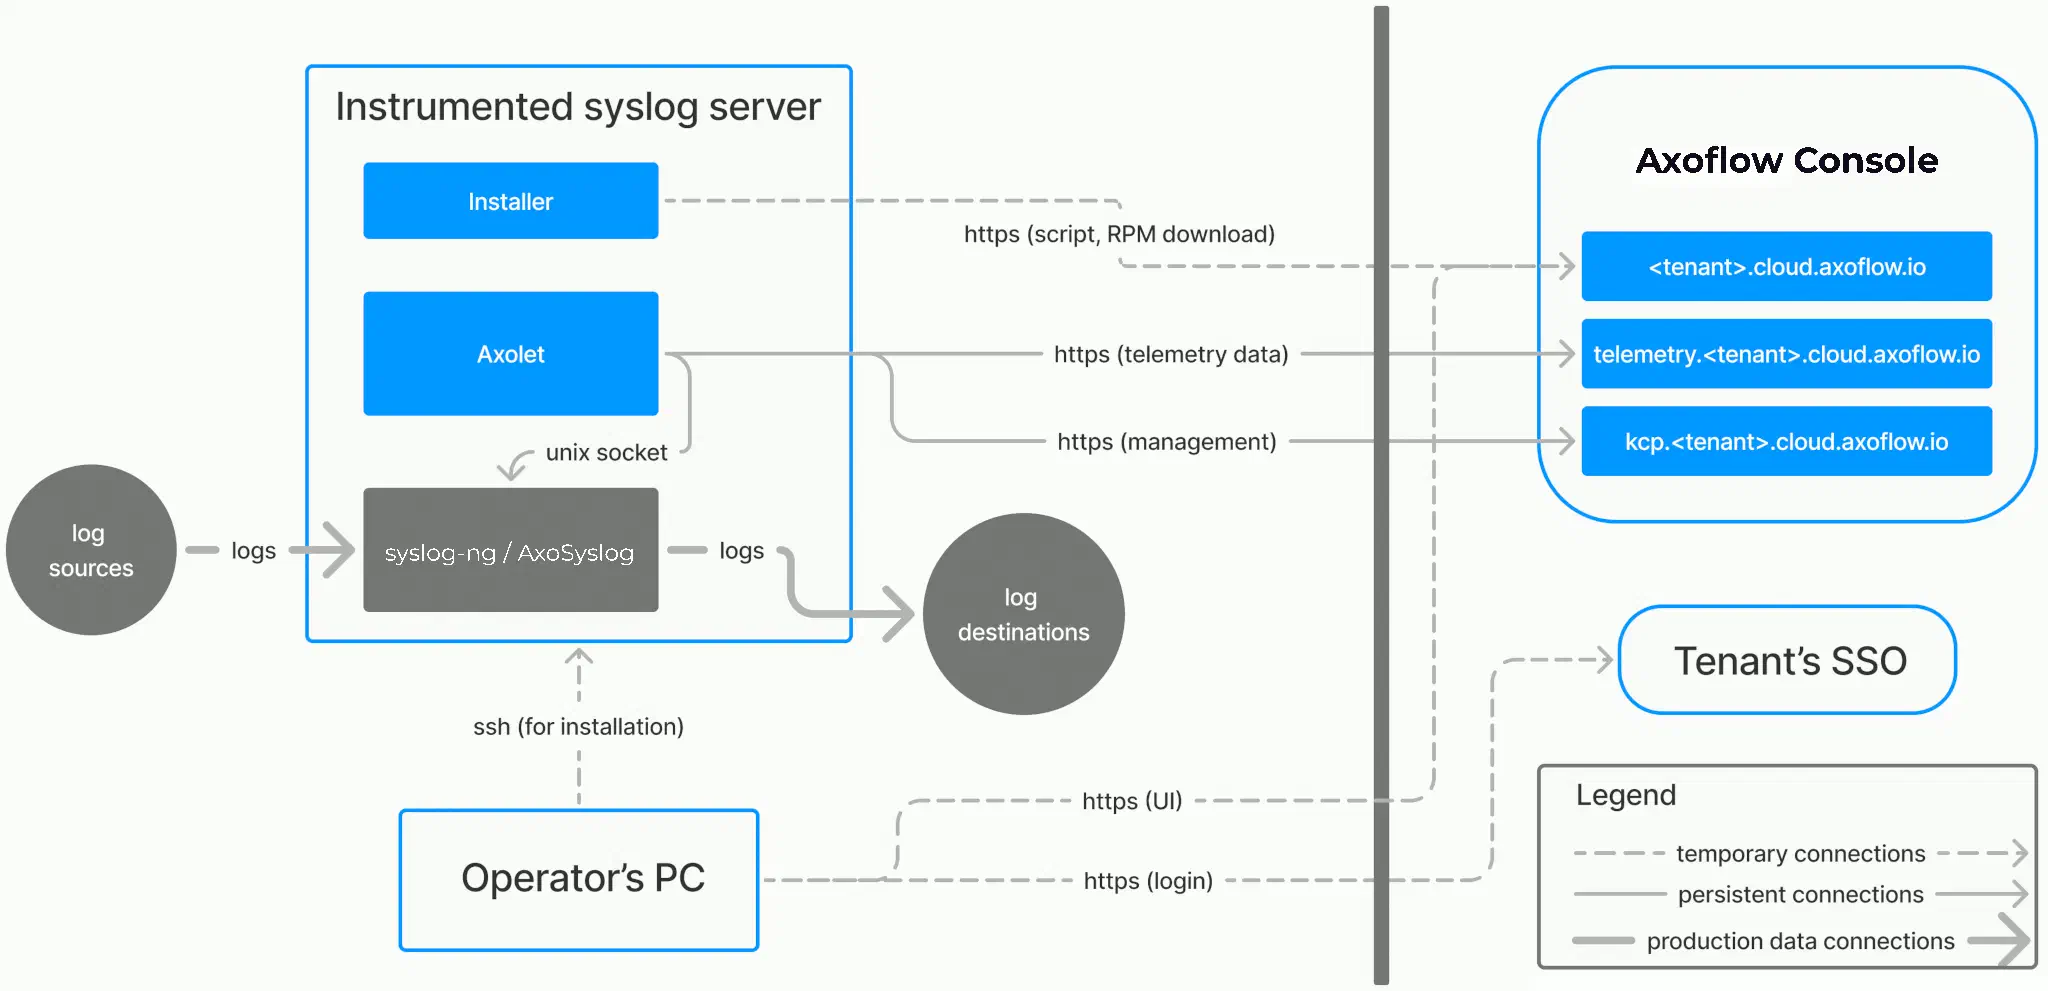
Prerequisites
Axolet should work on most Red Hat and Debian compatible Linux distributions. For production environments, we recommend using Red Hat Enterprise Linux 9.
Network access
The host must be able to access the following domains related to the AxoConsole:
-
When using AxoConsole SaaS:
<your-tenant-id>.cloud.axoflow.io: HTTPS traffic on TCP port 443, needed to download the binaries for Axoflow software (like Axolet and AxoRouter).kcp.<your-tenant-id>.cloud.axoflow.io: HTTPS (mutual TLS) traffic on TCP port 443 for management traffic.telemetry.<your-tenant-id>.cloud.axoflow.io: HTTPS (mutual TLS) traffic on TCP port 443, where Axolet sends the metrics of the host.us-docker.pkg.dev: HTTPS traffic on TCP port 443, but only if you’re forcing the installation script to pull the container images from the public repository. The Axolet and AxoRouter for Linux installation scripts download the images directly from AxoConsole.
-
When using an on-premise AxoConsole:
-
When installing Axoflow agent for Windows or Linux:
github.com: HTTPS traffic on TCP port 443, for downloading installer packages.
Install Axolet
To install Axolet on a host and onboard it to Axoflow, complete the following steps. If you need to reinstall Axolet for some reason, see Reinstall Axolet.
-
Open the AxoConsole at https://<your-tenant-id>.cloud.axoflow.io/.
-
Select Provisioning > Select type and platform.

-
Select Edge > Linux.
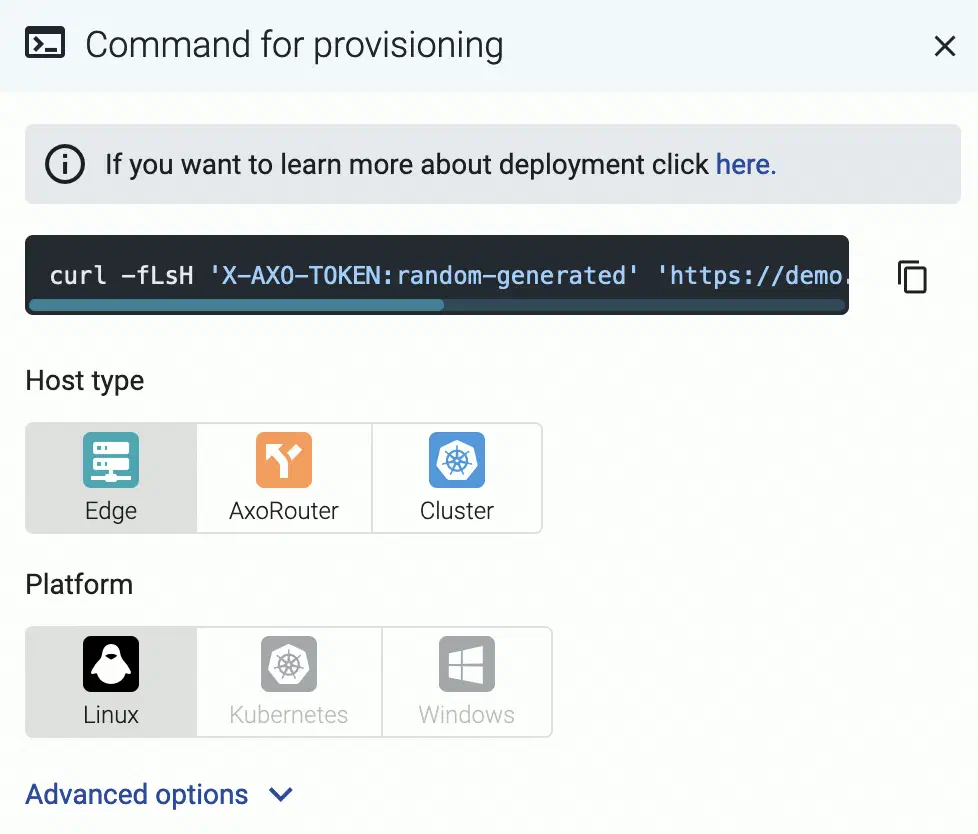
The curl command can be run manually or inserted into a template in any common software deployment package. When run, a script is downloaded that sets up the Axolet process to run automatically at boot time via systemd. For advanced installation options, see Advanced installation options.
-
Copy the deployment one-liner and run it on the host you are onboarding into Axoflow.
Note
Running the provisioning command with sudo would mask environment variables of the calling shell. Either start the whole procedure from a root shell, or let the install script call sudo when it needs to. In other words: don’t add the sudo command to the provisioning command.
Example output:
Do you want to install Axolet now? [Y]
y
% Total    % Received % Xferd  Average Speed   Time    Time     Time  Current
                                Dload  Upload   Total   Spent    Left  Speed
100 31.6M  100 31.6M    0     0  2127k      0  0:00:15  0:00:15 --:--:-- 2075k
Verifying packages...
Preparing packages...
axolet-0.40.0-1.aarch64
Created symlink /etc/systemd/system/multi-user.target.wants/axolet.service → /usr/lib/systemd/system/axolet.service.
Now continue with onboarding the host on the Axoflow web UI.
-
On the AxoConsole, reload the Provisioning page. A registration request for the new host should be displayed. Accept it.
-
Axolet starts sending metrics from the host. Check the Topology page to see the new host.
-
Continue to onboard the host as described for your specific log collector agent.
Manage Axolet
This section describes how to start, stop and check the status of the Axolet service on Linux.
Start Axolet
To start Axolet, execute the following command. For example:
systemctl start axolet
If the service starts successfully, no output will be displayed.
The following message indicates that Axolet cannot start (see Check Axolet status):
Job for axolet.service failed because the control process exited with error code. See `systemctl status axolet.service` and `journalctl -xe` for details.
Stop Axolet
To stop Axolet
-
Execute the following command.
systemctl stop axolet
-
Check the status of the Axolet service (see Check Axolet status).
Restart Axolet
To restart Axolet, execute the following command.
systemctl restart axolet
Reload the configuration without restarting Axolet
To reload the configuration file without restarting Axolet, execute the following command.
systemctl reload axolet
Check the status of Axolet service
To check the status of Axolet service
-
Execute the following command.
systemctl --no-pager status axolet
-
Check the Active: field, which shows the status of the Axolet service. The following statuses are possible:
active (running) - axolet service is up and runninginactive (dead) - axolet service is stopped
For AxoRouter hosts, you can check the Axolet logs from the AxoConsole using Log tapping for Agent logs.
Upgrade Axolet
AxoConsole raises an alert for the host when a new Axolet version is available. To upgrade to the new version, re-run the one-liner installation command you used to install Axolet, or select Provisioning > Select type and platform to create a new one.
Note that it can take a few minutes until the version numbers of the different services get updated on AxoConsole.
Run axolet as non-root
You can run Axolet as non-root user, but operators must have access to the following commands:
-
/usr/bin/systemctl * axolet.service: Controls the axolet.service systemd unit. Usually * is start, stop, restart, enable, and status. Used by the operators for troubleshooting.
-
/usr/local/bin/configure-axolet: Creates initial axolet configuration and enables/starts the axolet service. Executed by the bootstrap script.
-
Command to install and upgrade the axolet package. Executed by the bootstrap script if the packages aren’t already installed.
- On RPM-based Linux distributions:
/usr/bin/rpm -Uv axo*.rpm
- On DEB-based Linux distributions:
/usr/bin/dpkg -i axo*.deb
You can permit the syslogng user to run these commands by running on of the following:
sudo tee /etc/sudoers.d/configure-axoflow <<A
syslogng ALL=(ALL) NOPASSWD: /usr/local/bin/configure-axolet
syslogng ALL=(ALL) NOPASSWD: /bin/systemctl * axolet.service
# for rpm installation:
syslogng ALL=(ALL) NOPASSWD: /usr/bin/rpm -Uv axo*.rpm
A
sudo tee /etc/sudoers.d/configure-axoflow <<A
syslogng ALL=(ALL) NOPASSWD: /usr/local/bin/configure-axolet
syslogng ALL=(ALL) NOPASSWD: /bin/systemctl * axolet.service
# for deb installation:
syslogng ALL=(ALL) NOPASSWD: /usr/bin/dpkg -i axo*.deb
A
5.2 - Advanced installation options
When installing Axolet, you can set a number of advanced options if needed for your environment. Setting the advanced options in the AxoConsole automatically updates the one-liner command that you can copy and run.
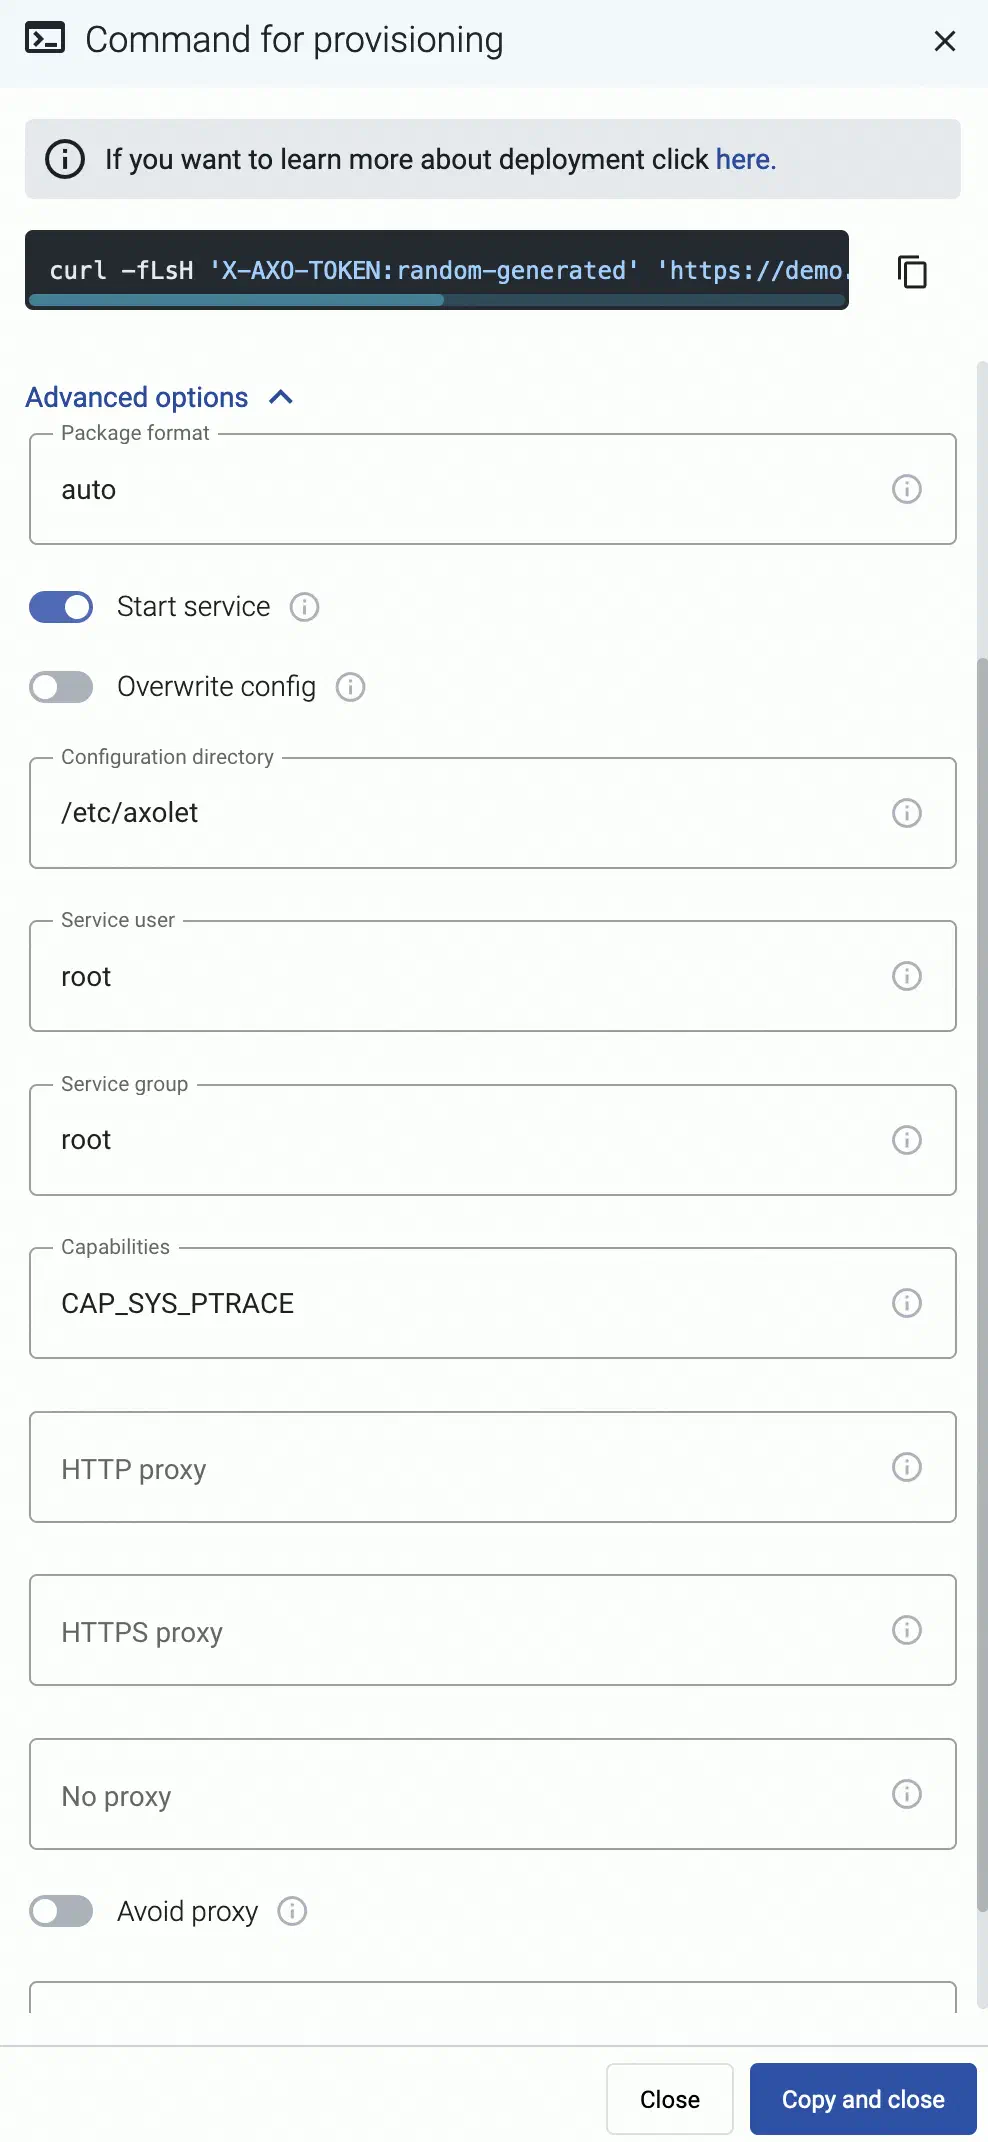
Alternatively, before running the one-liner you can use one of the following methods:
Proxy settings
Use the HTTP proxy, HTTPS proxy, No proxy parameters to configure HTTP proxy settings for the installer. To avoid using the proxy for the Axolet service, enable the Avoid proxy parameter as well. Lowercase variable names are preferred because they work universally.
Installation options
You can pass the following parameters to the installation script as environment variables, or as URL parameters.
Note
Running the provisioning command with sudo would mask environment variables of the calling shell. Either start the whole procedure from a root shell, or let the install script call sudo when it needs to. In other words: don’t add the sudo command to the provisioning command.
API server host
|
|
| Default value: |
|
| Environment variable |
|
| URL parameter |
api_server_host |
Description: Override the host part of the API endpoint for the host.
Avoid proxy
|
|
| Default value: |
false |
| Available values: |
true, false |
| Environment variable |
AXOLET_AVOID_PROXY |
| URL parameter |
avoid_proxy |
Description: If set to true, the value of the *_proxy variables will only be used for downloading the installer, but not for the axolet service itself. If set to false, the Axolet service will use the variables from the installer.
Capabilities
|
|
| Default value: |
CAP_SYS_PTRACE |
| Available values: |
Whitespace-separated list of capability names with CAP_ prefix. |
| Environment variable |
AXOLET_CAPS |
| URL parameter |
caps |
Description: Ambient Linux capabilities the axolet service will use.
Configuration directory
|
|
| Default value: |
/etc/axolet |
| Environment variable |
AXOLET_CONFIG_DIR |
| URL parameter |
config_dir |
Description: The directory where the configuration files are stored.
HTTP proxy
|
|
| Default value: |
empty string |
| Environment variable |
AXOLET_HTTP_PROXY |
| URL parameter |
http_proxy |
Description: Use a proxy to access AxoConsole from the host.
HTTPS proxy
|
|
| Default value: |
empty string |
| Environment variable |
AXOLET_HTTPS_PROXY |
| URL parameter |
https_proxy |
Description: Use a proxy to access AxoConsole from the host.
Initial labels
|
|
| Default value: |
empty string |
| Environment variable |
AXOLET_INITIAL_LABELS |
| URL parameter |
initial_labels |
Description: Comma-separated list of key=value labels. These labels will be suggested for the host when you add the source to AxoConsole. For example, product=windows,team=windows,vendor=microsoft
No proxy
|
|
| Default value: |
empty string |
| Environment variable |
AXOLET_NO_PROXY |
| URL parameter |
no_proxy |
Description: Destinations that should be reached directly, without going through the proxy.
Overwrite config
|
|
| Default value: |
false |
| Available values: |
true, false |
| Environment variable |
AXOLET_CONFIG_OVERWRITE |
| URL parameter |
config_overwrite |
Description: If set to true, the configuration process will overwrite existing configuration (/etc/axolet/config.json). This means that the agent will get a new GUID and it will require approval on the AxoConsole.
|
|
| Default value: |
auto |
| Available values: |
auto, dep, rpm, tar, none |
| Environment variable |
AXOLET_INSTALL_PACKAGE |
| URL parameter |
install_package |
Description: File format of the installer package.
Service group
|
|
| Default value: |
root |
| Environment variable |
AXOLET_GROUP |
| URL parameter |
group |
Description: Name of the group and Axolet will be running as. It should be either root or the group syslog-ng is running as.
Service user
|
|
| Default value: |
root |
| Environment variable |
AXOLET_USER |
| URL parameter |
user |
Description: Name of the user Axolet will be running as. It should be either root or the user syslog-ng is running as. See also Run axolet as non-root.
Start service
|
|
| Default value: |
AXOLET_START=true |
| Available values: |
true, false |
| Environment variable |
AXOLET_START |
| URL parameter |
start |
Description: Start axolet agent at the end of installation. Use false for preparing golden images. In this case axolet will generate a new GUID on the first boot after cloning the image.
If you are preparing a host for cloning with Axolet already installed, set the following environment variable in your (root) shell session, before running the one-liner command. For example:
export START_AXOLET=false
curl ... # Run the command copied from the Provisioning page
This way Axolet will only start and initialize after the first reboot.
5.3 - Run axolet as non-root
If the log collector agent (AxoSyslog or syslog-ng) is running as a non-root user, you may want to configure the Axolet agent to run as the same user.
To do that, set the AXOLET_USER and AXOLET_GROUP environment variables to the user’s username and groupname. For details, see Advanced installation options.
Operators will need to have access to the following commands:
-
/usr/bin/systemctl * axolet.service: Controls the axolet.service systemd unit. Usually * is start, stop, restart, enable, and status. Used by the operators for troubleshooting.
-
/usr/local/bin/configure-axolet: Creates initial axolet configuration and enables/starts the axolet service. Executed by the bootstrap script.
-
Command to install and upgrade the axolet package. Executed by the bootstrap script if the packages aren’t already installed.
- On RPM-based Linux distributions:
/usr/bin/rpm -Uv axo*.rpm
- On DEB-based Linux distributions:
/usr/bin/dpkg -i axo*.deb
For example, you can permit the syslogng user to run these commands by running the following commands:
sudo tee /etc/sudoers.d/configure-axoflow <<A
syslogng ALL=(ALL) NOPASSWD: /usr/local/bin/configure-axolet
syslogng ALL=(ALL) NOPASSWD: /bin/systemctl * axolet.service
# for rpm installation:
syslogng ALL=(ALL) NOPASSWD: /usr/bin/rpm -Uv axo*.rpm
A
sudo tee /etc/sudoers.d/configure-axoflow <<A
syslogng ALL=(ALL) NOPASSWD: /usr/local/bin/configure-axolet
syslogng ALL=(ALL) NOPASSWD: /bin/systemctl * axolet.service
# for deb installation:
syslogng ALL=(ALL) NOPASSWD: /usr/bin/dpkg -i axo*.deb
A
5.4 - Reinstall Axolet
Reinstall Axolet to a (cloned) machine
To re-install Axolet on a (cloned) machine that has an earlier installation running, complete the following steps.
-
Log in to the host as root and execute the following commands:
systemctl stop axolet
rm -r /etc/axolet/
-
Follow the regular installation steps described in Axolet.
Recover Axolet after the root CA certificate was rotated
-
Log in to the host as root and execute the following commands:
export AXOLET_KEEP_GUID=y AXOLET_CONFIG_OVERWRITE=y PATH=$PATH:/usr/local/bin
-
Run the one-liner from the AxoConsole Provisioning page in the same shell.
-
The installation may result in an error message, but Axolet should eventually recover. You can check by running:
journalctl -b -u axolet -n 20 -f
6 - Data sources
7 - Destinations
8 - Agent for Linux edge hosts
Axoflow provides Axoflow agent for Linux (a customized OpenTelemetry Collector distribution) to collect data from Linux-based edge hosts.
Axoflow agent for Linux can collect data from files and systemd journals.
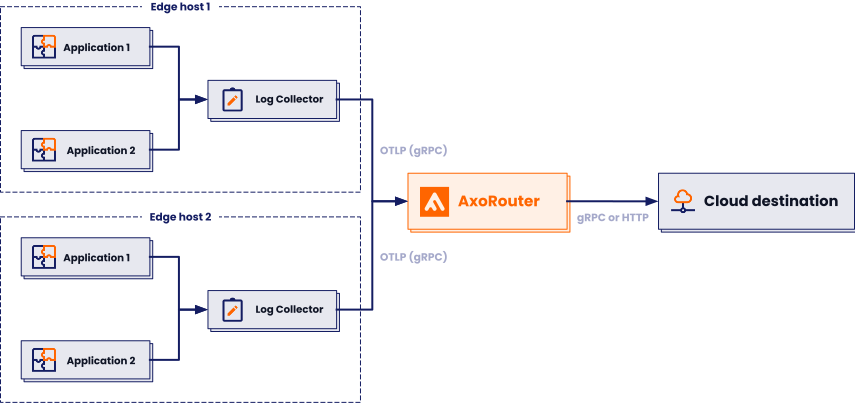
What the installer does
When you deploy axolet, you run a command that installs the required software packages, configures them and sets up the connection with Axoflow.
The installer script performs the following main steps:
- Executes prerequisite checks:
- Tests the network connection with the console endpoints.
- Checks if the operating system is supported.
- Downloads the installers (
.rpm or .deb) of the Axolet agent and the Axoflow agent for Linux.
- The installer script installs the packages. If the packages are already installed, the installer will update them to the latest version.
The installer installs:
- The collector agent (by default) to
/usr/bin/axoflow-otel-collector.
- A default configuration file to
/etc/axoflow-otel-collector/config.yaml.
- The
axolet management agent (by default) to /usr/local/bin/axolet.
axolet performs the following main steps on its first execution:
- Generates and persists a unique identifier (GUID).
- Initiates a cryptographic handshake process to AxoConsole.
- AxoConsole issues a client certificate to axolet, which will be stored in the above mentioned
config.json file.
- The service waits for an approval on AxoConsole. Once you approve the host registration request, axolet starts to manage the local services and send telemetry data to AxoConsole. It keeps doing so as long as the agent is registered.
Note
Note that AxoRouter and Axoflow agent collects detailed, real-time metrics about the data-flows – giving you observability over the health of the security data pipeline and its components. Your security data remains in your self-managed cloud or in your on-prem instance where your sources, destinations, Axoflow agents, and AxoRouters are running, only metrics are forwarded to AxoConsole.
To install Axoflow agent on a Linux host, complete the following steps. For other platforms, see Provision pipeline elements.
Prerequisites
- Axoflow agent should work on most Red Hat and Debian compatible Linux distributions. Both x86_64 and arm64 architectures are supported. For production environments, we recommend using Red Hat Enterprise Linux 9.
- When using Axoflow agent with an on-premises AxoConsole deployment, you must prepare the Axoflow agent host
Network access
The host must be able to access the following domains related to the AxoConsole:
-
When using AxoConsole SaaS:
<your-tenant-id>.cloud.axoflow.io: HTTPS traffic on TCP port 443, needed to download the binaries for Axoflow software (like Axolet and AxoRouter).kcp.<your-tenant-id>.cloud.axoflow.io: HTTPS (mutual TLS) traffic on TCP port 443 for management traffic.telemetry.<your-tenant-id>.cloud.axoflow.io: HTTPS (mutual TLS) traffic on TCP port 443, where Axolet sends the metrics of the host.us-docker.pkg.dev: HTTPS traffic on TCP port 443, but only if you’re forcing the installation script to pull the container images from the public repository. The Axolet and AxoRouter for Linux installation scripts download the images directly from AxoConsole.
-
When using an on-premise AxoConsole:
-
When installing Axoflow agent for Windows or Linux:
github.com: HTTPS traffic on TCP port 443, for downloading installer packages.
- To transport data to an AxoRouter, Axoflow agent must be able to access the OpenTelemetry Connector of the AxoRouter. By default, the connector uses the 4317 TCP port.
Limitations
Communication between the Axoflow agent hosts and AxoRouter hosts uses the OpenTelemetry Protocol (OTLP/gRPC), but currently doesn’t use TLS or authentication.
Install Axoflow agent for Linux
-
Select Provisioning > Select type and platform.
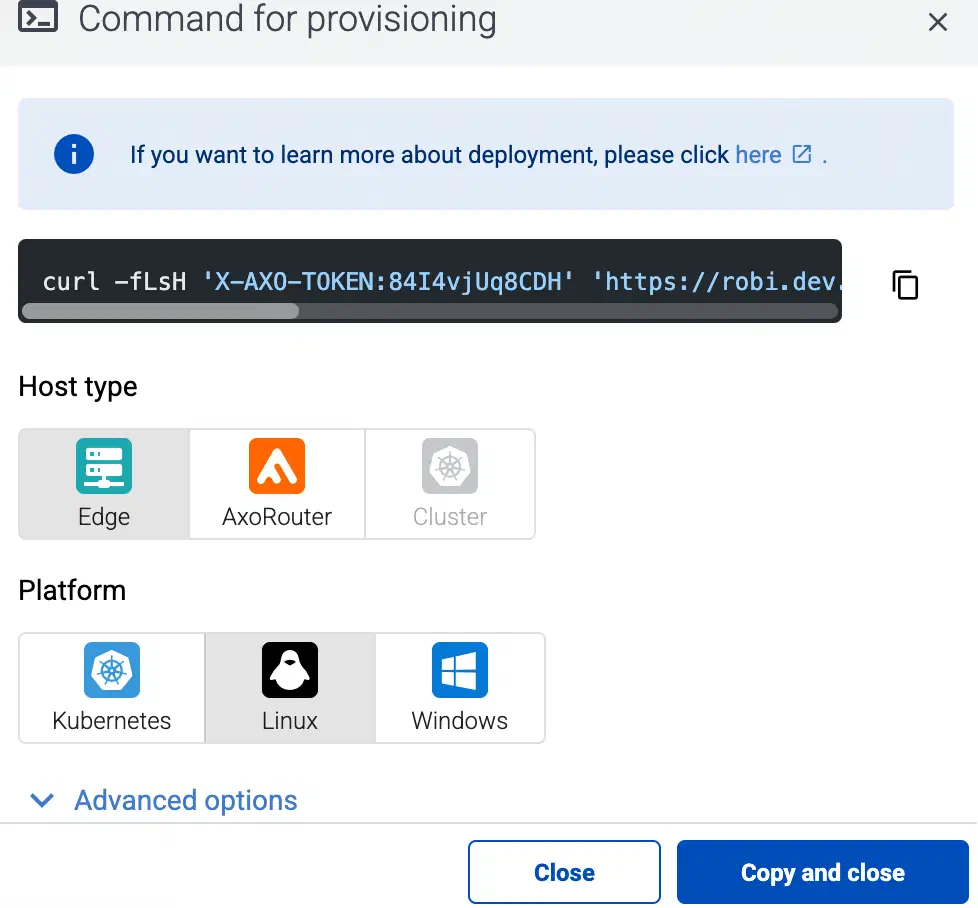
-
Select the type (Edge) and platform (Linux). The one-liner installation command is displayed.
If needed, set the Advanced options (for example, proxy settings, or External image pull in air-gapped environments) to modify the installation parameters. Usually, you don’t have to use advanced options unless the Axoflow support team instructs you to do so.
-
Open a terminal on the host where you want to install Axoflow agent.
-
Run the one-liner, then follow the on-screen instructions.
Example output:
curl -fLsH 'X-AXO-TOKEN:random-generated' 'https://<your-tenant-id>.cloud.axoflow.io/setup.sh?type=AXOEDGE&platform=LINUX&install_agent=true' | sh
Do you want to install Axoflow agents now? [Y]
Y

Verifying packages...
Preparing packages...
axolet-0.86.0.x86_64
The unique identifier of this installation: 9hrtcd8bz6u61aihd2zd

Verifying packages...
Preparing packages...
axoflow-otel-collector-0.129.0~axoflow.5-1.x86_64
Created symlink /etc/systemd/system/multi-user.target.wants/axoflow-otel-collector.service → /usr/lib/systemd/system/axoflow-otel-collector.service.
Axolet service is running.
Now continue with onboarding the host on the Axoflow web UI.
-
Verify that the axolet and axoflow-otel-collector services are running by running sudo systemctl list-units | grep axo
Example output:
axoflow-otel-collector.service                                                       loaded active     running         Axoflow Otel Collector
axolet.service                                                                       loaded activating start     start Axoflow agent
-
On the AxoConsole, reload the Provisioning page. A registration request for the new host should be displayed. Accept it.
-
The host now appears on the Topology page. To collect data from the host, the host must match the edge selector of an Edge collection rule.
The AxoRouter connector that receives data from Axoflow agent adds the following fields to the meta variable:
| field |
Value |
| meta.connector.type |
otlp |
| meta.connector.name |
<name of the connector> |
| meta.product |
opentelemetry |
| meta.platform |
linux |
8.1 - Manage the Linux agent
This section describes how to start, stop and check the status of the axolet and axoflow-otel-collector services on Linux.
Start the service
To start the axolet or axoflow-otel-collector service, execute the following commands:
systemctl start axoletsystemctl start axoflow-otel-collector
Alternatively, you can restart the service from AxoConsole:
- Find the host on the Topology or the Sources page. Alternatively, select
⌘/Ctrl + K and enter the name of the host.
- Select the name of the host.
- Select Services > Restart.
Stop the service
To stop the axolet or axoflow-otel-collector service, execute the following commands:
systemctl stop axoletsystemctl stop axoflow-otel-collector
Check the status of the service
To check the status of the axolet or axoflow-otel-collector service, execute the following commands:
systemctl status axoletsystemctl status axoflow-otel-collector
For more detailed logs, run:
journalctl -u axoletjournalctl -u axoflow-otel-collector
Upgrade Axoflow agent
AxoConsole raises an alert for the host when a new Axoflow agent version is available. To upgrade to the new version, re-run the one-liner installation command you used to install Axoflow agent, or select Provisioning > Select type and platform to create a new one (make sure to enable the Advanced options > Install Collector agent option).
Note that it can take a few minutes until the version numbers of the different services get updated on AxoConsole.
8.2 - Advanced installation options
When installing Axoflow agent for Linux, you can set a number of advanced options if needed for your environment. Setting the advanced options in the AxoConsole automatically updates the one-liner command that you can copy and run.
Alternatively, before running the one-liner you can use one of the following methods:
Proxy settings
Use the HTTP proxy, HTTPS proxy, No proxy parameters to configure HTTP proxy settings for the installer. To avoid using the proxy for the Axolet service, enable the Avoid proxy parameter as well. Lowercase variable names are preferred because they work universally.
Installation options
You can pass the following parameters to the installation script as environment variables, or as URL parameters.
API server host
|
|
| Default value: |
|
| Environment variable |
|
| URL parameter |
api_server_host |
Description: Override the host part of the API endpoint for the host.
Avoid proxy
|
|
| Default value: |
false |
| Available values: |
true, false |
| Environment variable |
AXOLET_AVOID_PROXY |
| URL parameter |
avoid_proxy |
Description: If set to true, the value of the *_proxy variables will only be used for downloading the installer, but not for the axolet service itself. If set to false, the Axolet service will use the variables from the installer.
Capabilities
|
|
| Default value: |
CAP_SYS_PTRACE |
| Available values: |
Whitespace-separated list of capability names with CAP_ prefix. |
| Environment variable |
AXOLET_CAPS |
| URL parameter |
caps |
Description: Ambient Linux capabilities the axolet service will use.
Configuration directory
|
|
| Default value: |
/etc/axolet |
| Environment variable |
AXOLET_CONFIG_DIR |
| URL parameter |
config_dir |
Description: The directory where the configuration files are stored.
HTTP proxy
|
|
| Default value: |
empty string |
| Environment variable |
AXOLET_HTTP_PROXY |
| URL parameter |
http_proxy |
Description: Use a proxy to access AxoConsole from the host.
HTTPS proxy
|
|
| Default value: |
empty string |
| Environment variable |
AXOLET_HTTPS_PROXY |
| URL parameter |
https_proxy |
Description: Use a proxy to access AxoConsole from the host.
Initial labels
|
|
| Default value: |
empty string |
| Environment variable |
AXOLET_INITIAL_LABELS |
| URL parameter |
initial_labels |
Description: Comma-separated list of key=value labels. These labels will be suggested for the host when you add the source to AxoConsole. For example, product=windows,team=windows,vendor=microsoft
No proxy
|
|
| Default value: |
empty string |
| Environment variable |
AXOLET_NO_PROXY |
| URL parameter |
no_proxy |
Description: Destinations that should be reached directly, without going through the proxy.
Overwrite config
|
|
| Default value: |
false |
| Available values: |
true, false |
| Environment variable |
AXOLET_CONFIG_OVERWRITE |
| URL parameter |
config_overwrite |
Description: If set to true, the configuration process will overwrite existing configuration (/etc/axolet/config.json). This means that the agent will get a new GUID and it will require approval on the AxoConsole.
|
|
| Default value: |
auto |
| Available values: |
auto, dep, rpm, tar, none |
| Environment variable |
AXOLET_INSTALL_PACKAGE |
| URL parameter |
install_package |
Description: File format of the installer package.
Service group
|
|
| Default value: |
root |
| Environment variable |
AXOLET_GROUP |
| URL parameter |
group |
Description: Name of the group and Axolet will be running as. It should be either root or the group syslog-ng is running as.
Service user
|
|
| Default value: |
root |
| Environment variable |
AXOLET_USER |
| URL parameter |
user |
Description: Name of the user Axolet will be running as. It should be either root or the user syslog-ng is running as. See also Run axolet as non-root.
Start service
|
|
| Default value: |
AXOLET_START=true |
| Available values: |
true, false |
| Environment variable |
AXOLET_START |
| URL parameter |
start |
Description: Start axolet agent at the end of installation. Use false for preparing golden images. In this case axolet will generate a new GUID on the first boot after cloning the image.
If you are preparing a host for cloning with Axolet already installed, set the following environment variable in your (root) shell session, before running the one-liner command. For example:
export START_AXOLET=false
curl ... # Run the command copied from the Provisioning page
This way Axolet will only start and initialize after the first reboot.
8.3 - Configure data collection
To configure the agent to collect data from the edge host and send it to an AxoRouter instance, you must have:
The edge selectors of these rules are high-level policies that use dynamic host labels to determine which edge hosts match the rule.
To configure data collection on the edge host, complete the following steps.
- Create a new Collection rule (select Sources > Collection Rules > Add Rule), or add the host to an existing rule.
- Create a new Data Forwarding rule (select Sources > Forwarding Rules > Add Rule), or add the host to an existing rule.
9 - Windows host - agent based solution
Axoflow provides Axoflow agent for Windows (a customized OpenTelemetry Collector distribution) to collect data from Microsoft Windows hosts.
Axoflow agent can collect data from files, Windows Event Log, and Windows Event Traces (ETW).
What the installer does
When you deploy axolet, you run a command that installs the required software packages, configures them and sets up the connection with Axoflow.
The installer script performs the following main steps:
- Executes prerequisite checks:
- Tests the network connection with the console endpoints.
- Checks if the operating system is supported.
- Downloads the installers (
.msi) of the Axolet agent and the Axoflow agent for Windows.
- The installer script installs the packages. If the packages are already installed, the installer will update them to the latest version.
The installer installs:
- The collector agent (by default) to
C:\Program Files\Axoflow\OpenTelemetry Collector\axoflow-otel-collector.exe.
- A default configuration file to
C:\ProgramData\Axoflow\OpenTelemetry Collector\config.yaml.
- The
axolet management agent (by default) to C:\Program Files\Axoflow\Axolet\axolet.exe.
axolet performs the following main steps on its first execution:
- Generates and persists a unique identifier (GUID).
- Initiates a cryptographic handshake process to AxoConsole.
- AxoConsole issues a client certificate to axolet, which will be stored in the above mentioned
config.json file.
- The service waits for an approval on AxoConsole. Once you approve the host registration request, axolet starts to send telemetry data to AxoConsole. It keeps doing so as long as the agent is registered.
Note
Note that AxoRouter and Axoflow agent collects detailed, real-time metrics about the data-flows – giving you observability over the health of the security data pipeline and its components. Your security data remains in your self-managed cloud or in your on-prem instance where your sources, destinations, Axoflow agents, and AxoRouters are running, only metrics are forwarded to AxoConsole.
To install Axoflow agent on a Windows host, complete the following steps. For other platforms, see Provision pipeline elements.
Prerequisites
-
You’ll need Administrator PowerShell access to the Windows host.
-
Axoflow agent supports the following Windows versions on x86_64 architectures:
- Windows Server 2025
- Windows Server 2022
- Windows Server 2019
- Windows Server 2016
- Windows 11
- Windows 10
-
When using Axoflow agent with an on-premises AxoConsole deployment, you must prepare the Axoflow agent host
Network access
The host must be able to access the following domains related to the AxoConsole:
-
When using AxoConsole SaaS:
<your-tenant-id>.cloud.axoflow.io: HTTPS traffic on TCP port 443, needed to download the binaries for Axoflow software (like Axolet and AxoRouter).kcp.<your-tenant-id>.cloud.axoflow.io: HTTPS (mutual TLS) traffic on TCP port 443 for management traffic.telemetry.<your-tenant-id>.cloud.axoflow.io: HTTPS (mutual TLS) traffic on TCP port 443, where Axolet sends the metrics of the host.us-docker.pkg.dev: HTTPS traffic on TCP port 443, but only if you’re forcing the installation script to pull the container images from the public repository. The Axolet and AxoRouter for Linux installation scripts download the images directly from AxoConsole.
-
When using an on-premise AxoConsole:
-
When installing Axoflow agent for Windows or Linux:
github.com: HTTPS traffic on TCP port 443, for downloading installer packages.
- To transport data to an AxoRouter, Axoflow agent must be able to access the OpenTelemetry Connector of the AxoRouter. By default, the connector uses the 4317 TCP port.
Limitations
Communication between the Axoflow agent hosts and AxoRouter hosts uses the OpenTelemetry Protocol (OTLP/gRPC), but currently doesn’t use TLS or authentication.
Install Axoflow agent for Windows
-
Select Provisioning > Select type and platform.
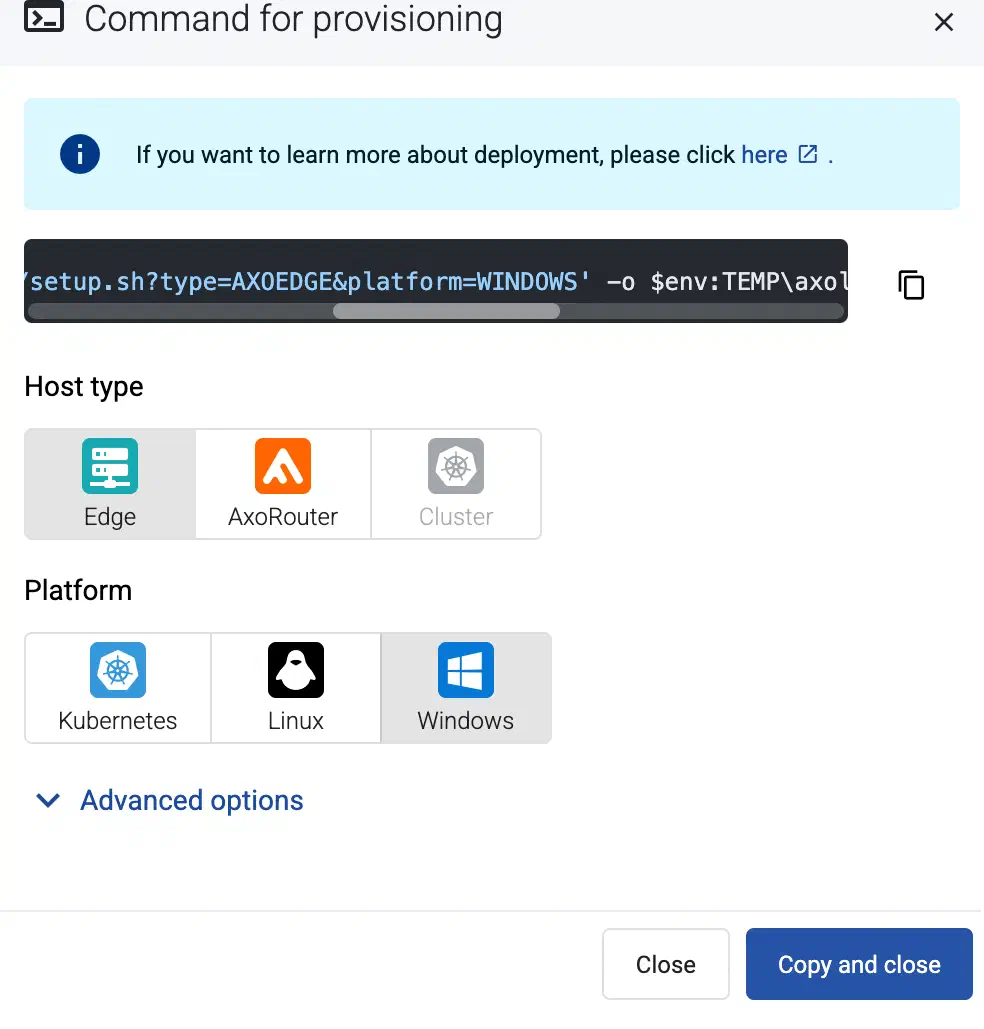
-
Select the type (Edge) and platform (Windows). The one-liner installation command is displayed.
If needed, set the Advanced options (for example, proxy settings, or External image pull in air-gapped environments) to modify the installation parameters. Usually, you don’t have to use advanced options unless the Axoflow support team instructs you to do so.
-
Open a PowerShell terminal as Administrator on the host where you want to install Axoflow agent.
-
Only on Windows Server 2016: Explicitly enable TLS1.2 encryption (Windows Server 2016, PowerShell 5.1 defaults to TLS 1.0 or 1.1 for web requests).
[Net.ServicePointManager]::SecurityProtocol = [Net.SecurityProtocolType]::Tls12
-
Run the one-liner, then follow the on-screen instructions.
Example output:
Invoke-WebRequest -Headers @{'%v' = 'X-AXO-TOKEN:xxx'} -Uri 'https://<your-tenant-id>.cloud.axoflow.io/setup.sh?type=AXOEDGE&platform=WINDOWS' -OutFile $env:TEMP\\axolet-installer.ps1; & $env:TEMP\\axolet-installer.ps1
Do you want to install Axolet now? [Y]

Installing Axoflow agent...

Axolet service is running.
Now continue with onboarding the host on the Axoflow web UI.
-
Verify that the axolet and axoflow-otel-collector services are running.
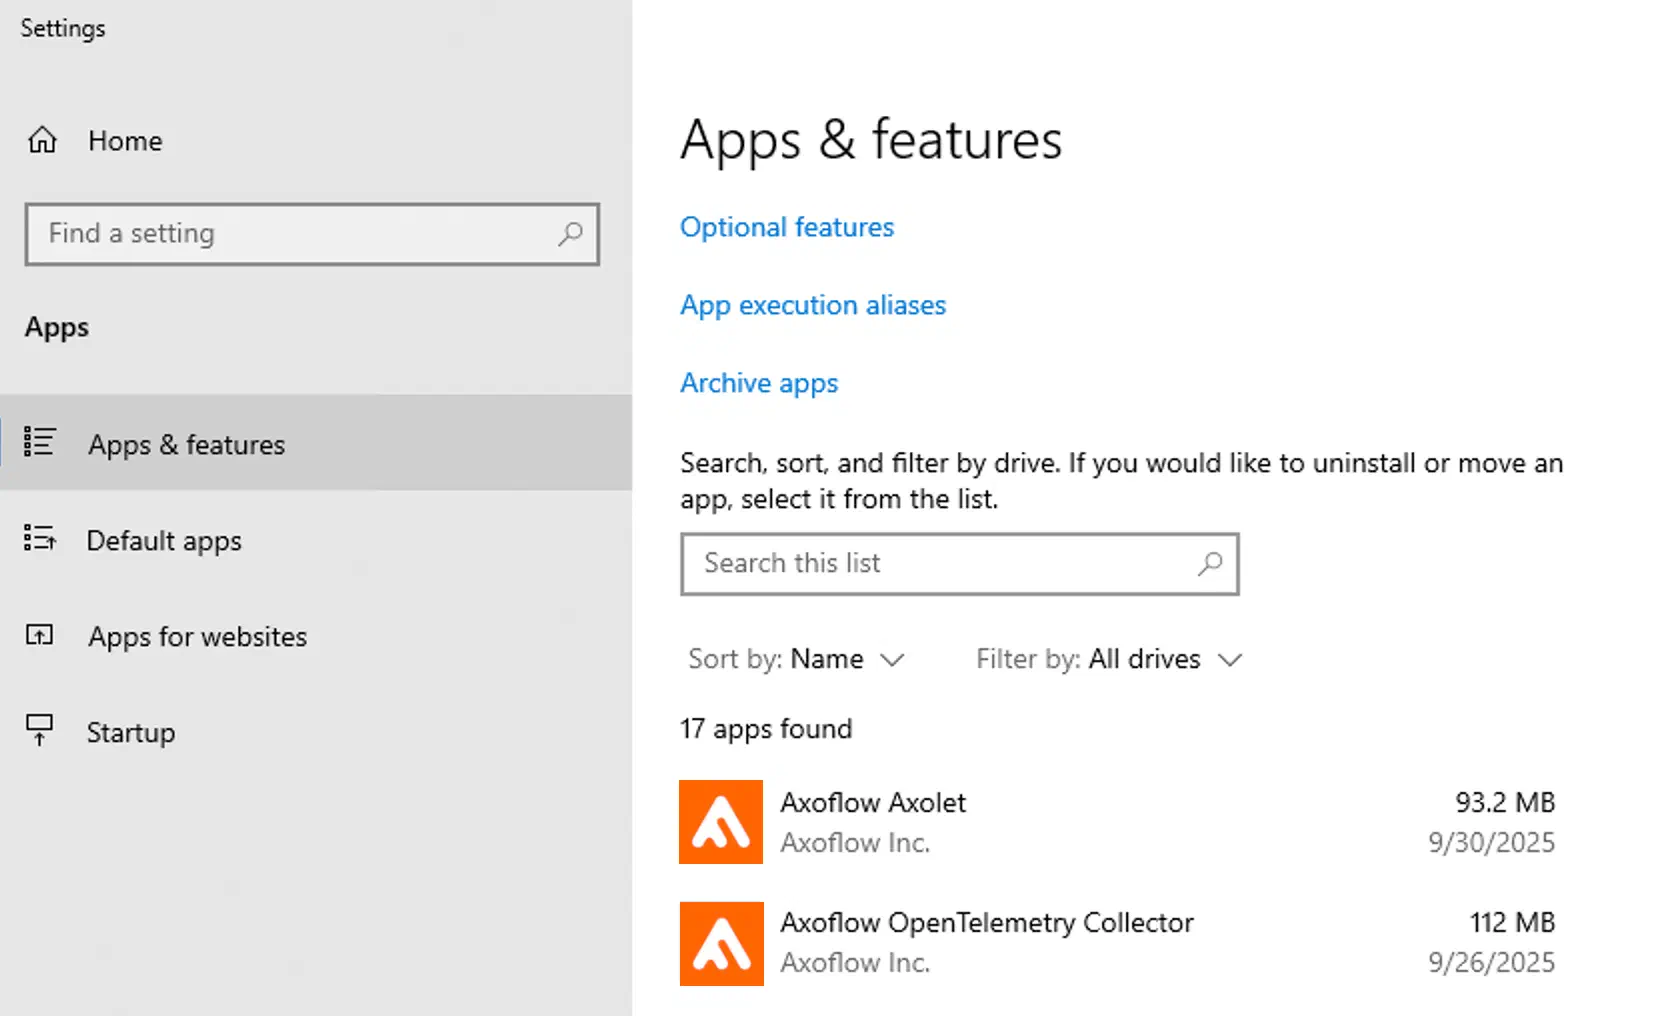
If you run into errors or problems, see Troubleshooting.
-
On the AxoConsole, reload the Provisioning page. A registration request for the new host should be displayed. Accept it.
-
The host now appears on the Topology page. To collect data from the host, the host must match the edge selector of an Edge collection rule.
The AxoRouter connector that receives data from Axoflow agent adds the following fields to the meta variable:
| field |
Value |
| meta.connector.type |
otlp |
| meta.connector.name |
<name of the connector> |
| meta.product |
windows, windows-dns, windows-dhcp |
| meta.platform |
windows |
Troubleshooting
If you run into problems when installing Axoflow agent for Windows, complete the following steps.
-
Double-check that you’re running the installation command:
- as administrator,
- in PowerShell, not in Cmd.
-
Set the following environment variable to store the installation logs. Adjust the directory as needed.
$env:TEMP_DIR = "C:\Temp\axoflow-agent-install"
-
Re-run the installation command.
-
Open the Windows Event Viewer and check the Windows Logs > System events at the time of installation for errors or issues logged by the Service Control Manager.
-
Check that the installation logs of axolet and axoflow-otel-collector are available, for example, the C:\Temp\axoflow-agent-install\axolet-windows-amd64_<version-number>.msi-install.log and C:\Temp\axoflow-agent-install\axoflow-otel-collector_<version-number>-axoflow.1_windows_x64.msi-install.log files exist.
-
If you suspect that the installer is incorrectly reporting connectivity issues, disable the preflight check and re-run the installation command.
$env:SKIP_PREFLIGHT_CHECK = 'true'
-
If needed, contact our support team.
9.1 - Manage the Windows agent
This section describes how to start, stop and check the status of the axolet and axoflow-otel-collector services on Windows. axolet logs are available under C:\Windows\Temp\axolet.log, while Axoflow agent logs are available in the event log under Windows Logs / Application.
Start the service
To start the axolet or axoflow-otel-collector service, execute the following commands:
sc.exe start axoletsc.exe start axoflow-otel-collector
Alternatively, you can restart the service from AxoConsole:
- Find the host on the Topology or the Sources page. Alternatively, select
⌘/Ctrl + K and enter the name of the host.
- Select the name of the host.
- Select Services > Restart.
Stop the service
To stop the axolet or axoflow-otel-collector service, execute the following commands:
sc.exe stop axoletsc.exe stop axoflow-otel-collector
Check the status of the service
To check the status of the axolet or axoflow-otel-collector service, execute the following commands:
sc.exe query axoletsc.exe query axoflow-otel-collector
Upgrade Axoflow agent
AxoConsole raises an alert for the host when a new Axoflow agent version is available. To upgrade to the new version, re-run the one-liner installation command you used to install Axoflow agent, or select Provisioning > Select type and platform to create a new one.
9.2 - Advanced installation options
When installing Axoflow agent on Windows, you can set a number of advanced options if needed for your environment. Setting the advanced options in the AxoConsole automatically updates the one-liner command that you can copy and run.
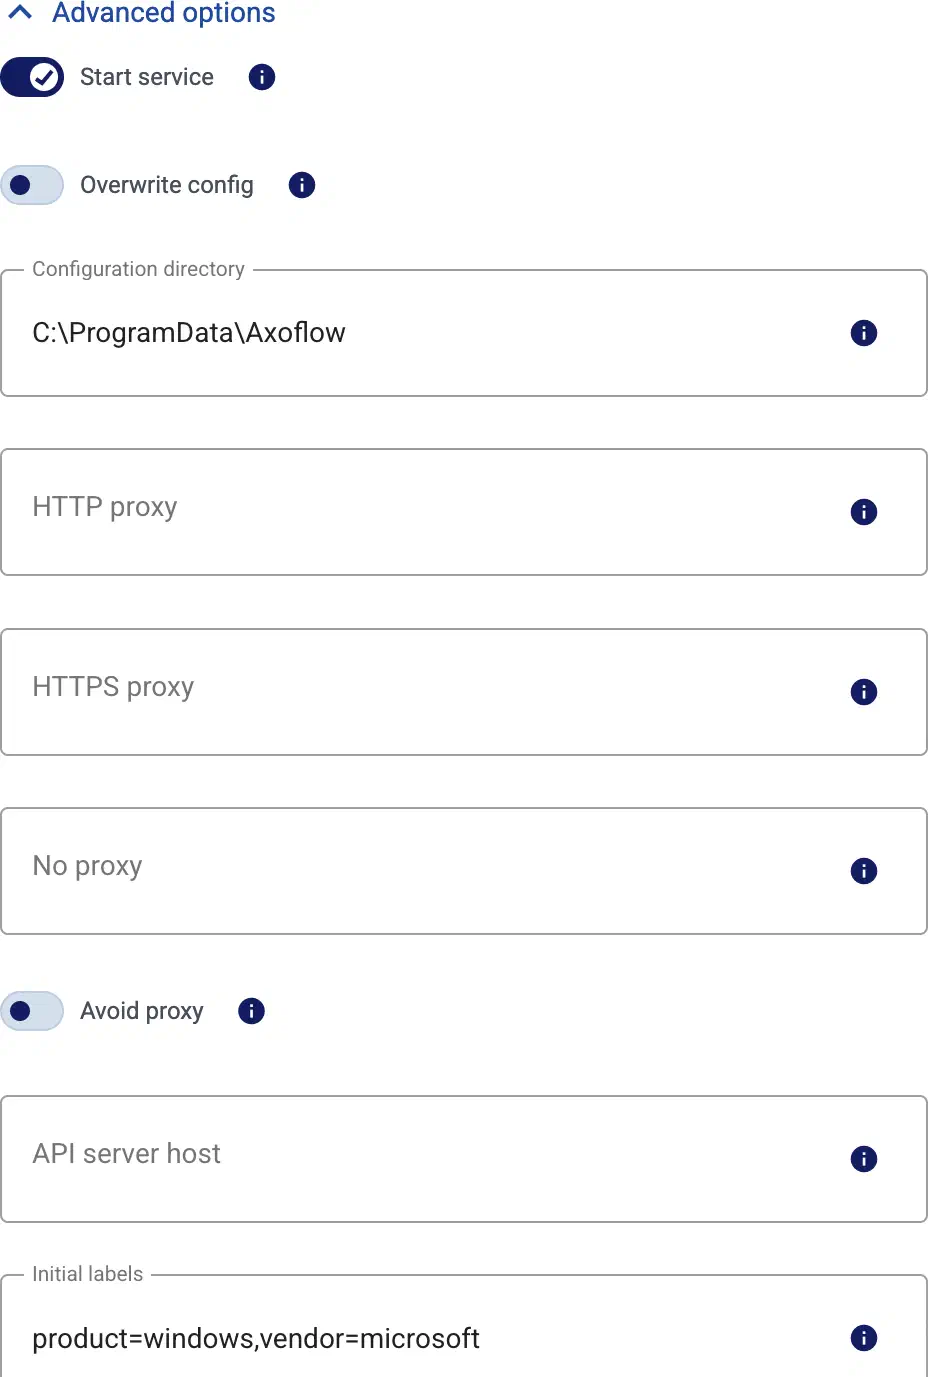
Alternatively, before running the one-liner you can use one of the following methods:
Proxy settings
Use the HTTP proxy, HTTPS proxy, No proxy parameters to configure HTTP proxy settings for the installer. To avoid using the proxy for the Axolet service, enable the Avoid proxy parameter as well. Lowercase variable names are preferred because they work universally.
Installation options
You can pass the following parameters to the installation script as environment variables, or as URL parameters.
API server host
|
|
| Default value: |
|
| Environment variable |
|
| URL parameter |
api_server_host |
Description: Override the host part of the API endpoint for the host.
Avoid proxy
|
|
| Default value: |
false |
| Available values: |
true, false |
| Environment variable |
AXOLET_AVOID_PROXY |
| URL parameter |
avoid_proxy |
Description: If set to true, the value of the *_proxy variables will only be used for downloading the installer, but not for the axolet service itself. If set to false, the Axolet service will use the variables from the installer.
Collector agent URL
|
|
| Default value: |
https://github.com/axoflow/axoflow-otel-collector-releases/releases/download/v<version-number>/axoflow-otel-collector_<version-number>_windows_x64.msi |
| Environment variable |
AXOLET_COLLECTOR_AGENT_URL |
| URL parameter |
collector_agent_url |
Description: Deploy the specified agent binary.
Configuration directory
|
|
| Default value: |
C:\ProgramData\Axoflow |
| Environment variable |
AXOLET_CONFIG_DIR |
| URL parameter |
config_dir |
Description: The directory where the configuration files are stored.
HTTP proxy
|
|
| Default value: |
empty string |
| Environment variable |
AXOLET_HTTP_PROXY |
| URL parameter |
http_proxy |
Description: Use a proxy to access AxoConsole from the host.
HTTPS proxy
|
|
| Default value: |
empty string |
| Environment variable |
AXOLET_HTTPS_PROXY |
| URL parameter |
https_proxy |
Description: Use a proxy to access AxoConsole from the host.
Initial labels
|
|
| Default value: |
product=windows,vendor=microsoft |
| Environment variable |
AXOLET_INITIAL_LABELS |
| URL parameter |
initial_labels |
Description: Comma-separated list of key=value labels. These labels will be suggested for the host when you add the source to AxoConsole. For example, product=windows,team=windows,vendor=microsoft
Install collector agent
|
|
| Default value: |
true |
| Available values: |
true, false |
| Environment variable |
AXOLET_INSTALL_AGENT |
| URL parameter |
install_agent |
Description: Deploy the Axoflow agent. If set to false, only the Axolet agent will be installed.
Non-interactive installation
|
|
| Default value: |
false |
| Available values: |
true, false |
| Environment variable |
AXOLET_NON_INTERACTIVE |
| URL parameter |
non_interactive |
Description: Don’t ask for user confirmation during the installation.
No proxy
|
|
| Default value: |
empty string |
| Environment variable |
AXOLET_NO_PROXY |
| URL parameter |
no_proxy |
Description: Destinations that should be reached directly, without going through the proxy.
Overwrite config
|
|
| Default value: |
false |
| Available values: |
true, false |
| Environment variable |
AXOLET_CONFIG_OVERWRITE |
| URL parameter |
config_overwrite |
Description: If set to true, the configuration process will overwrite existing configuration (/etc/axolet/config.json). This means that the agent will get a new GUID and it will require approval on the AxoConsole.
Start service
|
|
| Default value: |
AXOLET_START=true |
| Available values: |
true, false |
| Environment variable |
AXOLET_START |
| URL parameter |
start |
Description: Start axolet agent at the end of installation. Use false for preparing golden images. In this case axolet will generate a new GUID on the first boot after cloning the image.
If you are preparing a host for cloning with Axolet already installed, set the following environment variable in your (root) shell session, before running the one-liner command. For example:
$Env:START_AXOLET = false
Invoke-WebRequest ... # Run the command copied from the Provisioning page
This way Axolet will only start and initialize after the first reboot.
9.3 - Configure data collection
To configure the agent to collect data from the edge host and send it to an AxoRouter instance, you must have:
The edge selectors of these rules are high-level policies that use dynamic host labels to determine which edge hosts match the rule.
To configure data collection on the edge host, complete the following steps.
- Create a new Collection rule (select Sources > Collection Rules > Add Rule), or add the host to an existing rule.
- Create a new Data Forwarding rule (select Sources > Forwarding Rules > Add Rule), or add the host to an existing rule.