
AxoRouter Opens Windows! (WEC Edition)
In the first blog of this series, we covered how to set up OpenTelemetry (OTEL) for use as an agent-based mechanism for collecting Windows Event logs as well as flat files. We will now cover WEF/WEC, which offers a centralized and agentless approach to the same thing.
To review, Windows Event Forwarding (WEF) and Window Event Collector (WEC) were created to facilitate centralized Windows log collection, while maintaining the (proprietary) Windows Event Log format. However, as noted in the first blog, many enterprises want to centralize this collection on a non-Windows platform, for:
- further analysis in a SIEM/analytics tool, or to
- store in a Data Lake/object store.
We will now dive into the steps needed to configure WEF/WEC for use with the Axoflow platform and, as you’ll see, the output in Splunk will look identical to that of OTEL.
Configure AxoRouter for use with WEC
Similar to OTEL, AxoRouter provides an automatic facility for collecting and classifying WEC events from any number of Windows clients. However, OTEL configuration is focused on the client, whereas the WEC configuration is focused on the server. For this reason, AxoRouter requires some simple configuration steps to work with WEC.
- Configuration of a flow, similar to (or exactly the same as) the one configured for OTEL.
- The configuration of a connector, which will form the basis of a WEC subscription. This subscription is what the Windows clients will use to determine the appropriate Event Logs (and/or files) to send to AxoRouter. To the Windows clients, these subscriptions look exactly like those from a standard Windows-based WEC server.
- Certificate and group policy management. Most of this work is done on the Windows side, and these certificates will likely already be in place. The same holds true for Group Policy, which likely just needs a new set of certificates and URL for the new AxoRouter server.
Let’s walk through the configuration of a WEC connector on AxoRouter. Before we start, ensure that a flow is set up to ensure that data will arrive at the proper destination. This can be the same as that used for OTEL; indeed in my lab the same flow works for both data sources:

After the flow is set up, we can start the WEC configuration: Navigate to the Host Connectors page of the AxoRouter that we want to configure as the WEC server:

Here, we see that there is a Windows connector that has been pre-configured (axorouter-wec). Diving into its configuration, you’ll see that there are quite a few more parameters to set compared to the OTLP setup with the agent. This is because AxoRouter is serving as a WEC server; it therefore needs to be configured carefully as a centralized collection point from a Windows perspective. Here is that configuration:
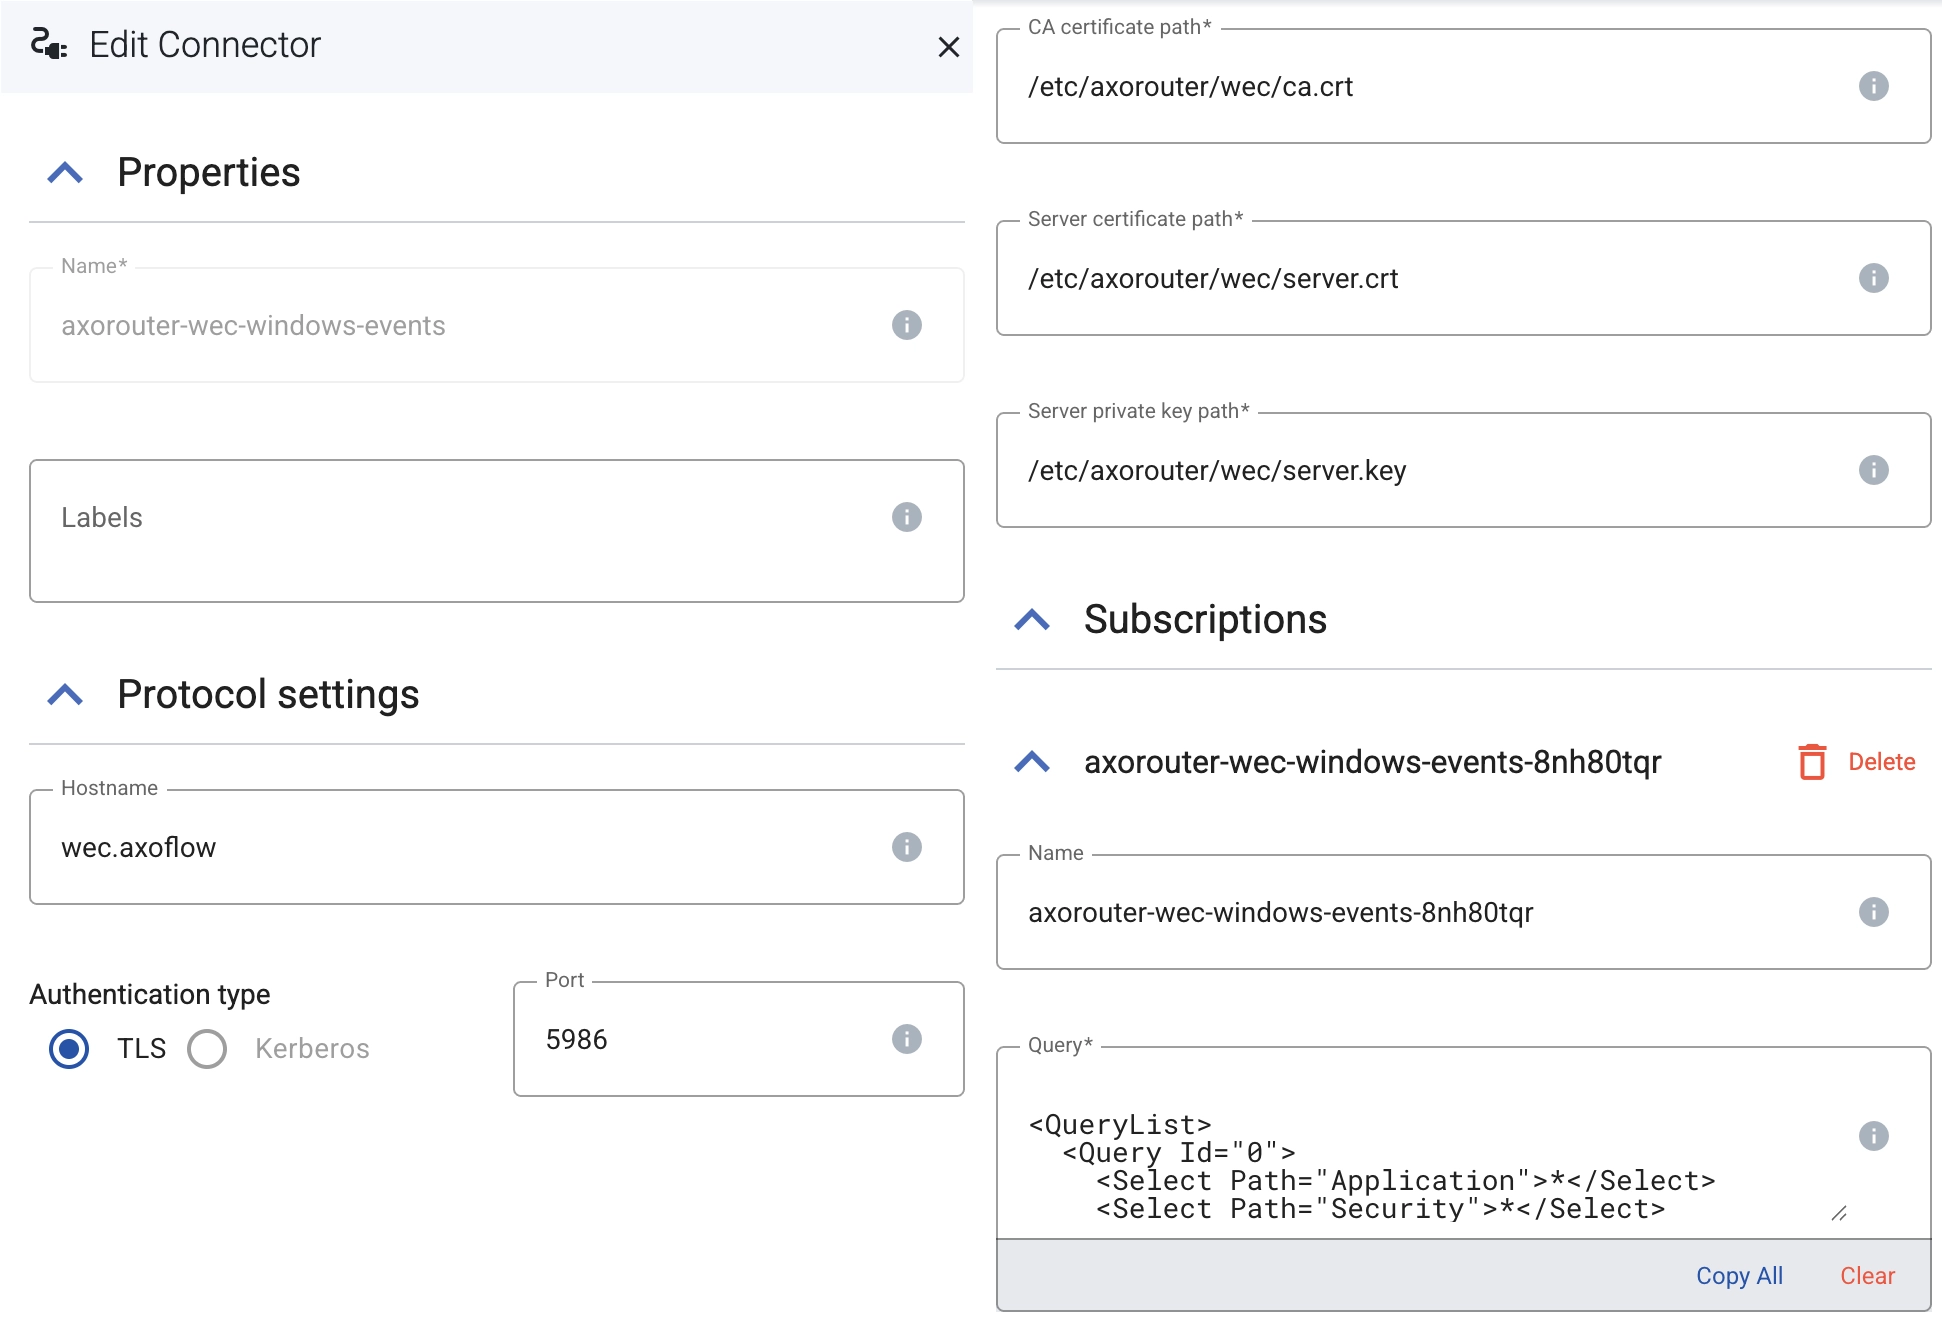
This allows you to configure authentication, the certificates (likely from the Windows side) that will be used, and then one or more subscriptions. The Query in each subscription is identical to what you would configure on a native WEC server, and indicates which Event Logs and/or files will be collected:
<QueryList>
  <Query Id="0">
    <Select Path="Application">*</Select>
    <Select Path="Security">*</Select>
    <Select Path="Setup">*</Select>
    <Select Path="System">*</Select>
  </Query>
</QueryList>
Note that this is roughly similar to the OTEL configuration from the previous blog, though it’s much simpler here because it contains only the subscription elements, with the other configuration parameters (receivers/exporters) being configured elsewhere in the form. One configuration item is critical to get right though – the Hostname entered as part of the “Protocol settings” must match the one used on the clients and the certificate Common Name (CN). A mismatch here is a common reason why data doesn’t flow (and debugging WEC is not the friendliest exercise 🙂).
Finally, there are a number of additional options that can be set:

Note that this is roughly similar to the OTEL configuration from the previous blog, though it’s much simpler here because it contains only the subscription elements, with the other configuration parameters (receivers/exporters) being configured elsewhere in the form.
Finally, there are a number of additional options that can be set:

In many cases these can be left as default, but some may wish to override defaults (e.g. the RenderedText (similar to the suppress_rendering_info: setting for the OTEL Collector).
Configure your Windows hosts
On the Windows side, we won’t delve into the low-level configuration details here, but as noted above:
The CN (Common Name) of the server certificate must match the HTTPS hostname shown in the screenshot below (from the Group Policy Editor).

When configured correctly (and winrm restarted), the Event Viewer will show a proper connection to the subscription:
Using the exact same flow as that for the OTEL collector should yield identical results to that from OTEL (when configured similarly):

Run the following command on Windows to generate an arbitrary error event in the application Event Log. This results in raw XML being sent to Splunk, as preferred by the TA:
eventcreate /t ERROR /id 100 /l application /d "BBBBBBBB"
We can see the default XML datastream in Splunk, again similar to OTEL.

As with OTEL, this can be overridden by creating and enabling processing elements in the flow if desired. For example, you can convert the XML shown above into a JSON payload (which saves data size, network bandwidth, and is also better processed by Splunk).
Wrap-up
In this post, we have covered the configuration of the agentless Windows Event Log collection (WEF/WEC), with logs being sent to a central AxoRouter receiver. Regardless of whether WEC (agentless) or OTEL agent is deployed, Axoflow will automatically classify and optimize these different streams for efficiency, content enrichment, and proper formatting for each selected destination. In the default configuration, the events sent to Splunk and other analytics tools are identical.
Don’t hesitate to reach out with any questions on what we have covered in the last two Windows-based blogs!
{{request-a-demo-button}}

Follow Our Progress!
We are excited to be realizing our vision above with a full Axoflow product suite.
Sign Me UpFighting data Loss?

Book a free 30-min consultation with syslog-ng creator Balázs Scheidler