Sending Kubernetes logs to OpenSearch
The following tutorial shows you how to install AxoSyslog on Kubernetes, deploy OpenSearch to the same cluster, and send Kubernetes logs to OpenSearch.
Prerequisites
You need:
-
A Kubernetes cluster. We used minikube with docker driver and Helm. We used a Ubuntu 22.04 (amd64) machine, but it should work on any system that can run minikube (2 CPUs, 2GB of free memory, 20GB of free disk space).
The OpenSearch service needs a large mmap count setting, so set it to at least 262144, for example:
sysctl -w vm.max_map_count=262144
Generate logs
If you don’t already have an application that generates logs deployed to the Kubernetes cluster, install kube-logging/log-generator to generate sample logs. Complete the following steps.
-
Add the
kube-loggingrepository to Helm.helm repo add kube-logging https://kube-logging.github.io/helm-chartsExpected output:
"kube-logging" has been added to your repositories -
Update your repositories.
helm repo updateThe output should look like:
Hang tight while we grab the latest from your chart repositories... ...Successfully got an update from the "kube-logging" chart repository Update Complete. ⎈Happy Helming!⎈ -
Install
kube-logging/log-generator.helm install --generate-name --wait kube-logging/log-generatorThe output should look like:
NAME: log-generator-1684694629 LAST DEPLOYED: Sun May 21 20:43:49 2023 NAMESPACE: default STATUS: deployed REVISION: 1 TEST SUITE: None -
Check that the
log-generatoris running:kubectl get podsThe output should look like:
NAME                                        READY   STATUS        RESTARTS       AGE
log-generator-1681984863-5946c559b9-ftrrn   1/1     Running       0              8s
Set up OpenSearch
-
Install an OpenSearch cluster with Helm:
helm repo add opensearch https://opensearch-project.github.io/helm-charts/Expected output:
"opensearch" has been added to your repositories -
Update your repositories.
helm repo updateThe output should look like:
Hang tight while we grab the latest from your chart repositories... ...Successfully got an update from the "opensearch" chart repository Update Complete. ⎈Happy Helming!⎈ -
Install OpenSearch. This step can take a few minutes.
helm install --generate-name --wait opensearch/opensearch -
Install the OpenSearch dashboards.
helm install --generate-name --wait opensearch/opensearch-dashboardsThe output should look like:
NAME: opensearch-dashboards-1684695728 LAST DEPLOYED: Sun May 21 21:02:09 2023 NAMESPACE: default STATUS: deployed REVISION: 1 TEST SUITE: None NOTES: 1. Get the application URL by running these commands: export POD_NAME=$(kubectl get pods --namespace default -l "app.kubernetes.io/name=opensearch-dashboards,app.kubernetes.io/instance=opensearch-dashboards-1684695728" -o jsonpath="{.items[0].metadata.name}") export CONTAINER_PORT=$(kubectl get pod --namespace default $POD_NAME -o jsonpath="{.spec.containers[0].ports[0].containerPort}") echo "Visit http://127.0.0.1:8080 to use your application" kubectl --namespace default port-forward $POD_NAME 8080:$CONTAINER_PORT -
Now you should have 5 pods. Check that they exist:
kubectl get podsThe output should look like:
NAME READY STATUS RESTARTS AGE log-generator-1681984863-5946c559b9-ftrrn 1/1 Running 0 3m39s opensearch-cluster-master-0 1/1 Running 0 81s opensearch-cluster-master-1 1/1 Running 0 81s opensearch-cluster-master-2 1/1 Running 0 81s opensearch-dashboards-1681999620-59f64f98f7-bjwwh 1/1 Running 0 44s -
Forward the 5601 port of the OpenSearch Dashboards service (replace the name of the pod with your pod).
kubectl port-forward <name-of-your-opensearch-dashboards-pod> 8080:5601The output should look like:
Forwarding from 127.0.0.1:8080 -> 5601 Forwarding from [::1]:8080 -> 5601 -
Log in to the dashboard at
http://localhost:8080with admin/admin. You will soon create an Index Pattern here, but first you have to send some logs fromsyslog-ng.
Set up axosyslog-collector
-
Add the AxoSyslog Helm repository:
helm repo add axosyslog https://axoflow.github.io/axosyslog-charts helm repo update -
Create a YAML file (called
axoflow-demo.yamlin the examples) to configure the collector.config: sources: kubernetes: # Collect kubernetes logs enabled: true destinations: # Send logs to OpenSearch opensearch: - address: "opensearch-cluster-master" index: "test-axoflow-index" user: "admin" password: "admin" tls: # Do not validate the server's TLS certificate. peerVerify: false # Send the syslog fields + the metadata from .k8s.* in JSON format template: "$(format-json --scope rfc5424 --exclude DATE --key ISODATE @timestamp=${ISODATE} k8s=$(format-json .k8s.* --shift-levels 2 --exclude .k8s.log))" -
Check how the
syslog-ng.conffile looks with your custom values:helm template -f axoflow-demo.yaml -s templates/config.yaml axosyslog/axosyslog-collectorThe output should look like:
# Source: axosyslog-collector/templates/config.yaml apiVersion: v1 kind: ConfigMap metadata: labels: helm.sh/chart: axosyslog-collector-0.3.0 app.kubernetes.io/name: axosyslog-collector app.kubernetes.io/instance: release-name app.kubernetes.io/version: "4.2.0" app.kubernetes.io/managed-by: Helm name: release-name-axosyslog-collector data: syslog-ng.conf: | @version: current @include "scl.conf" options { stats( level(1) ); }; log { source { kubernetes(); }; destination { elasticsearch-http( url("https://opensearch-cluster-master:9200/_bulk") index("test-axoflow-index") type("") template("$(format-json --scope rfc5424 --exclude DATE --key ISODATE @timestamp=${ISODATE} k8s=$(format-json .k8s.* --shift-levels 2 --exclude .k8s.log))") user("admin") password("admin") tls( peer-verify(no) ) ); }; }; -
Install the
axosyslog-collectorchart:helm install --generate-name --wait -f axoflow-demo.yaml axosyslog/axosyslog-collectorThe output should look like:
NAME: axosyslog-collector-1682002179 LAST DEPLOYED: Thu Apr 20 16:49:39 2023 NAMESPACE: default STATUS: deployed REVISION: 1 TEST SUITE: None NOTES: 1. Watch the axosyslog-collector-1682002179 container start. -
Check your pods:
kubectl get pods --namespace=default -l app=axosyslog-collector-1682002179 -w
kubectl get pods
The output should look like:
NAME                                                READY   STATUS    RESTARTS   AGE
log-generator-1681984863-5946c559b9-ftrrn           1/1     Running   0          13m
opensearch-cluster-master-0                         1/1     Running   0          11m
opensearch-cluster-master-1                         1/1     Running   0          11m
opensearch-cluster-master-2                         1/1     Running   0          11m
opensearch-dashboards-1681999620-59f64f98f7-bjwwh   1/1     Running   0          10m
axosyslog-collector-1682002179-pjlkn                1/1     Running   0          6s
Check the logs in OpenSearch
-
Open OpenSearch dashboard at
http://localhost:8080/app/management/opensearch-dashboards/. -
Create an Index Pattern called
test-axoflow-index:http://localhost:8080/app/management/opensearch-dashboards/indexPatterns. At Step 2, set the Time field to@timestamp.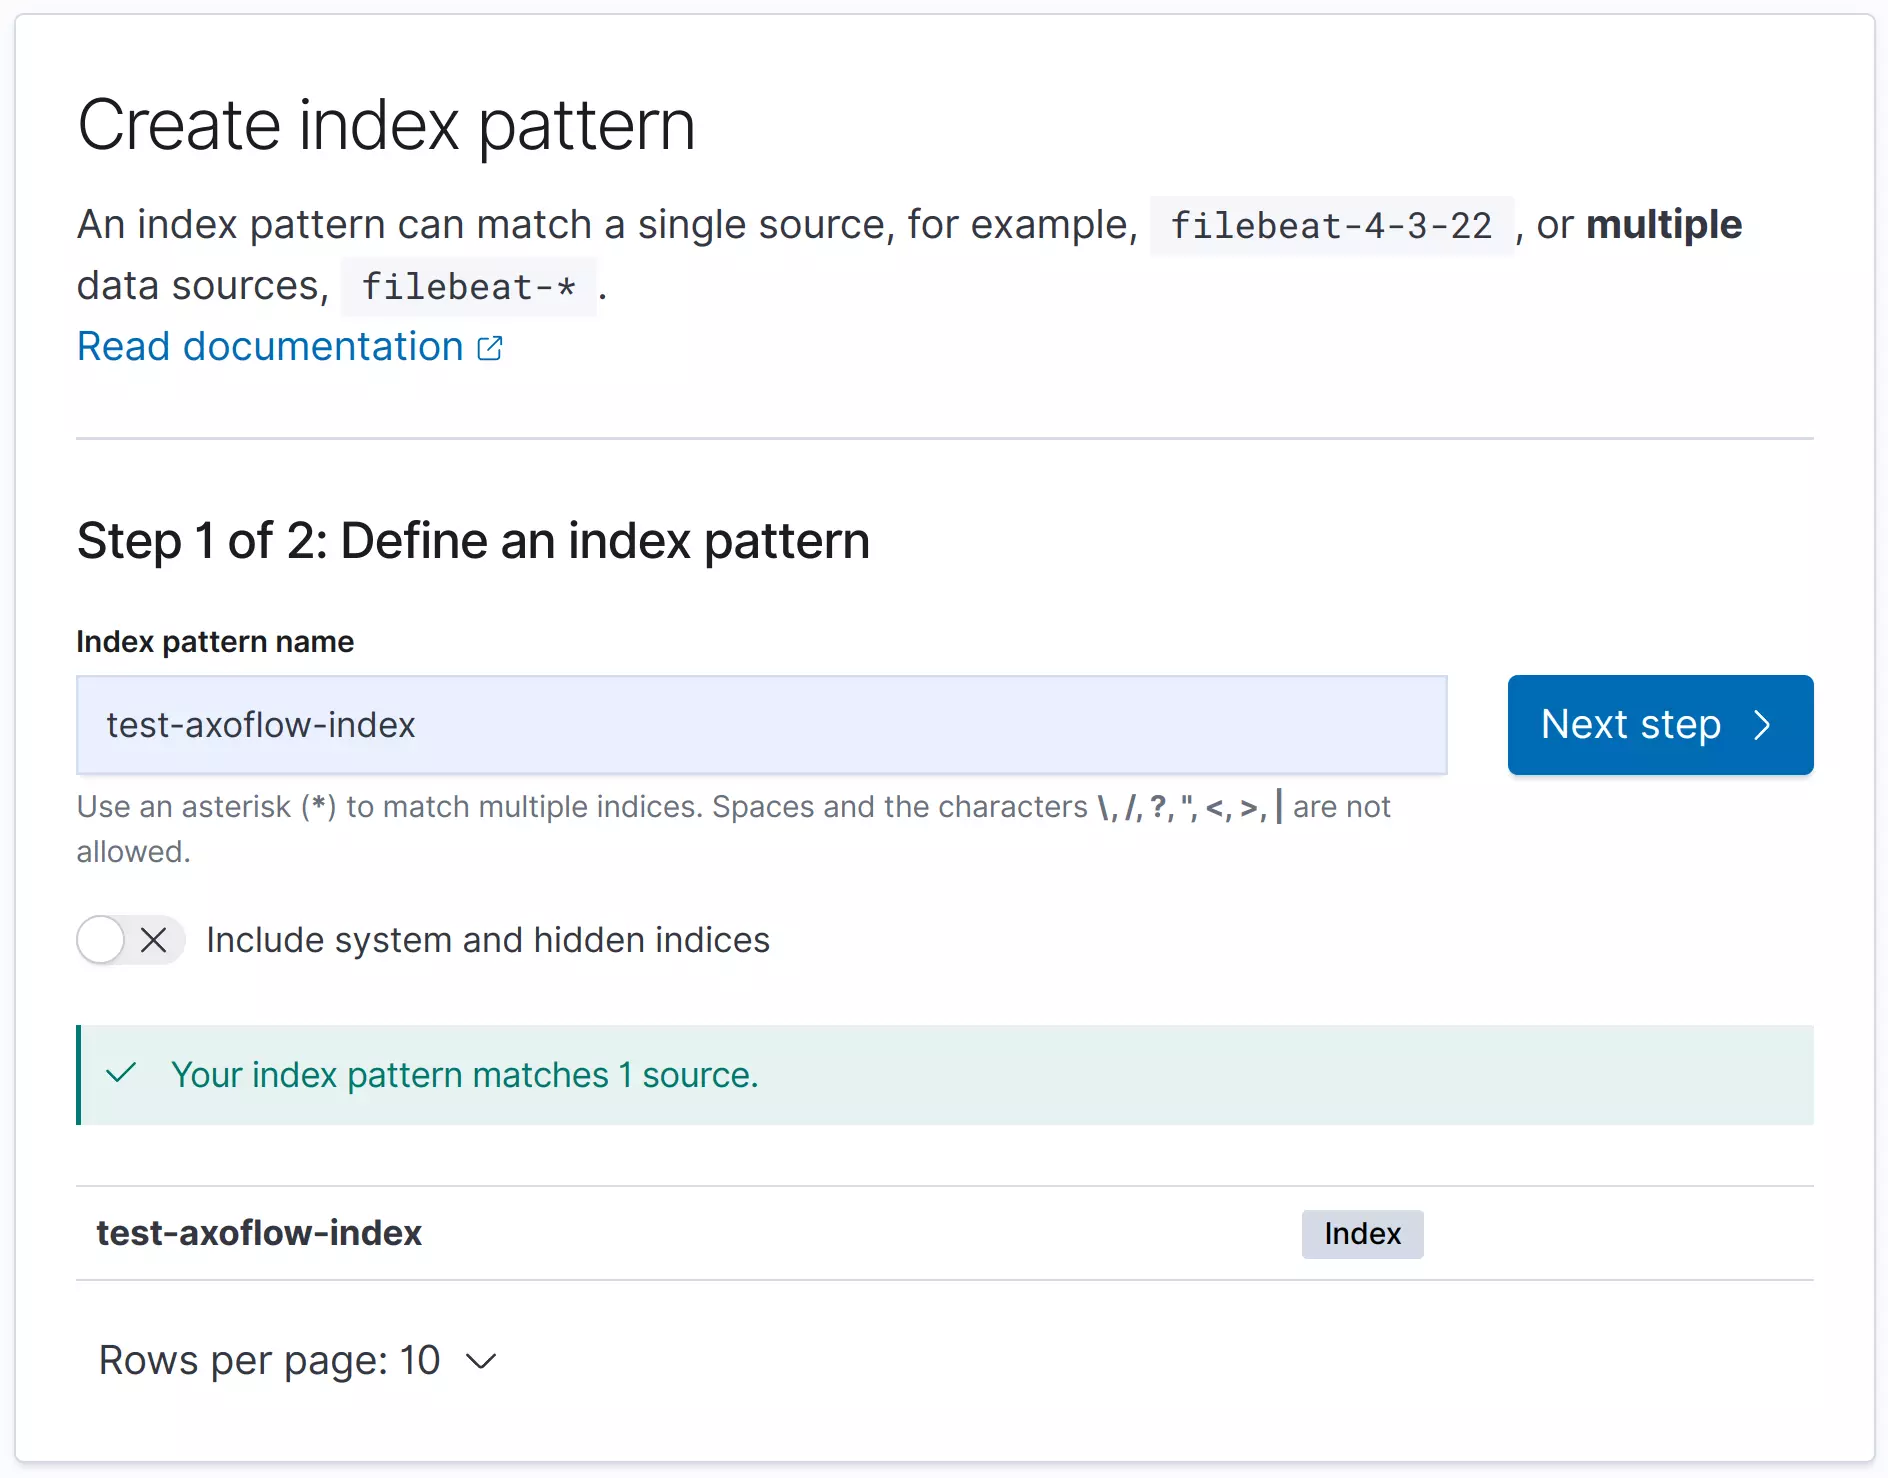
-
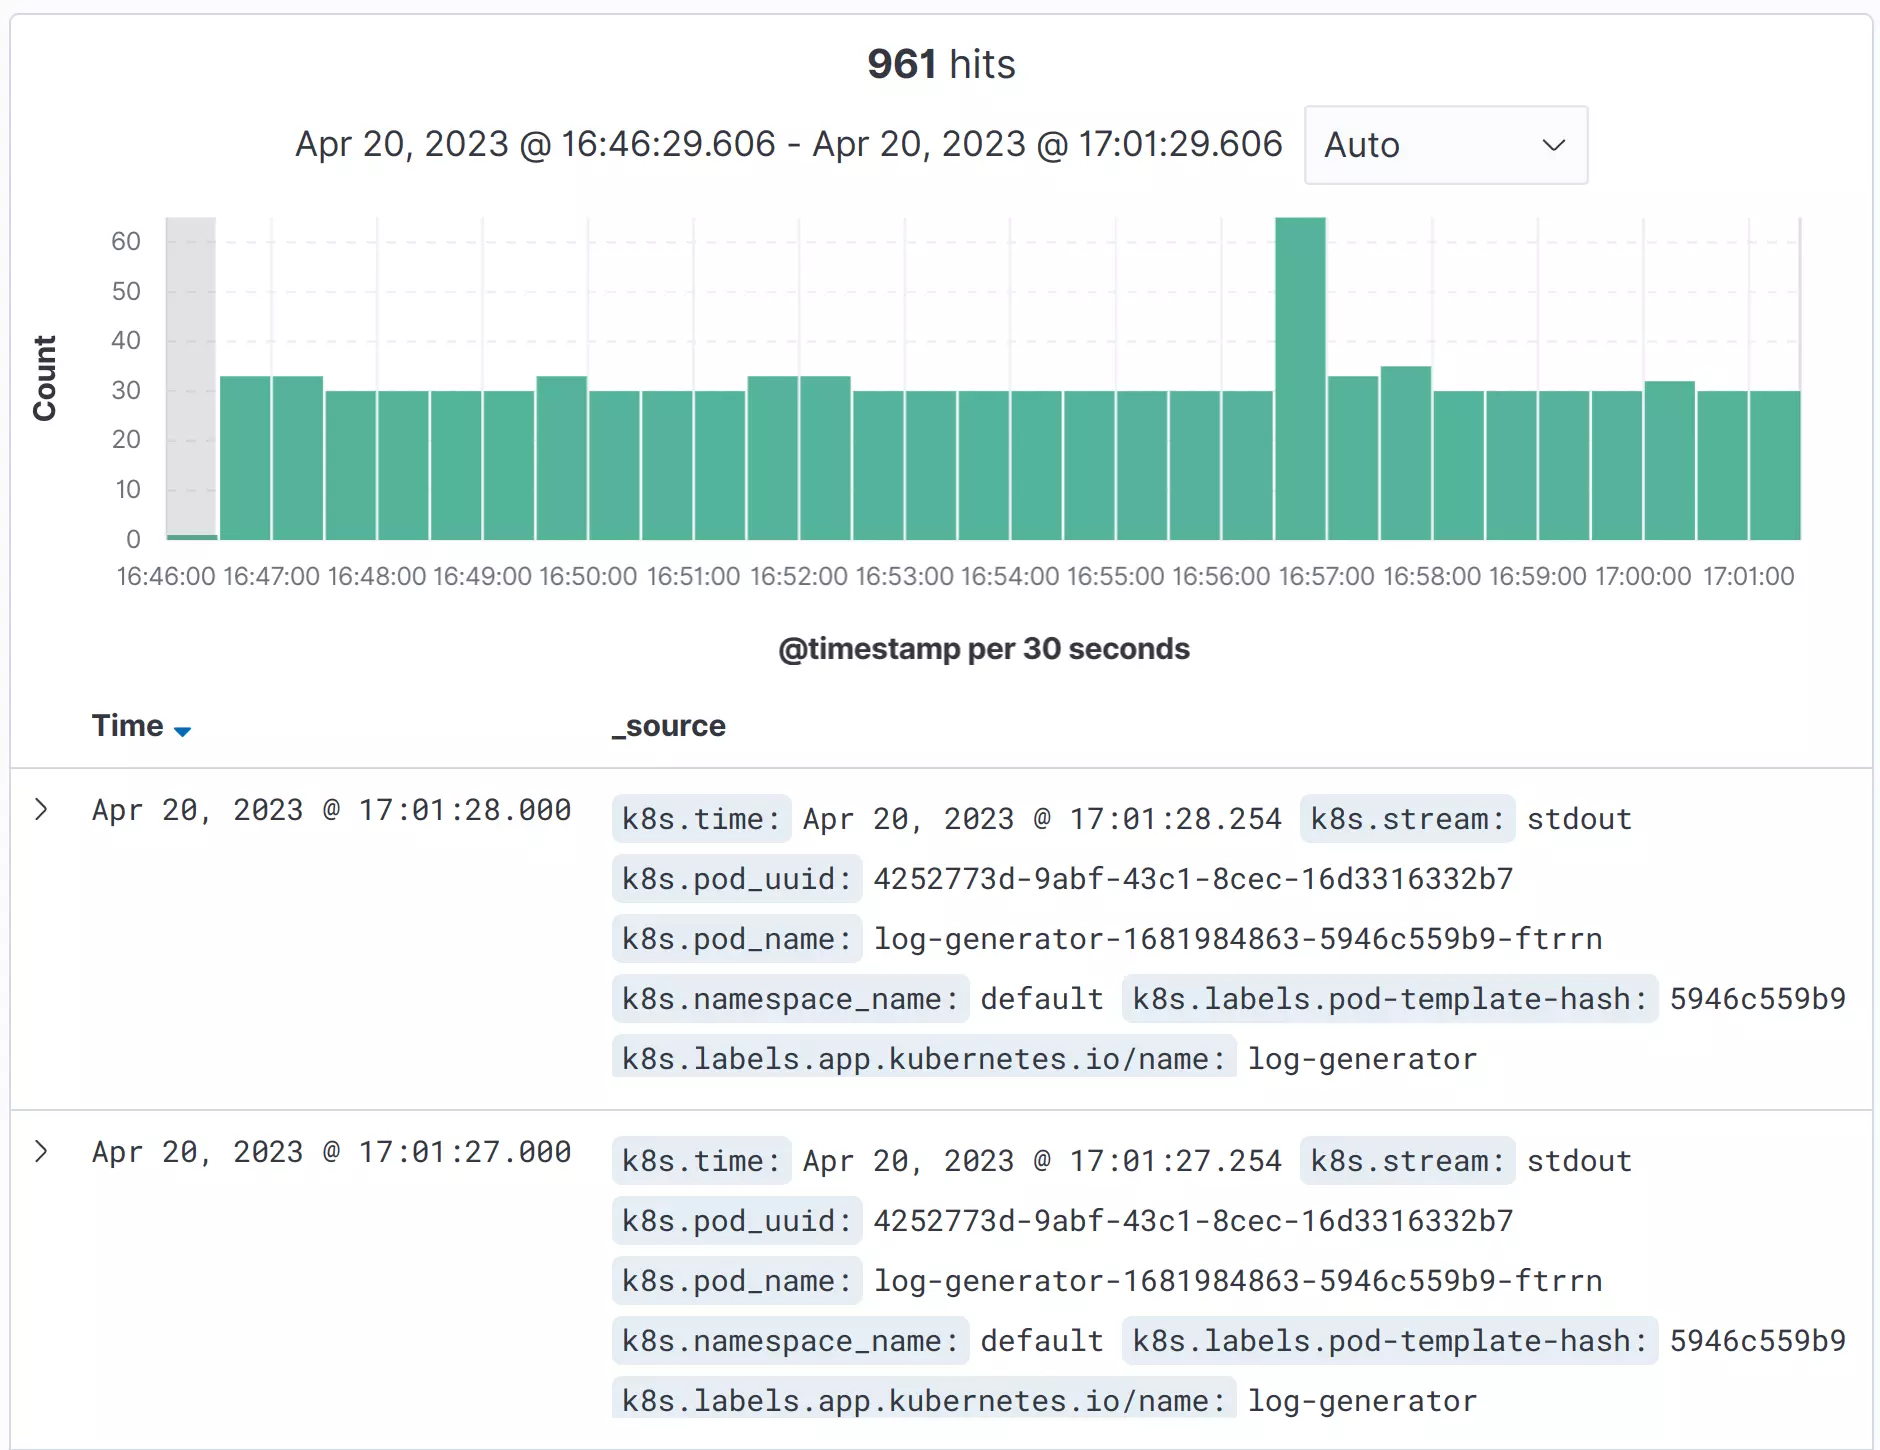
Now you can see your logs on the Discover view at
http://localhost:8080/app/discover. Opening the detailed view for a log entry shows you the fields sent to OpenSearch.