This is the multi-page printable view of this section.
Click here to print.
Return to the regular view of this page.
Agent for Linux edge hosts
Axoflow provides Axoflow agent for Linux (a customized OpenTelemetry Collector distribution) to collect data from Linux-based edge hosts.
Axoflow agent for Linux can collect data from files and systemd journals.
What the installer does
When you deploy axolet, you run a command that installs the required software packages, configures them and sets up the connection with Axoflow.
The installer script performs the following main steps:
- Executes prerequisite checks:
- Tests the network connection with the console endpoints.
- Checks if the operating system is supported.
- Downloads the installers (
.rpm or .deb) of the Axolet agent and the Axoflow agent for Linux.
- The installer script installs the packages. If the packages are already installed, the installer will update them to the latest version.
The installer installs:
- The collector agent (by default) to
/usr/bin/axoflow-otel-collector.
- A default configuration file to
/etc/axoflow-otel-collector/config.yaml.
- The
axolet management agent (by default) to /usr/local/bin/axolet.
axolet performs the following main steps on its first execution:
- Generates and persists a unique identifier (GUID).
- Initiates a cryptographic handshake process to AxoConsole.
- AxoConsole issues a client certificate to axolet, which will be stored in the above mentioned
config.json file.
- The service waits for an approval on AxoConsole. Once you approve the host registration request, axolet starts to
manage the local services and
send telemetry data to AxoConsole. It keeps doing so as long as the agent is registered.
Note
Note that AxoRouter and Axoflow agent collects detailed, real-time metrics about the data-flows – giving you observability over the health of the security data pipeline and its components. Your security data remains in your self-managed cloud or in your on-prem instance where your sources, destinations, Axoflow agents, and AxoRouters are running, only metrics are forwarded to AxoConsole.
To install Axoflow agent on a Linux host, complete the following steps. For other platforms, see Provision pipeline elements.
Prerequisites
- Axoflow agent should work on most Red Hat and Debian compatible Linux distributions. Both x86_64 and arm64 architectures are supported. For production environments, we recommend using Red Hat Enterprise Linux 9.
- When using Axoflow agent with an on-premises AxoConsole deployment, you must prepare the Axoflow agent host
Network access
The hosts must be able to access the following domains related to the AxoConsole:
-
When using AxoConsole SaaS:
<your-tenant-id>.cloud.axoflow.io: HTTPS traffic on TCP port 443, needed to download the binaries for Axoflow software (like Axolet and AxoRouter).kcp.<your-tenant-id>.cloud.axoflow.io: HTTPS (mutual TLS) traffic on TCP port 443 for management traffic.telemetry.<your-tenant-id>.cloud.axoflow.io: HTTPS (mutual TLS) traffic on TCP port 443, where Axolet sends the metrics of the host.us-docker.pkg.dev: HTTPS traffic on TCP port 443, for pulling container images (AxoRouter only).
-
When using an on-premise AxoConsole:
-
When installing Axoflow agent for Windows or Linux:
github.com: HTTPS traffic on TCP port 443, for downloading installer packages.
Limitations
Communication between the Axoflow agent hosts and AxoRouter hosts uses the OpenTelemetry Protocol (OTLP/gRPC), but currently doesn’t use TLS or authentication.
Install Axoflow agent for Linux
-
Select Provisioning > Select type and platform.
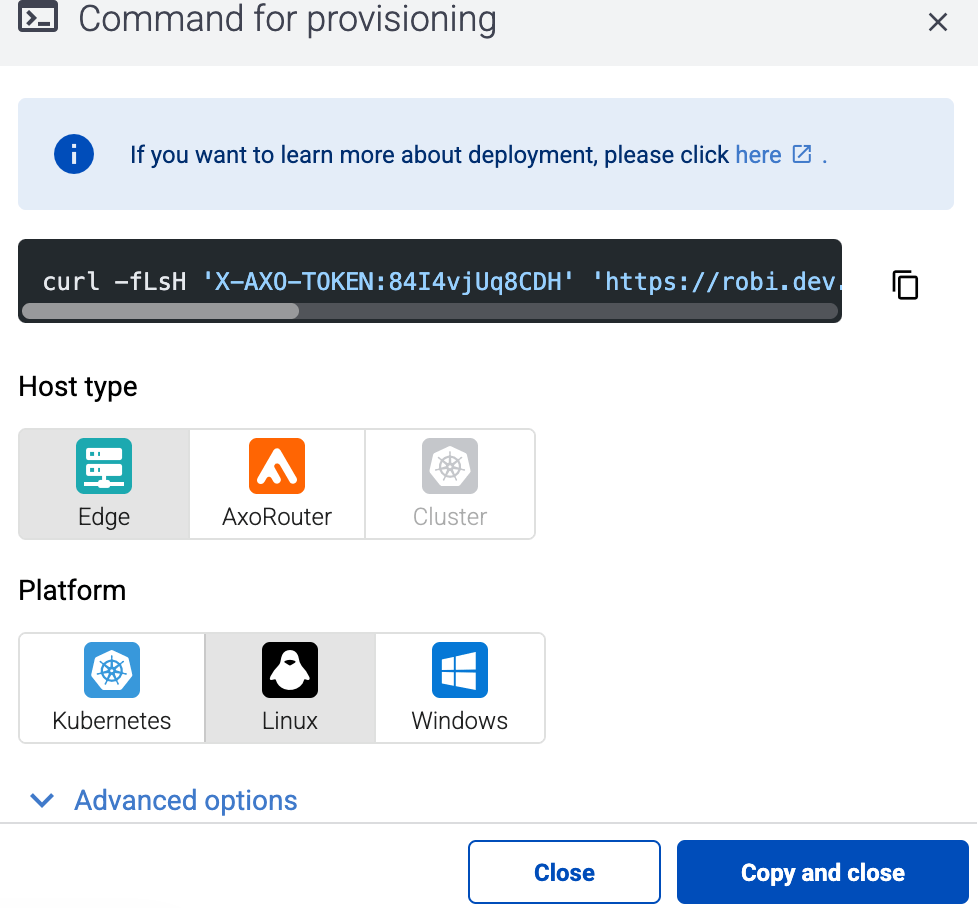
-
Select the type (Edge) and platform (Linux). The one-liner installation command is displayed.
If needed, set the Advanced options (for example, proxy settings) to modify the installation parameters. Usually, you don’t have to use advanced options unless the Axoflow support team instructs you to do so.
-
Select Advanced options > Install Collector agent.
-
Open a terminal on the host where you want to install Axoflow agent.
-
Run the one-liner, then follow the on-screen instructions.
Example output:
curl -fLsH 'X-AXO-TOKEN:random-generated' 'https://<your-tenant-id>.cloud.axoflow.io/setup.sh?type=AXOEDGE&platform=LINUX&install_agent=true' | sh
Do you want to install Axoflow agents now? [Y]
Y

Verifying packages...
Preparing packages...
axolet-0.70.0.x86_64
The unique identifier of this installation: 9hrtcd8bz6u61aihd2zd

Verifying packages...
Preparing packages...
axoflow-otel-collector-0.129.0~axoflow.5-1.x86_64
Created symlink /etc/systemd/system/multi-user.target.wants/axoflow-otel-collector.service → /usr/lib/systemd/system/axoflow-otel-collector.service.
Axolet service is running.
Now continue with onboarding the host on the Axoflow web UI.
-
Verify that the axolet and axoflow-otel-collector services are running by running sudo systemctl list-units | grep axo
Example output:
axoflow-otel-collector.service                                                       loaded active     running         Axoflow Otel Collector
axolet.service                                                                       loaded activating start     start Axoflow agent
-
On the AxoConsole, reload the Provisioning page. A registration request for the new host should be displayed. Accept it.
-
The host now appears on the Topology page. To collect data from the host, the host must match the edge selector of an Edge collection rule.
The AxoRouter connector that receives data from Axoflow agent adds the following fields to the meta variable:
| field |
value |
| meta.connector.type |
otlp |
| meta.connector.name |
<name of the connector> |
| meta.product |
opentelemetry |
| meta.edge.connector.name |
|
| meta.edge.connector.type |
otelJournald |
| meta.edge.connector.labels.product |
otel-journald |
| meta.edge.connector.labels.vendor |
opentelemetry |
| meta.edge.connector.rule_id |
<name of the collection rule> |
1 - Manage the Linux agent
This section describes how to start, stop and check the status of the axolet and axoflow-otel-collector services on Linux.
Start the service
To start the axolet or axoflow-otel-collector service, execute the following commands:
systemctl start axoletsystemctl start axoflow-otel-collector
Alternatively, you can restart the service from AxoConsole:
- Find the host on the Topology or the Sources page.
- Select the name of the host.
- Select Services > Restart.
Stop the service
To stop the axolet or axoflow-otel-collector service, execute the following commands:
systemctl stop axoletsystemctl stop axoflow-otel-collector
Check the status of the service
To check the status of the axolet or axoflow-otel-collector service, execute the following commands:
systemctl status axoletsystemctl status axoflow-otel-collector
For more detailed logs, run:
journalctl -u axoletjournalctl -u axoflow-otel-collector
Upgrade Axoflow agent
AxoConsole raises an alert for the host when a new Axoflow agent version is available. To upgrade to the new version, re-run the one-liner installation command you used to install Axoflow agent, or select Provisioning > Select type and platform to create a new one (make sure to enable the Advanced options > Install Collector agent option).
2 - Advanced installation options
When installing Axoflow agent for Linux, you can set a number of advanced options if needed for your environment. Setting the advanced options in the AxoConsole automatically updates the one-liner command that you can copy and run.
Alternatively, before running the one-liner you can use one of the following methods:
Proxy settings
Use the HTTP proxy, HTTPS proxy, No proxy parameters to configure HTTP proxy settings for the installer. To avoid using the proxy for the Axolet service, enable the Avoid proxy parameter as well. Lowercase variable names are preferred because they work universally.
Installation options
You can pass the following parameters to the installation script as environment variables, or as URL parameters.
API server host
|
|
| Default value: |
|
| Environment variable |
|
| URL parameter |
api_server_host |
Description: Override the host part of the API endpoint for the host.
Avoid proxy
|
|
| Default value: |
false |
| Available values: |
true, false |
| Environment variable |
AXOLET_AVOID_PROXY |
| URL parameter |
avoid_proxy |
Description: If set to true, the value of the *_proxy variables will only be used for downloading the installer, but not for the axolet service itself. If set to false, the Axolet service will use the variables from the installer.
Capabilities
|
|
| Default value: |
CAP_SYS_PTRACE |
| Available values: |
Whitespace-separated list of capability names with CAP_ prefix. |
| Environment variable |
AXOLET_CAPS |
| URL parameter |
caps |
Description: Ambient Linux capabilities the axolet service will use.
Configuration directory
|
|
| Default value: |
/etc/axolet
|
| Environment variable |
AXOLET_CONFIG_DIR |
| URL parameter |
config_dir |
Description: The directory where the configuration files are stored.
HTTP proxy
|
|
| Default value: |
empty string |
| Environment variable |
AXOLET_HTTP_PROXY |
| URL parameter |
http_proxy |
Description: Use a proxy to access AxoConsole from the host.
HTTPS proxy
|
|
| Default value: |
empty string |
| Environment variable |
AXOLET_HTTPS_PROXY |
| URL parameter |
https_proxy |
Description: Use a proxy to access AxoConsole from the host.
Initial labels
|
|
| Default value: |
empty string
|
| Environment variable |
AXOLET_INITIAL_LABELS |
| URL parameter |
initial_labels |
Description: Comma-separated list of key=value labels. These labels will be suggested for the host when you add the source to AxoConsole. For example, product=windows,team=windows,vendor=microsoft
No proxy
|
|
| Default value: |
empty string |
| Environment variable |
AXOLET_NO_PROXY |
| URL parameter |
no_proxy |
Description: Destinations that should be reached directly, without going through the proxy.
Overwrite config
|
|
| Default value: |
false |
| Available values: |
true, false |
| Environment variable |
AXOLET_CONFIG_OVERWRITE |
| URL parameter |
config_overwrite |
Description: If set to true, the configuration process will overwrite existing configuration (/etc/axolet/config.json). This means that the agent will get a new GUID and it will require approval on the AxoConsole.
|
|
| Default value: |
auto |
| Available values: |
auto, dep, rpm, tar, none |
| Environment variable |
AXOLET_INSTALL_PACKAGE |
| URL parameter |
install_package |
Description: File format of the installer package.
Service group
|
|
| Default value: |
root |
| Environment variable |
AXOLET_GROUP |
| URL parameter |
group |
Description: Name of the group and Axolet will be running as. It should be either root or the group syslog-ng is running as.
Service user
|
|
| Default value: |
root |
| Environment variable |
AXOLET_USER |
| URL parameter |
user |
Description: Name of the user Axolet will be running as. It should be either root or the user syslog-ng is running as. See also Run axolet as non-root.
Start service
|
|
| Default value: |
AXOLET_START=true |
| Available values: |
true, false |
| Environment variable |
AXOLET_START |
| URL parameter |
start |
Description: Start axolet agent at the end of installation. Use false for preparing golden images. In this case axolet will generate a new GUID on the first boot after cloning the image.
If you are preparing a host for cloning with Axolet already installed, set the following environment variable in your (root) shell session, before running the one-liner command. For example:
export START_AXOLET=false
curl ... # Run the command copied from the Provisioning page
This way Axolet will only start and initialize after the first reboot.
3 - Configure data collection
To configure the agent to collect data from the edge host and send it to an AxoRouter instance, you must have:
The edge selectors of these rules are high-level policies that use dynamic host labels to determine which edge hosts match the rule.
To configure data collection on the edge host, complete the following steps.
- Create a new Collection rule (select Sources > Collection Rules > Add Rule), or add the host to an existing rule.
- Create a new Data Forwarding rule (select Sources > Forwarding Rules > Add Rule), or add the host to an existing rule.