AxoRouter is a key building block of Axoflow that collects, aggregates, transforms and routes all kinds of telemetry and security data automatically. AxoRouter for Linux includes a Podman container running AxoSyslog, Axolet, and other components.
To install AxoRouter on a Linux host, complete the following steps. For other platforms, see AxoRouter.
What the install script does
When you deploy AxoRouter, you run a command that installs the required software packages, configures them and sets up the connection with Axoflow.
The installer script installs the axolet packages, then executes the configure-axolet command with the right parameters. (If the packages are already installed, the installer will update them unless the none package format is selected when generating the provisioning command.)
The install script is designed to be run as root (sudo), but you can configure AxoRouter to run as a non-root user.
The installer script performs the following main steps:
- Executes prerequisite checks:
- Tests the network connection with the console endpoints.
- Checks if the operating system is supported.
- Checks if
podmanis installed.
- Checks if
-
Downloads and installs the
axorouterRPM or DEB package.-
The package contains the
axorouter-ctlandsetup-axoroutercommands and theaxorouter.containerunit files for podman-systemd.Note: The
legacyversion of the package uses docker and standardserviceunits.
-
-
Executes the
setup-axoroutercommand, which- Updates the environment variables used by the axorouter service.
- Enables and starts the AxoRouter service.
- Downloads and installs the
axoletRPM or DEB package.- The package contains the
axoletandconfigure-axoletcommands, and theaxolet.servicesystemd unit file.
- The package contains the
- The
configure-axoletcommand is executed with a configuration snippet on its standard input which contains a token required for registering into the management platform. The command:-
Writes the initial
/etc/axolet/config.jsonconfiguration file.Note: if the file already exists it will only be overwritten if the Overwrite config option is enabled when generating the provisioning command.
-
Enables and starts the
axoletservice.
-
axolet performs the following main steps on its first execution:
- Generates and persists a unique identifier (GUID).
- Initiates a cryptographic handshake process to Axoflow Console.
- Axoflow Console issues a client certificate to AxoRouter, which will be stored in the above mentioned
config.jsonfile. - The service waits for an approval on Axoflow Console. Once you approve the host registration request, axolet starts to manage the local services and send telemetry data to Axoflow Console. It keeps doing so as long as the agent is registered.
Prerequisites
-
AxoRouter should work on most Red Hat and Debian compatible Linux distributions. For production environments, we recommend using Red Hat 9.
- Podman must be installed on the host (
sudo yum install podman) - When using AxoRouter with an on-premises Axoflow Console deployment, you must prepare the AxoRouter host
Minimal resource requirements
- CPU: at least
100m - Memory:
256MB - Storage:
8Gi
Network access
The hosts must be able to access the following domains related to the Axoflow Console:
-
When using Axoflow Console SaaS:
<your-tenant-id>.cloud.axoflow.io: HTTPS traffic on TCP port 443, needed to download the binaries for Axoflow software (like Axolet and AxoRouter).kcp.<your-tenant-id>.cloud.axoflow.io: HTTPS (mutual TLS) traffic on TCP port 443 for management traffic.telemetry.<your-tenant-id>.cloud.axoflow.io: HTTPS (mutual TLS) traffic on TCP port 443, where Axolet sends the metrics of the host.us-docker.pkg.dev: HTTPS traffic on TCP port 443, for pulling container images (AxoRouter only).
-
When using an on-premise Axoflow Console:
-
The following domains should point to Axoflow Console IP address to access Axoflow from your desktop and AxoRouter hosts:
your-host.your-domain: The main domain of your Axoflow Console deployment.authenticate.your-host.your-domain: A subdomain used for authentication.idp.your-host.your-domain: A subdomain for the identity provider.
-
The Axoflow Console host must have the following Open Ports:
- Port 80 (HTTP)
- Port 443 (HTTPS)
-
Install AxoRouter
-
Select Provisioning > Select type and platform.

-
Select the type (AxoRouter) and platform (Linux). The one-liner installation command is displayed.
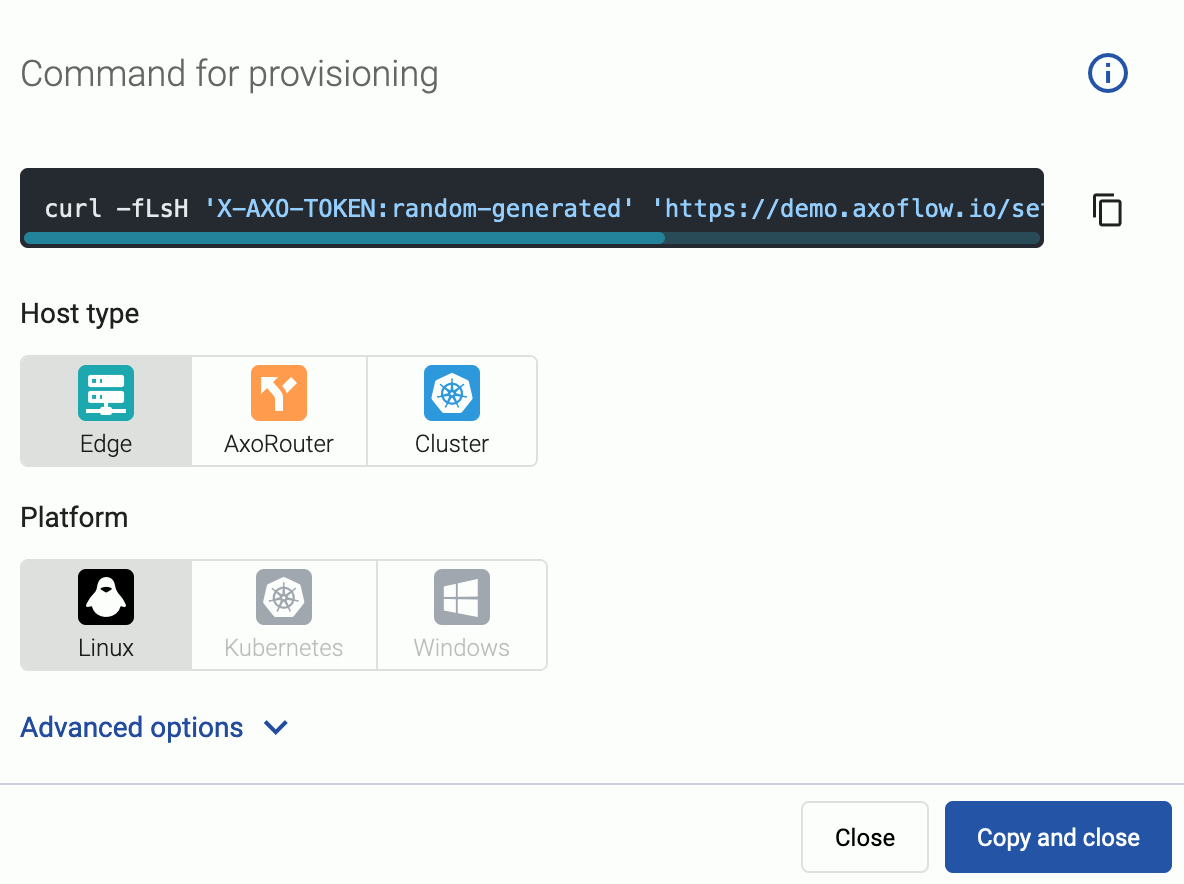
If needed, set the Advanced options (for example, proxy settings) to modify the installation parameters. Usually, you don’t have to use advanced options unless the Axoflow support team instructs you to do so.
-
Open a terminal on the host where you want to install AxoRouter.
-
Run the one-liner, then follow the on-screen instructions.
Note Running the provisioning command withsudowould mask environment variables of the calling shell. Either start the whole procedure from a root shell, or let the install script call sudo when it needs to. In other words: don’t add thesudocommand to the provisioning command.Example output:
Do you want to install AxoRouter now? [Y] y % Total % Received % Xferd Average Speed Time Time Time Current Dload Upload Total Spent Left Speed 100 4142 100 4142 0 0 19723 0 --:--:-- --:--:-- --:--:-- 19818 Verifying packages... Preparing packages... axorouter-0.40.0-1.aarch64 % Total % Received % Xferd Average Speed Time Time Time Current Dload Upload Total Spent Left Speed 100 31.6M 100 31.6M 0 0 2092k 0 0:00:15 0:00:15 --:--:-- 2009k Verifying packages... Preparing packages... axolet-0.40.0-1.aarch64 Created symlink /etc/systemd/system/multi-user.target.wants/axolet.service → /usr/lib/systemd/system/axolet.service. Now continue with onboarding the host on the Axoflow web UI. -
Register the host.
-
Reload the Provisioning page. There should be a registration request for the new AxoRouter deployment. Select ✓.
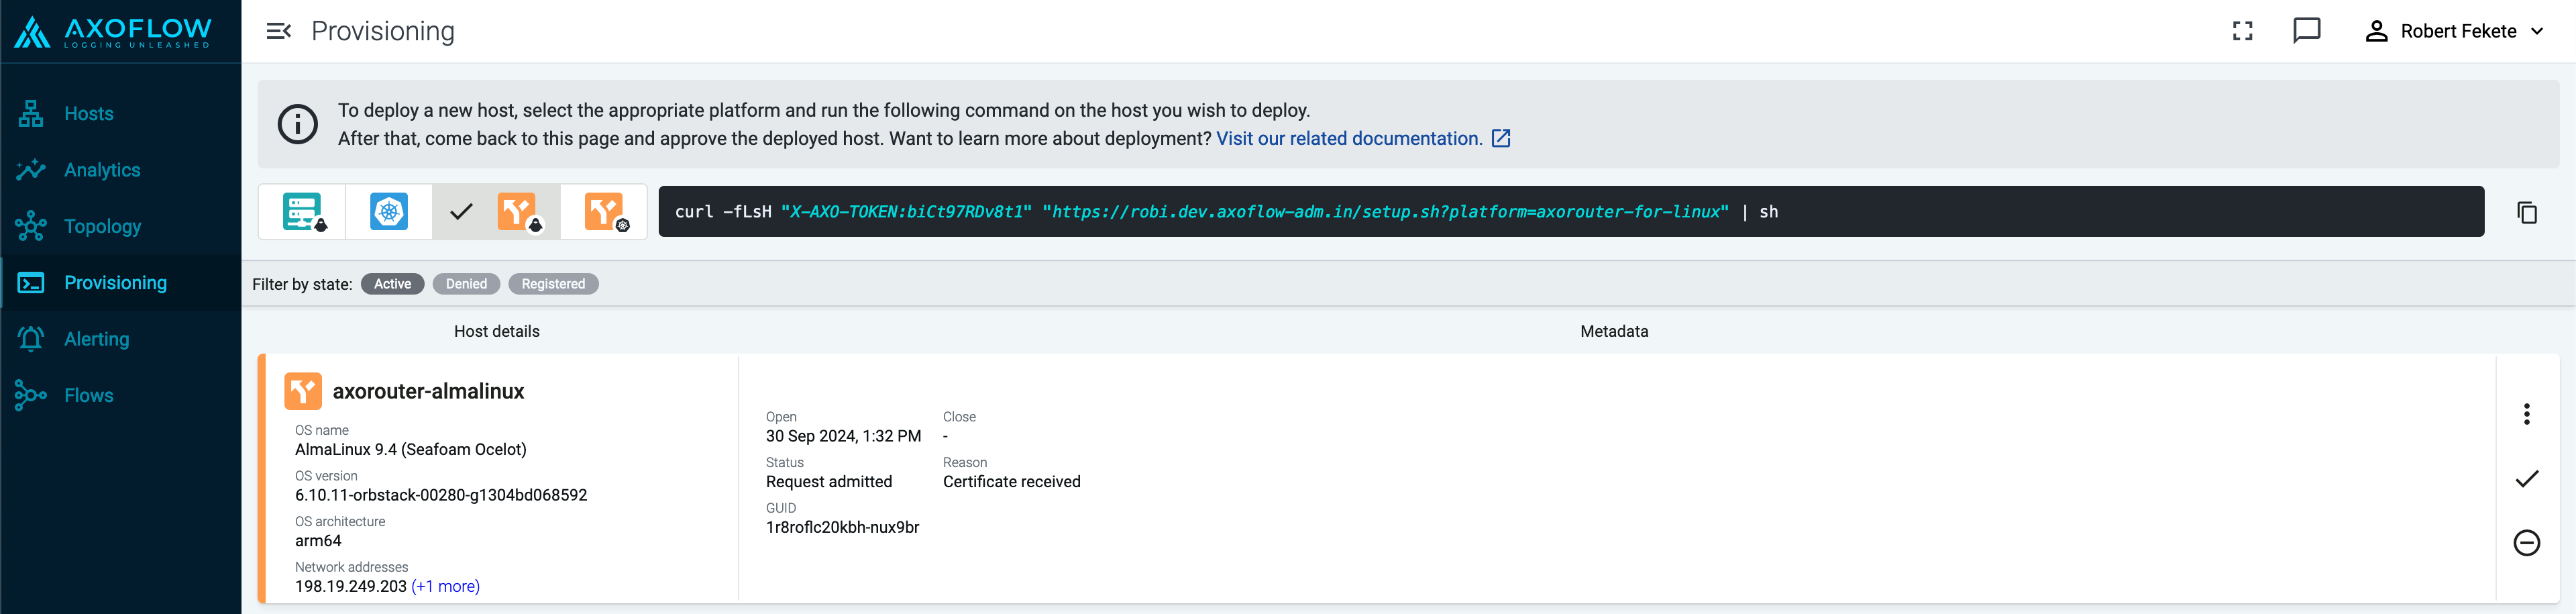
-
Select Register to register the host. You can add a description and labels (in
label:valueformat) to the host. -
Select the Topology page. The new AxoRouter instance is displayed.
-
Create a flow
- If you haven’t already done so, create a new destination.
-
Create a flow to connect the new AxoRouter to the destination.
-
Select Flows.
-
Select Create New Flow.
-
Enter a name for the flow, for example,
my-test-flow.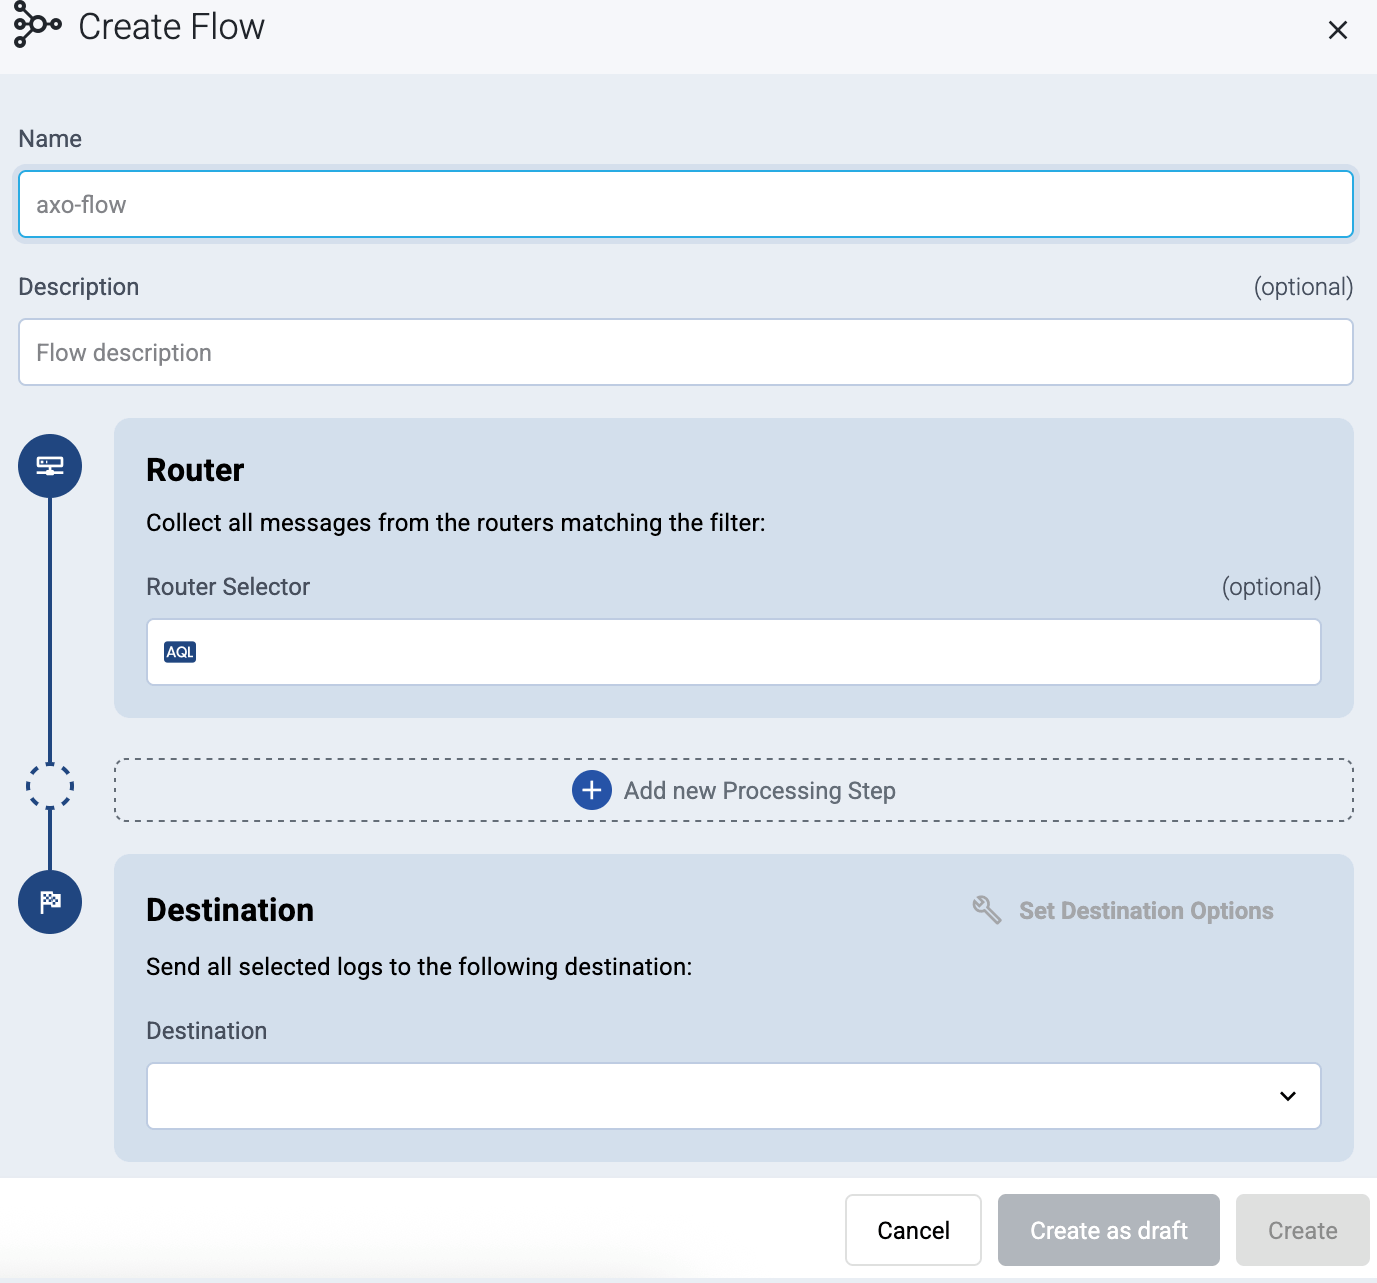
-
In the Router Selector field, enter an expression that matches the router(s) you want to apply the flow. To select a specific router, use a name selector, for example,
name = my-axorouter-hostname.It also makes more complex filtering possible, using the Equals, Contains (partial match), and Match (regular expression match) operators. Note that:
- To execute the search, click Search, or hit ESC then ENTER.
- Axoflow Console autocompletes the built-in and custom labels and field names, as well as their most frequent values, but doesn’t autocomplete labels and variables created by data parsing and processing steps.
- You can use the AND and OR operators to combine expressions, and also parenthesis if needed.
-
Select the Destination where you want to send your data. If you don’t have any destination configured, see Destinations.
By default, you can select only external destinations. If you want to send data to another AxoRouter, enable the Show all destinations option, and select the connector of the AxoRouter where you want to send the data.

-
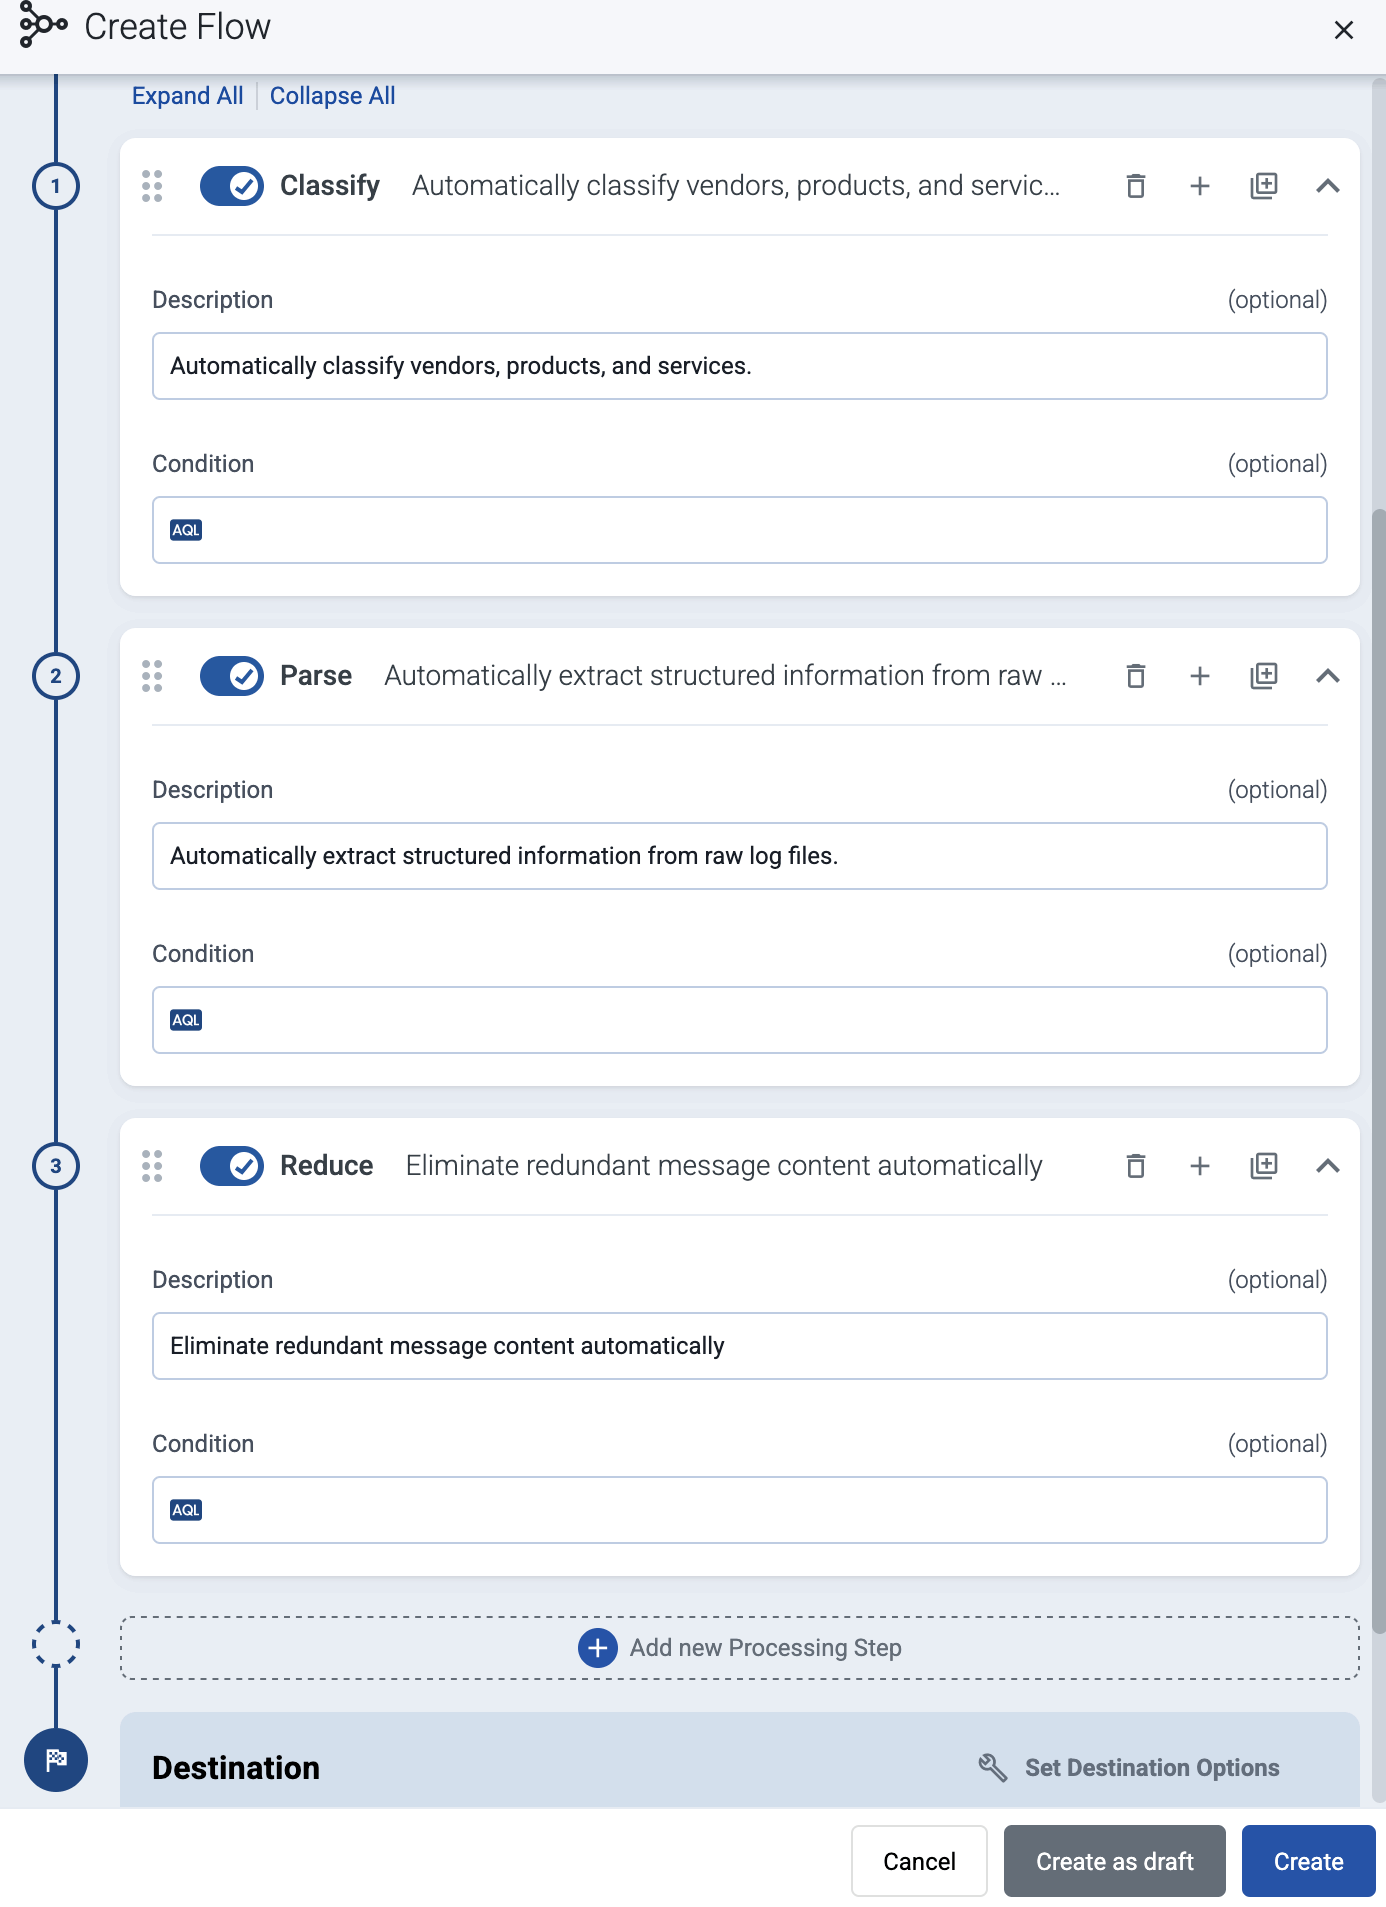
(Optional) To process the data transferred in the flow, select Add New Processing Step. For details, see Processing steps. For example:
- Add a Classify, a Parse, and a Reduce step, in that order, to automatically remove redundant and empty fields from your data.
- To select which messages are processed by the flow, add a Select Messages step, and enter a filter into the Query field. For example, to select only the messages received from Fortinet FortiGate firewalls, use the
meta.vendor = fortinet AND meta.product = fortigatequery. - Save the processing steps.
-
Select Create.
-
The new flow appears in the Flows list.

-
Send logs to AxoRouter
Configure your hosts to send data to AxoRouter.
-
For appliances that are specifically supported by Axoflow, see Sources.
-
For other appliances and generic Linux devices, see Generic tips.
-
For a quick test without an actual source, you can also do the following (requires
ncto be installed on the AxoRouter host):-
Open the Axoflow Console, select Topology, then select the AxoRouter instance you’ve deployed.
-
Select ⋮ > Tap log flow > Input log flow. Select Start.
-
Open a terminal on your AxoRouter host.
-
Run the following command to send 120 test messages (2 per second) in a loop to AxoRouter:
for i in `seq 1 120`; do echo "<165> fortigate date=$(date -u +%Y-%m-%d) time=$(date -u +"%H:%M:%S%Z") devname=us-east-1-dc1-a-dmz-fw devid=FGT60D4614044725 logid=0100040704 type=event subtype=system level=notice vd=root logdesc=\"System performance statistics\" action=\"perf-stats\" cpu=2 mem=35 totalsession=61 disk=2 bandwidth=158/138 setuprate=2 disklograte=0 fazlograte=0 msg=\"Performance statistics: average CPU: 2, memory: 35, concurrent sessions: 61, setup-rate: 2\""; sleep 0.5; done | nc -v 127.0.0.1 514Alternatively, you can send logs in an endless loop:
while true; do echo "<165> fortigate date=$(date -u +%Y-%m-%d) time=$(date -u +"%H:%M:%S%Z") devname=us-east-1-dc1-a-dmz-fw devid=FGT60D4614044725 logid=0100040704 type=event subtype=system level=notice vd=root logdesc=\"System performance statistics\" action=\"perf-stats\" cpu=2 mem=35 totalsession=61 disk=2 bandwidth=158/138 setuprate=2 disklograte=0 fazlograte=0 msg=\"Performance statistics: average CPU: 2, memory: 35, concurrent sessions: 61, setup-rate: 2\""; sleep 1; done | nc -v 127.0.0.1 514
-
Manage AxoRouter
This section describes how to start, stop and check the status of the AxoRouter service on Linux.
Start AxoRouter
To start AxoRouter, execute the following command. For example:
systemctl start axorouter
If the service starts successfully, no output will be displayed.
The following message indicates that AxoRouter can not start (see Check AxoRouter status):
Job for axorouter.service failed because the control process exited with error code. See `systemctl status axorouter.service` and `journalctl -xe` for details.
Stop AxoRouter
To stop AxoRouter
-
Execute the following command.
systemctl stop axorouter -
Check the status of the AxoRouter service (see Check AxoRouter status).
Restart AxoRouter
To restart AxoRouter, execute the following command.
systemctl restart axorouter
Reload the configuration without restarting AxoRouter
To reload the configuration file without restarting AxoRouter, execute the following command.
systemctl reload axorouter
Check the status of AxoRouter service
To check the status of AxoRouter service
-
Execute the following command.
systemctl --no-pager status axorouter -
Check the
Active:field, which shows the status of the AxoRouter service. The following statuses are possible:-
active (running)-axorouterservice is up and running -
inactive (dead)-axorouterservice is stopped
-
Upgrade AxoRouter
Axoflow Console raises an alert for the host when a new AxoRouter version is available. To upgrade to the new version, re-run the one-liner installation command you used to install AxoRouter, or select Provisioning > Select type and platform to create a new one.
