This chapter describes the installation and configuration of AxoConsole in different scenarios.
AxoConsole is available as:
- an SaaS service,
- on-premises deployment,
- Kubernetes deployment.
This is the multi-page printable view of this section. Click here to print.
This chapter describes the installation and configuration of AxoConsole in different scenarios.
AxoConsole is available as:
This guide shows you how to install AxoConsole on a local, on-premises virtual machine using k3s and Helm. Installation of other components like the ingress controller and the cert-manager is also included. Since this is a single instance deployment, we don’t recommend using it in production environments. For additional steps and configurations needed in production environments, contact our support team.
To deploy AxoConsole in an air-gapped environment, see Air-gapped.
At a high level, the deployment consists of the following steps:
Running the installation script on the virtual machine that deploys:
Any of these components can be skipped if already installed.
Basic authentication with admin user and password is configured by default. You can also configure other common authentication methods like LDAP, Github and Google.
Before deploying AxoRouter describes the steps you have to complete on a host before deploying AxoRouter on it. These steps are specific to on-premises AxoConsole deployments, and aren’t needed when using the SaaS AxoConsole.
To install AxoConsole, you’ll need the following:
The URL for the AxoConsole installation script. You’ll receive this URL from our team. You can request it using the contact form.
CAUTION:
Don’t start the Install AxoConsole process until you’ve received the URL.
A license key for AxoConsole. You’ll receive this from our team. You can request it using the contact form.
A host that meets the system requirements.
Network access set up for the host.
Supported operating system: Ubuntu 24.04, Red Hat 9 and compatible (tested with AlmaLinux 9)
The virtual machine (VM) must have at least:
| Resource | Minimum | Production |
|---|---|---|
| CPU | 4 vCPU | 16 vCPU |
| RAM | 8 GB | 16 GB |
Disk (/) |
100 GB | 250 GB |
A Minimum setup with 4 vCPU (x86_64-based), 8 GB RAM, and 100 GB disk space can handle about 100 AxoRouter instances and 1000 data source hosts.
A real-life production scenario that handles 100 AxoRouter and 3000 data source hosts with 30-day metric retention would need:
For details on sizing, contact our support team.
You’ll need to have access to a user with sudo privileges.
The host must be able to access the following domains related to the AxoConsole:
When using AxoConsole SaaS:
<your-tenant-id>.cloud.axoflow.io: HTTPS traffic on TCP port 443, needed to download the binaries for Axoflow software (like Axolet and AxoRouter).kcp.<your-tenant-id>.cloud.axoflow.io: HTTPS (mutual TLS) traffic on TCP port 443 for management traffic.telemetry.<your-tenant-id>.cloud.axoflow.io: HTTPS (mutual TLS) traffic on TCP port 443, where Axolet sends the metrics of the host.us-docker.pkg.dev: HTTPS traffic on TCP port 443, but only if you’re forcing the installation script to pull the container images from the public repository. The Axolet and AxoRouter for Linux installation scripts download the images directly from AxoConsole.When using an on-premise AxoConsole:
The following domains should point to AxoConsole IP address to access Axoflow from your desktop and AxoRouter hosts:
your-host.your-domain: The main domain of your AxoConsole deployment.idp.your-host.your-domain: A subdomain for the identity provider.kcp.your-host.your-domain: A subdomain for management traffic.telemetry.your-host.your-domain: A subdomain for agent telemetry.The AxoConsole host must have the following Open Ports:
When installing Axoflow agent for Windows or Linux:
github.com: HTTPS traffic on TCP port 443, for downloading installer packages.CAUTION:
This procedure covers how to deploy a new AxoConsole instance. The installation script can’t upgrade existing deployments, contact the Axoflow support team for detailed upgrade instructions.
Download the installation script from the URL you’ve received from the Axoflow Support Team.
Transfer the file to the host where you want to install AxoConsole.
Run the installation script with your license key and the domain name for your AxoConsole deployment.
/var/lib/rancher/k3s/server/manifests/axoflow-config.yaml) available on the host.
sudo LICENSE_KEY=<your-license-key> BASE_HOSTNAME=<axoconsole-domain-name> AXOFLOW_VERSION=0.86.0 bash ./axoflow-install.sh ‐‐no-airgap
BASE_HOSTNAME, the installer probes whether <VM_IP>.nip.io resolves and offers it as the default. nip.io is a free wildcard DNS service — handy for testing and demos because the console and all its subdomains resolve without any DNS or /etc/hosts configuration. For production deployments, use a proper domain name.
You can use the following flags as needed for your environment.
--step: Prompt before each step--dry-run: Show what would be done without executing anything--skip-k3s: Skip k3s installation (already installed)--skip-cert-manager: Skip cert-manager installation--disable-traefik: Disable the built-in Traefik ingress controller of k3s. Use this option when using a custom ingress controller.--skip-nip-io: Skip the automatic <VM_IP>.nip.io DNS probe and use axoflow.local as the default base hostname.--diagnose [namespace]: Inspect pods that are not ready and explain why (image-pull errors, configuration issues, crashes). Runs automatically on a timeout; use on demand after a failed install.--uninstall: Uninstall AxoConsole. Prompts before each step — removing workloads, deleting data, and removing k3s — so you can stop at any point. See Uninstall AxoConsole.Advanced flags:
--skip-images: Skip container image import entirely. Use when images are already loaded into k3s.--image-mode bundle|component|skip: Control how container images are imported. bundle (default) imports pre-packaged image tarballs; component imports one image per component; skip skips import.--prepare-env: Install k3s, cert-manager, and Traefik only — skip AxoConsole itself. Use for a two-phase install where you want to configure the environment before deploying AxoConsole.--ignore-requirements: Bypass hardware requirement checks.If needed, follow the on-screen instructions. For a test installation, you can usually use the default values. For recommendations for a production environment, contact our support team.
Wait a few minutes until everything is installed.
In case of any errors, check Troubleshooting for tips.
The script prompts to display the password of the default admin user. Record it, you’ll need it to log in to AxoConsole.
...
[2026-06-02 20:44:28] [INFO ] All pods in axoflow are ready/complete
[2026-06-02 20:44:28] [INFO ] Axoflow is healthy
[2026-06-02 20:44:28] [INFO ] Access the UI at: https://<axoconsole-domain-name>
Show admin credentials? [y/N]: y
Username: admin
Password: MzGIjuWKjXOtiRs4
If needed, later you can retrieve the password by running:
kubectl -n "${AXOFLOW_NAMESPACE}" get secret axoidp-admin \
-o go-template='Username: {{ .data.username | base64decode }}{{ printf "\n" }}Password: {{ .data.password | base64decode }}{{ printf "\n" }}'
If the domain name of AxoConsole cannot be resolved from your desktop, add it to the /etc/hosts file in the following format. Use and IP address of AxoConsole that can be accessed from your desktop.
<AXOFLOW-CONSOLE-IP-ADDRESS> <your-host.your-domain> idp.<your-host.your-domain> kcp.<your-host.your-domain> telemetry.<your-host.your-domain>
Open the https://<your-host.your-domain> URL in your browser.
The on-premise deployment of AxoConsole shows a self-signed certificate. If your browser complains about the related risks, accept it.
Use the email address and password you got or set in the installation step to log in to AxoConsole.
| Service Name | Namespace | Purposes | Function |
|---|---|---|---|
| KCP | axoflow |
Backend API | Kubernetes Like Service with built in database, that service manage all the settings that our system manage |
| Chalco | axoflow |
Frontend API | Serve the UI API Calls, implement business logic for the UI |
| Controller-Manager | axoflow |
Backend Service | Reacts to state changes in our business entities, manage business logic for the Backend |
| Telemetry Proxy | axoflow |
Backend API | Receives agents telemetries |
| UI | axoflow |
Dashboard | The frontend for AxoConsole |
| Prometheus | axoflow |
Backend API /Service | Monitoring component to store time series information and an API for query, manage alert rules |
| Alertmanager | axoflow |
Backend API /Service | Monitoring component to send alerts based on alerting rules (optional, disabled by default) |
| Axoflow IDP | axoflow |
Identity Connector/Proxy | Identity Connector/Proxy to allow the customer to use own identity (Google, LDAP, etc.) |
| Axolet Dist | axoflow |
Backend API | Static artifact store to contains agents binaries |
| Cert Manager (kcp) | axoflow |
Automated Certificate management tool | Manage certificates for Agents |
| Cert Manager | cert-manager |
Automated Certificate management tool | Manage certificates for Axoflow components (Backend API, HTTP Proxy) |
| FilterX Validator | axoflow |
Backend API | Validates FilterX expressions used in data processing pipelines |
| Traefik Ingress Controller | ingress-traefik |
HTTP Proxy | Route the HTTP traffic between multiple Frontend/Backend APIs |
[ERROR] Timed out waiting for k3s node to be Ready error message, increase the timeout limit by running K3S_TIMEOUT=180, then rerun the installation script.In case of other errors, run the following command to create a debug package from the cluster, and contact our support team.
sudo k3s kubectl cluster-info dump --all-namespaces --output-directory=./cluster-dump && tar -czvf cluster-dump.tar.gz cluster-dump
To uninstall AxoConsole, run the installer with the --uninstall flag:
sudo ./axoflow-install.sh --uninstall
The uninstaller prompts before each step and requires separate confirmation for:
Removing the AxoConsole workloads and manifests
Deleting stored data (namespace and PersistentVolumeClaims) — irreversible
CAUTION:
Hazard of data loss!
Confirming step 2 permanently deletes all stored data.
Removing k3s
CAUTION:
Hazard of data loss!
If you’re using k3s to run other software apart from AxoConsole, decline step 3 to keep k3s in place.
The uninstaller is safe to run on a partial or incomplete installation.
This guide shows you how to install AxoConsole on a local, on-premises virtual machine using k3s and Helm. Installation of other components like the ingress controller and the cert-manager is also included. Since this is a single instance deployment, we don’t recommend using it in production environments. For additional steps and configurations needed in production environments, contact our support team.
At a high level, the deployment consists of the following steps:
To install AxoConsole, you’ll need the following:
The URL for the AxoConsole Helm chart. You’ll receive this URL from our team. You can request it using the contact form.
CAUTION:
Don’t start the Install AxoConsole process until you’ve received the chart URL.
A license key for AxoConsole. You’ll receive this from our team. You can request it using the contact form.
A host that meets the system requirements.
Network access set up for the host.
Supported operating system: Ubuntu 24.04, Red Hat 9 and compatible (tested with AlmaLinux 9)
The virtual machine (VM) must have at least:
This setup can handle about 100 AxoRouter instances and 1000 data source hosts.
For reference, a real-life scenario that handles 100 AxoRouter and 3000 data source hosts with 30-day metric retention would need:
For details on sizing, contact our support team.
You’ll need to have access to a user with sudo privileges.
The host must be able to access the following domains related to the AxoConsole:
When using AxoConsole SaaS:
<your-tenant-id>.cloud.axoflow.io: HTTPS traffic on TCP port 443, needed to download the binaries for Axoflow software (like Axolet and AxoRouter).kcp.<your-tenant-id>.cloud.axoflow.io: HTTPS (mutual TLS) traffic on TCP port 443 for management traffic.telemetry.<your-tenant-id>.cloud.axoflow.io: HTTPS (mutual TLS) traffic on TCP port 443, where Axolet sends the metrics of the host.us-docker.pkg.dev: HTTPS traffic on TCP port 443, but only if you’re forcing the installation script to pull the container images from the public repository. The Axolet and AxoRouter for Linux installation scripts download the images directly from AxoConsole.When using an on-premise AxoConsole:
The following domains should point to AxoConsole IP address to access Axoflow from your desktop and AxoRouter hosts:
your-host.your-domain: The main domain of your AxoConsole deployment.idp.your-host.your-domain: A subdomain for the identity provider.kcp.your-host.your-domain: A subdomain for management traffic.telemetry.your-host.your-domain: A subdomain for agent telemetry.The AxoConsole host must have the following Open Ports:
When installing Axoflow agent for Windows or Linux:
github.com: HTTPS traffic on TCP port 443, for downloading installer packages.Complete the following steps to install k3s and some dependencies on the virtual machine.
Run getenforce to check the status of SELinux.
Check the /etc/selinux/config file and make sure that the settings match the results of the getenforce output (for example, SELINUX=disabled). K3S supports SELinux, but the installation can fail if there is a mismatch between the configured and actual settings.
Install k3s.
Run the following command:
curl -sfL https://get.k3s.io | INSTALL_K3S_EXEC="--disable traefik --disable metrics-server" K3S_KUBECONFIG_MODE="644" sh -s -
Check that the k3s service is running:
systemctl status k3s
Install the NGINX ingress controller.
NGINX_VERSION="v4.11.3"
sudo tee /var/lib/rancher/k3s/server/manifests/ingress-nginx.yaml > /dev/null <<EOF
---
apiVersion: helm.cattle.io/v1
kind: HelmChart
metadata:
  name: ingress-nginx
  namespace: kube-system
spec:
  createNamespace: true
  chart: ingress-nginx
  repo: https://kubernetes.github.io/ingress-nginx
  version: $NGINX_VERSION
  targetNamespace: ingress-nginx
  valuesContent: |-
    controller:
      extraArgs:
        enable-ssl-passthrough: true
      hostNetwork: true
      hostPort:
        enabled: true
      service:
        enabled: false
      admissionWebhooks:
        enabled: false
      updateStrategy:
        strategy:
          type: Recreate
EOF
Install the cert-manager controller.
Run the command:
CM_VERSION="1.16.2"
sudo tee /var/lib/rancher/k3s/server/manifests/cert-manager.yaml > /dev/null <<EOF
---
apiVersion: helm.cattle.io/v1
kind: HelmChart
metadata:
  name: cert-manager
  namespace: kube-system
spec:
  createNamespace: true
  chart: cert-manager
  version: $CM_VERSION
  repo: https://charts.jetstack.io
  targetNamespace: cert-manager
  valuesContent: |-
    crds:
      enabled: true
    enableCertificateOwnerRef: true
EOF
Wait for the helm chart to be installed:
while ! kubectl get job helm-install-cert-manager -n kube-system; do
  sleep 1
done
kubectl wait --for=condition=complete job/helm-install-cert-manager -n kube-system --timeout=300s
Complete the following steps to deploy the AxoConsole Helm chart.
Set the following environment variables as needed for your deployment.
The domain name for your AxoConsole deployment. This must point to the IP address of the VM you’re installing AxoConsole on.
BASE_HOSTNAME=your-host.your-domain
$BASE_HOSTNAME must end with a valid top-level domain, for example, .com or .io.)
The license key of AxoConsole. You’ll receive this from our team. You can request it using the contact form.
LICENSE_KEY="your-license-key"
The version number of AxoConsole you want to deploy.
VERSION="0.78.0"
The internal IP address of the virtual machine. This is needed so the authentication service can communicate with the identity provider without relying on DNS.
VM_IP_ADDRESS=$(hostname -I | cut -d' ' -f1)
Check that the above command returned the correct IP, it might not be accurate if the host has multiple IP addresses.
The URL of the Axoflow Helm chart. You’ll receive this URL from our team. You can request it using the contact form.
AXOFLOW_HELM_CHART_URL="<the-chart-URL-received-from-Axoflow>"
Install AxoConsole. You can either let the chart create a password, or you can set an email and password manually.
Add password automatically: The following configuration file enables automatic password creation. If this basic setup is working, you can configure another authentication provider.
sudo tee /var/lib/rancher/k3s/server/manifests/axoflow.yaml > /dev/null <<EOF
---
apiVersion: helm.cattle.io/v1
kind: HelmChart
metadata:
  name: axoflow
  namespace: kube-system
spec:
  createNamespace: true
  targetNamespace: axoflow
  version: $VERSION
  chart: $AXOFLOW_HELM_CHART_URL
  failurePolicy: abort
  valuesContent: |-
    baseHostName: $BASE_HOSTNAME
    licenseKey: $LICENSE_KEY
    dex:
      localIP: $VM_IP_ADDRESS
EOF
To reclaim your autogenerated password, use the following command.
kubectl -n axoflow get secret axoflow-admin -o go-template='Email: {{ .data.email | base64decode }}{{ printf "\n" }}Password: {{ .data.password | base64decode }}{{ printf "\n" }}'
Record the email and password, you’ll need it to log in to AxoConsole.
Set password manually: If you’d like to set the email/password manually, create the secret storing the required information, then set a unique identifier for the administrator user using uuidgen. Note that:
uuid-runtime package by running sudo apt install uuid-runtime.htpasswd tool, which is part of the httpd-tools package on Red Hat (install it using sudo dnf install httpd-tools), and the apache2-utils package on Ubuntu (install it using sudo apt install apache2-utils).ADMIN_USERNAME="<your admin username>"
ADMIN_EMAIL="<your admin email>"
ADMIN_PASSWORD="<your admin password>"
ADMIN_UUID=$(uuidgen)
ADMIN_PASSWORD_HASH=$(echo $ADMIN_PASSWORD | htpasswd -BinC 10 $ADMIN_USERNAME | cut -d: -f2)
sudo tee /var/lib/rancher/k3s/server/manifests/axoflow.yaml > /dev/null <<EOF
---
apiVersion: helm.cattle.io/v1
kind: HelmChart
metadata:
name: axoflow
namespace: kube-system
spec:
createNamespace: true
targetNamespace: axoflow
version: $VERSION
chart: $AXOFLOW_HELM_CHART_URL
failurePolicy: abort
valuesContent: |-
baseHostName: $BASE_HOSTNAME
licenseKey: $LICENSE_KEY
pomerium:
policy:
emails:
- $ADMIN_EMAIL
dex:
localIP: $VM_IP_ADDRESS
defaultCredential:
create: false
EOF
kubectl -n axoflow create secret generic axoflow-admin --from-literal=username=$ADMIN_USERNAME --from-literal=password_hash=$ADMIN_PASSWORD_HASH --from-literal=email=$ADMIN_EMAIL --from-literal=uuid=$ADMIN_UUID
Wait a few minutes until everything is installed. Check that every component has been installed and is running:
kubectl get pods -A
The output should be similar to:
NAMESPACE       NAME                                       READY   STATUS      RESTARTS       AGE
axoflow         axolet-dist-55ccbc4759-q7l7n               1/1     Running     0              2d3h
axoflow         chalco-6cfc74b4fb-mwbbz                    1/1     Running     0              2d3h
axoflow         configure-kcp-1-x6js6                      0/1     Completed   2              2d3h
axoflow         configure-kcp-cert-manager-1-wvhhp         0/1     Completed   1              2d3h
axoflow         configure-kcp-token-1-xggg7                0/1     Completed   1              2d3h
axoflow         controller-manager-5ff8d5ffd-f6xtq         1/1     Running     0              2d3h
axoflow         dex-5b9d7b88b-bv82d                        1/1     Running     0              2d3h
axoflow         kcp-0                                      1/1     Running     1 (2d3h ago)   2d3h
axoflow         kcp-cert-manager-0                         1/1     Running     0              2d3h
axoflow         pomerium-56b8b9b6b9-vt4t8                  1/1     Running     0              2d3h
axoflow         prometheus-server-0                        2/2     Running     0              2d3h
axoflow         telemetryproxy-65f77dcf66-4xr6b            1/1     Running     0              2d3h
axoflow         ui-6dc7bdb4c5-frn2p                        2/2     Running     0              2d3h
cert-manager    cert-manager-74c755695c-5fs6v              1/1     Running     5 (144m ago)   2d3h
cert-manager    cert-manager-cainjector-dcc5966bc-9kn4s    1/1     Running     0              2d3h
cert-manager    cert-manager-webhook-dfb76c7bd-z9kqr       1/1     Running     0              2d3h
ingress-nginx   ingress-nginx-controller-bcc7fb5bd-n5htp   1/1     Running     0              2d3h
kube-system     coredns-ccb96694c-fhk8f                    1/1     Running     0              2d3h
kube-system     helm-install-axoflow-b9crk                 0/1     Completed   0              2d3h
kube-system     helm-install-cert-manager-88lt7            0/1     Completed   0              2d3h
kube-system     helm-install-ingress-nginx-qvkhf           0/1     Completed   0              2d3h
kube-system     local-path-provisioner-5cf85fd84d-xdlnr    1/1     Running     0              2d3h
(For details on what the different services do, see the service reference.)
If the domain name of AxoConsole cannot be resolved from your desktop, add it to the /etc/hosts file in the following format. Use and IP address of AxoConsole that can be accessed from your desktop.
<AXOFLOW-CONSOLE-IP-ADDRESS> <your-host.your-domain> idp.<your-host.your-domain> authenticate.<your-host.your-domain>
Open the https://<your-host.your-domain> URL in your browser.
The on-premise deployment of AxoConsole shows a self-signed certificate. If your browser complains about the related risks, accept it.
Use the email address and password you got or set in the installation step to log in to AxoConsole.
| Service Name | Namespace | Purposes | Function |
|---|---|---|---|
| KCP | axoflow |
Backend API | Kubernetes Like Service with built in database, that service manage all the settings that our system manage |
| Chalco | axoflow |
Frontend API | Serve the UI API Calls, implement business logic for the UI |
| Controller-Manager | axoflow |
Backend Service | Reacts to state changes in our business entities, manage business logic for the Backend |
| Telemetry Proxy | axoflow |
Backend API | Receives agents telemetries |
| UI | axoflow |
Dashboard | The frontend for AxoConsole |
| Prometheus | axoflow |
Backend API /Service | Monitoring component to store time series information and an API for query, manage alert rules |
| Alertmanager | axoflow |
Backend API /Service | Monitoring component to Send alert based on alerting rules |
| Dex | axoflow |
Identity Connector/Proxy | Identity Connector/Proxy to allow the customer to use own identity (Google, Ldap, etc.) |
| Pomerium | axoflow |
HTTP Proxy | Allow policy based access to the Frontend API (Chalco) |
| Axolet Dist | axoflow |
Backend API | Static artifact store to contains agents binaries |
| Cert Manager (kcp) | axoflow |
Automated Certificate management tool | Manage certificates for Agents |
| Cert Manager | cert-manager |
Automated Certificate management tool | Manage certificates for Axoflow components (Backend API, HTTP Proxy) |
| NGINX Ingress Controller | ingress-nginx |
HTTP Proxy | Allow routing the HTTP traffic between multiple Frontend/Backend API |
Onboarding allows you to collect metrics about the host, display the host on the Topology page, and to tap into the log flow.
Onboarding requires you to modify the host and the configuration of the logging agent (syslog-ng) running on the host.
For syslog-ng PE, version 7.0.33 or newer is required. Note that the 7.0.x product line needs a different configuration snippet than the 8.1.x product line.
For syslog-ng OSE, version 4.1.1 or newer is required, but we recommend using AxoSyslog instead (at least syslog-ng OSE version 4.5.0).
To onboard an existing syslog-ng instance into Axoflow, complete the following steps.
Install Axolet on the host, then approve its registration on the Provisioning page of the AxoConsole.
The syslog-ng host will now be visible on the Topology page of the AxoConsole as a source.
Select Topology > Add Item > Path.
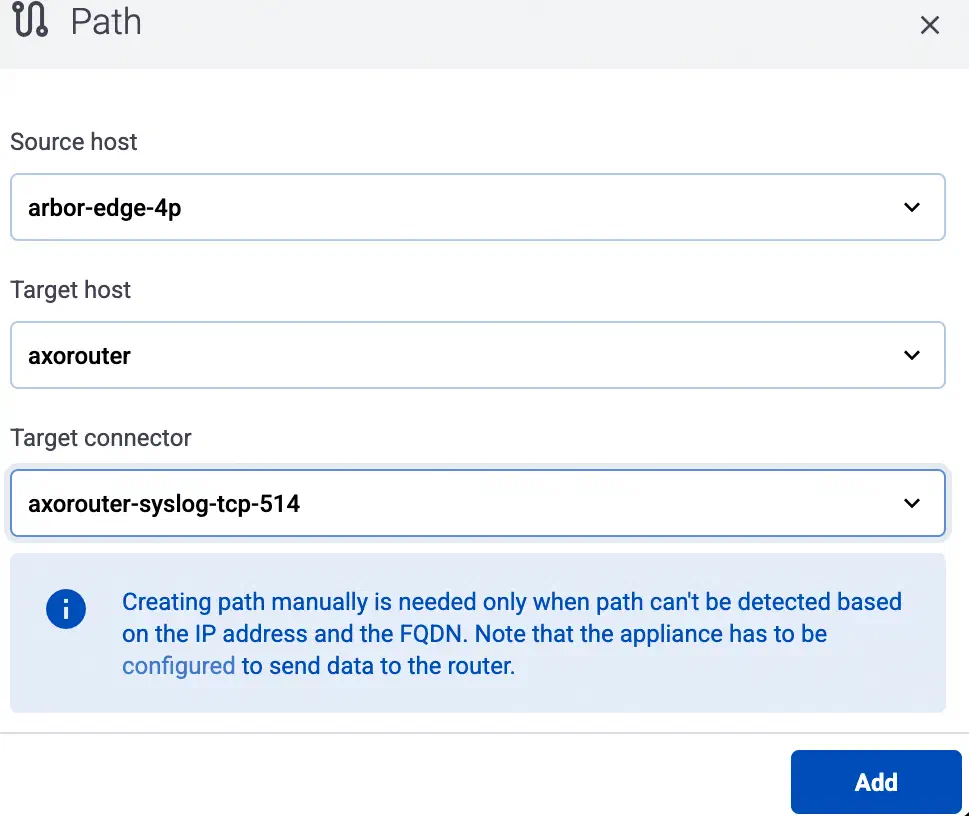
If not set automatically, select the beginning of the path in the Source host field.
Select the target router or aggregator this source is sending its data to in the Target host field, for example, axorouter.
Select the Target connector. The connector determines how the destination receives the data (for example, using which protocol or port).
Select Add. The new path appears on the Topology page.

Access the syslog-ng host and edit the configuration of syslog-ng. Set the statistics-related global options like this (if the options block already exists, add these lines to the bottom of the block):
options {
    stats-level(2);
    stats-freq(0); # Inhibit statistics output to stdout
};
(Optional) To get detailed metrics and analytics about the traffic that flows through the host, instrument your syslog-ng configuration as follows:
metrics-probe() stanzas. The example below shows how to instrument the configuration to highlight common macros such as $HOST and $PROTOCOL. If you want to customize the collected metrics or need help with the instrumentation, contact us.
Download the following configuration snippet to the syslog-ng host, for example, as /etc/syslog-ng/conf.d/axoflow-instrumentation.conf for syslog-ng.
/opt/syslog-ng/etc/axoflow-instrumentation.conf.
For syslog-ng PE 8.x and newer:
# Metrics probe parser definition for a specified destination
# This will yield a reasonable number of metrics for common
# syslog-ng macros
block parser metrics-output(destination(undefined)) {

  # This will probe for the number of *events*.
  # key name is fixed; labels are user-specified
  metrics-probe(
    key("classified_output_events_total")
    labels(
      "host" => "${HOST}"
      "service" => "${PROGRAM}"
      "source" => "${SOURCE}"
      "dest_port" => "$DESTPORT"
      "dest_ip" => "$DESTIP"
      "src_ip" => "$SOURCEIP"
      "protocol" => "$(if ($PROTO == 6) TCP $(if ($PROTO == 17) UDP $PROTO))"
      "ip_protocol" => "$IP_PROTO"
      "transport" => "$TRANSPORT"
      "destination_name" => "`destination`"
      "issue" => "$(or $(tags-head message.parse_error syslog.unexpected_framing syslog.missing_pri syslog.rfc3164_missing_header syslog.invalid_hostname message.utf8_sanitized) 'none')"
    )
  );

  # This will probe for the number of *bytes*.
  # key name is fixed; labels are user-specified
  metrics-probe(
    key("classified_output_event_bytes_total")
    increment("${RAWMSG_SIZE}")
    labels(
        "host" => "${HOST}"
        "service" => "${PROGRAM}"
        "source" => "${SOURCE}"
        "dest_port" => "$DESTPORT"
        "dest_ip" => "$DESTIP"
        "src_ip" => "$SOURCEIP"
        "protocol" => "$(if ($PROTO == 6) TCP $(if ($PROTO == 17) UDP $PROTO))"
        "ip_protocol" => "$IP_PROTO"
        "transport" => "$TRANSPORT"
        "destination_name" => "`destination`"
        "issue" => "$(or $(tags-head message.parse_error syslog.unexpected_framing syslog.missing_pri syslog.rfc3164_missing_header syslog.invalid_hostname message.utf8_sanitized) 'none')"
    )
  );
};


# For syslog-ng OSE this should be /var/lib/syslog-ng/axotap.sock
@define AXOTAP_SOCK "/opt/syslog-ng/var/axotap.sock"

block rewrite format_axotap_sock_message(service_type("input")) {
  set("$(substr ${MESSAGE} 0 32768)" value(MESSAGE));
  set("$(substr ${RAWMSG} 0 32768)" value(RAWMSG));
  set("$(format-json --no-cast debug.msg=$(format-json --no-cast --scope all-nv-pairs) log.body=${MESSAGE})" value(".tap.event"));
  set(json('{"note":"message object too long for tapping"}') value(".tap.event") condition("$(length ${.tap.event})" > 131072));

  set("$(format-json --no-cast tap=$(format-json --no-cast tapId='' serviceType='`service_type`' eventId=${UNIQID} labels=$(format-json --no-cast) hostCandidate=$(format-json --no-cast) facility=${FACILITY} format=${MSGFORMAT} hostFrom=${HOST_FROM} message=$(echo ${MESSAGE}) rawMessage=${RAWMSG} severity=${SEVERITY} source=${SOURCE} tags=${TAGS} timestamp=${ISODATE} transport=${TRANSPORT}) event=json(${.tap.event}))" value(".tap.formatted"));
};


# input side tapping
destination "d_axotap_input_static" {
  channel {
    filter {
      rate-limit(key("$SOURCE:$PROGRAM:$HOST:$SOURCEIP:$DESTIP") rate(1));
    };

    rewrite {
      format_axotap_sock_message(service_type("input"));
    };

    destination {
      unix-dgram("`AXOTAP_SOCK`" persist-name("axotap_input_static") template("${.tap.formatted}"));
    };
  };
};


log {
  destination("d_axotap_input_static");
  flags(catchall);
};


# output side tapping
destination "d_axotap_output" {
  channel {
    filter {
      rate-limit(key("$SOURCE:$PROGRAM:$HOST:$SOURCEIP:$DESTIP") rate(1));
    };

    rewrite {
      format_axotap_sock_message(service_type("output"));
    };

    destination {
      unix-dgram("`AXOTAP_SOCK`" template("${.tap.formatted}"));
    };
  };
};
For syslog-ng PE 7.0.33 and newer 7.0.x, and syslog-ng OSE version 4.1.1-4.4.0:
# Metrics probe parser definition for a specified destination
# This will yield a reasonable number of metrics for common
# syslog-ng macros
block parser metrics-output(destination(undefined)) {

  # This will probe for the number of *events*.
  # key name is fixed; labels are user-specified
  metrics-probe(
    key("classified_output_events_total")
    labels(
      "host" => "${HOST}"
      "service" => "${PROGRAM}"
      "source" => "${SOURCE}"
      "dest_port" => "$DESTPORT"
      "dest_ip" => "$DESTIP"
      "src_ip" => "$SOURCEIP"
      "protocol" => "$(if ($PROTO == 6) TCP $(if ($PROTO == 17) UDP $PROTO))"
      "ip_protocol" => "$IP_PROTO"
      "transport" => "$TRANSPORT"
      "destination_name" => "`destination`"
    )
  );

  # This will probe for the number of *bytes*.
  # key name is fixed; labels are user-specified
  metrics-probe(
    key("classified_output_event_bytes_total")
    increment("${RAWMSG_SIZE}")
    labels(
        "host" => "${HOST}"
        "service" => "${PROGRAM}"
        "source" => "${SOURCE}"
        "dest_port" => "$DESTPORT"
        "dest_ip" => "$DESTIP"
        "src_ip" => "$SOURCEIP"
        "protocol" => "$(if ($PROTO == 6) TCP $(if ($PROTO == 17) UDP $PROTO))"
        "ip_protocol" => "$IP_PROTO"
        "transport" => "$TRANSPORT"
        "destination_name" => "`destination`"
    )
  );
};


# For syslog-ng OSE this should be /var/lib/syslog-ng/axotap.sock
@define AXOTAP_SOCK "/opt/syslog-ng/var/run/axotap.sock"

block rewrite format_axotap_sock_message(service_type("input")) {
  set("$(substr ${MESSAGE} 0 32768)" value(MESSAGE));
  set("$(substr ${RAWMSG} 0 32768)" value(RAWMSG));
  set("$(format-json --no-cast debug.msg=$(format-json --no-cast --scope all-nv-pairs) log.body=${MESSAGE})" value(".tap.event"));
  set(json('{"note":"message object too long for tapping"}') value(".tap.event") condition("$(length ${.tap.event})" > 131072));

  set("$(format-json --no-cast tap=$(format-json --no-cast tapId='' serviceType='`service_type`' eventId=${UNIQID} labels=$(format-json --no-cast) hostCandidate=$(format-json --no-cast) facility=${FACILITY} format=${MSGFORMAT} hostFrom=${HOST_FROM} message=$(echo ${MESSAGE}) rawMessage=${RAWMSG} severity=${SEVERITY} source=${SOURCE} tags=${TAGS} timestamp=${ISODATE} transport=${TRANSPORT}) event=json(${.tap.event}))" value(".tap.formatted"));
};


# input side tapping
destination "d_axotap_input_static" {
  channel {
    filter {
      rate-limit(template("$SOURCE:$PROGRAM:$HOST:$SOURCEIP:$DESTIP") rate(1));
    };

    rewrite {
      format_axotap_sock_message(service_type("input"));
    };

    destination {
      unix-dgram("`AXOTAP_SOCK`" persist-name("axotap_input_static") template("${.tap.formatted}"));
    };
  };
};


log {
  destination("d_axotap_input_static");
  flags(catchall);
};


# output side tapping
destination "d_axotap_output" {
  channel {
    filter {
      rate-limit(template("$SOURCE:$PROGRAM:$HOST:$SOURCEIP:$DESTIP") rate(1));
    };

    rewrite {
      format_axotap_sock_message(service_type("output"));
    };

    destination {
      unix-dgram("`AXOTAP_SOCK`" template("${.tap.formatted}"));
    };
  };
};
Include it in at the top of your configuration file:
@version: current
@include "axoflow-instrumentation.conf"
Edit every destination statement to include a parser { metrics-output(destination(my-destination)); }; line (making sure to include the channel construct if your destination block does not already contain it):
destination my-destination {
    channel {
        parser { metrics-output(destination(my-destination)); };
        destination { file("/dev/null"); };
        };
    };
Reload the configuration of syslog-ng.
systemctl reload syslog-ng
To enable log tapping for the output logs (traffic that the host sends to its destinations), add the d_axotap_output destination in your log paths. This allows the Axolet agent to collect rate-limited log samples from that specific point in the pipeline.
Tapping the input logs (traffic arriving to the sources of the host) needs only the configuration snippet.
Find a log path that you want to tap into and add the tap destination in a safe way, for example, by adding it in a separate inner log path:
log {
    source(s_udp514);
    log { destination(d_udp514); };
    log { destination(d_axotap); };
};
Reload the configuration of syslog-ng.
systemctl reload syslog-ng
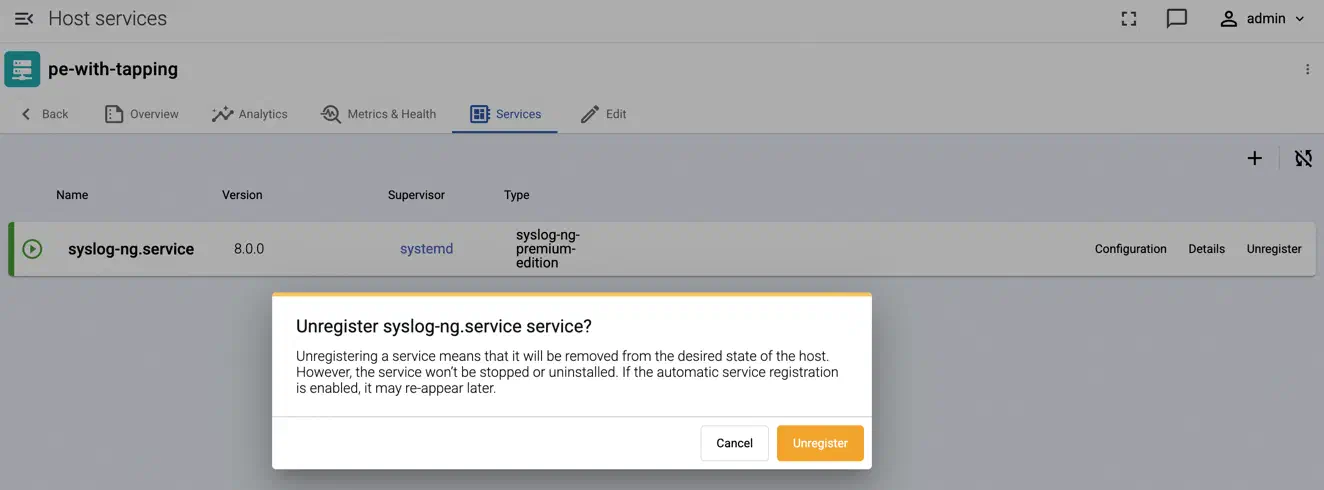
Unregister the service so that auto service registration can discover the new tapping point:
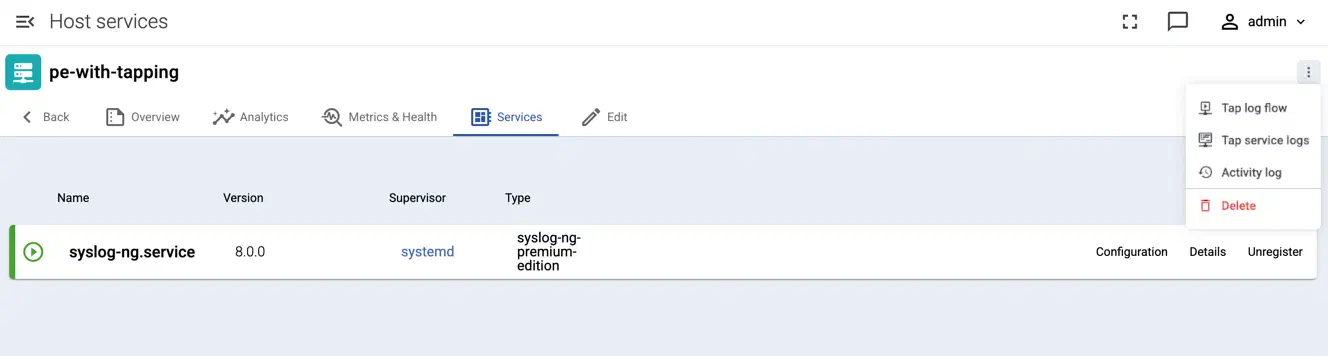
Test log tapping from the top right menu:
kubectl apply -f - <<EOT
apiVersion: batch/v1
kind: CronJob
metadata:
  annotations:
  labels:
    app: tap-updater
  name: tap-updater
spec:
  concurrencyPolicy: Forbid
  failedJobsHistoryLimit: 1
  jobTemplate:
    metadata:
      name: tap-updater
    spec:
      template:
        spec:
          containers:
          - args:
            - -exc
            - |
              export KUBECONFIG=/home/nobody/kcp/config
              kubectl get edge -o name | xargs -r kubectl patch --type=json -p='[{"op":"add","path":"/spec/services/0/tap/socket","value":"/var/lib/syslog-ng/axotap.sock"}]'
            command:
            - /bin/sh
            image: us-docker.pkg.dev/axoflow-registry-prod/axoflow/axoflow:0.86.0
            imagePullPolicy: IfNotPresent
            name: configure
            resources:
              limits:
                memory: 200Mi
              requests:
                cpu: 400m
            terminationMessagePath: /dev/termination-log
            terminationMessagePolicy: File
            volumeMounts:
            - mountPath: /home/nobody/kcp
              name: kcp-account
          dnsPolicy: ClusterFirst
          restartPolicy: OnFailure
          schedulerName: default-scheduler
          securityContext: {}
          terminationGracePeriodSeconds: 30
          volumes:
          - name: kcp-account
            secret:
              defaultMode: 420
              optional: false
              secretName: kcp-account
  schedule: '1 * * * *'
  successfulJobsHistoryLimit: 3
  suspend: false
EOT
AxoConsole supports the following authentication providers for on-premises deployments:
| Provider | Description | When to use |
|---|---|---|
| Built-in (axoidp) | Axoflow’s built-in identity provider | Default for all installations. Manages local users with username and password. |
| Dex | Open-source identity federation layer | Use when you want to authenticate users with an existing identity system such as LDAP, Google, or GitHub. |
The built-in provider is enabled automatically during installation. To use a different provider, see the relevant section below.
Dex is an open-source identity federation layer. When you configure AxoConsole to use Dex, Dex handles authentication with your existing identity system and passes user identity back to AxoConsole.
The following connectors are supported:
Configure Dex as the OIDC provider in the /var/lib/rancher/k3s/server/manifests/axoflow-config.yaml file. For example:
chalco:
  oidc:
    enabled: true
    provider: "dex"

axoidp:
  enabled: false

dex:
  enabled: true
After saving the file, k3s automatically applies the changes. Users will be redirected to the Dex login page on next login.
This section shows you how to use GitHub OAuth2 as an authentication backend for AxoConsole. It is assumed that you already have a GitHub organization. Complete the following steps.
Register a new OAuth GitHub application for your organization. (For testing, you can create it under your personal account.) Make sure to:
Set the Homepage URL to the URL of your AxoConsole deployment: https://<your-console-host.your-domain>/callback, for example, https://axoflow-console.example.com.
Set the Authorization callback URL to: https://auth.<your-console-host.your-domain>/callback, for example, https://auth.axoflow-console.example.com/callback.
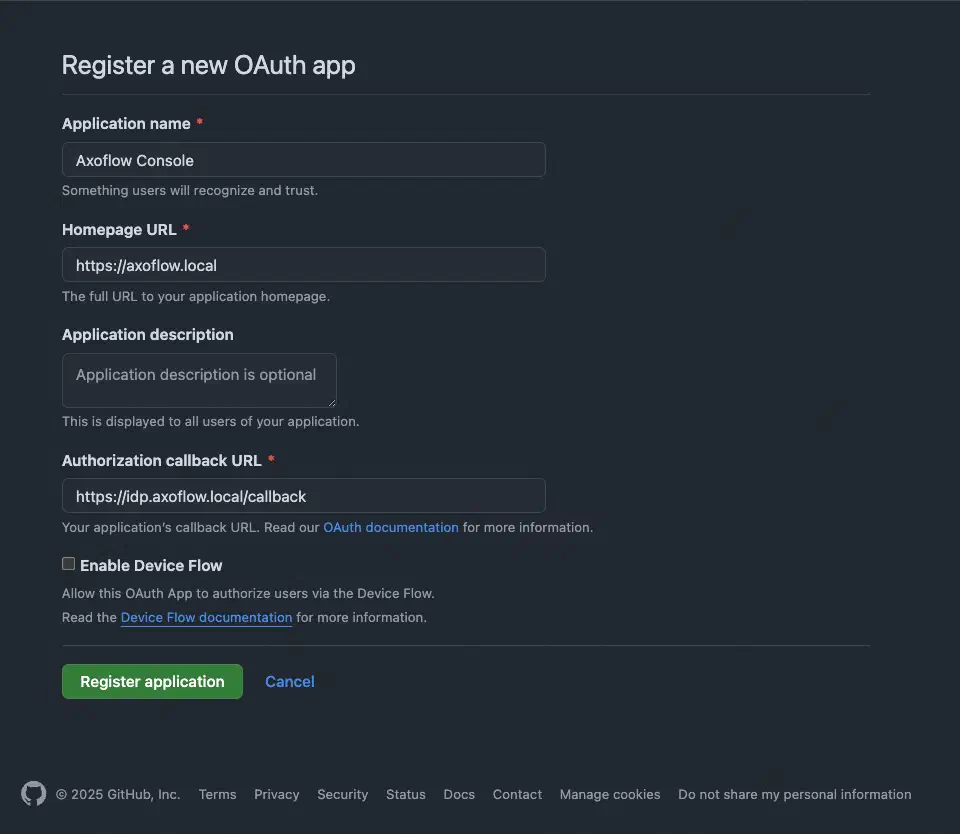
Save the Client id of the app, you’ll need it to configure AxoConsole.
Generate a Client secret and save it, you’ll need it to configure AxoConsole.
Configure Dex as the OIDC provider in the /var/lib/rancher/k3s/server/manifests/axoflow-config.yaml file. For example:
chalco:
  oidc:
    enabled: true
    provider: "dex"

axoidp:
  enabled: false

dex:
  enabled: true
Configure authentication by editing the spec.dex.config section of the /var/lib/rancher/k3s/server/manifests/axoflow-config.yaml file.
(Optional) If you’ve used our earlier example, delete the spec.dex.config.staticPasswords section.
Add the spec.dex.config.connectors section to the file, like this:
dex:
  enabled: true
  localIP: $VM_IP_ADDRESS
  config:
    create: true
    connectors:
    - type: github
      # Required field for connector id.
      id: github
      # Required field for connector name.
      name: GitHub
      config:
        # Credentials can be string literals or pulled from the environment.
        clientID: <ID-of-GitHub-application>
        clientSecret: <Secret-of-GitHub-application>
        redirectURI: <idp.your-host.your-domain/callback>
        orgs:
          - name: <your-GitHub-organization>
Note that if you have a valid domain name that points to the VM, you can omit the localIP: $VM_IP_ADDRESS line.
Edit the following fields. For details on the configuration parameters, see the Dex GitHub connector documentation.
connectors.config.clientID: The ID of the GitHub OAuth application.connectors.config.clientSecret: The client secret of the GitHub OAuth application.connectors.config.redirectURI: The callback URL of the GitHub OAuth application: https://auth.<your-console-host.your-domain>/callback, for example, https://auth.axoflow-console.example.com/callback.orgs section with the loadAllGroups: trueconnectors.config.orgs: List of the GitHub organizations whose members can access AxoConsole. Restrict access to your organization.Configure authorization in the kcp.rbac.roles section of the /var/lib/rancher/k3s/server/manifests/axoflow-config.yaml file.
The following roles are available in AxoConsole by default:
IAMadmin: Can manage the roles and permissions to access AxoConsole. Only this role can make changes on the Settings > Roles page. Can see the Identity Provider Admin Panel link, which points to the authentication and administration page of the identity provider used to authenticate on AxoConsole. (Every user can access their own profile page at the identity provider by selecting <their username> > Profile in the top-left.)
admin: Has full access to AxoConsole, but has only read access to the Settings > Roles page.
infrastructureManager: Can manage the infrastructure (without the permissions to view or tap log contents, or to rehydrate data). Has full access to the following pages: Activity Logs, Alerting, Routers, Sources, Flows, Provisioning, Search Logs. Can tap into service logs which may contain event payload.
infrastructureViewer: Similar to infrastructure-manager, but can only view the pages.
contentManager: Can view log content and manage content related details like flows (without the permissions to manage infrastructure, but including access to view infrastructure details).
contentViewer: Can view content like analytics, log search, log tapping (without the permissions to manage or view infrastructure details).
If you need other roles, contact the Axoflow support team. Composing other roles is possible as part of a custom integration.
You can use email addresses or GitHub groups to assign your users to AxoConsole user roles.
To use the groups fetched from GitHub, prefix the name of the GitHub group with groups:, and add them to the related roles under kcp.rbac.roles.<role>.groups. For example:
  rbac:
    createRoles: true
    createRoleBindings: true
    roles:
      IAMadmin:
        groups:
          - groups:iamadmin
      admin:
        groups:
          - groups:admins
      contentViewer:
        groups:
          - groups:readonly
A specific email address, for example, email:username@example.com
An entire email domain, for example, emaildomain:example.com. Any user who authenticates with an email address belonging to this email domain will have access to the role.
A user group. The format of the group depends on the OID provider.
cognito:groups:<groupname-retrieved-from-cognito>, for example, cognito:groups:ExampleGoogleSaml:Operator.groups:<groupname-retrieved-from-dex> for example, groups:operator.A specific session of an authenticated user, in the following format: user:<oidc-response-subject>, for example: user:42c4e962-f077-705f-138f-f01ba1220c44.
Every authenticated user: axoflow:user
For details on authorization settings, see Authorization.
Save the file.
Restart the dex deployment after changing the connector:
kubectl rollout restart deployment/dex -n axoflow
Expected output:
deployment.apps/dex restarted
Open the main page of your AxoConsole deployment in your browser. You’ll be redirected to the GitHub authentication page.
After completing the GitHub authentication you can access AxoConsole.
You can troubleshoot common errors by running kubectl logs -n axoflow <dex-container-name>
If you run into problems setting up the authentication or authorization, contact our support team.
This section shows you how to use Google OpenID Connect as an authentication backend for AxoConsole. It is assumed that you already have a Google organization and Google Cloud Console access. Complete the following steps.
To use Google authentication, AxoConsole must be deployed on a publicly accessible domain name (the $BASE_HOSTNAME must end with a valid top-level domain, for example, .com or .io.)
Configure OpenID Connect and create an OpenID credential for a Web application.
https://auth.<your-console-host.your-domain>/callback, for example, https://auth.axoflow-console.example.com/callback.For details on setting up OpenID Connect, see the official documentation.
To use group memberships when assigning your users to AxoConsole user roles, you have to configure a service account to retrieve group memberships. Otherwise, you can use email domains. To set up a proper service account, complete the following steps.
https://www.googleapis.com/auth/admin.directory.group.readonly scope to the service account. Do not delegate any other scope.You’ll also need the email address of a Google Workspace user with a minimum of the Groups Reader Role assigned. The service account will impersonate this user when making calls to the admin API.
Configure Dex as the OIDC provider in the /var/lib/rancher/k3s/server/manifests/axoflow-config.yaml file. For example:
chalco:
  oidc:
    enabled: true
    provider: "dex"

axoidp:
  enabled: false

dex:
  enabled: true
Configure authentication by editing the spec.dex.config section of the /var/lib/rancher/k3s/server/manifests/axoflow-config.yaml file.
(Optional) If you’ve used our earlier example, delete the spec.dex.config.staticPasswords section.
Add the spec.dex.config.connectors section to the file, like this:
connectors:
- type: google
  id: google
  name: Google
  config:
    # Connector config values starting with a "$" will read from the environment.
    clientID: <ID-of-Google-application>
    clientSecret: <Secret-of-GitHub-application>

    # Dex's issuer URL + "/callback"
    redirectURI: <idp.your-host.your-domain/callback>

    # Set the value of `prompt` query parameter in the authorization request
    # The default value is "consent" when not set.
    promptType: consent

    # Google supports whitelisting allowed domains when using G Suite
    # (Google Apps). The following field can be set to a list of domains
    # that can log in:
    #
    hostedDomains:
    - <your-domain>

    # For group membership authorization:
    #serviceAccountFilePath: "/etc/dex/sa-file/service-account.json"
    #domainToAdminEmail:
      #"*": <impersonated-group-reader-email-address>
Edit the following fields. For details on the configuration parameters, see the Dex Google connector documentation.
connectors.config.clientID: The ID of the Google application.connectors.config.clientSecret: The client secret of the Google application.connectors.config.redirectURI: The callback URL of the Google application: https://auth.<your-console-host.your-domain>/callback, for example, https://auth.axoflow-console.example.com/callback.connectors.config.hostedDomains: The domain where AxoConsole is deployed, for example, example.com. Your users must have email addresses for this domain at Google.If you’ll use Google group memberships for authorization, uncomment the serviceAccountFilePath and domainToAdminEmail sections. Replace <impersonated-group-reader-email-address> with the email address you created in Google group memberships prerequisites.
    # For group membership authorization:
    serviceAccountFilePath: "/etc/dex/sa-file/service-account.json"
    domainToAdminEmail:
      "*": <impersonated-group-reader-email-address>
Configure authorization in the kcp.rbac.roles section of the /var/lib/rancher/k3s/server/manifests/axoflow-config.yaml file.
The following roles are available in AxoConsole by default:
IAMadmin: Can manage the roles and permissions to access AxoConsole. Only this role can make changes on the Settings > Roles page. Can see the Identity Provider Admin Panel link, which points to the authentication and administration page of the identity provider used to authenticate on AxoConsole. (Every user can access their own profile page at the identity provider by selecting <their username> > Profile in the top-left.)
admin: Has full access to AxoConsole, but has only read access to the Settings > Roles page.
infrastructureManager: Can manage the infrastructure (without the permissions to view or tap log contents, or to rehydrate data). Has full access to the following pages: Activity Logs, Alerting, Routers, Sources, Flows, Provisioning, Search Logs. Can tap into service logs which may contain event payload.
infrastructureViewer: Similar to infrastructure-manager, but can only view the pages.
contentManager: Can view log content and manage content related details like flows (without the permissions to manage infrastructure, but including access to view infrastructure details).
contentViewer: Can view content like analytics, log search, log tapping (without the permissions to manage or view infrastructure details).
If you need other roles, contact the Axoflow support team. Composing other roles is possible as part of a custom integration.
To assign Google groups to AxoConsole roles, add the groups of your users to the related roles under kcp.rbac.roles.<role>.groups.
  rbac:
    createRoles: true
    createRoleBindings: true
    roles:
      IAMadmin:
        groups:
          - groups:iamadmin@example.com
      admin:
        groups:
          - groups:admin@example.com
      contentViewer:
        groups:
          - groups:readonly@example.com
A specific email address, for example, email:username@example.com
An entire email domain, for example, emaildomain:example.com. Any user who authenticates with an email address belonging to this email domain will have access to the role.
A user group. The format of the group depends on the OID provider.
cognito:groups:<groupname-retrieved-from-cognito>, for example, cognito:groups:ExampleGoogleSaml:Operator.groups:<groupname-retrieved-from-dex> for example, groups:operator.A specific session of an authenticated user, in the following format: user:<oidc-response-subject>, for example: user:42c4e962-f077-705f-138f-f01ba1220c44.
Every authenticated user: axoflow:user
For details on authorization settings, see Authorization.
Save the file.
If you’re using Google groups to assign user roles, complete the following steps.
Run the following command to delete the dex-google-service-account secret. This is a placeholder secret that you’ll re-create with valid values in the next step.
kubectl -n axoflow delete secret dex-google-service-account
Re-create the secret using the JSON key of the Google service account you’ve created in Google group membership.
kubectl -n axoflow create secret dex-google-service-account --from-file <path-to-the-JSON-key>
Expected output:
secret/dex-google-service-account created
Edit the /var/lib/rancher/k3s/server/manifests/axoflow-config.yaml file and set the dex.googleServiceAccount.create option to false.
Restart the dex deployment after changing the connector:
kubectl rollout restart deployment/dex -n axoflow
Expected output:
deployment.apps/dex restarted
Open the main page of your AxoConsole deployment in your browser. You’ll be redirected to the Google authentication page.
After completing the Google authentication you can access AxoConsole.
You can troubleshoot common errors by running kubectl logs -n axoflow <dex-container-name>
If you run into problems setting up the authentication or authorization, contact our support team.
This section shows you how to use LDAP as an authentication backend for AxoConsole. In the examples we used the public demo service of FreeIPA as an LDAP server. It is assumed that you already have an LDAP server in place. Complete the following steps.
Configure Dex as the OIDC provider in the /var/lib/rancher/k3s/server/manifests/axoflow-config.yaml file. For example:
chalco:
  oidc:
    enabled: true
    provider: "dex"

axoidp:
  enabled: false

dex:
  enabled: true
Configure authentication by editing the spec.dex.config section of the /var/lib/rancher/k3s/server/manifests/axoflow-config.yaml file.
(Optional) If you’ve used our earlier example, delete the spec.dex.config.staticPasswords section.
Add the spec.dex.config.connectors section to the file, like this:
CAUTION:
This example shows a simple configuration suitable for testing. In production environments, make sure to:
$ character, you must set it in an environment variable and pass it like bindPW: $LDAP_BINDPW. dex:
enabled: true
localIP: $VM_IP_ADDRESS
config:
create: true
connectors:
- type: ldap
name: OpenLDAP
id: ldap
config:
host: ipa.demo1.freeipa.org
insecureNoSSL: true
# This would normally be a read-only user.
bindDN: uid=admin,cn=users,cn=accounts,dc=demo1,dc=freeipa,dc=org
bindPW: Secret123
usernamePrompt: Email Address
userSearch:
baseDN: dc=demo1,dc=freeipa,dc=org
filter: "(objectClass=person)"
username: mail
# "DN" (case sensitive) is a special attribute name. It indicates that
# this value should be taken from the entity's DN not an attribute on
# the entity.
idAttr: uid
emailAttr: mail
nameAttr: cn
groupSearch:
baseDN: dc=demo1,dc=freeipa,dc=org
filter: "(objectClass=groupOfNames)"
userMatchers:
# A user is a member of a group when their DN matches
# the value of a "member" attribute on the group entity.
- userAttr: DN
groupAttr: member
# The group name should be the "cn" value.
nameAttr: cn
Edit the following fields. For details on the configuration parameters, see the Dex LDAP connector documentation.
connectors.config.host: The hostname and optionally the port of the LDAP server in “host:port” format.connectors.config.bindDN and connectors.config.bindPW: The DN and password for an application service account that the connector uses to search for users and groups.connectors.config.userSearch.bindDN and connectors.config.groupSearch.bindDN: The base DN for the user and group search.Configure authorization in the kcp.rbac.roles section of the /var/lib/rancher/k3s/server/manifests/axoflow-config.yaml file.
The following roles are available in AxoConsole by default:
IAMadmin: Can manage the roles and permissions to access AxoConsole. Only this role can make changes on the Settings > Roles page. Can see the Identity Provider Admin Panel link, which points to the authentication and administration page of the identity provider used to authenticate on AxoConsole. (Every user can access their own profile page at the identity provider by selecting <their username> > Profile in the top-left.)
admin: Has full access to AxoConsole, but has only read access to the Settings > Roles page.
infrastructureManager: Can manage the infrastructure (without the permissions to view or tap log contents, or to rehydrate data). Has full access to the following pages: Activity Logs, Alerting, Routers, Sources, Flows, Provisioning, Search Logs. Can tap into service logs which may contain event payload.
infrastructureViewer: Similar to infrastructure-manager, but can only view the pages.
contentManager: Can view log content and manage content related details like flows (without the permissions to manage infrastructure, but including access to view infrastructure details).
contentViewer: Can view content like analytics, log search, log tapping (without the permissions to manage or view infrastructure details).
If you need other roles, contact the Axoflow support team. Composing other roles is possible as part of a custom integration.
kcp.rbac.roles.<role>.groups. In the following example, the managers group gets administrator role, and the readonly group gets read-only access to AxoConsole. rbac:
createRoles: true
createRoleBindings: true
roles:
IAMadmin:
groups:
- groups:iamadmin
admin:
groups:
- groups:managers
contentViewer:
groups:
- groups:readonly
A specific email address, for example, email:username@example.com
An entire email domain, for example, emaildomain:example.com. Any user who authenticates with an email address belonging to this email domain will have access to the role.
A user group. The format of the group depends on the OID provider.
cognito:groups:<groupname-retrieved-from-cognito>, for example, cognito:groups:ExampleGoogleSaml:Operator.groups:<groupname-retrieved-from-dex> for example, groups:operator.A specific session of an authenticated user, in the following format: user:<oidc-response-subject>, for example: user:42c4e962-f077-705f-138f-f01ba1220c44.
Every authenticated user: axoflow:user
For details on authorization settings, see Authorization.
Save the file.
Restart the dex deployment after changing the connector:
kubectl rollout restart deployment/dex -n axoflow
Expected output:
deployment.apps/dex restarted
You can troubleshoot common errors by running kubectl logs -n axoflow <dex-container-name>
If you run into problems setting up the authentication or authorization, contact our support team.
These sections show you how to configure the authorization of AxoConsole with different authentication backends.
Authorization is configured in the kcp.rbac.roles section of /var/lib/rancher/k3s/server/manifests/axoflow-config.yaml.
The installer sets up the following default role bindings, which grant full access to users in the admin group of your identity provider:
kcp:
  rbac:
    roles:
      IAMadmin:
        groups:
          - "groups:admin"
      admin:
        groups:
          - "groups:admin"
Verify that this matches your requirements by checking the file:
grep -A20 'rbac:' /var/lib/rancher/k3s/server/manifests/axoflow-config.yaml
The following roles are available in AxoConsole by default:
IAMadmin: Can manage the roles and permissions to access AxoConsole. Only this role can make changes on the Settings > Roles page. Can see the Identity Provider Admin Panel link, which points to the authentication and administration page of the identity provider used to authenticate on AxoConsole. (Every user can access their own profile page at the identity provider by selecting <their username> > Profile in the top-left.)
admin: Has full access to AxoConsole, but has only read access to the Settings > Roles page.
infrastructureManager: Can manage the infrastructure (without the permissions to view or tap log contents, or to rehydrate data). Has full access to the following pages: Activity Logs, Alerting, Routers, Sources, Flows, Provisioning, Search Logs. Can tap into service logs which may contain event payload.
infrastructureViewer: Similar to infrastructure-manager, but can only view the pages.
contentManager: Can view log content and manage content related details like flows (without the permissions to manage infrastructure, but including access to view infrastructure details).
contentViewer: Can view content like analytics, log search, log tapping (without the permissions to manage or view infrastructure details).
If you need other roles, contact the Axoflow support team. Composing other roles is possible as part of a custom integration.
To assign additional groups to a role, add them to the groups list. The group format depends on your authentication backend:
groups:<group-name>emaildomain:<domain>Edit the manifest and save — k3s picks up the change automatically:
sudo vi /var/lib/rancher/k3s/server/manifests/axoflow-config.yaml
When using AxoRouter with an on-premises AxoConsole deployment, you have to complete the following steps on the hosts you want to deploy AxoRouter on. These steps are specific to on-premises AxoConsole deployments, and are not needed when using the SaaS AxoConsole.
After a successful AxoConsole installation, the installer writes a prepare-axorouter-host.sh script to the log directory on the AxoConsole host. This script automates all the steps below.
Copy the script to each AxoRouter or Axoflow agent host.
Run it as root:
sudo bash prepare-axorouter-host.sh
The script adds the AxoConsole base hostname and its idp., kcp., and telemetry. subdomains to /etc/hosts, and installs the AxoConsole CA certificate into the system trust store.
If the prepare-host script is not available, complete the following steps manually.
If the domain name of AxoConsole cannot be resolved from the AxoRouter host, add it to the /etc/hosts file of the AxoRouter host in the following format. Use and IP address of AxoConsole that can be accessed from the AxoRouter host.
<AXOFLOW-CONSOLE-IP-ADDRESS> <AXOFLOW-CONSOLE-BASE-URL> idp.<AXOFLOW-CONSOLE-BASE-URL> kcp.<AXOFLOW-CONSOLE-BASE-URL> telemetry.<AXOFLOW-CONSOLE-BASE-URL>
Import AxoConsole certificates to AxoRouter hosts.
On the AxoConsole host: Run the following command to extract the AxoConsole CA certificate. The AxoRouter host will need this certificate to download the installation binaries.
kubectl get secret -n axoflow axoflow-local-root-ca -o jsonpath='{.data.ca\.crt}' | base64 -d > axoflow-ca.crt
Copy this file to the AxoRouter hosts.
On the AxoRouter hosts: Copy the certificate file extracted from the AxoConsole host.
/etc/pki/ca-trust/source/anchors/ folder, then run sudo update-ca-trust extract. (If needed, install the ca-certificates package.)/usr/local/share/ca-certificates/ folder, then run sudo update-ca-certificatescurl -I https://<your-host.your-domain> should give you a valid HTTP/2 200 response
Now you can deploy AxoRouter on the host.
To upgrade an on-prem AxoConsole deployment, complete the following steps.
Log in to the host running AxoConsole.
Run the following command to update the version number in the /var/lib/rancher/k3s/server/manifests/axoflow-config.yaml file to 0.86.0.
sudo sed -i.old -E 's/^( *version: ).*/\10.86.0/' /var/lib/rancher/k3s/server/manifests/axoflow-config.yaml
Wait a few minutes until the pods are restarted. You can check their status by running:
kubectl get pods -A
If everything is working as expected, re-deploy your AxoRouter and Axoflow agent instances to upgrade them.
In case you experience problems during the upgrade, contact our support team.
This guide shows you how to install AxoConsole in an air-gapped environment on a virtual machine. To deploy an on-premises AxoConsole that has internet access, see Deployment guide.
Since this is a single instance deployment, we don’t recommend using it in production environments. For additional steps and configurations needed in production environments, contact our support team.
At a high level, the deployment consists of the following steps:
Running the installation script on the virtual machine that deploys:
Any of these components can be skipped if already installed.
Basic authentication with admin user and password is configured by default. You can also configure other common authentication methods like LDAP, Github and Google.
Before deploying AxoRouter describes the steps you have to complete on a host before deploying AxoRouter on it. These steps are specific to on-premises AxoConsole deployments, and aren’t needed when using the SaaS AxoConsole.
To install AxoConsole, you’ll need the following:
The URL for downloading the AxoConsole bundle. You’ll receive this URL from our team. You can request it using the contact form.
CAUTION:
Don’t start the Install AxoConsole process until you’ve received the bundle URL.
A license key for AxoConsole. You’ll receive this from our team. You can request it using the contact form.
A host that meets the system requirements.
Supported operating system: Ubuntu 24.04, Red Hat 9 and compatible (tested with AlmaLinux 9)
The virtual machine (VM) must have at least:
| Resource | Minimum | Production |
|---|---|---|
| CPU | 4 vCPU | 16 vCPU |
| RAM | 8 GB | 16 GB |
Disk (/) |
100 GB | 250 GB |
A Minimum setup with 4 vCPU (x86_64-based), 8 GB RAM, and 100 GB disk space can handle about 100 AxoRouter instances and 1000 data source hosts.
A real-life production scenario that handles 100 AxoRouter and 3000 data source hosts with 30-day metric retention would need:
For details on sizing, contact our support team.
You’ll need to have access to a user with sudo privileges.
CAUTION:
This procedure covers how to deploy a new AxoConsole instance. The installation script can’t upgrade existing deployments, contact the Axoflow support team for detailed upgrade instructions.
Download the installation bundle file from the URL you’ve received from the Axoflow Support Team.
Transfer the file to the host where you want to install AxoConsole.
Extract the file and navigate into the directory.
tar -xf axoflow-all-in-one-0.86.0-linux-amd64.tar
cd axoflow-all-in-one-0.86.0-linux-amd64
Run the installation script with your license key and the domain name for your AxoConsole deployment.
/var/lib/rancher/k3s/server/manifests/axoflow-config.yaml) available on the host.
sudo LICENSE_KEY=<your-license-key> BASE_HOSTNAME=<axoconsole-domain-name> AXOFLOW_VERSION=0.86.0 bash ./axoflow-install.sh
BASE_HOSTNAME, the installer probes whether <VM_IP>.nip.io resolves and offers it as the default. nip.io is a free wildcard DNS service — handy for testing and demos because the console and all its subdomains resolve without any DNS or /etc/hosts configuration. For production deployments, use a proper domain name.
You can use the following flags as needed for your environment.
--step: Prompt before each step--dry-run: Show what would be done without executing anything--skip-k3s: Skip k3s installation (already installed)--skip-cert-manager: Skip cert-manager installation--disable-traefik: Disable the built-in Traefik ingress controller of k3s. Use this option when using a custom ingress controller.--skip-nip-io: Skip the automatic <VM_IP>.nip.io DNS probe and use axoflow.local as the default base hostname.--diagnose [namespace]: Inspect pods that are not ready and explain why (image-pull errors, configuration issues, crashes). Runs automatically on a timeout; use on demand after a failed install.--uninstall: Uninstall AxoConsole. Prompts before each step — removing workloads, deleting data, and removing k3s — so you can stop at any point. See Uninstall AxoConsole.Advanced flags:
--skip-images: Skip container image import entirely. Use when images are already loaded into k3s.--image-mode bundle|component|skip: Control how container images are imported. bundle (default) imports pre-packaged image tarballs; component imports one image per component; skip skips import.--prepare-env: Install k3s, cert-manager, and Traefik only — skip AxoConsole itself. Use for a two-phase install where you want to configure the environment before deploying AxoConsole.--ignore-requirements: Bypass hardware requirement checks.If needed, follow the on-screen instructions. For a test installation, you can usually use the default values. For recommendations for a production environment, contact our support team.
Wait a few minutes until everything is installed.
In case of any errors, check Troubleshooting for tips.
The script prompts to display the password of the default admin user. Record it, you’ll need it to log in to AxoConsole.
...
[2026-06-02 20:44:28] [INFO ] All pods in axoflow are ready/complete
[2026-06-02 20:44:28] [INFO ] Axoflow is healthy
[2026-06-02 20:44:28] [INFO ] Access the UI at: https://<axoconsole-domain-name>
Show admin credentials? [y/N]: y
Username: admin
Password: MzGIjuWKjXOtiRs4
If needed, later you can retrieve the password by running:
kubectl -n "${AXOFLOW_NAMESPACE}" get secret axoidp-admin \
-o go-template='Username: {{ .data.username | base64decode }}{{ printf "\n" }}Password: {{ .data.password | base64decode }}{{ printf "\n" }}'
If the domain name of AxoConsole cannot be resolved from your desktop, add it to the /etc/hosts file in the following format. Use and IP address of AxoConsole that can be accessed from your desktop.
<AXOFLOW-CONSOLE-IP-ADDRESS> <your-host.your-domain> idp.<your-host.your-domain> kcp.<your-host.your-domain> telemetry.<your-host.your-domain>
Open the https://<your-host.your-domain> URL in your browser.
The on-premise deployment of AxoConsole shows a self-signed certificate. If your browser complains about the related risks, accept it.
Use the email address and password you got or set in the installation step to log in to AxoConsole.
If you run a host firewall (for example, firewalld), open the ports AxoConsole and AxoRouter need before you start the installation, otherwise agents and log sources won’t be able to connect.
The reference commands in this section are written for RHEL 9.X and the k3s Kubernetes distribution, which is the default in the air-gapped AxoConsole bundle. If you run a different operating system, a different firewall front-end, or a Kubernetes distribution other than k3s, the commands, zones, and CIDRs may differ: use the port list and adapt the commands to your environment. For the operating system requirements of k3s, see the k3s installation requirements.
The k3s project recommends disabling firewalld entirely (systemctl disable --now firewalld) and relying on k3s-managed iptables rules instead. Only apply the rules below if your security policy requires firewalld to stay enabled.
On the AxoConsole node:
The AxoConsole host must have the following Open Ports:
kubectl and for the axolet agents on AxoRouter nodes to connect back to the cluster.In addition, the k3s pod and service CIDRs (by default 10.42.0.0/16 and 10.43.0.0/16) must be trusted so that intra-cluster traffic is not filtered.
If you deploy AxoRouter on the AxoConsole host, open the ports needed by AxoRouter. For details, see Install AxoRouter on Linux.
firewalld commands for RHEL 9.X and k3s.firewalld and a default k3s installation (with Traefik as the ingress controller). Adjust the pod and service CIDRs only if you’ve changed the k3s defaults (--cluster-cidr / --service-cidr).
On the AxoConsole node:
# Traefik ingress - HTTP redirect and HTTPS (Console UI, API, all web traffic)
firewall-cmd --permanent --add-port=80/tcp
firewall-cmd --permanent --add-port=443/tcp

# k3s API server - required for kubectl and for axolet agents on AxoRouter nodes
firewall-cmd --permanent --add-port=6443/tcp

# Trust k3s pod and service CIDRs so intra-cluster traffic is not filtered
# Adjust these only if you changed the k3s defaults (--cluster-cidr / --service-cidr)
firewall-cmd --permanent --zone=trusted --add-source=10.42.0.0/16  # pod CIDR
firewall-cmd --permanent --zone=trusted --add-source=10.43.0.0/16  # service CIDR

firewall-cmd --reload
If you’ve deployed AxoRouter on the node, open the log-ingestion ports that correspond to the default portMapping in the axorouter-syslog chart. Disable or skip any port your deployment does not use.
# Syslog - standard UDP and TCP
firewall-cmd --permanent --add-port=514/udp
firewall-cmd --permanent --add-port=514/tcp

# Syslog - reliable delivery (RFC 3195)
firewall-cmd --permanent --add-port=601/tcp

# Syslog - TLS (RFC 5425)
firewall-cmd --permanent --add-port=6514/tcp

# OpenTelemetry - gRPC receiver
firewall-cmd --permanent --add-port=4317/tcp

# Splunk HEC receiver (optional - only if you forward Splunk HEC traffic)
firewall-cmd --permanent --add-port=9900/tcp

# Windows Event Collector (WEC) LoadBalancer service (optional)
firewall-cmd --permanent --add-port=5085/tcp

firewall-cmd --reload
When you create a connector rule in AxoConsole that opens a new listening port on a AxoRouter node, open that port in firewalld on the corresponding node as well:
# Replace <PORT> and <PROTOCOL> (tcp or udp) with the values from your connector rule
firewall-cmd --permanent --add-port=<PORT>/<PROTOCOL>
firewall-cmd --reload
To list all currently open ports:
firewall-cmd --list-ports
| Service Name | Namespace | Purposes | Function |
|---|---|---|---|
| KCP | axoflow |
Backend API | Kubernetes Like Service with built in database, that service manage all the settings that our system manage |
| Chalco | axoflow |
Frontend API | Serve the UI API Calls, implement business logic for the UI |
| Controller-Manager | axoflow |
Backend Service | Reacts to state changes in our business entities, manage business logic for the Backend |
| Telemetry Proxy | axoflow |
Backend API | Receives agents telemetries |
| UI | axoflow |
Dashboard | The frontend for AxoConsole |
| Prometheus | axoflow |
Backend API /Service | Monitoring component to store time series information and an API for query, manage alert rules |
| Alertmanager | axoflow |
Backend API /Service | Monitoring component to send alerts based on alerting rules (optional, disabled by default) |
| Axoflow IDP | axoflow |
Identity Connector/Proxy | Identity Connector/Proxy to allow the customer to use own identity (Google, LDAP, etc.) |
| Axolet Dist | axoflow |
Backend API | Static artifact store to contains agents binaries |
| Cert Manager (kcp) | axoflow |
Automated Certificate management tool | Manage certificates for Agents |
| Cert Manager | cert-manager |
Automated Certificate management tool | Manage certificates for Axoflow components (Backend API, HTTP Proxy) |
| FilterX Validator | axoflow |
Backend API | Validates FilterX expressions used in data processing pipelines |
| Traefik Ingress Controller | ingress-traefik |
HTTP Proxy | Route the HTTP traffic between multiple Frontend/Backend APIs |
[ERROR] Timed out waiting for k3s node to be Ready error message, increase the timeout limit by running K3S_TIMEOUT=180, then rerun the installation script.In case of other errors, run the following command to create a debug package from the cluster, and contact our support team.
sudo k3s kubectl cluster-info dump --all-namespaces --output-directory=./cluster-dump && tar -czvf cluster-dump.tar.gz cluster-dump
To uninstall AxoConsole, run the installer with the --uninstall flag:
sudo ./axoflow-install.sh --uninstall
The uninstaller prompts before each step and requires separate confirmation for:
Removing the AxoConsole workloads and manifests
Deleting stored data (namespace and PersistentVolumeClaims) — irreversible
CAUTION:
Hazard of data loss!
Confirming step 2 permanently deletes all stored data.
Removing k3s
CAUTION:
Hazard of data loss!
If you’re using k3s to run other software apart from AxoConsole, decline step 3 to keep k3s in place.
The uninstaller is safe to run on a partial or incomplete installation.