This guide describes how to deploy multiple AxoRouter hosts as a high availability cluster with keepalived managing a shared virtual IP across the hosts. Instead of relying on a dedicated load balancer, keepalived uses VRRP to keep the virtual IP on a healthy node and fail it over automatically, so this setup needs no external load-balancing hardware. For an overview of other approaches, including putting a load balancer in front of the cluster, see AxoRouter high availability deployment options.
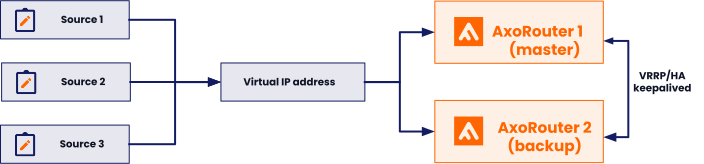
The examples in this guide deploy AxoRouter on AlmaLinux 10, but the procedure also works on other supported platforms.
The hosts running AxoRouter can be physical or virtual machines. The recommended layout depends on which you choose:
- Physical machines: Install two machines with a dedicated HA link between them to keep the HA traffic separate from the production traffic.
- Virtual machines: Set up three VMs with a dedicated (and guaranteed bandwidth) HA link (HA VLAN) spanning across them, to keep the HA traffic separate from the production traffic.
A cluster targeting highly reliable services should ideally consist of at least three nodes to avoid split-brain situations. In a split-brain situation, both nodes think that they are the last surviving node (for example, during a network failure) and bring up their services, leading to several problems.
The setups described here use fewer than the ideal number of nodes for cost reasons. Dedicated HA links provide an additional channel for HA communication independently of the production traffic, and significantly reduce the risk of split-brain scenarios.
At a high level, setting up the cluster involves the following steps:
- Prepare every cluster host: deploy AxoRouter, install
keepalived, and configure SELinux to letkeepalivedquery the AxoRouter service status. - Configure
keepalivedon the primary node with theMASTERstate, the shared virtual IP, and the addresses of the peer nodes. - Configure
keepalivedon each secondary node with theBACKUPstate and a lower priority than the primary. - Open TCP port 112 on every host’s firewall so the nodes can exchange VRRP advertisements, then enable and start the
keepalivedservice.
The following sections walk through each step in detail.
Prepare the hosts and install keepalived
On every AxoRouter host that is a member of the high availability cluster, complete the following steps.
-
Deploy AxoRouter on every host as described in Install AxoRouter on Linux.
-
Install
keepalivedfrom the OS repositories.sudo dnf install keepalived -
Configure SELinux so
keepalivedcan monitor the status of AxoRouter. For that, create and load a SELinux policy module that allowskeepalivedto run thesystemctl statuscommand.-
Install the
selinux-policy-develpackage:sudo dnf install selinux-policy-devel -
Create a policy module file.
cat > keepalived-allow-systemctl-status.te <<EOF module keepalived-allow-systemctl-status 1.0; require { type keepalived_t; type syslogd_var_run_t; type systemd_systemctl_exec_t; type systemd_generator_unit_file_t; class file { execute execute_no_trans getattr map open read setattr }; class dir read; class service status; } #============= keepalived_t ============== allow keepalived_t syslogd_var_run_t:dir read; #!!!! This avc can be allowed using the boolean 'domain_can_mmap_files' allow keepalived_t systemd_systemctl_exec_t:file { execute execute_no_trans getattr open read setattr }; #!!!! This avc can be allowed using the boolean 'domain_can_mmap_files' allow keepalived_t systemd_systemctl_exec_t:file map; allow keepalived_t systemd_generator_unit_file_t:service status; EOF -
Build and load the SELinux module:
checkmodule -M -m -o keepalived-allow-systemctl-status.mod keepalived-allow-systemctl-status.te
semodule_package -o keepalived-allow-systemctl-status.pp -m keepalived-allow-systemctl-status.mod
sudo semodule -i keepalived-allow-systemctl-status.pp
-
-
Repeat these steps on the other AxoRouter hosts.
Configure keepalived as MASTER (primary node)
-
Set up the
keepalivedconfiguration on the primary node. See the list of main configuration elements after the command.sudo mv /etc/keepalived/keepalived.conf{,.old} -v sudo cat > /etc/keepalived/keepalived.conf <<EOF vrrp_script check_axorouter { script "/usr/bin/systemctl status axorouter" interval 5 timeout 2 rise 5 fall 2 user root } vrrp_instance axorouter_vip { state MASTER interface enp0s8 virtual_router_id 51 priority 254 advert_int 1 unicast_src_ip 192.168.56.10 unicast_peer { 192.168.56.11 } authentication { auth_type PASS auth_pass Ax0R0ut3r } virtual_ipaddress { 192.168.10.64/25 dev enp0s9 } track_script { check_axorouter } track_interface { enp0s9 # Fail over if public interface dies enp0s8 # Fail over if dedicated HA interface dies } } EOFThe main configuration elements are:
state: The default state of the node.interface: The interfacekeepalivedis listening on (in this case the HA interface).virtual_router_id: This ID should match across the nodes belonging to the same cluster.priority: An assigned value belonging to the cluster node. During an election, the node with the highest priority wins. The maximum value is 254.unicast_src_ip: The source IP addresskeepalivedsends its advertisements with (in this case on the HA interface).unicast_peer: IP addresses of the other cluster nodes (in this case the IP addresses on their respective HA interfaces).auth_pass: The password can have any value. Maximum length is 8 characters; longer values are truncated. All members of the cluster must have the same value.virtual_ipaddress: The virtual IP address and the interface it should be configured on (the interface facing the data sources).track_script: A shell script that can be used to verify the status of the service.track_interface: A list of network interfaces the status of whichkeepalivedshould monitor (the interfacekeepalivedis listening on is in this list by default).
-
Enable inbound traffic on port 112/TCP on the host’s firewall.
sudo firewall-cmd --permanent --add-port=112/tcp && firewall-cmd --reload -
Enable and start the
keepalivedservice.sudo systemctl enable --now keepalived
Configure keepalived as BACKUP (secondary nodes)
Perform the following steps on the secondary hosts.
-
Deploy the following
keepalivedconfiguration.sudo mv /etc/keepalived/keepalived.conf{,.old} -v sudo cat > /etc/keepalived/keepalived.conf <<EOF vrrp_script check_axorouter { script "/usr/bin/systemctl status axorouter" interval 5 timeout 2 rise 5 fall 2 user root } vrrp_instance axorouter_vip { state BACKUP interface enp0s8 virtual_router_id 51 priority 253 advert_int 1 unicast_src_ip 192.168.56.11 unicast_peer { 192.168.56.10 } authentication { auth_type PASS auth_pass Ax0R0ut3r } virtual_ipaddress { 192.168.10.64/25 dev enp0s9 } track_script { check_axorouter } track_interface { enp0s9 # Fail over if public interface dies enp0s8 # Fail over if dedicated HA interface dies } } EOF -
Enable inbound traffic at port 112/TCP on the host’s firewall.
sudo firewall-cmd --permanent --add-port=112/tcp && firewall-cmd --reload -
Enable and start the
keepalivedservice.sudo systemctl enable --now keepalived
After this, you should have a functional virtual/service IP address so the virtual IP moves to another AxoRouter host if the active one fails.