This is the multi-page printable view of this section. Click here to print.
Storage
- 1: Overview
- 2: Search
- 3: Create Store
- 4: Create External Store
- 5: Delete or Wipe Store
- 6: Deploy AxoLake
1 - Overview
Axoflow provides a range of storage solutions for your security data, with federated search capabilities.
-
AxoStore is a lightweight, queryable, temporary storage option that stores data locally on the AxoRouter host. AxoConsole provides federated search for every AxoRouter that has AxoStore deployed, so you can simultaneously run queries on every AxoStore.
AxoStore is automatically available for all Axoflow customers, for each AxoRouter node, with 7 days retention, and up to 1TB of storage. For longer retention time or bigger storage, you need an extended AxoStore subscription. Contact us for the details.
-
AxoLake is a tiered SaaS security lake with a scalable hot tier for fast queries, and cost-efficient, S3-compatible cloud-based cold tier. You can use high-level, policy-based routing to decide which data goes to cold storage, hot storage, or your SIEM. If you need to work with data from cold storage, you can rehydrate it into hot storage, or even replay it to send it into your SIEM. Designed for long-term retention, open access, and integration with SIEMs and security analytics.
AxoLake provides cheap, long-term archive storage, while delivering accessible hot data for detection and analytics.
To separate the different data in the storage, you can create separate containers called stores. Each store appears as separate destination that you can select in your flows.
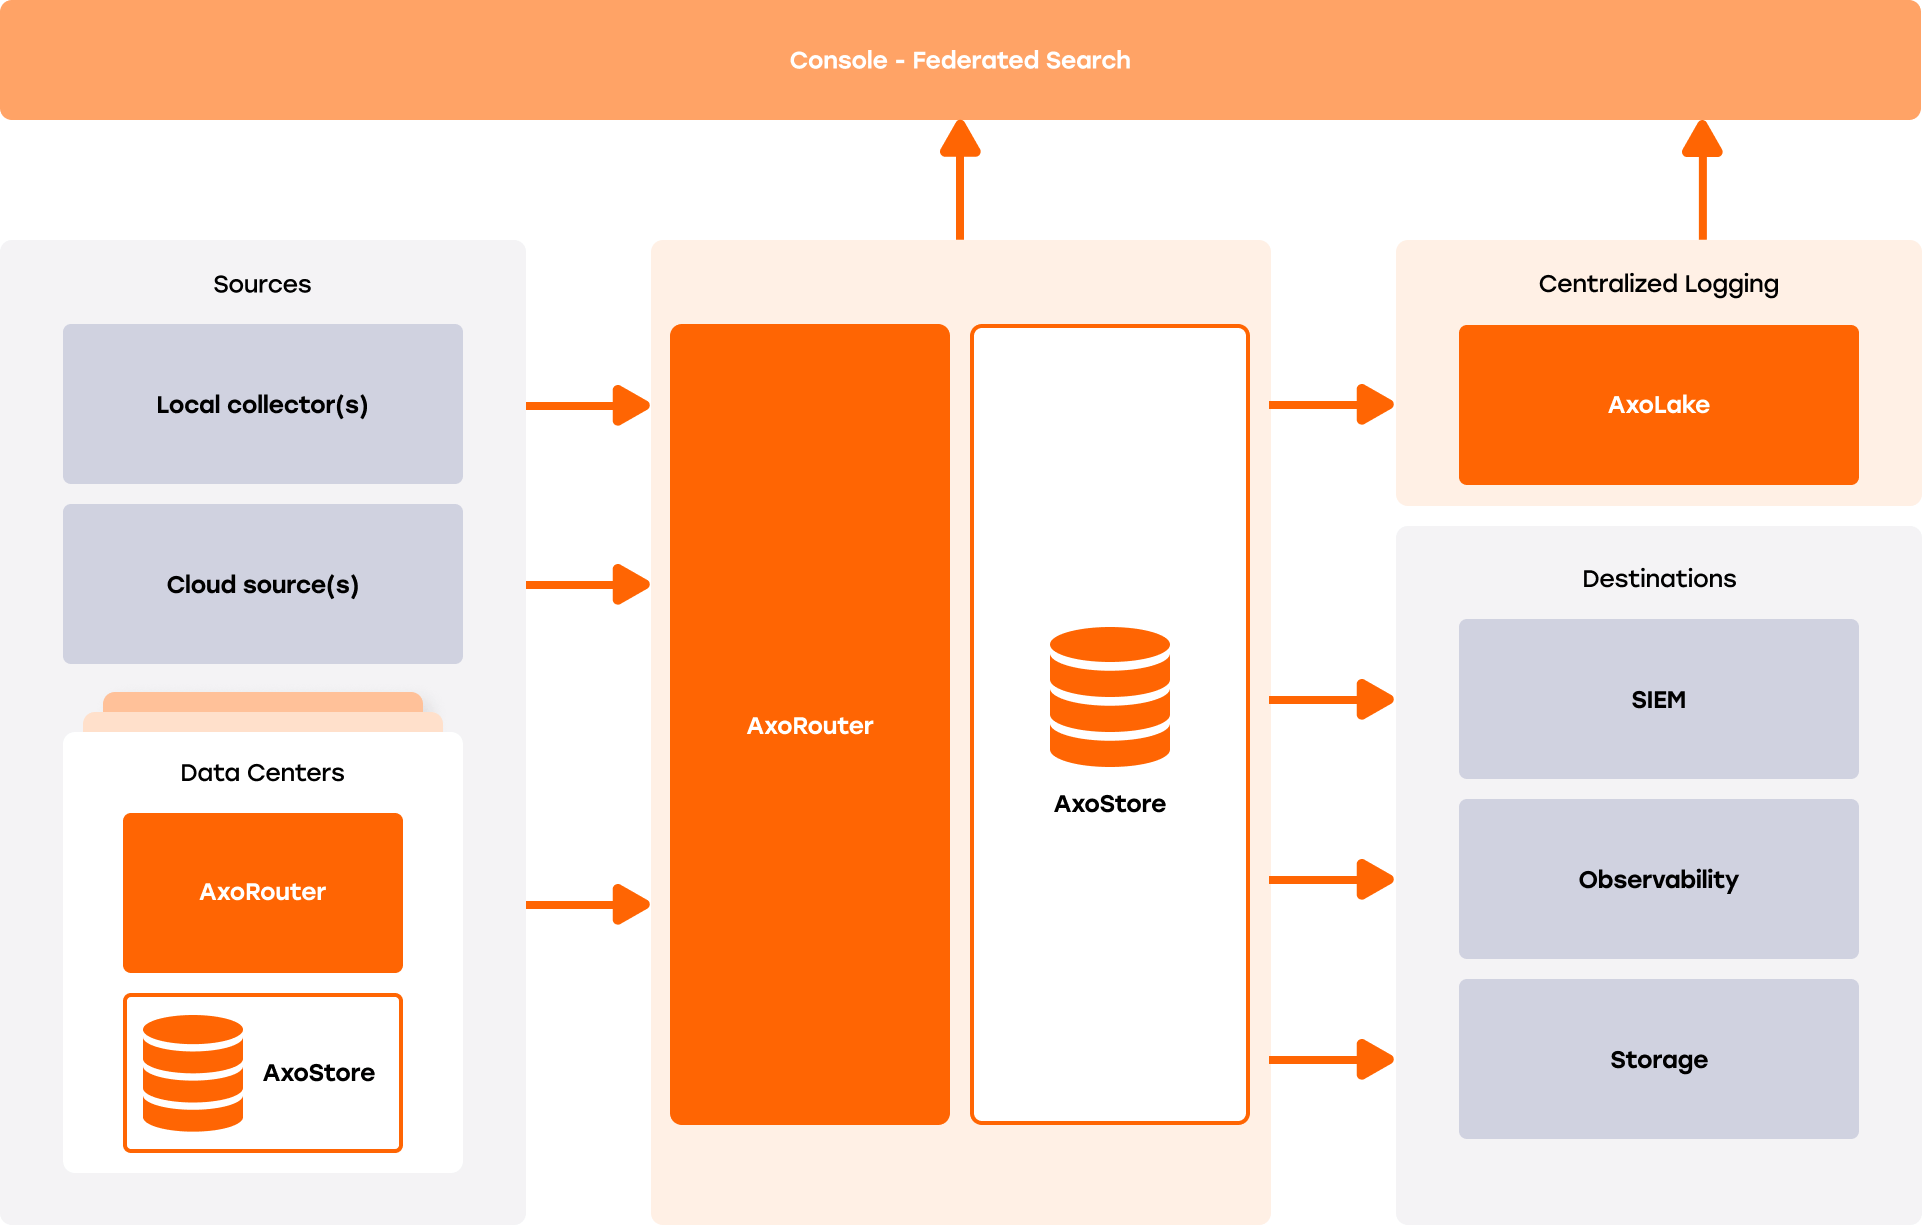
We refer to stores created in AxoStore as stores, while those in AxoLake are called external stores.
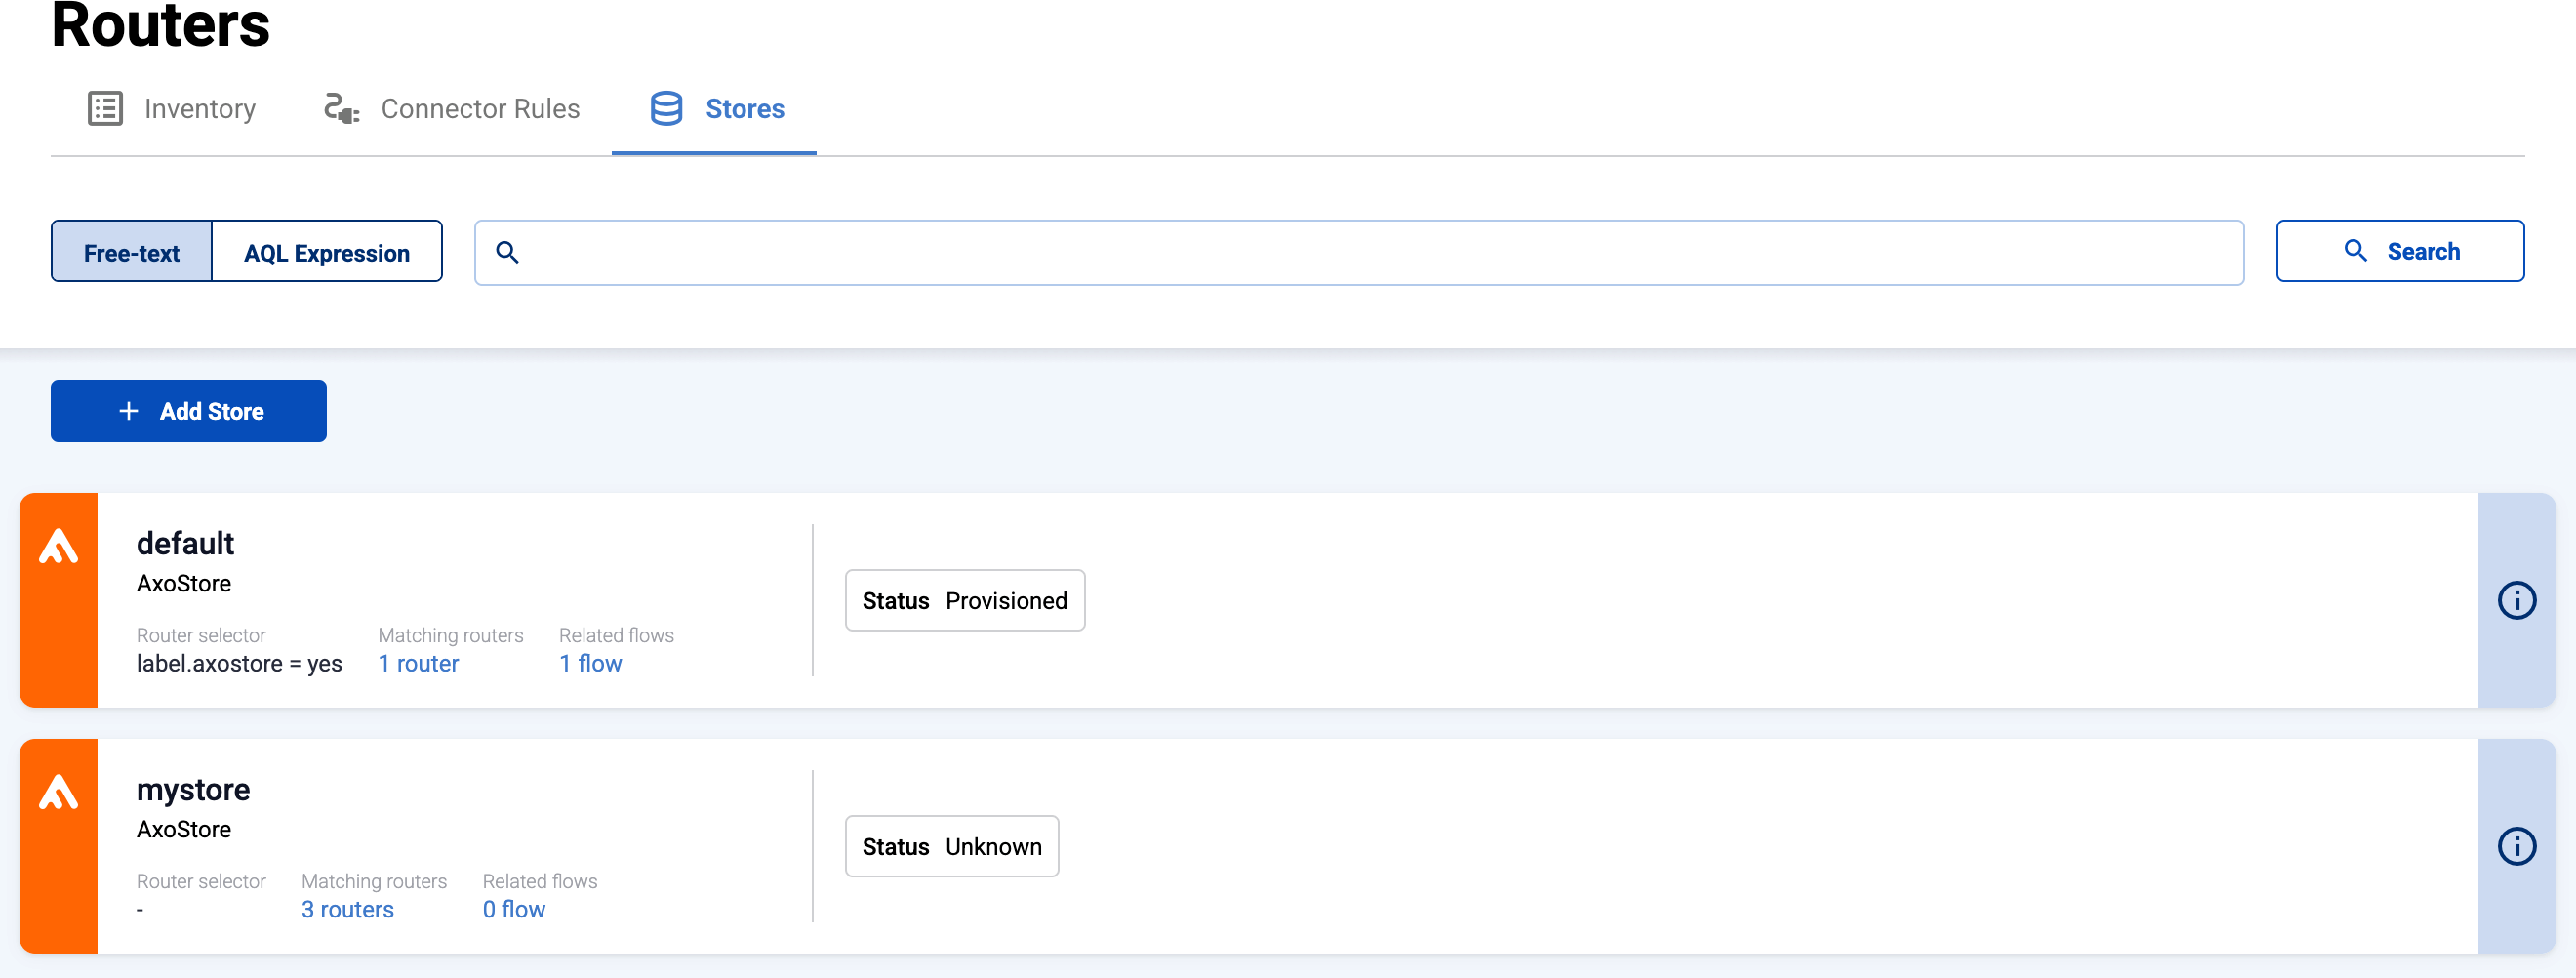
The available stores are listed on the Routers > Stores page. To show only one type of stores, select AQL Expression and enter type=axostore or type=external.
2 - Search
The Search Logs page provides a federated search console to query all data stored in AxoStores (the storage component of AxoRouter) and external stores (AxoLake). Note that AxoStore is only available on an AxoRouter if it was enabled when the AxoRouter host was deployed or updated. For details, see Install AxoRouter on Linux.
To display data from the specified period without any specific search keywords, just select Search.
-
Basic Search mode searches in the values of the following fields of the messages:
body,host_nameBasic Search is case insensitive. Adding multiple keywords searches for matches in any of the previous fields. This is equivalent to the
@ANY =* keyword1 AND @ANY =* keyword2AQL query. -
AQL Query Search mode allows you to search in specific labels of the hosts using different operators.
It also makes more complex filtering possible, using the Equals, Contains (partial match), and Match (regular expression match) operators. Note that:
- To execute the search, click Search, or hit ESC then ENTER.
- AxoConsole autocompletes the built-in and custom labels and field names, as well as their most frequent values, but doesn’t autocomplete labels and variables created by data parsing and processing steps.
- You can use the AND and OR operators to combine expressions, and also parenthesis if needed. For details on AQL, see AQL operator reference.
- The precedence of the operators is the following: parentheses, AND, OR, comparison operators.
- Use the usual keyboard shortcuts to undo (⌘/Ctrl + Z) or redo (⌘/Ctrl + Shift + Z) your edits.
For example,
meta.vendor = palo-alto-networks,meta.host.labels.location != us-east-1, ormeta.connection.src_ip =* 192.168.When searching in stores, you can use the following fields (depending on the configuration of the store).
To limit the search, you can:
- Adjust the Time range of the search (default is 1 day). Note that AxoStore retains data only for 7 days.
- Search only the data stored on a specific Router (by default, AxoConsole searches in the data of every AxoRouter that has AxoStore deployed).
- Search only the data in a specific Store. (By default, every AxoRouter that has AxoStore deployed has a
defaultstore. To create a new store, see Create Store or Create External Store.)

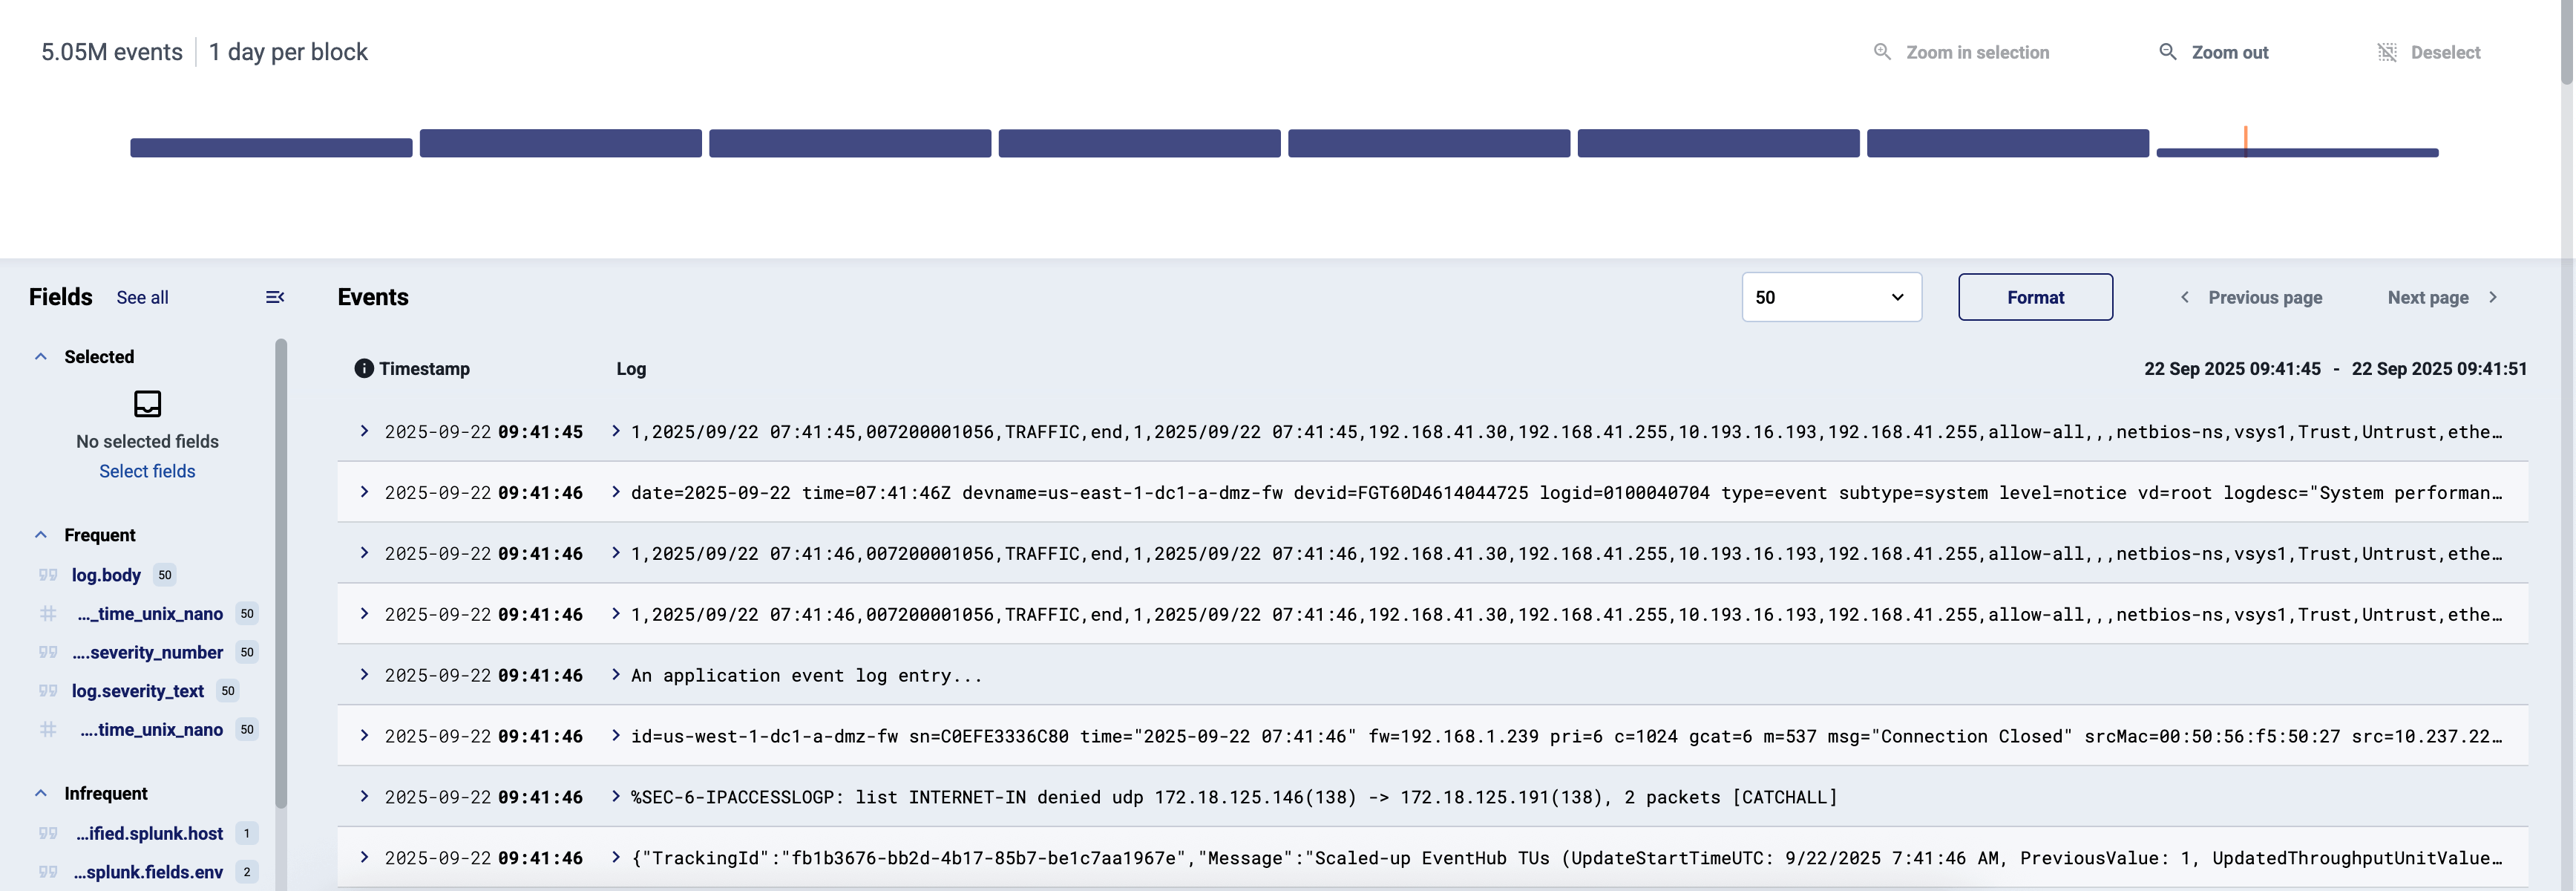
The time distribution of the search results allows you to quickly zoom in on a specific time period. You can select multiple bars to zoom in on them.
Events
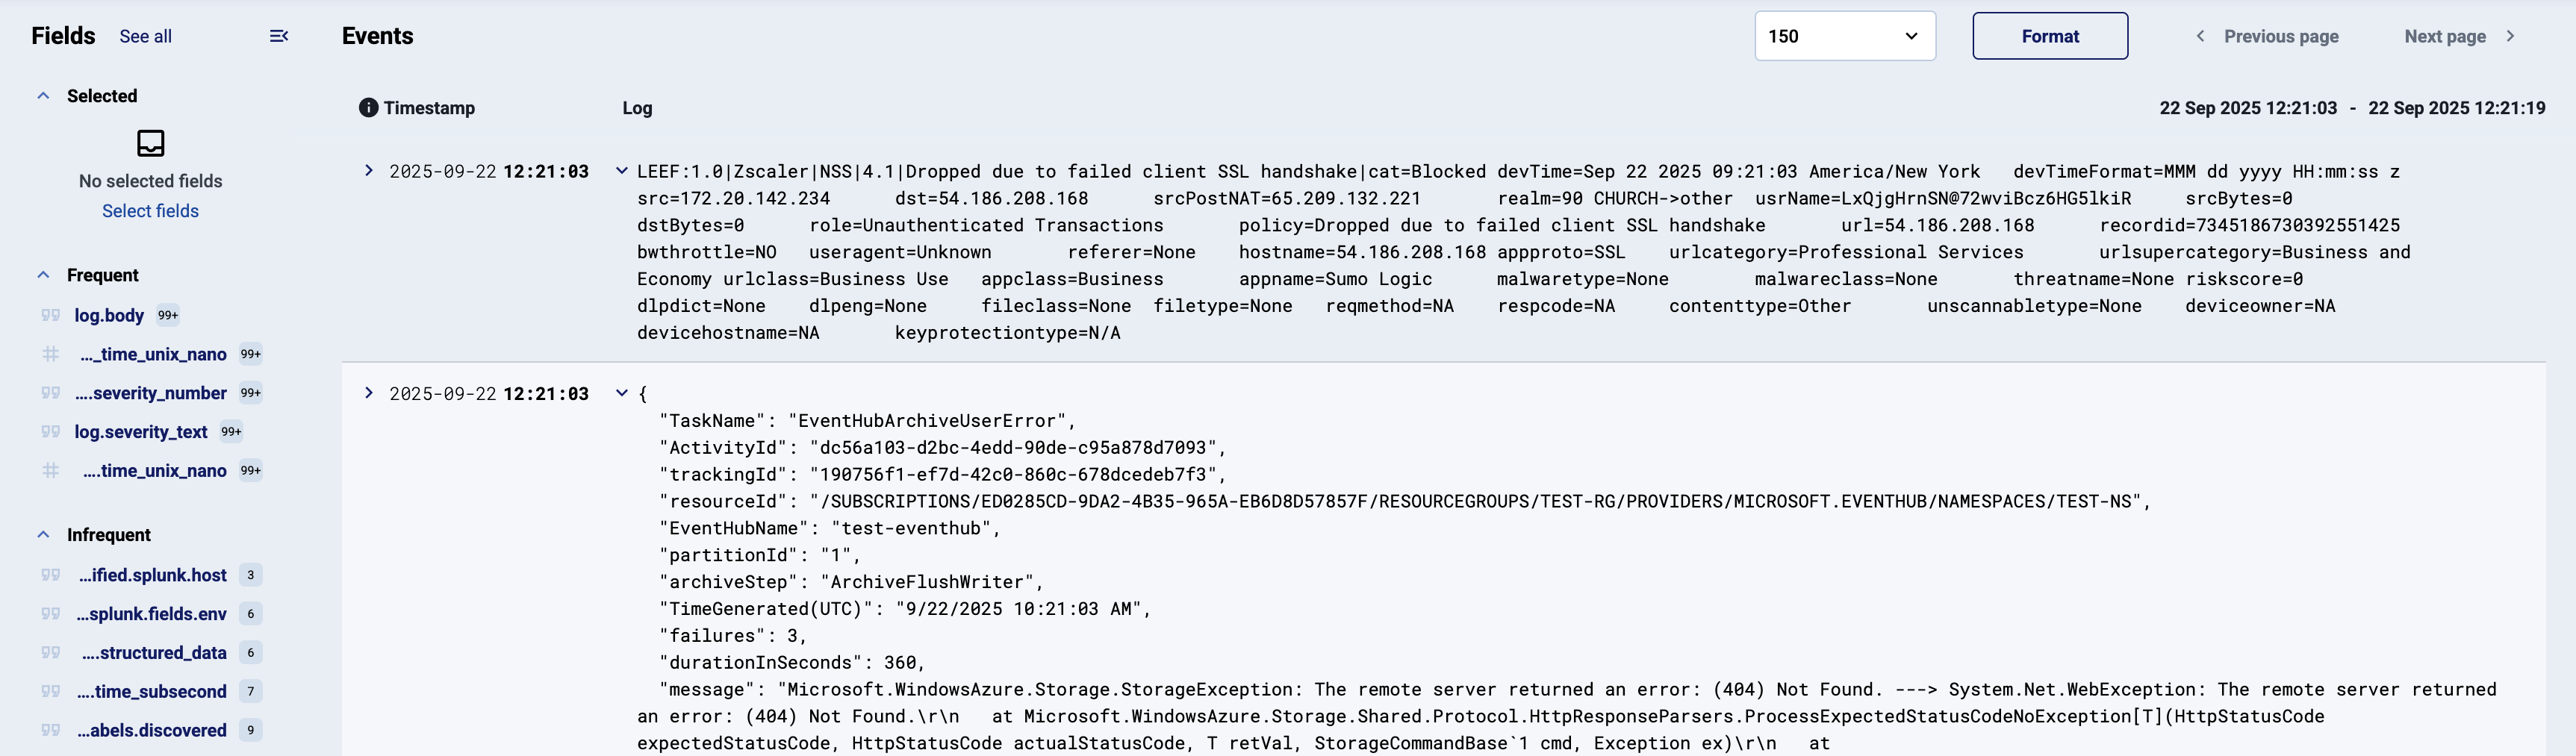
The Events section of the page shows the search results.
Select Format to Wrap long events, and/or Prettify to format JSON messages into human-readable format.
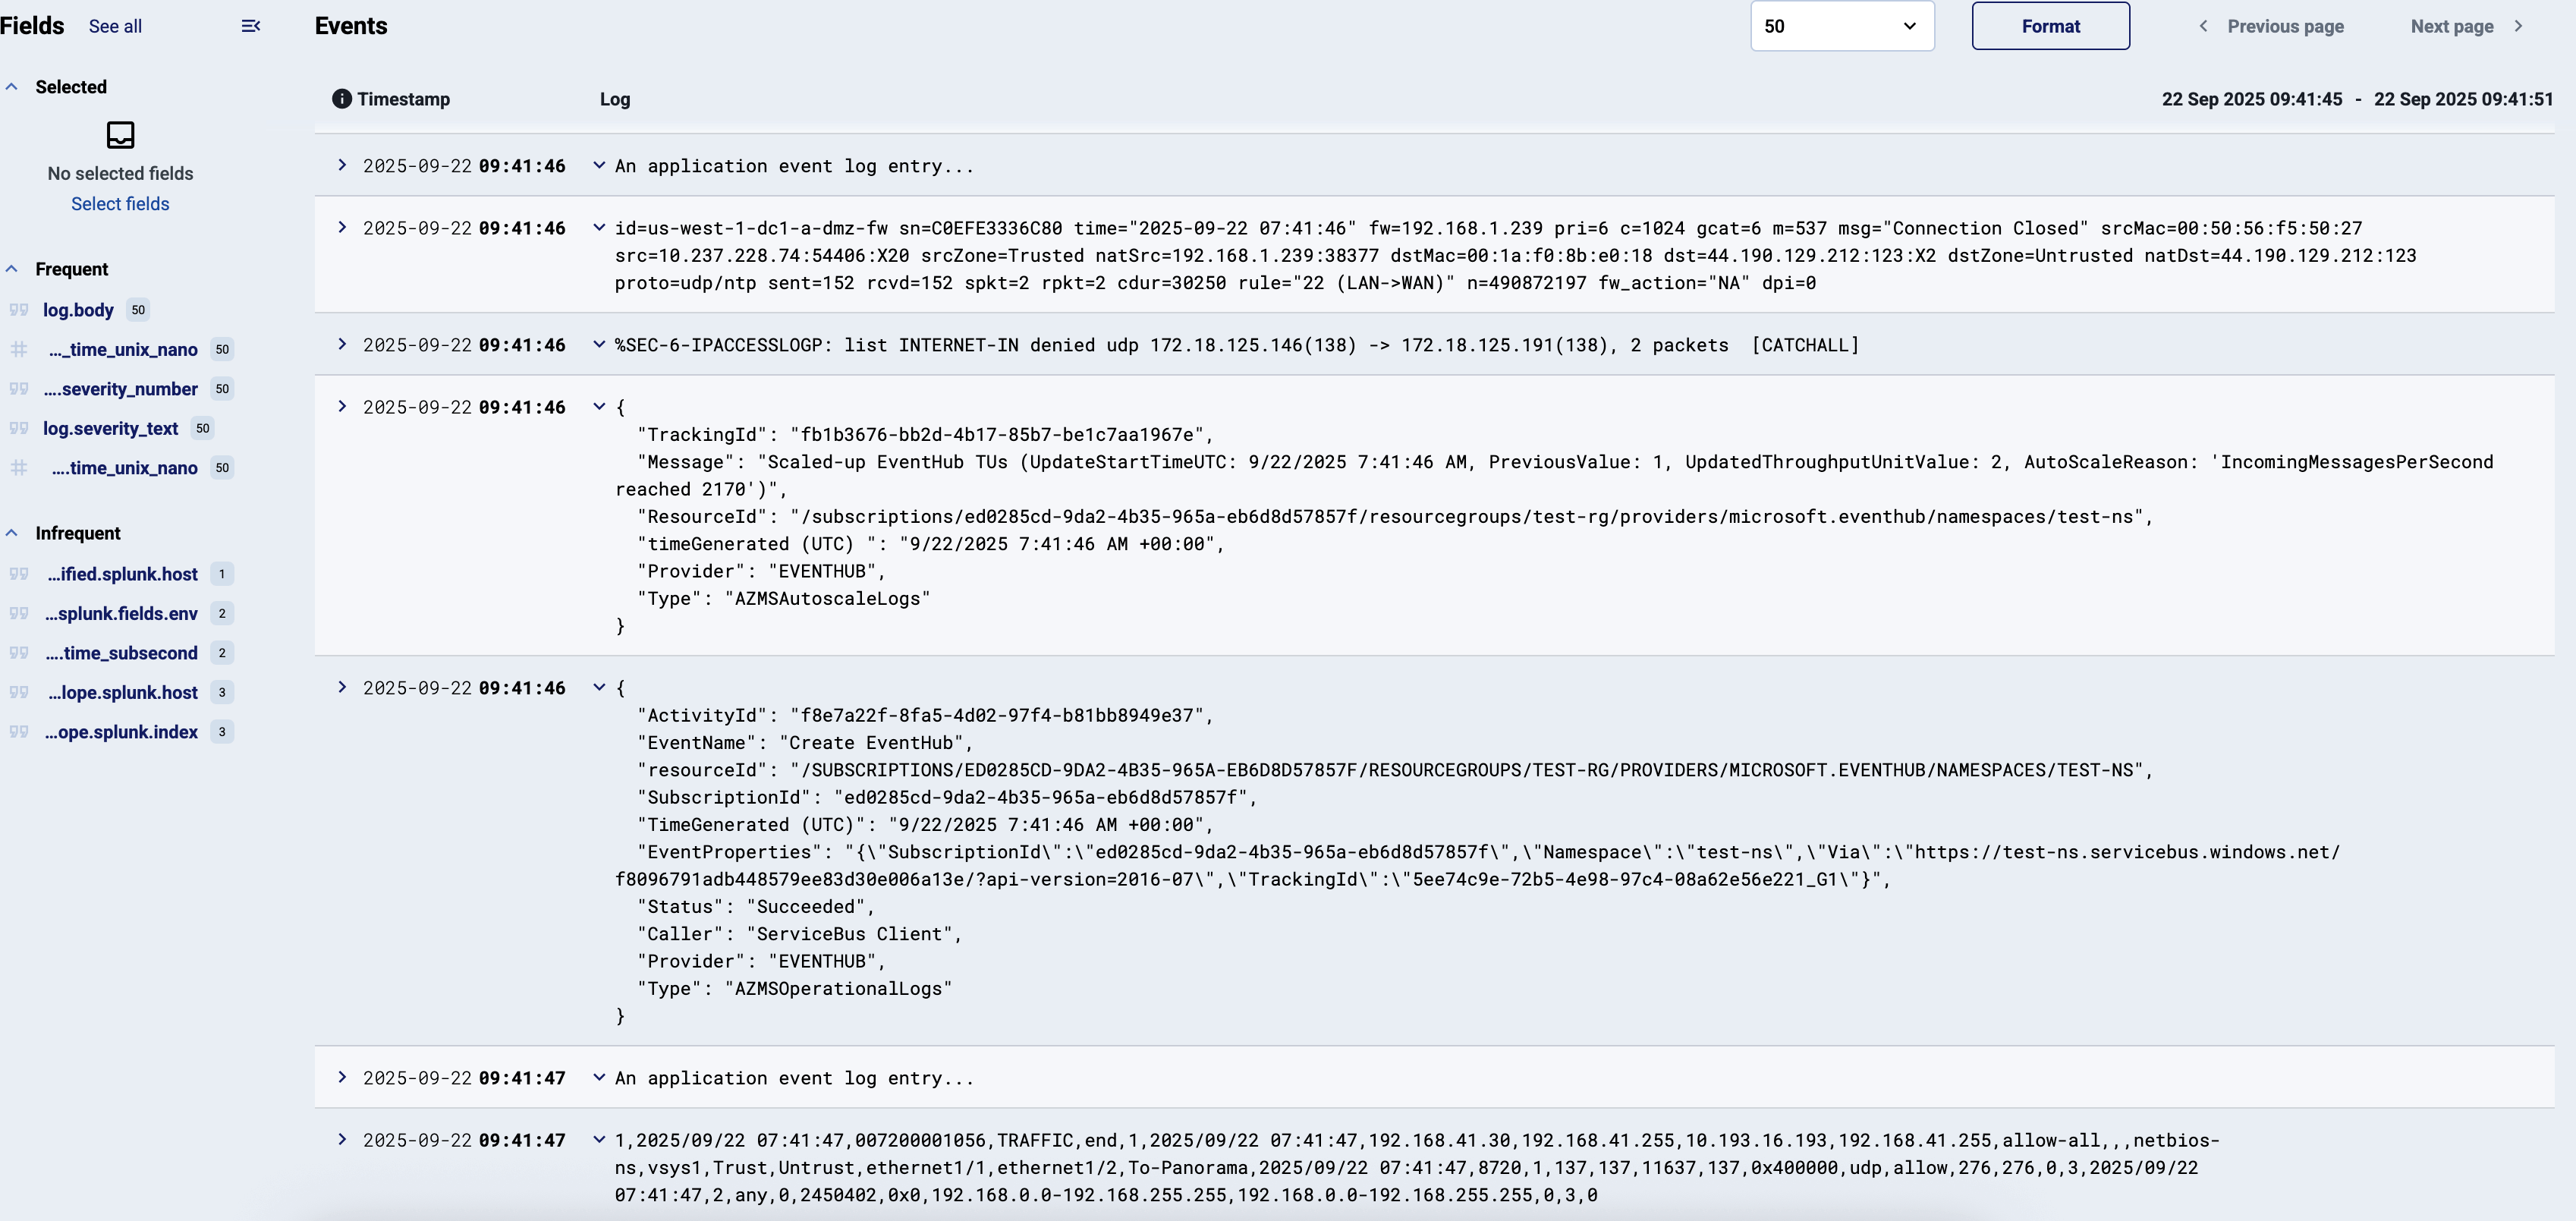
You can open the elements of an event to see its metadata and other details. Depending on the configuration of the store, you can access the following fields.
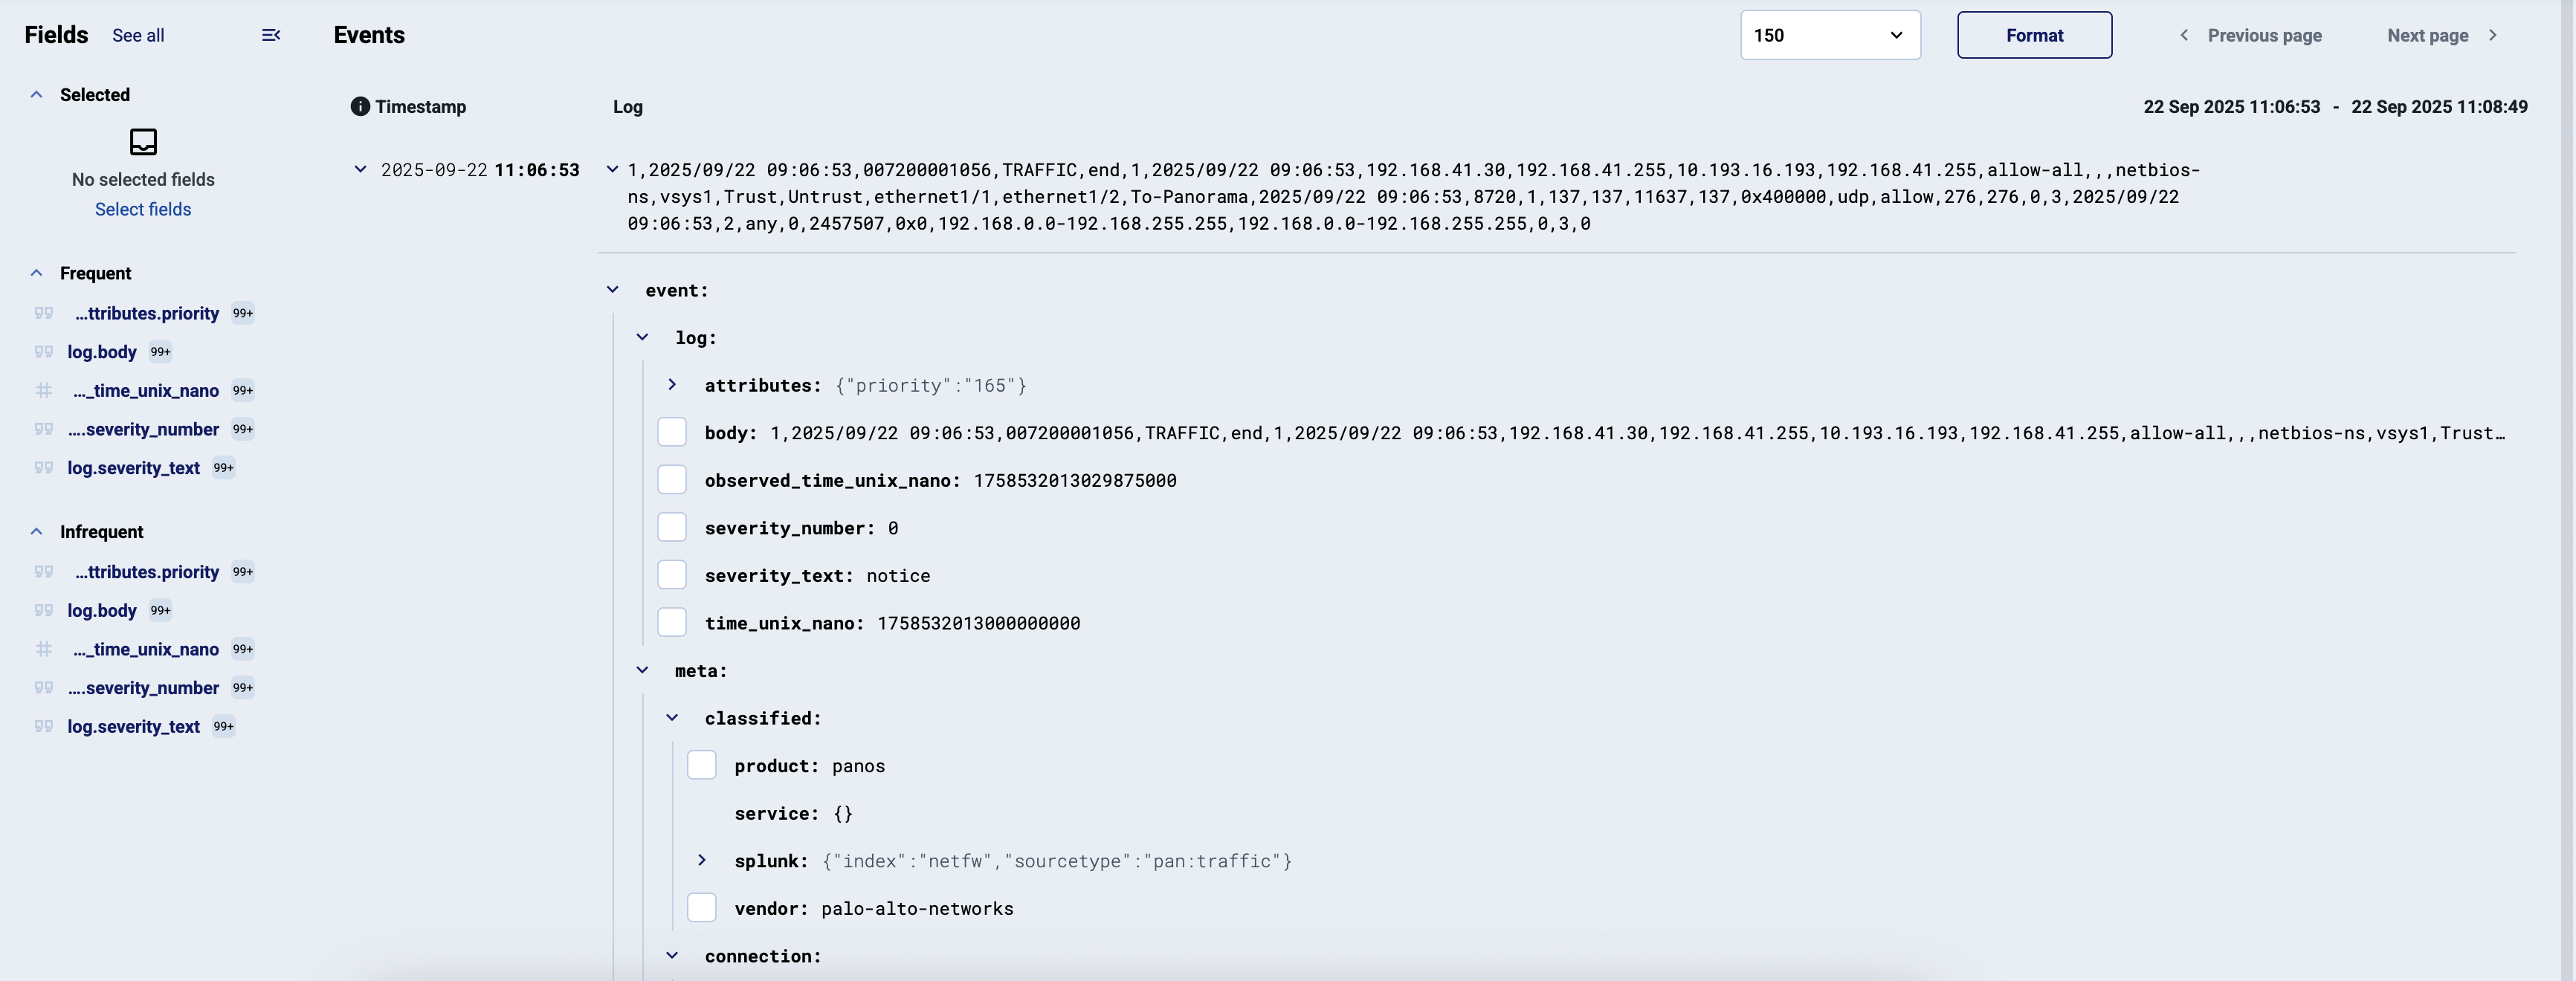
- To add a field to the selected fields and display it for every event, click the checkbox before the field. Selected fields are included as separate fields when you Export the search results into a CSV file.
- To copy the name or the value of a field, select the name of the field, then select Copy Path or Copy Value.
- To copy an AQL query that matches this field and its current value, select the name of the field, then select Copy as Query. You can paste this query into the AQL search field, and use it for filtering.
Fields
The sidebar shows the Frequent and Infrequent fields that appear in the events of the current page (and the number of their occurrence).
You can hover over any field and select to show the selected field and its value under each event that has this field.

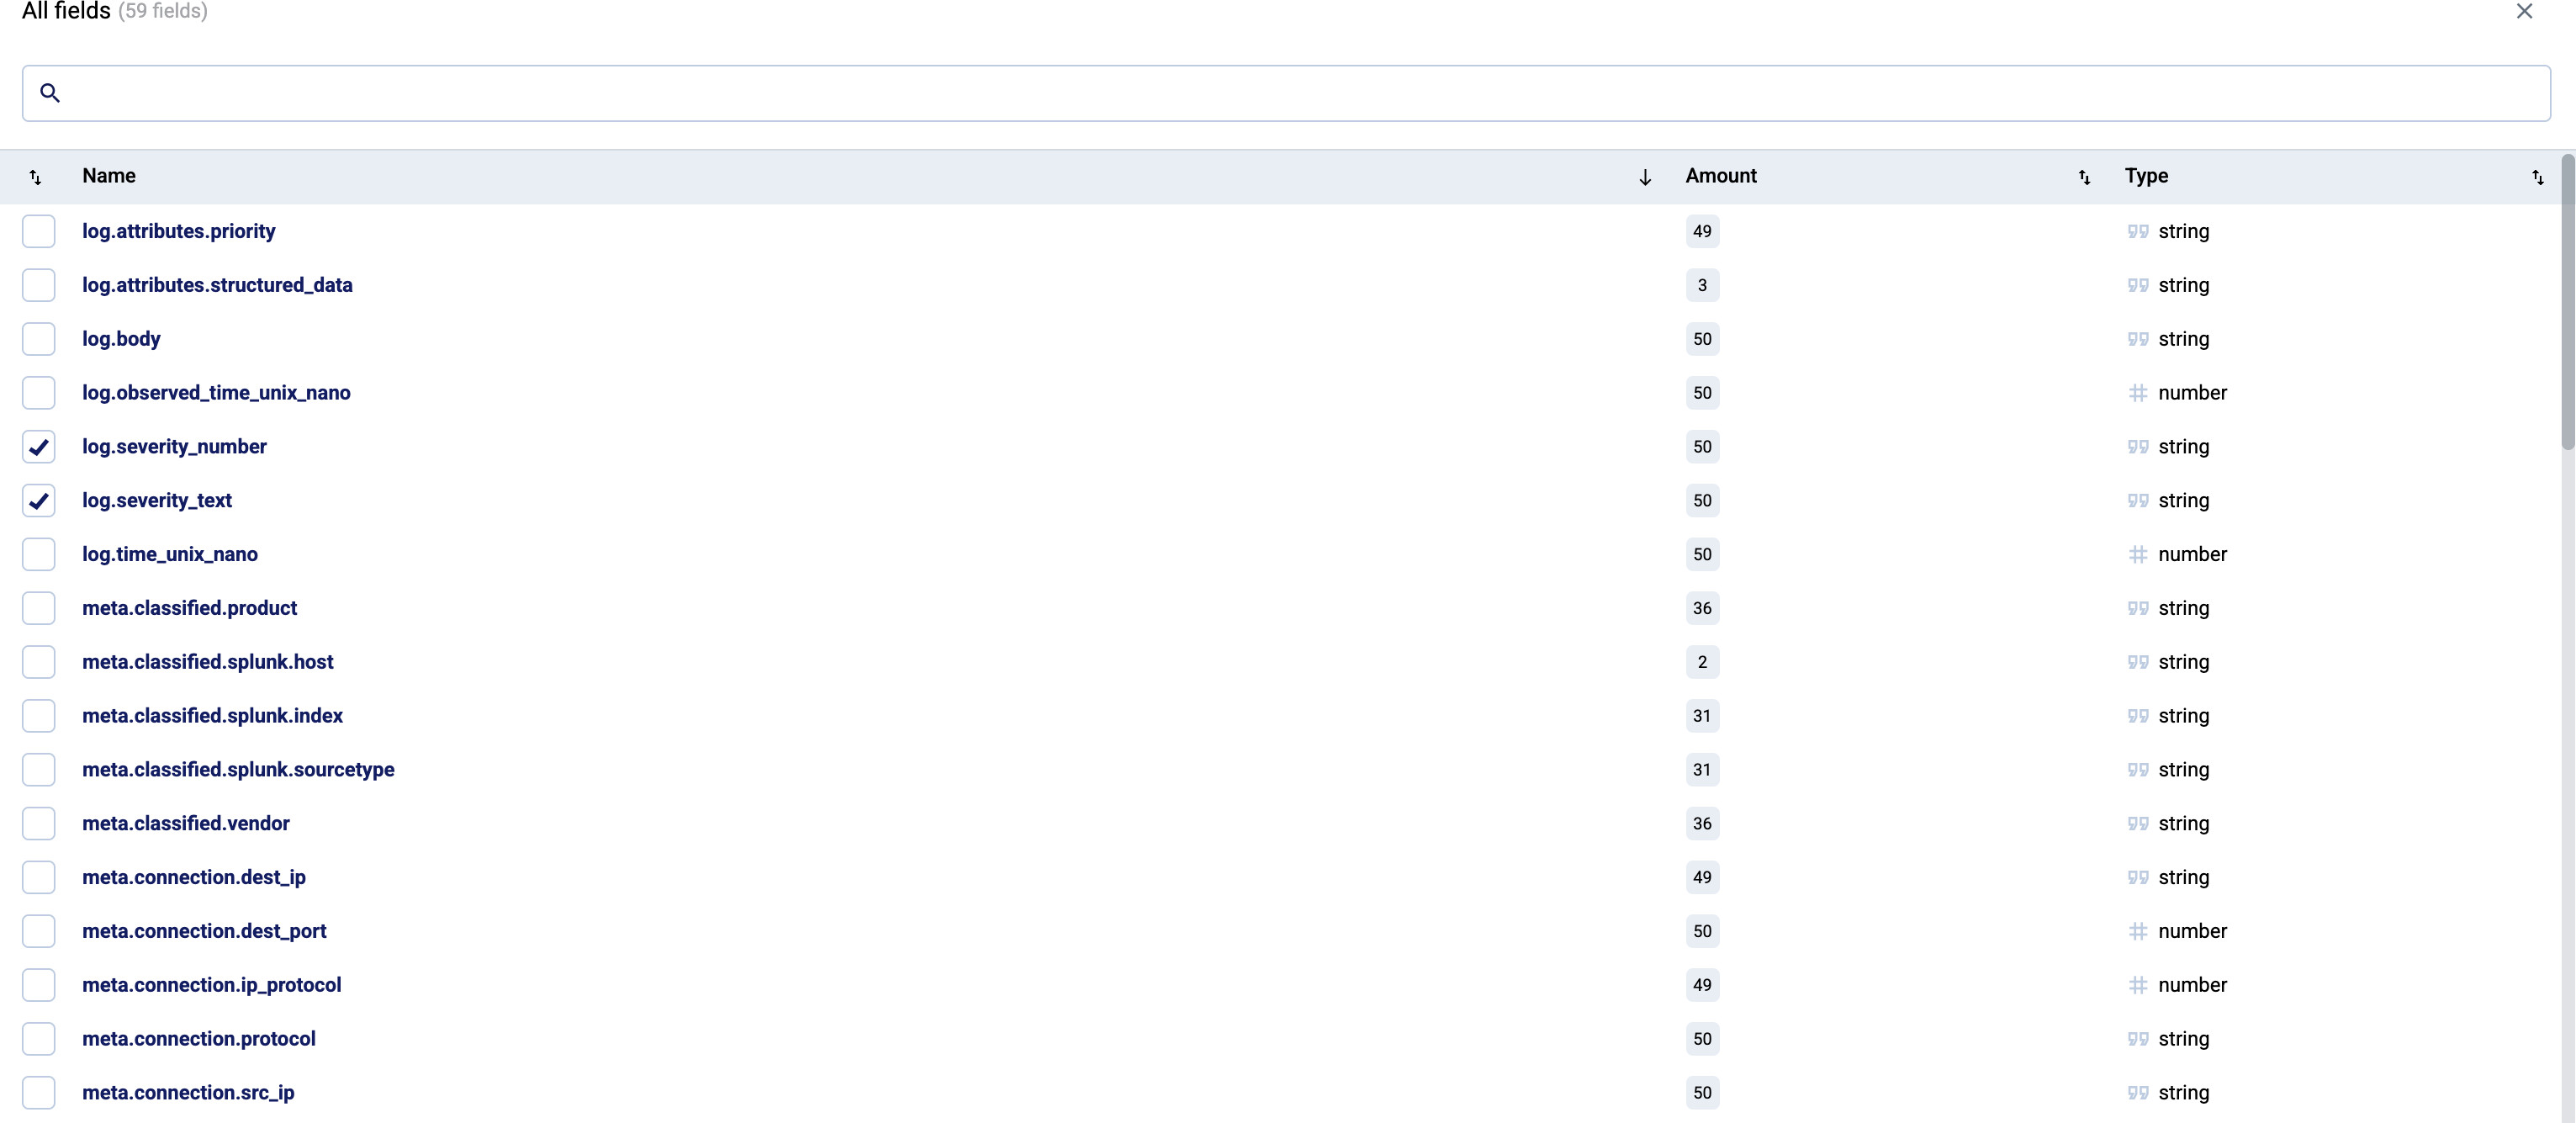
To show other fields (and their occurrence) in the sidebar, select See all, then select the fields you want to display. Depending on the configuration of the store, you can access the following fields.
Export search results
To export the search results, select Export. Note that:
- Only the search results shown on the current page will be exported (50 entries by default)
- By default, the timestamp and the message fields are exported. To include other fields, add them to the selected fields before exporting the data.
3 - Create Store
To create a new store in an AxoStore, complete the following steps.
- AxoStore stores logs locally on the AxoRouter that processed the messages.
- External stores use a separately deployed AxoLake or an existing compatible ClickHouse cluster.
Prerequisites
The AxoRouters you want to store data on must have been provisioned with the Enable AxoStore option enabled. (If there is a service called axostore in the Router > your-AxoRouter > Overview > Services list (even it’s grayed out), that AxoRouter has AxoStore enabled.)
To enable using AxoStore on an already deployed AxoRouter, re-deploy the AxoRouter with the Enable AxoStore option enabled.
Steps
To create a new store in an AxoStore, complete the following steps.
-
Navigate to Routers > Stores > Add Store.
-
Enter a Name for the store. This name will appear in the list of destinations (with the
-storesuffix) when setting the destination of a Flow. You cannot modify the name of the store later.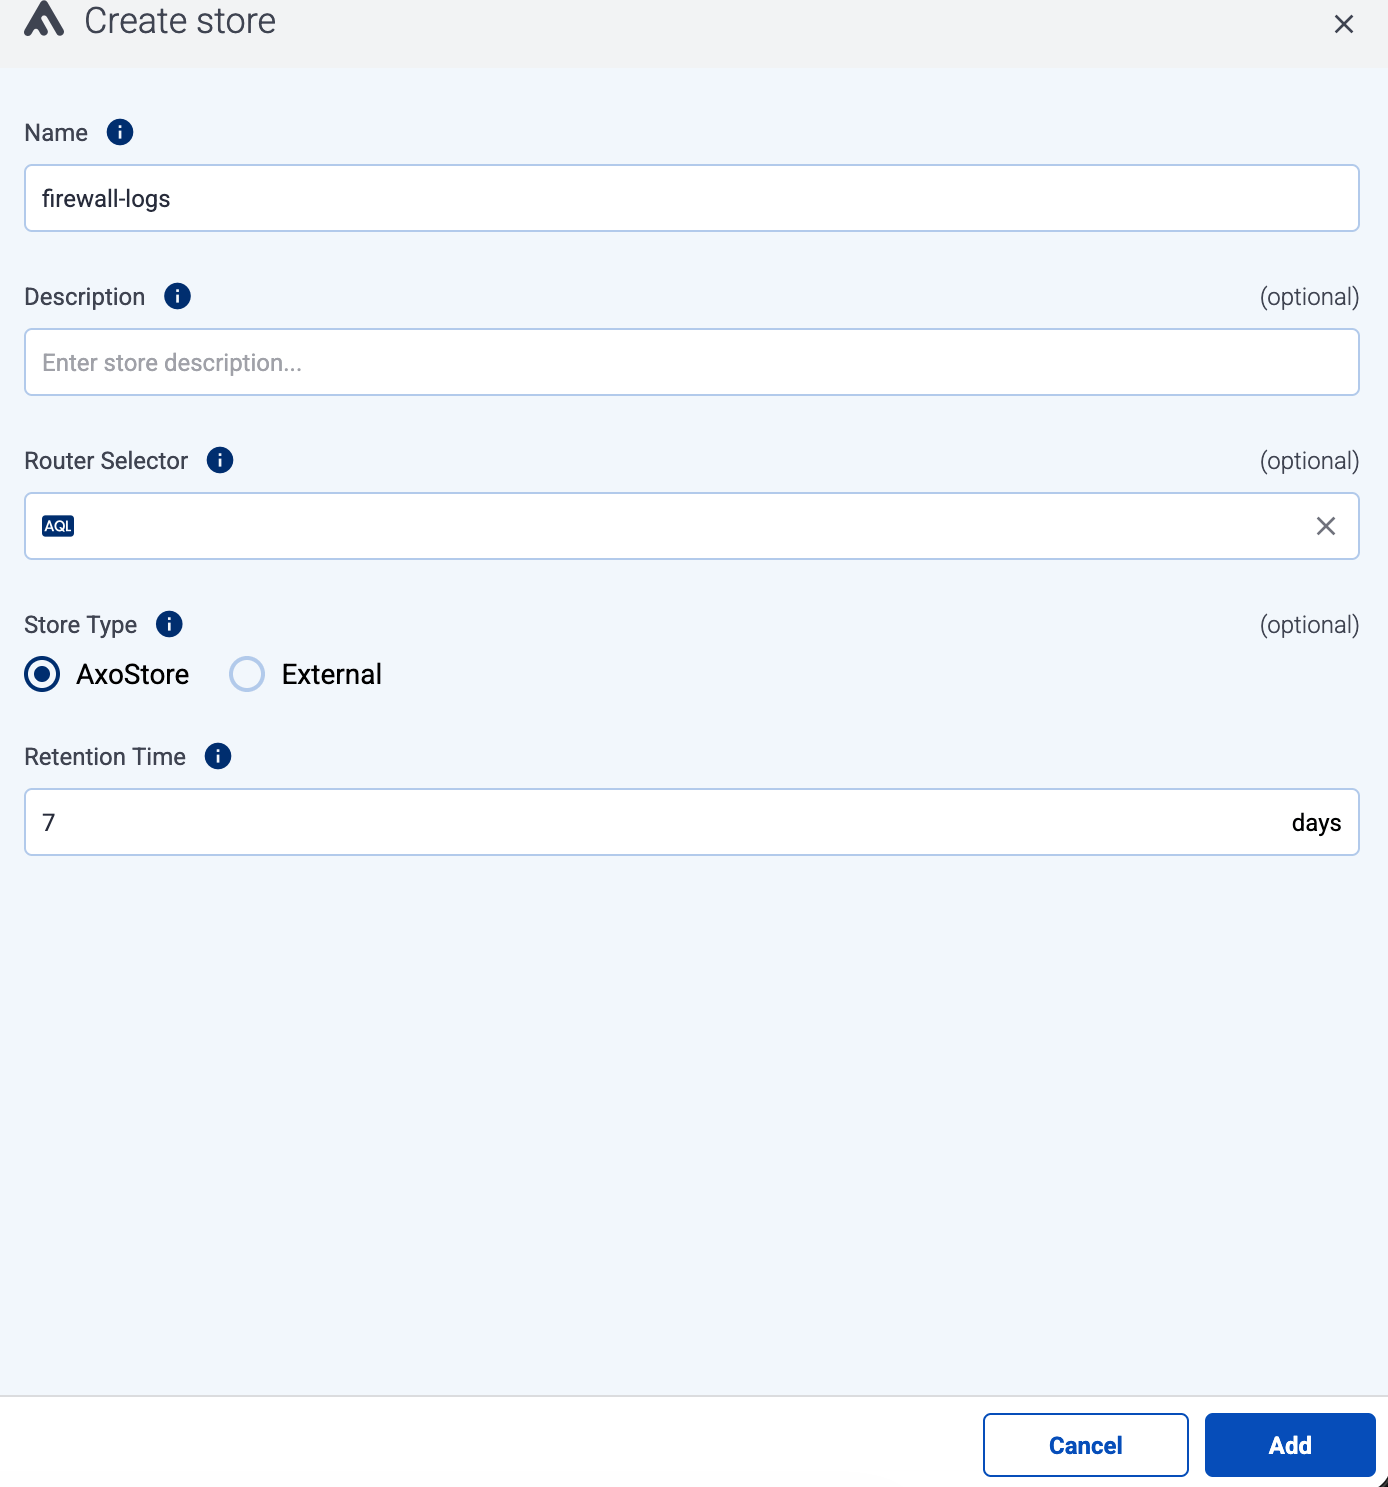
-
(Optional) Enter a description for the store.
-
Set Store type to AxoStore.
-
Set the Router Selector so it matches the AxoRouter instances where you want to create this store.
You can use any labels and metadata of the AxoRouter hosts in the Router selectors, for example, the hostname of the AxoRouter, or any custom labels.
- If you leave the Router Selector field empty, the selector will match every AxoRouter instance.
- To select only a specific AxoRouter instance, set the
namefield to the name of the instance as selector. For example,name = my-axorouter. - If you set multiple fields in the selector, the selector will match only AxoRouter instances that match all elements of the selector. (There in an AND relationship between the fields.)
-
(Optional) Select additional options about which message parts to store:
-
Include Metadata: If enabled, the metadata of the events is stored as a separate object. Otherwise, only the metadata that has dedicated fields in the Storage schema will be recorded.
-
Include Raw Body: Store also the original, unparsed (raw) message as a separate field.
CAUTION:
Enabling this option approximately doubles the storage size of the message.
-
-
Set the Retention Time (in days) so older data is automatically deleted from the store. You cannot modify this parameter later.
-
Select the Config Profile to use for the AxoStore. The profile determines resource limits (CPU, memory) and various optimization and performance settings. Every AxoRouter that creates this AxoStore will use the same profile. The following profiles are available:
CAUTION:
You cannot change the Config Profile of the AxoStore later.- Default: Recommended for small-scale deployments and evaluation use cases.
- Large: For AxoRouters with powerful hardware (at least 16 vCPU and 32GiB RAM), used for storing large amount of data.
For AxoRouter hardware sizing recommendations, see Resource requirements.
-
Select Create.
-
The new store will be created on the AxoRouters matching the Router Selector. You can check the stores available on an AxoRouter by selecting Routers > your-AxoRouter > Overview > Stores.
4 - Create External Store
To create a new store in an AxoLake or a self-managed Clickhouse instance, complete the following steps. (For details on deploying AxoLake or an appropriate self-managed Clickhouse instance, contact our support team.)
- AxoStore stores logs locally on the AxoRouter that processed the messages.
- External stores use a separately deployed AxoLake or an existing compatible ClickHouse cluster.
Prerequisites
-
You must have an AxoLake or a self-managed Clickhouse instance available.
-
You’ll need user credentials (username and password) to authenticate to the database. The account must have:
INSERTprivileges for the database where you’re creating the store to send data, andSELECTprivileges to access the data from the Search Logs page.
-
Your AxoRouter instances must be able to access the database on the network level.
Steps
To create a new store in an AxoLake, complete the following steps.
-
Navigate to Routers > Stores > Add Store.
-
Enter a Name for the store. his name will appear in the list of destinations (with the
-storesuffix) when setting the destination of a Flow. You cannot modify the name of the store later.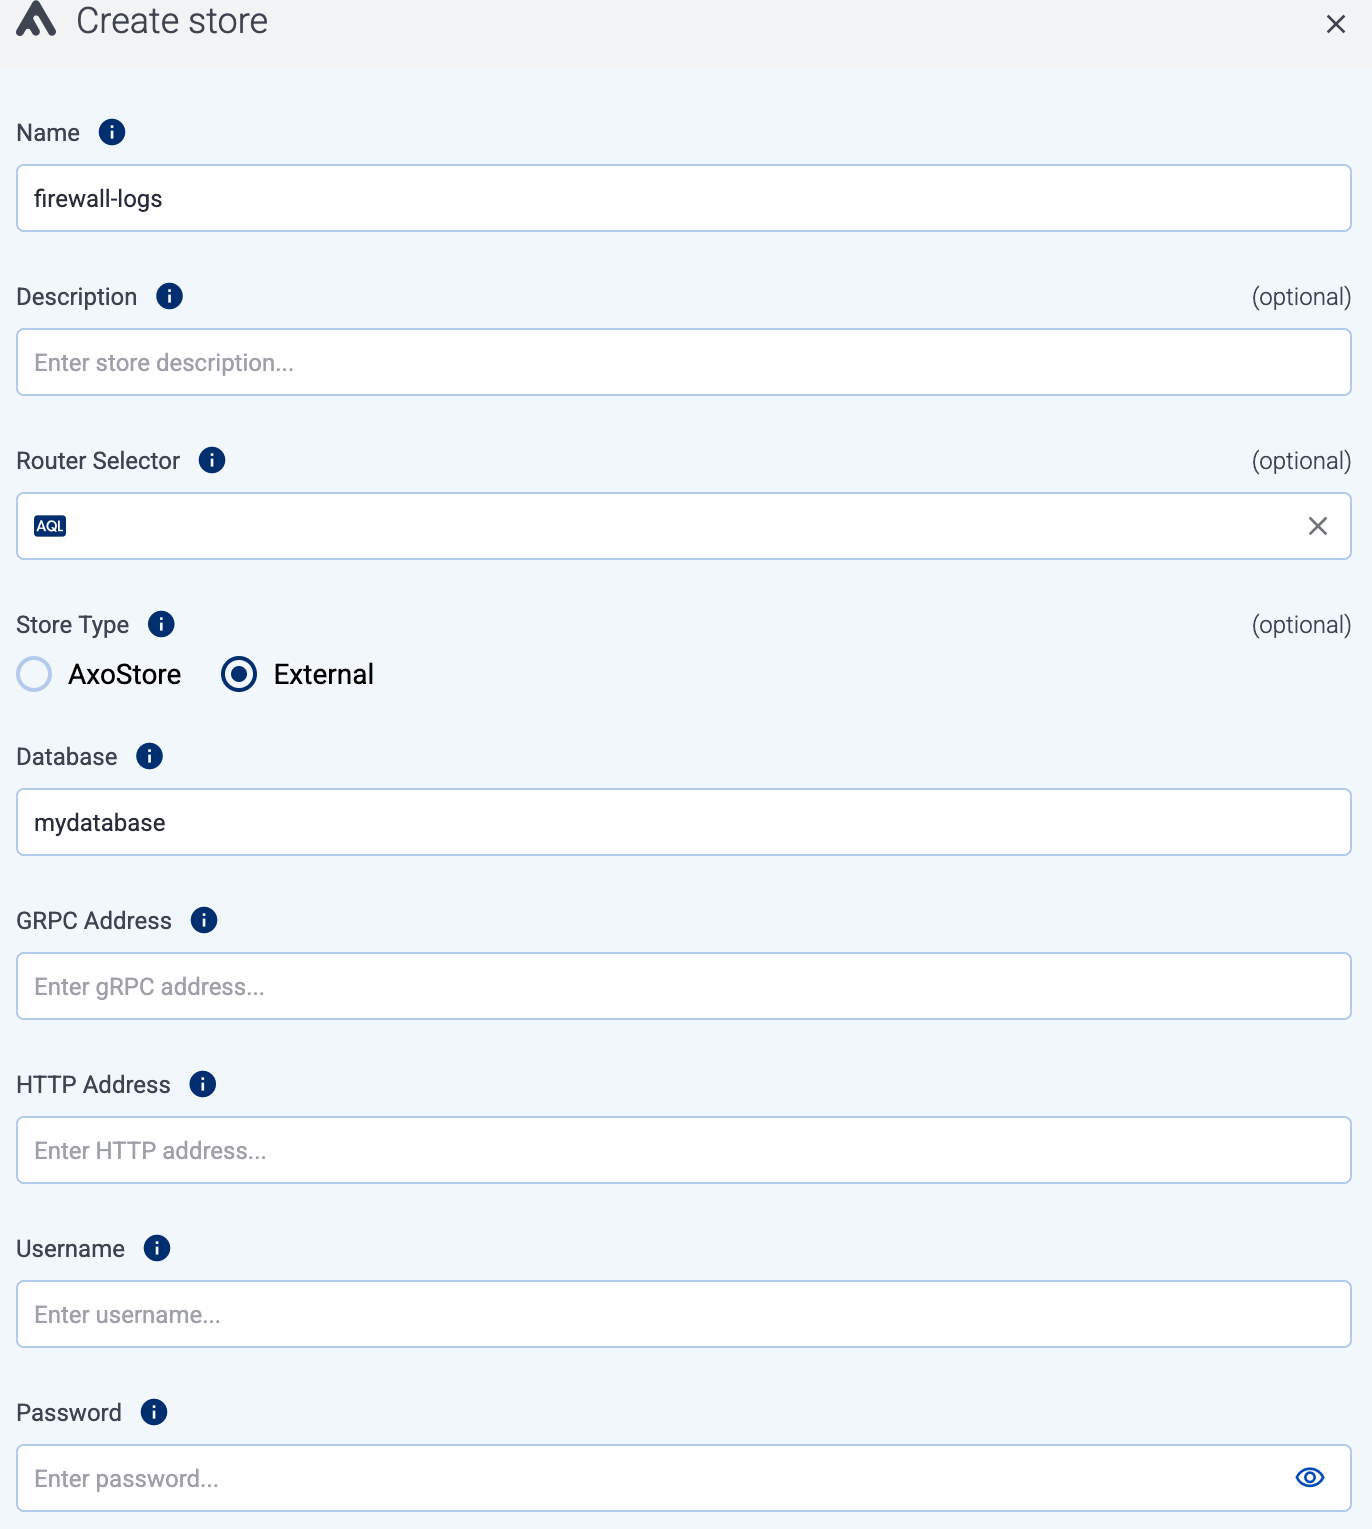
-
(Optional) Enter a description for the store.
-
(Optional) Select additional options about which message parts to store:
-
Include Metadata: If enabled, the metadata of the events is stored as a separate object. Otherwise, only the metadata that has dedicated fields in the Storage schema will be recorded.
-
Include Raw Body: Store also the original, unparsed (raw) message as a separate field.
CAUTION:
Enabling this option approximately doubles the storage size of the message.
-
-
Set Store type to External.
-
Enter the name of the Database to create the store in. (This is the name of the database you’ve created in AxoLake/Clickhouse. It can only contain letters, numbers, and underscores.)
-
Set the gRPC Address and the HTTP Address of the database listener, for example,
10.0.0.123:9100and10.0.0.123:9000. Instead of IP address, you can also use FQDN. -
Enter the credentials of the user account used to access the database into the User and Password fields.
-
Select Create.
5 - Delete or Wipe Store
There are two ways to remove a store: delete and wipe.
-
Deleting a store immediately terminates the connection between your AxoRouters and the store. No further data will be added to the store. Data already in the store will be automatically deleted after the configured retention time of the store expires. To recover data from a deleted store before the retention time expires, contact our support team.
-
Wiping instantly deletes all data in the store.
CAUTION:
Wiping a store is irreversible and cannot be undone. All data in the store is lost forever.
To remove a store, complete the following steps.
-
Navigate to Routers > Stores.
-
Select the store you want to remove, then:
- To delete the store, select ⋮ > Delete.
- To wipe the store, select ⋮ > Wipe data.
-
Confirm that you want to remove the store.
6 - Deploy AxoLake
To create an AxoLake, or a self-managed Clickhouse instance, complete the following steps.