Axolet is the agent software for Axoflow. Its primary purpose is to discover the log collector services that are running on the host (for example, AxoSyslog or SC4S), and report their operating statistics (counters) to Axoflow.
1 - Install Axolet
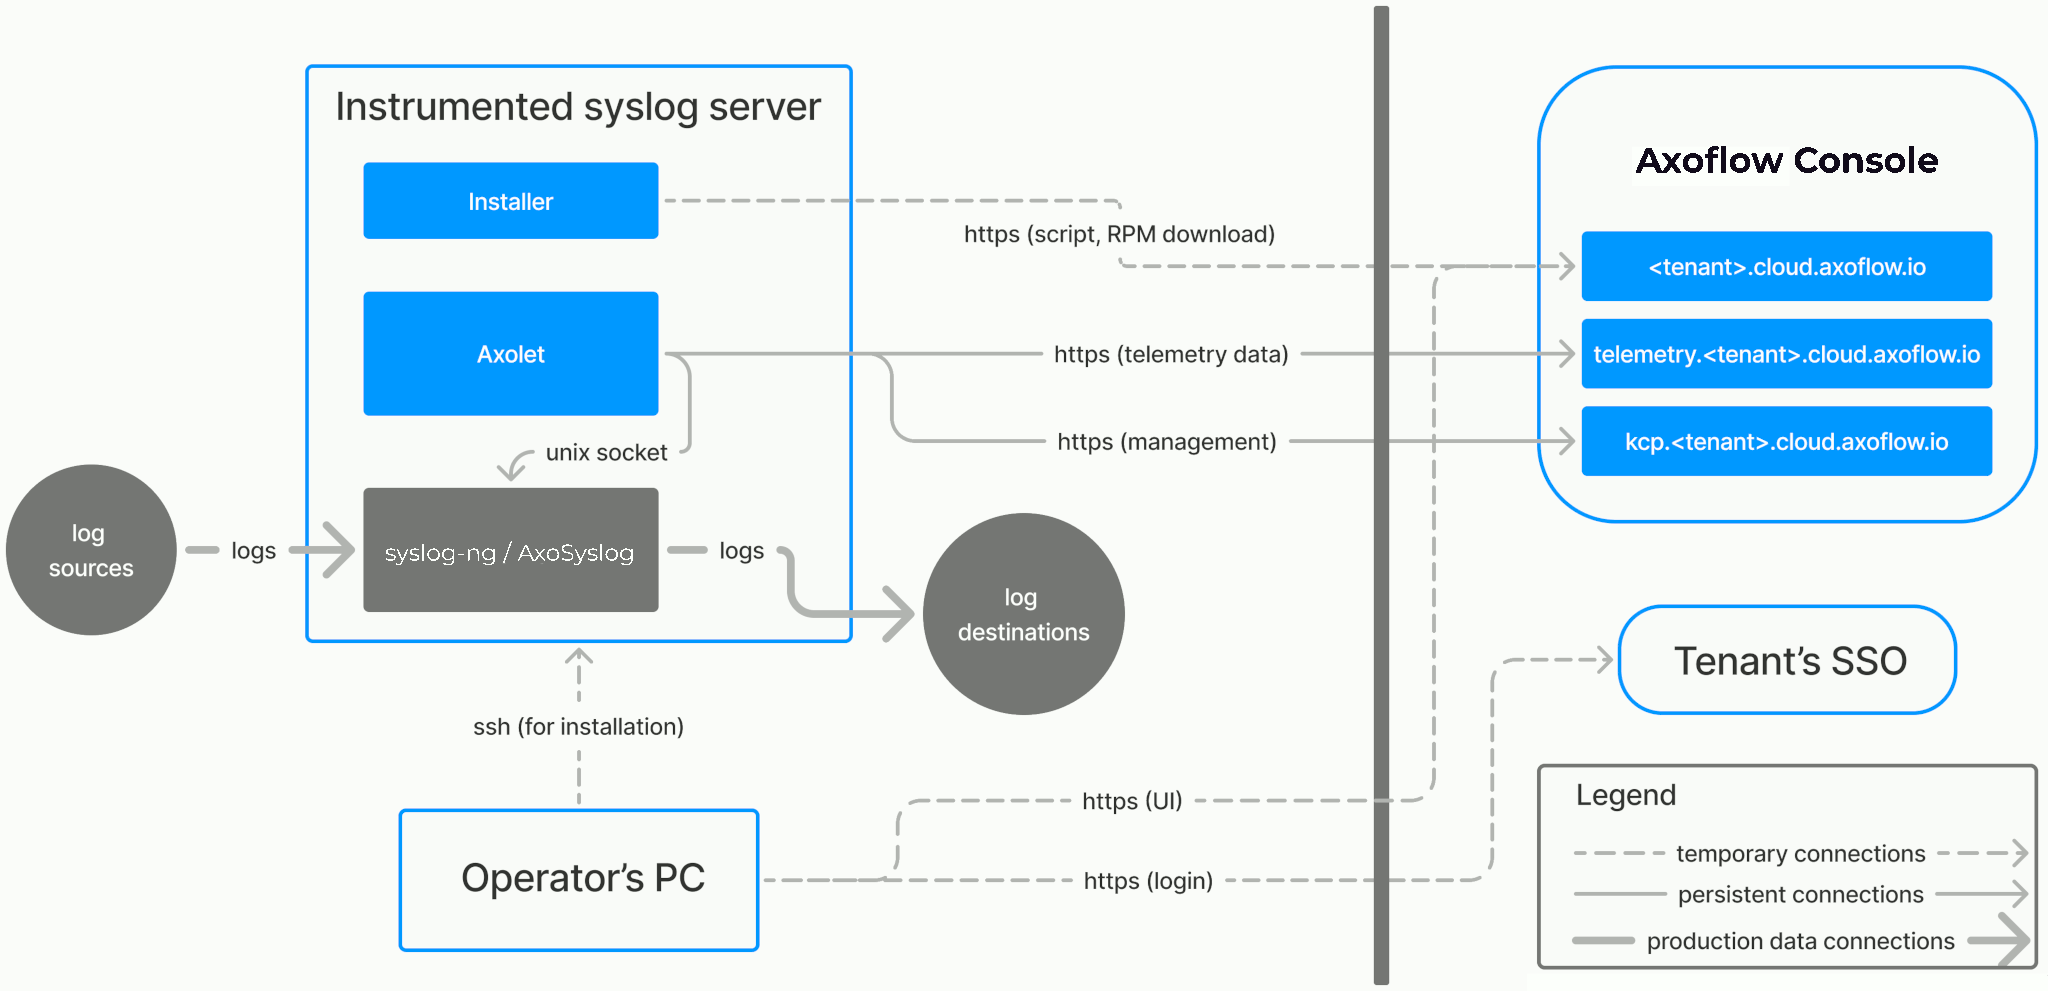
Axolet is the agent software for Axoflow. Its primary purpose is to discover the log collector services that are running on the host (for example, AxoSyslog or SC4S), and report their operating statistics (counters) to Axoflow.
It is simple to install Axolet on individual hosts, or collectively via orchestration tools such as chef or puppet.
What the install script does
When you deploy Axolet, you run a command that installs the required software packages, configures them and sets up the connection with Axoflow.
The installer script installs the axolet packages, then executes the configure-axolet command with the right parameters. (If the packages are already installed, the installer will update them unless the none package format is selected when generating the provisioning command.)
The install script is designed to be run as root (sudo), but you can configure Axolet to run as a non-root user.
The installer script performs the following main steps:
- Executes prerequisite checks:
- Tests the network connection with the console endpoints.
- Checks if the operating system is supported.
- Downloads and installs the
axoletRPM or DEB package.- The package contains the
axoletandconfigure-axoletcommands, and theaxolet.servicesystemd unit file.
- The package contains the
- The
configure-axoletcommand is executed with a configuration snippet on its standard input which contains a token required for registering into the management platform. The command:-
Writes the initial
/etc/axolet/config.jsonconfiguration file.Note: if the file already exists it will only be overwritten if the Overwrite config option is enabled when generating the provisioning command.
-
Enables and starts the
axoletservice.
-
axolet performs the following main steps on its first execution:
- Generates and persists a unique identifier (GUID).
- Initiates a cryptographic handshake process to Axoflow Console.
- Axoflow Console issues a client certificate to Axolet, which will be stored in the above mentioned
config.jsonfile. - The service waits for an approval on Axoflow Console. Once you approve the host registration request, axolet starts to send telemetry data to Axoflow Console. It keeps doing so as long as the agent is registered.
Prerequisites
Axolet should work on most Red Hat and Debian compatible Linux distributions. For production environments, we recommend using Red Hat Enterprise Linux 9.
Network access
The hosts must be able to access the following domains related to the Axoflow Console:
-
When using Axoflow Console SaaS:
<your-tenant-id>.cloud.axoflow.io: HTTPS traffic on TCP port 443, needed to download the binaries for Axoflow software (like Axolet and AxoRouter).kcp.<your-tenant-id>.cloud.axoflow.io: HTTPS (mutual TLS) traffic on TCP port 443 for management traffic.telemetry.<your-tenant-id>.cloud.axoflow.io: HTTPS (mutual TLS) traffic on TCP port 443, where Axolet sends the metrics of the host.us-docker.pkg.dev: HTTPS traffic on TCP port 443, for pulling container images (AxoRouter only).
-
When using an on-premise Axoflow Console:
-
The following domains should point to Axoflow Console IP address to access Axoflow from your desktop and AxoRouter hosts:
your-host.your-domain: The main domain of your Axoflow Console deployment.authenticate.your-host.your-domain: A subdomain used for authentication.idp.your-host.your-domain: A subdomain for the identity provider.
-
The Axoflow Console host must have the following Open Ports:
- Port 80 (HTTP)
- Port 443 (HTTPS)
-
Install Axolet
To install Axolet on a host and onboard it to Axoflow, complete the following steps. If you need to reinstall Axolet for some reason, see Reinstall Axolet.
-
Open the Axoflow Console at
https://<your-tenant-id>.cloud.axoflow.io/. -
Select Provisioning > Select type and platform.

-
Select Edge > Linux.

The
curlcommand can be run manually or inserted into a template in any common software deployment package. When run, a script is downloaded that sets up theAxoletprocess to run automatically at boot time viasystemd. For advanced installation options, see Advanced installation options. -
Copy the deployment one-liner and run it on the host you are onboarding into Axoflow.
Note Running the provisioning command withsudowould mask environment variables of the calling shell. Either start the whole procedure from a root shell, or let the install script call sudo when it needs to. In other words: don’t add thesudocommand to the provisioning command.Example output:
Do you want to install Axolet now? [Y] y % Total % Received % Xferd Average Speed Time Time Time Current Dload Upload Total Spent Left Speed 100 31.6M 100 31.6M 0 0 2127k 0 0:00:15 0:00:15 --:--:-- 2075k Verifying packages... Preparing packages... axolet-0.40.0-1.aarch64 Created symlink /etc/systemd/system/multi-user.target.wants/axolet.service → /usr/lib/systemd/system/axolet.service. Now continue with onboarding the host on the Axoflow web UI. -
On the Axoflow Console, reload the Provisioning page. A registration request for the new host should be displayed. Accept it.
-
Axolet starts sending metrics from the host. Check the Topology page to see the new host.
-
Continue to onboard the host as described for your specific log collector agent.
Manage Axolet
This section describes how to start, stop and check the status of the Axolet service on Linux.
Start Axolet
To start Axolet, execute the following command. For example:
systemctl start axolet
If the service starts successfully, no output will be displayed.
The following message indicates that Axolet can not start (see Check Axolet status):
Job for axolet.service failed because the control process exited with error code. See `systemctl status axolet.service` and `journalctl -xe` for details.
Stop Axolet
To stop Axolet
-
Execute the following command.
systemctl stop axolet -
Check the status of the Axolet service (see Check Axolet status).
Restart Axolet
To restart Axolet, execute the following command.
systemctl restart axolet
Reload the configuration without restarting Axolet
To reload the configuration file without restarting Axolet, execute the following command.
systemctl reload axolet
Check the status of Axolet service
To check the status of Axolet service
-
Execute the following command.
systemctl --no-pager status axolet -
Check the
Active:field, which shows the status of the Axolet service. The following statuses are possible:-
active (running)-axoletservice is up and running -
inactive (dead)-axoletservice is stopped
-
For AxoRouter hosts, you can check the Axolet logs from the Axoflow Console using Log tapping for Agent logs.
Upgrade Axolet
Axoflow Console raises an alert for the host when a new Axolet version is available. To upgrade to the new version, re-run the one-liner installation command you used to install Axolet, or select Provisioning > Select type and platform to create a new one.
Run axolet as non-root
You can run Axolet as non-root user, but operators must have access to the following commands:
-
/usr/bin/systemctl * axolet.service: Controls theaxolet.servicesystemd unit. Usually*isstart,stop,restart,enable, andstatus. Used by the operators for troubleshooting. -
/usr/local/bin/configure-axolet: Creates initialaxoletconfiguration and enables/starts theaxoletservice. Executed by the bootstrap script. -
Command to install and upgrade the
axoletpackage. Executed by the bootstrap script if the packages aren’t already installed.- On RPM-based Linux distributions:
/usr/bin/rpm -Uv axo*.rpm - On DEB-based Linux distributions:
/usr/bin/dpkg -i axo*.deb
- On RPM-based Linux distributions:
You can permit the syslogng user to run these commands by running on of the following:
sudo tee /etc/sudoers.d/configure-axoflow <<A
syslogng ALL=(ALL) NOPASSWD: /usr/local/bin/configure-axolet
syslogng ALL=(ALL) NOPASSWD: /bin/systemctl * axolet.service
# for rpm installation:
syslogng ALL=(ALL) NOPASSWD: /usr/bin/rpm -Uv axo*.rpm
A
sudo tee /etc/sudoers.d/configure-axoflow <<A
syslogng ALL=(ALL) NOPASSWD: /usr/local/bin/configure-axolet
syslogng ALL=(ALL) NOPASSWD: /bin/systemctl * axolet.service
# for deb installation:
syslogng ALL=(ALL) NOPASSWD: /usr/bin/dpkg -i axo*.deb
A
2 - Advanced installation options
When installing Axolet, you can set a number of advanced options if needed for your environment. Setting the advanced options in the Axoflow Console automatically updates the one-liner command that you can copy and run.

Alternatively, before running the one-liner you can use one of the following methods:
-
Set the related environment variable for the option. For example:
export AXOLET_USER=syslogng export AXOLET_GROUP=syslogng -
Set the related URL parameter for the option. For example:
curl -fLsH 'X-AXO-TOKEN:random-generated' 'https://<your-tenant-id>.cloud.axoflow.io/setup.sh?type=AXOEDGE&platform=LINUX&user=syslogng&group=syslogng' | sh
Proxy settings
Use the HTTP proxy, HTTPS proxy, No proxy parameters to configure HTTP proxy settings for the installer. To avoid using the proxy for the Axolet service, enable the Avoid proxy parameter as well. Lowercase variable names are preferred because they work universally.
Installation options
You can pass the following parameters to the installation script as environment variables, or as URL parameters.
Note
Running the provisioning command with
sudo would mask environment variables of the calling shell. Either start the whole procedure from a root shell, or let the install script call sudo when it needs to. In other words: don’t add the sudo command to the provisioning command.
API server host
| Default value: | |
| Environment variable | |
| URL parameter | api_server_host |
Description: Override the host part of the API endpoint for the host.
Avoid proxy
| Default value: | false |
| Available values: | true, false |
| Environment variable | AXOLET_AVOID_PROXY |
| URL parameter | avoid_proxy |
Description: If set to true, the value of the *_proxy variables will only be used for downloading the installer, but not for the axolet service itself. If set to false, the Axolet service will use the variables from the installer.
Capabilities
| Default value: | CAP_SYS_PTRACE |
| Available values: | Whitespace-separated list of capability names with CAP_ prefix. |
| Environment variable | AXOLET_CAPS |
| URL parameter | caps |
Description: Ambient Linux capabilities the axolet service will use.
Configuration directory
| Default value: | /etc/axolet |
| Environment variable | AXOLET_CONFIG_DIR |
| URL parameter | config_dir |
Description: The directory where the configuration files are stored.
HTTP proxy
| Default value: | empty string |
| Environment variable | AXOLET_HTTP_PROXY |
| URL parameter | http_proxy |
Description: Use a proxy to access Axoflow Console from the host.
HTTPS proxy
| Default value: | empty string |
| Environment variable | AXOLET_HTTPS_PROXY |
| URL parameter | https_proxy |
Description: Use a proxy to access Axoflow Console from the host.
No proxy
| Default value: | empty string |
| Environment variable | AXOLET_NO_PROXY |
| URL parameter | no_proxy |
Description: Comma-separated list of hosts that shouldn’t use proxy to access Axoflow Console from the host.
Overwrite config
| Default value: | false |
| Available values: | true, false |
| Environment variable | AXOLET_CONFIG_OVERWRITE |
| URL parameter | config_overwrite |
Description: If set to true, the configuration process will overwrite existing configuration (/etc/axolet/config.json). This means that the agent will get a new GUID and it will require approval on the Axoflow Console.
Package format
| Default value: | auto |
| Available values: | auto, dep, rpm, tar, none |
| Environment variable | AXOLET_INSTALL_PACKAGE |
| URL parameter | install_package |
Description: File format of the installer package.
Service group
| Default value: | root |
| Environment variable | AXOLET_GROUP |
| URL parameter | group |
Description: Name of the group and Axolet will be running as. It should be either root or the group syslog-ng is running as.
Service user
| Default value: | root |
| Environment variable | AXOLET_USER |
| URL parameter | user |
Description: Name of the user Axolet will be running as. It should be either root or the user syslog-ng is running as. See also Run axolet as non-root.
Start service
| Default value: | AXOLET_START=true |
| Available values: | true, false |
| Environment variable | AXOLET_START |
| URL parameter | start |
Description: Start axolet agent at the end of installation. Use false for preparing golden images. In this case axolet will generate a new GUID on the first boot after cloning the image.
If you are preparing a host for cloning with Axolet already installed, set the following environment variable in your (root) shell session, before running the one-liner command. For example:
export START_AXOLET=false
curl ... # Run the command copied from the Provisioning page
This way Axolet will only start and initialize after the first reboot.
3 - Run axolet as non-root
If the log collector agent (AxoSyslog or syslog-ng) is running as a non-root user, you may want to configure the Axolet agent to run as the same user.
To do that, set the AXOLET_USER and AXOLET_GROUP environment variables to the user’s username and groupname. For details, see Advanced installation options.
Operators will need to have access to the following commands:
-
/usr/bin/systemctl * axolet.service: Controls theaxolet.servicesystemd unit. Usually*isstart,stop,restart,enable, andstatus. Used by the operators for troubleshooting. -
/usr/local/bin/configure-axolet: Creates initialaxoletconfiguration and enables/starts theaxoletservice. Executed by the bootstrap script. -
Command to install and upgrade the
axoletpackage. Executed by the bootstrap script if the packages aren’t already installed.- On RPM-based Linux distributions:
/usr/bin/rpm -Uv axo*.rpm - On DEB-based Linux distributions:
/usr/bin/dpkg -i axo*.deb
- On RPM-based Linux distributions:
For example, you can permit the syslogng user to run these commands by running the following commands:
sudo tee /etc/sudoers.d/configure-axoflow <<A
syslogng ALL=(ALL) NOPASSWD: /usr/local/bin/configure-axolet
syslogng ALL=(ALL) NOPASSWD: /bin/systemctl * axolet.service
# for rpm installation:
syslogng ALL=(ALL) NOPASSWD: /usr/bin/rpm -Uv axo*.rpm
A
sudo tee /etc/sudoers.d/configure-axoflow <<A
syslogng ALL=(ALL) NOPASSWD: /usr/local/bin/configure-axolet
syslogng ALL=(ALL) NOPASSWD: /bin/systemctl * axolet.service
# for deb installation:
syslogng ALL=(ALL) NOPASSWD: /usr/bin/dpkg -i axo*.deb
A
4 - Reinstall Axolet
Reinstall Axolet to a (cloned) machine
To re-install Axolet on a (cloned) machine that has an earlier installation running, complete the following steps.
-
Log in to the host as root and execute the following commands:
systemctl stop axolet rm -r /etc/axolet/ -
Follow the regular installation steps described in Axolet.
Recover Axolet after the root CA certificate was rotated
-
Log in to the host as root and execute the following commands:
export AXOLET_KEEP_GUID=y AXOLET_CONFIG_OVERWRITE=y PATH=$PATH:/usr/local/bin -
Run the one-liner from the Axoflow Console Provisioning page in the same shell.
-
The installation may result in an error message, but Axolet should eventually recover. You can check by running:
journalctl -b -u axolet -n 20 -f