This is the multi-page printable view of this section. Click here to print.
Microsoft
- 1: Azure Monitor
- 2: Microsoft Sentinel
- 2.1: Configure Sentinel
1 - Azure Monitor
Sending data to Azure Monitor is practically identical to using the Sentinel destination. Follow the procedure described in Microsoft Sentinel.
2 - Microsoft Sentinel
Microsoft Sentinel: Cloud-native SIEM and SOAR platform for collecting, analyzing, and responding to security threats.
To add a Microsoft Sentinel or Azure Monitor destination to Axoflow, complete the following steps. AxoConsole can configure your AxoRouters to send data to the built-in CommonSecurityLog, SecurityEvents, Syslog, WindowsEvents tables of Azure Monitor. To send data to custom tables, contact our support team.
Prerequisites
The following list is a quick overview of the things you need to configure in Sentinel. For detailed instructions, see Configure Sentinel.
- An Azure subscription.
- An Enterprise application registration and client secret. You’ll need the Tenant ID, Application ID, and Application Secret of the application to configure the Axoflow destination.
- Entra ID should be configured to allow users to create new application registrations, otherwise Global or Application Administrator role is needed.
- A Log Analytics Workspace in Azure.
- Permissions required to create a workspace.
- A Data Collection Endpoint (DCE) and a Data Collection Rule (DCR). We provide you with ARM templates for both the DCE and the DCR.
- Permissions required to create and manage DCRs.
- Permissions assigned to the DCR.
- A Microsoft Sentinel workspace (optional).
Steps
-
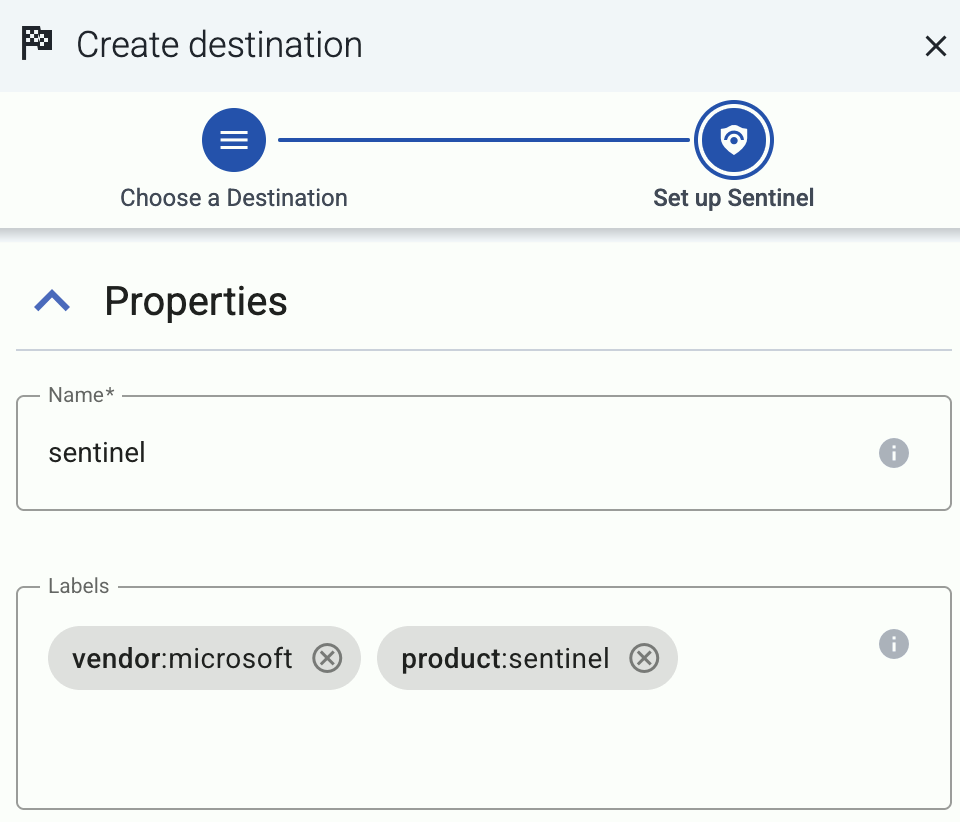
Create a new destination.
- Open the AxoConsole.
- Select Destinations > + Add Destination.
-
Configure the destination.
-
Select Sentinel or Azure Monitor.
-
Enter a name for the destination.
-
Configure the credentials needed for authentication.
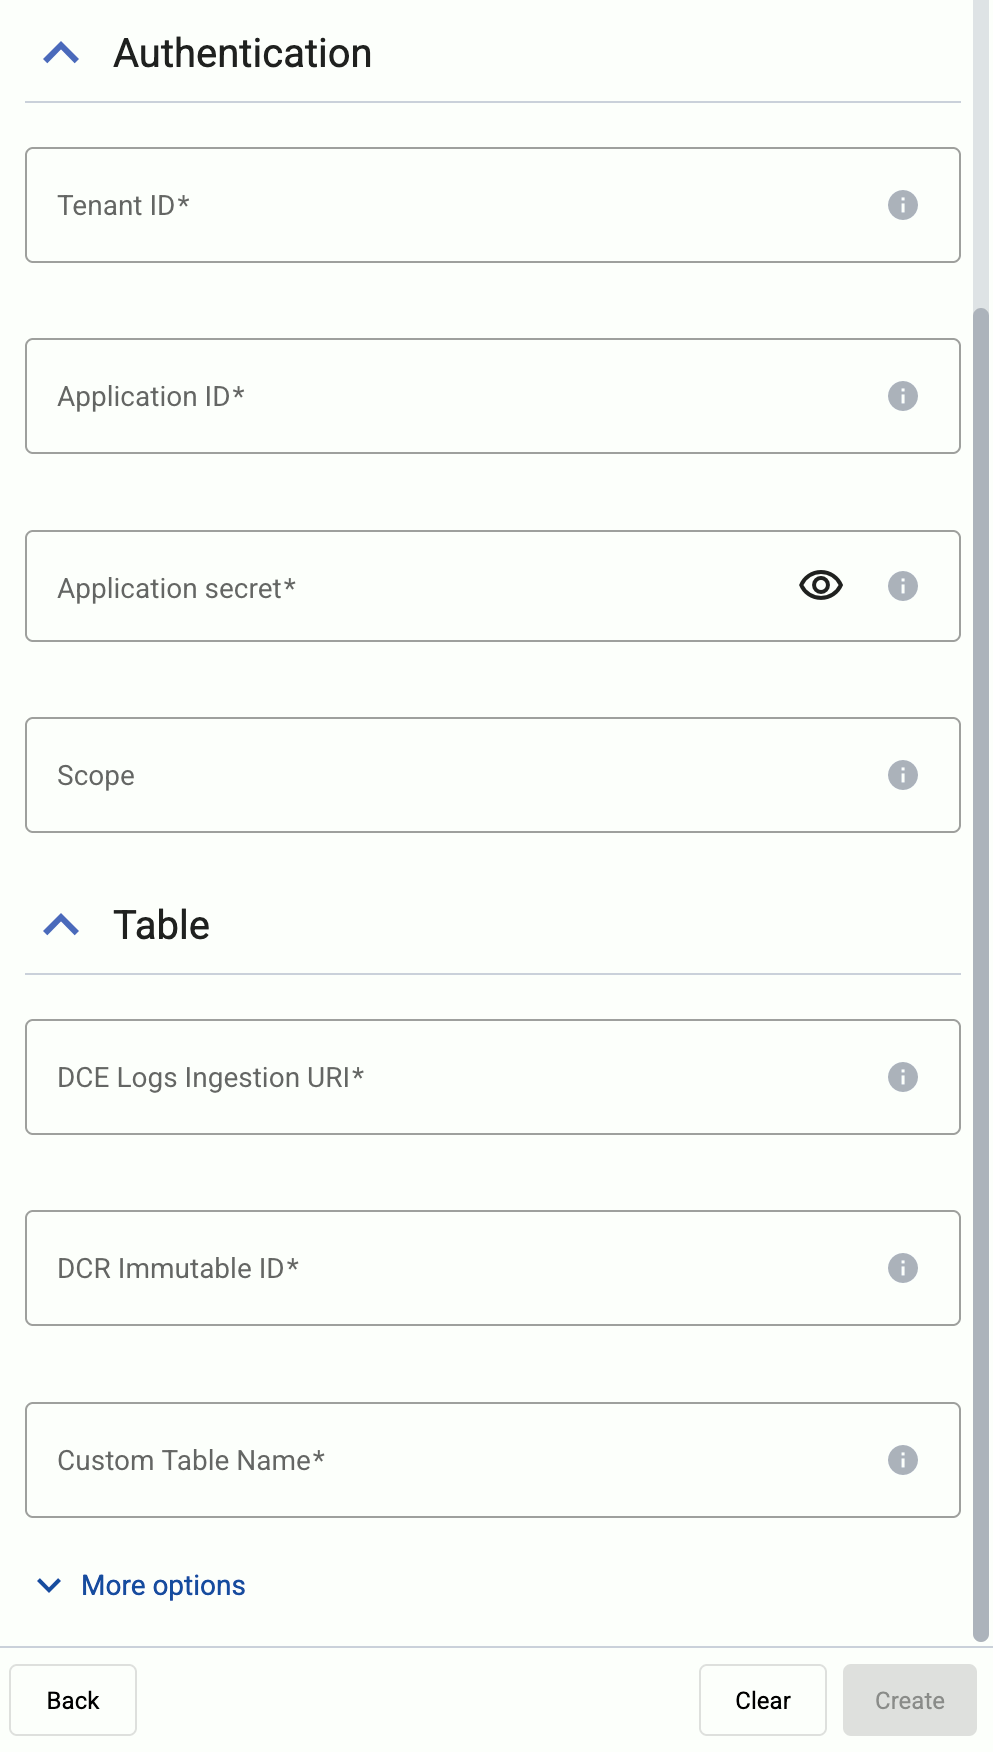
- Tenant ID: Directory (tenant) ID of the environment where you’re sending the data. (Practically everything belongs to the tenant ID: the Entra ID application, the Log analytics workspace, Sentinel, the DCE and the DCR, and so on.)
- Application ID: Application (client) ID of the Microsoft Entra ID application.
- Application secret: The Client secret of the Microsoft Entra ID application.
- Scope: The scope for the authentication token. Usually you can leave empty to use the default value (
https://monitor.azure.com//.default).
-
Specify the details of the table to send the data to.
- DCE Logs Ingestion URI: The URI of your Data Collection Endpoint (DCE).
- DCR Immutable ID: The immutable ID property of the Azure Monitor Data Collection Rule (DCR) where AxoRouter sends the data.
- Stream name: The name of the stream where AxoRouter sends the data. Use
Custom-Syslog-Streamif you are in doubt. It is available in the provided templates and used as the default normalization scheme.
-
Select More options, and set the batch size for sending data to Sentinel. Recommended batch configuration:
- Batch bytes: By default, this is set to
960000(960kB). Don’t increase it over 1000000 to make sure the request body is smaller than the 1MB limit in Sentinel. - Batch timeout: Set 10000 (10s) to control the delay of log ingestion.
- Batch bytes: By default, this is set to
-
(Optional) Set other options as needed for your environments.
- Timeout: The number of seconds to wait for a log-forwarding request to complete, and attempt to reconnect the server if exceeded. If the timeout is exceeded, AxoRouter attempts to reconnect the destination. The default (
0) is unlimited. For more details, see the AxoSyslog documentation.
-
Disk Buffer: Explicitly enable or disable disk buffer on AxoRouter. Default value: Enabled.
AxoRouter can store messages on the local disk if the destination or the network connection to the destination becomes unavailable. AxoRouter automatically sends the stored messages (in the order they were received) to the destination when the connection is reestablished. Note that the disk buffer is separate from AxoStore.
Capacity Bytes: Size of the disk buffer files in bytes. This value applies for each worker. Default value is 100MiB (104857600 bytes), which is also the recommended minimum.
The disk required for using disk buffering is Capacity Bytes*Number of Workers for each destination of AxoRouter.
-
Batch Bytes: Sets the maximum size of payload in a batch. If the size of the messages reaches this value, AxoRouter sends the batch to the destination even if the number of messages is less than the value of the batch lines option.
CAUTION:
When setting Batch Bytes:
- Note that the actual HTTP request will be about 4KB larger because of the request headers.
- Check the configuration of your destination, as SaaS solutions and ingress controllers often limit the maximal size of HTTP requests. If the sum of Batch Bytes and the request headers exceeds this limit, the data will be rejected. (In case of NGINX, with a
client intended to send too large bodyerror message.)
-
Batch Lines: Number of lines sent to the destination in one batch. AxoRouter waits for this number of lines to accumulate and sends them off in a single batch. Increasing this number increases throughput as more messages are sent in a single batch, but also increases message latency.
Note that Initial window size * Maximum Connections must be greater or equal than Batch lines * Number of workers for all the sources that feeds a given destination. Otherwise, the destination worker might be unable to send data until Batch timeout expires, even if there’s data available.
For more details, see the AxoSyslog documentation.
-
Batch Timeout: Maximal time in milliseconds to wait for a batch to be filled before sending it. The default value (
-1) means that the batch should be full before sending, which may result in a long wait if the incoming traffic is low. For more details, see the AxoSyslog documentation.
- Number of Workers: Used for scaling the destination in case of high message load. Specifies the number of worker threads AxoRouter uses for sending messages to the destination. The default is 1. If high message throughput is not a concern, leave it on 1. For maximum performance, increase it up to the number of CPU cores available on AxoRouter. For more details, see the AxoSyslog documentation.
- Timeout: The number of seconds to wait for a log-forwarding request to complete, and attempt to reconnect the server if exceeded. If the timeout is exceeded, AxoRouter attempts to reconnect the destination. The default (
-
Select Add.
-
-
Create a flow to connect the new destination to an AxoRouter instance.
-
Select Flows.
-
Select Add Flow.
-
Enter a name for the flow, for example,
my-test-flow.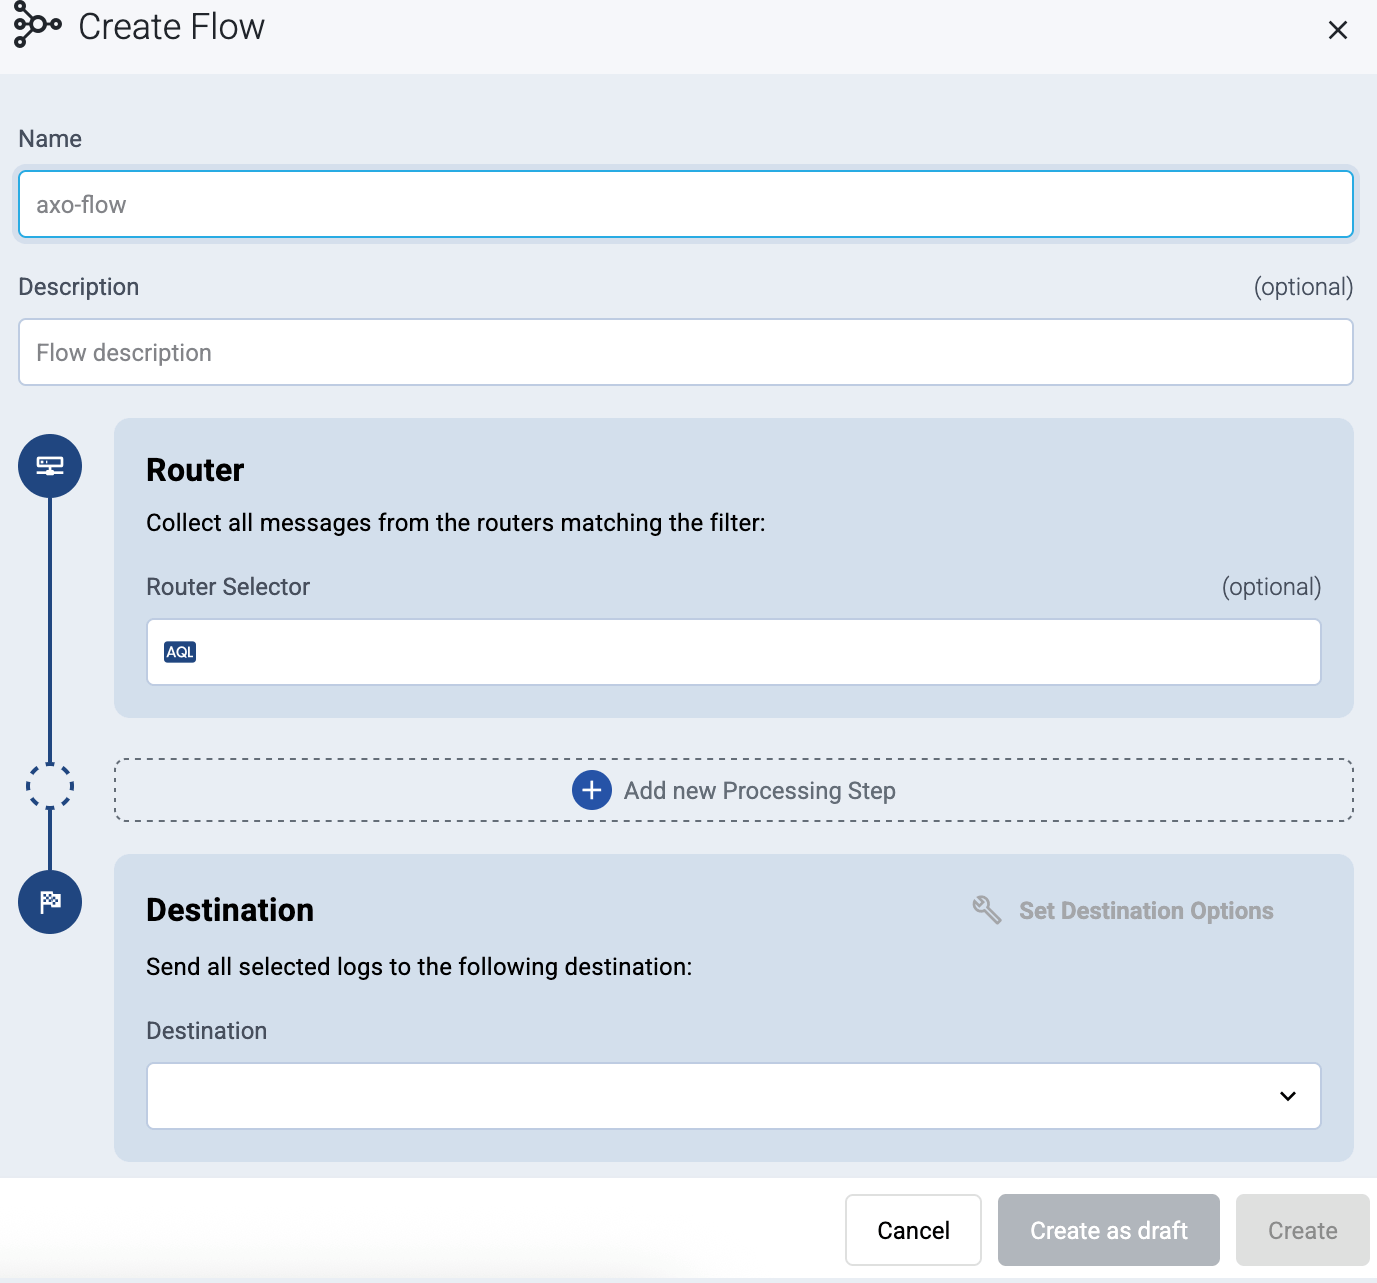
-
In the Router Selector field, enter an expression that matches the router(s) you want to apply the flow. To select a specific router, use a name selector, for example,
name = my-axorouter-hostname.You can use any labels and metadata of the AxoRouter hosts in the Router selectors, for example, the hostname of the AxoRouter, or any custom labels.
- If you leave the Router Selector field empty, the selector will match every AxoRouter instance.
- To select only a specific AxoRouter instance, set the
namefield to the name of the instance as selector. For example,name = my-axorouter. - If you set multiple fields in the selector, the selector will match only AxoRouter instances that match all elements of the selector. (There in an AND relationship between the fields.)
-
Select the Destination where you want to send your data. If you don’t have any destination configured, you can select + Add in the destination section to create a new destination now. For details on the different destinations, see Destinations.
- If you don’t have any destination configured, see Destinations.
- If you’ve already created a store, it automatically available as a destination. Note that the Router Selector of the flow must match only AxoRouters that have the selected store available, otherwise you’ll get an error message.
- If you want to send data to another AxoRouter, enable the Show all destinations option, and select the connector of the AxoRouter where you want to send the data.

-
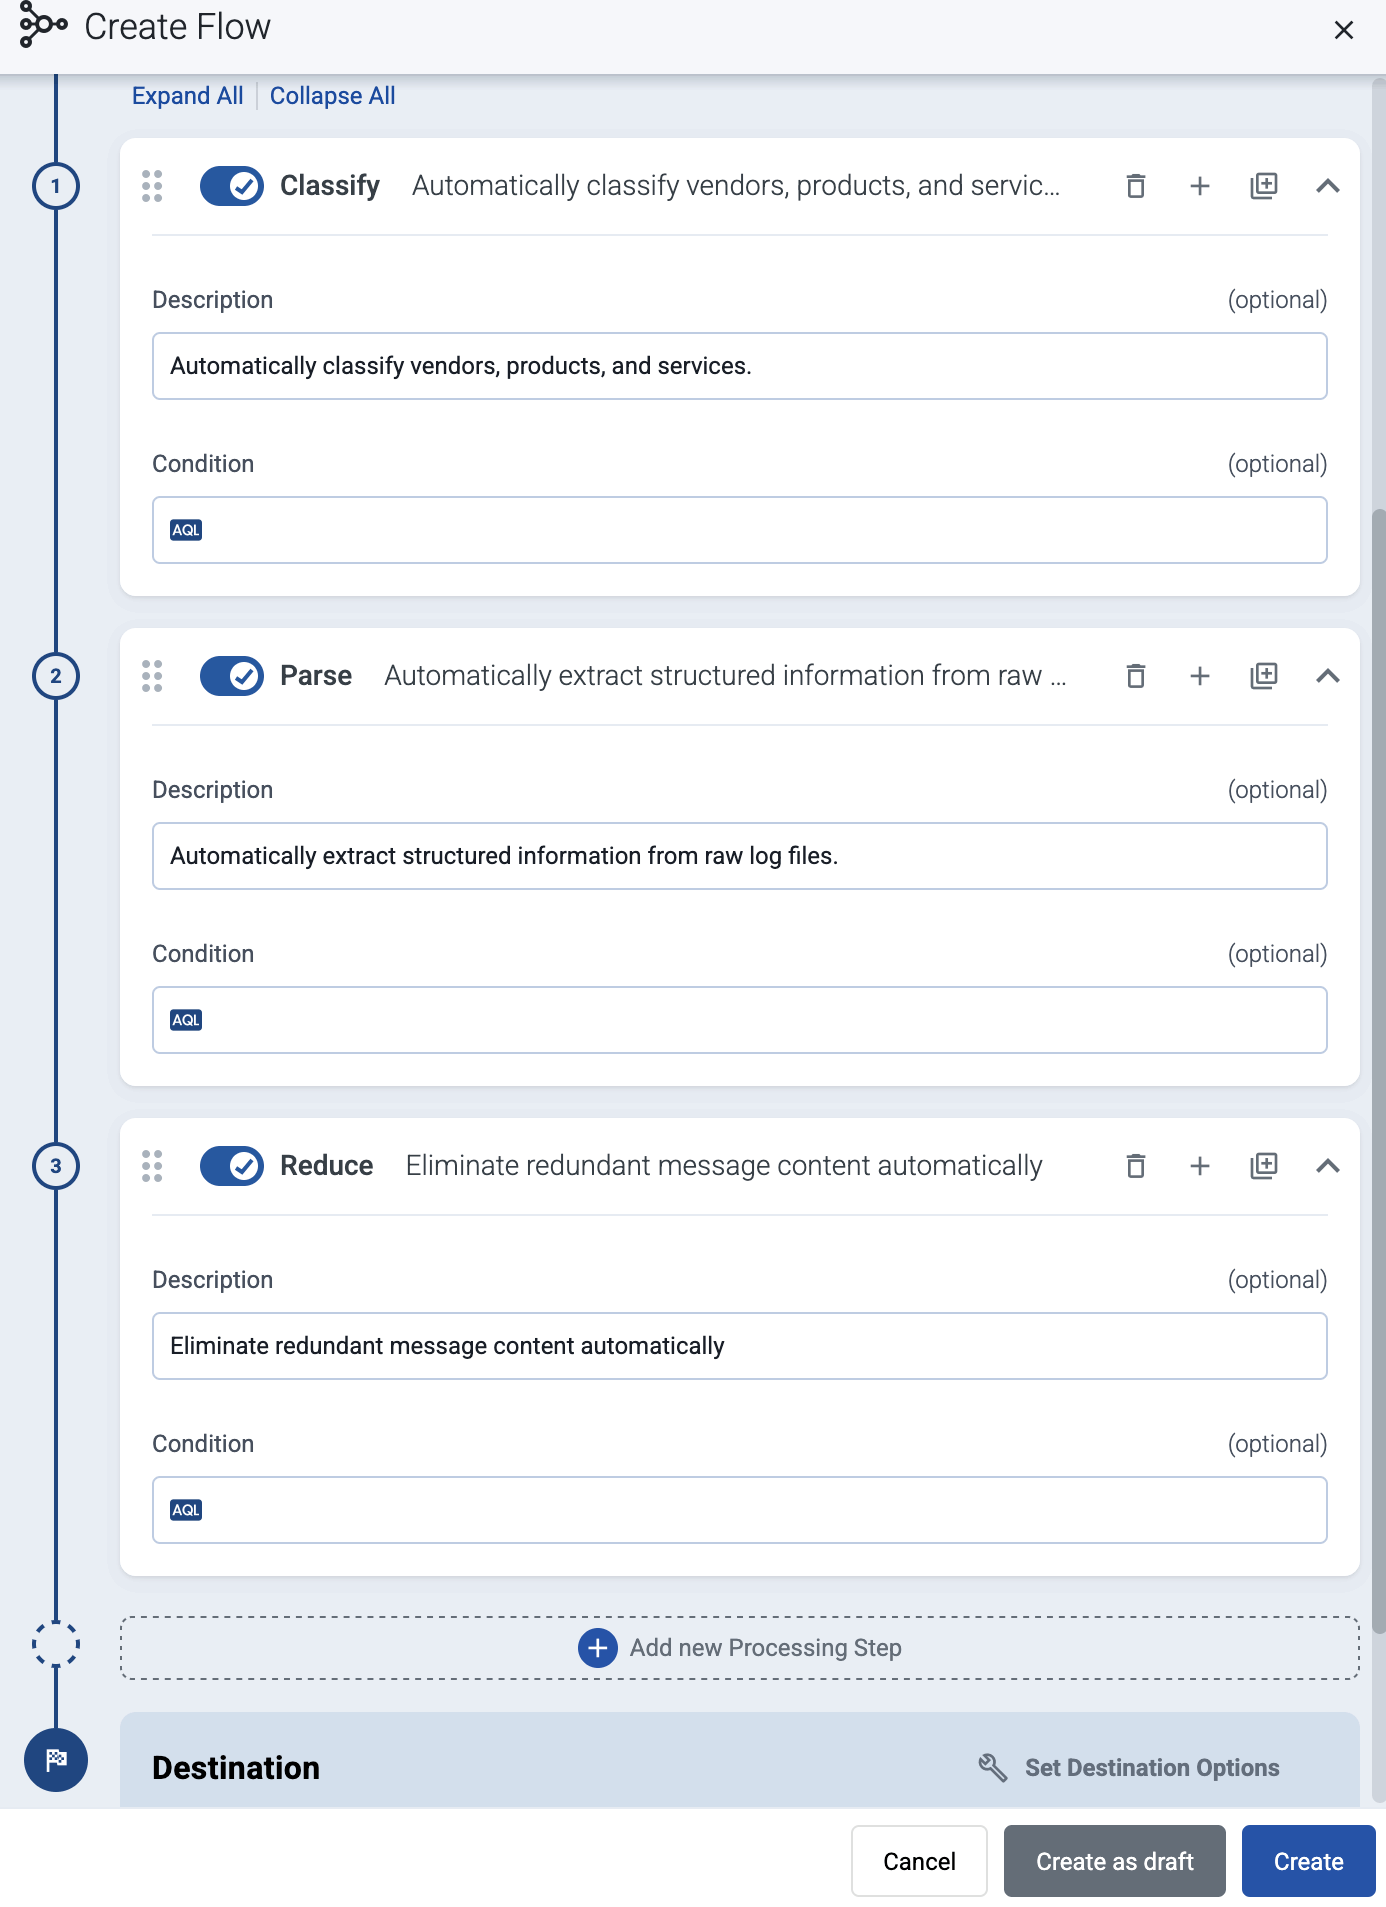
(Optional) To process the data transferred in the flow, select Add New Processing Step. For details, see Processing steps. For example:
- Add a Classify, a Parse, and a Reduce step, in that order, to automatically remove redundant and empty fields from your data.
- To select which messages are processed by the flow, add a Select Messages step, and enter a filter into the AQL Expression field. For example, to select only the messages received from Fortinet FortiGate firewalls, use the
meta.vendor = fortinet AND meta.product = fortigatequery. - Save the processing steps.
-
Select Add.
-
The new flow appears in the Flows list.

-
Related message fields
You can use the following message fields to modify messages sent to this destination using processing steps.
2.1 - Configure Sentinel
To send data from AxoRouter to Microsoft Sentinel, you have to configure a number of things in Sentinel before configuring a destination in AxoConsole. Complete the following steps.
Create an Azure App
Create an Azure (Microsoft Entra) application and credentials for it.
-
Navigate to App registrations on the Azure Portal.
-
Click New registration and register an application (for example
AxoflowIngestion). -
Save the Application (Client) ID and the Directory (Tenant) ID (you’ll need these later to configure Axoflow).
-
Go to Certificates & secrets > Client secrets > + New client secret.
-
Add a description and expiration, click Add, and record the secret value (OAuth secret). You’ll need this later to configure Axoflow.
NOTE: Set a reminder to renew the secret and update your Axoflow configuration before it expires, otherwise your AxoRouters won’t be able to send data to Sentinel, possibly causing data loss.
Enable Microsoft Sentinel on a Log Analytics Workspace
- In the Azure Portal search for Microsoft Sentinel.
- Select an existing workspace or create a new one (choose Resource Group and Region).
- Once added, select the workspace and open Tables.
- You should see the CommonSecurityLog, SecurityEvents, Syslog, WindowsEvents built-in tables. Sometimes the Syslog table appears only when it has data.
- From the workspace Overview, open JSON View and record the Workspace Resource ID (needed in templates).
Create a Data Collection Endpoint (DCE)
To create a Data Collection Endpoint, complete the following steps. For more details, see the Microsoft Sentinel documentation.
- Search for Deploy a custom template in Azure services.
- Choose Build your own template in the editor.
- Download the Axoflow DCE template, and upload or paste it into the template editor. Click Save.
- Set the parameters of the DCE. Make sure Region matches your Sentinel workspace.
- After creation, open it and copy its endpoint URL (that’s
logsIngestion.endpointin the JSON view) and its Resource ID (id). You’ll need the endpoint later to configure Axoflow, and the resource ID to configure the data collection rule.
Create a Data Collection Rule (DCR)
To create a Data Collection Rule, complete the following steps. For more details, see the Microsoft Sentinel documentation.
- Search for Deploy a custom template in Azure services.
- Choose Build your own template in the editor.
- Download the Axoflow DCR template, and upload or paste it into the template editor. Click Save.
- Set the parameters of the DCR. Enter the Workspace Resource ID and Endpoint Resource ID from the previous steps.
- After creation, open it and copy its
immutableIDfrom the JSON view. You’ll need it later to configure Axoflow.
Assign Permissions on the DCR
-
Open Access control (IAM) on the DCR.
-
Add a role assignment:
- Role: Monitoring Metrics Publisher
- Member: the Azure App you created in step 1 (Create an Azure App)
-
Review and assign. This gives the app permissions to push data into Sentinel via the DCR.
After configuring everything in Sentinel, configure a Sentinel destination in AxoConsole.