1 - /dev/null
/dev/null: Blackhole destination for testing or discarding events without storing them.
This is a null destination that discards (drops) every data it receives, but reports that it has successfully received the data. This is useful sometimes for testing and performance measurements, for example, to find out if a real destination is the bottleneck, or another element in the upstream pipeline.
CAUTION:
All data that’s sent to the /dev/null destination only is irrevocably lost.Steps
-
Create a new destination.
- Open the AxoConsole.
- Select Destinations > + Add Destination.
-
Configure the destination.
-
Select /dev/null.
-
Enter a name for the destination.

-
(Optional): Add custom labels to the destination.
-
Select Add.
-
-
Create a flow to connect the new destination to an AxoRouter instance.
-
Select Flows.
-
Select Add Flow.
-
Enter a name for the flow, for example,
my-test-flow.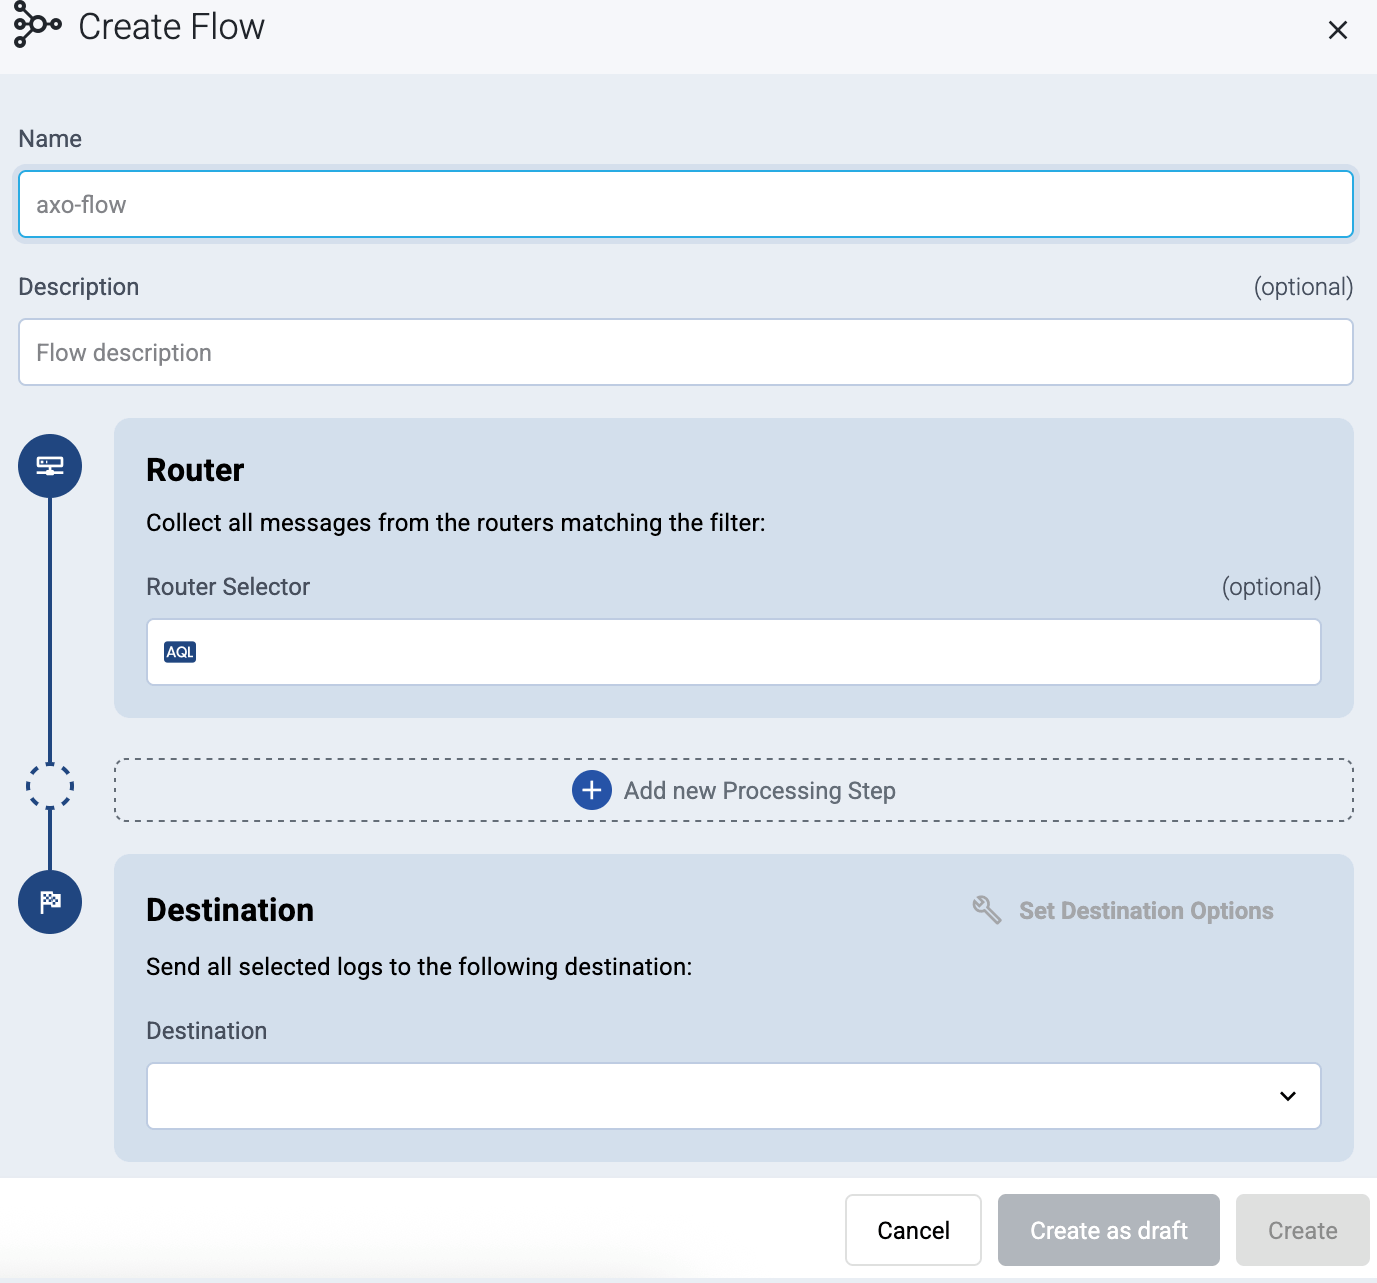
-
In the Router Selector field, enter an expression that matches the router(s) you want to apply the flow. To select a specific router, use a name selector, for example,
name = my-axorouter-hostname.You can use any labels and metadata of the AxoRouter hosts in the Router selectors, for example, the hostname of the AxoRouter, or any custom labels.
- If you leave the Router Selector field empty, the selector will match every AxoRouter instance.
- To select only a specific AxoRouter instance, set the
namefield to the name of the instance as selector. For example,name = my-axorouter. - If you set multiple fields in the selector, the selector will match only AxoRouter instances that match all elements of the selector. (There in an AND relationship between the fields.)
-
Select the Destination where you want to send your data. If you don’t have any destination configured, you can select + Add in the destination section to create a new destination now. For details on the different destinations, see Destinations.
- If you don’t have any destination configured, see Destinations.
- If you’ve already created a store, it automatically available as a destination. Note that the Router Selector of the flow must match only AxoRouters that have the selected store available, otherwise you’ll get an error message.
- If you want to send data to another AxoRouter, enable the Show all destinations option, and select the connector of the AxoRouter where you want to send the data.

-
(Optional) To process the data transferred in the flow, select Add New Processing Step. For details, see Processing steps. For example:
- Add a Classify, a Parse, and a Reduce step, in that order, to automatically remove redundant and empty fields from your data.
- To select which messages are processed by the flow, add a Select Messages step, and enter a filter into the AQL Expression field. For example, to select only the messages received from Fortinet FortiGate firewalls, use the
meta.vendor = fortinet AND meta.product = fortigatequery. - Save the processing steps.
-
Select Add.
-
The new flow appears in the Flows list.

-
2 - syslog
syslog: Standard protocol for system logs. Our source automatically detects, parses, and classifies incoming syslog events without pre-configuration.
The syslog destination forwards your security data in an RFC-3164 or RFC-5424 compliant syslog format, using the UDP, TCP, or TLS-encrypted TCP protocols.
Prerequisites
If you want to enable TLS encryption for this connector to encrypt the communication with the sources, you’ll need to set appropriate keys and certificates.
CAUTION:
Copy the keys and certificates to AxoRouter before starting to configure the connector. Otherwise, you won’t be able to make configuration changes that require reloading the AxoRouter service, including starting log tapping or flow tapping.Note the following points:
-
Keys and certificates must be in PEM format.
-
If the file contains a certificate chain, the file must begin with the certificate of the host, followed by the CA certificate that signed the certificate of the host, and any other signing CAs in order.
-
You must manually copy these files to their place on the AxoRouter host, currently you can’t distribute them from AxoConsole.
The files must be readable by the
axorouterservice. -
The recommended path for certificates is under
/etc/axorouter/user-config/(for example,/etc/axorouter/user-config/tls-key.pem). (If you need to use a different path, you have to append an option like-v /your/path:/your/pathto theAXOROUTER_PODMAN_ARGSvariable of/etc/axorouter/container.env.) -
When referring to the key or certificate during when configuring the connector, use absolute paths (for example,
/etc/axorouter/user-config/tls-key.pem).
Steps
-
Create a new destination.
- Open the AxoConsole.
- Select Destinations > + Add Destination.
-
Configure the destination.
-
Select Syslog.
-
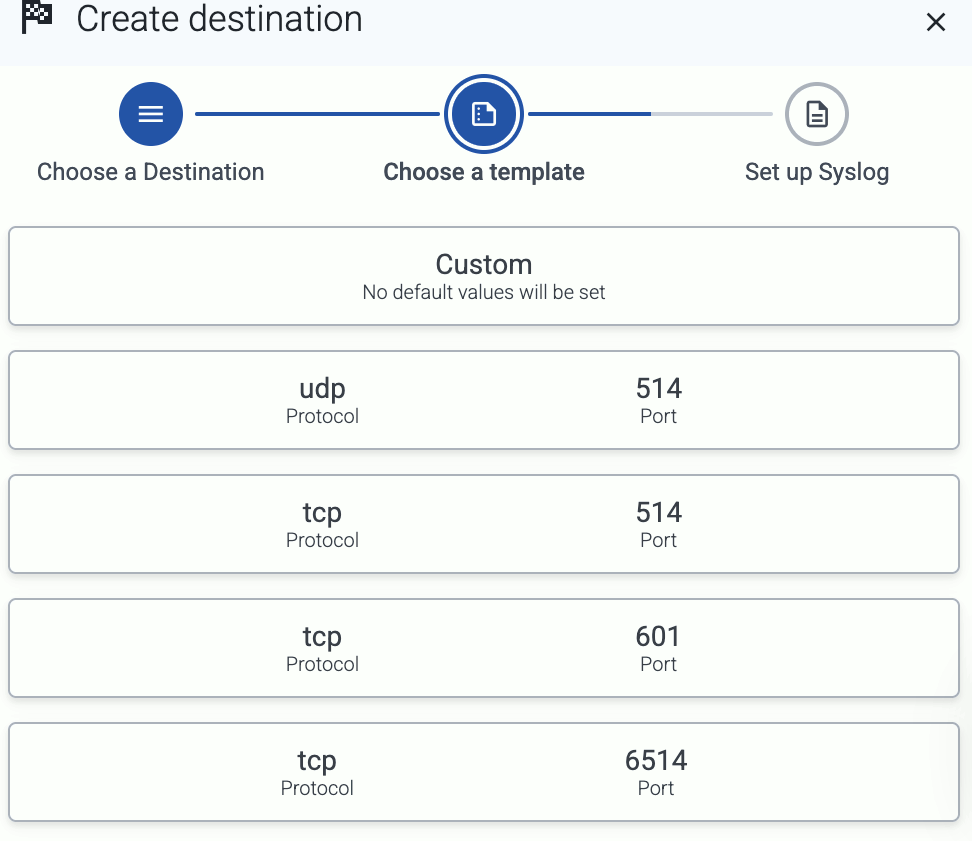
Select the template to use one of the standard syslog ports and transport protocols—for example, UDP port 514, which is commonly used for the RFC3164 syslog protocol.
To configure a different port, or to specify the protocol elements manually, select Custom.
-
Enter a name for the destination.
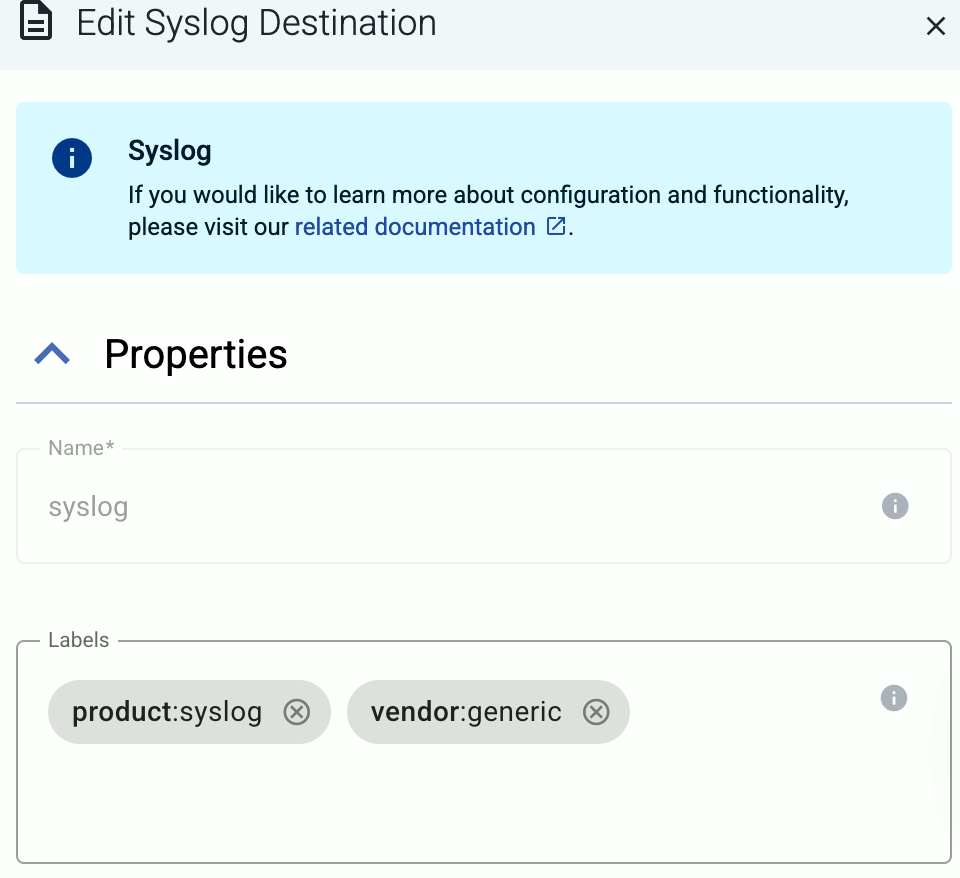
-
(Optional): Add custom labels to the destination.
-
Select the protocol to use for sending syslog data: TCP, UDP, or TLS.
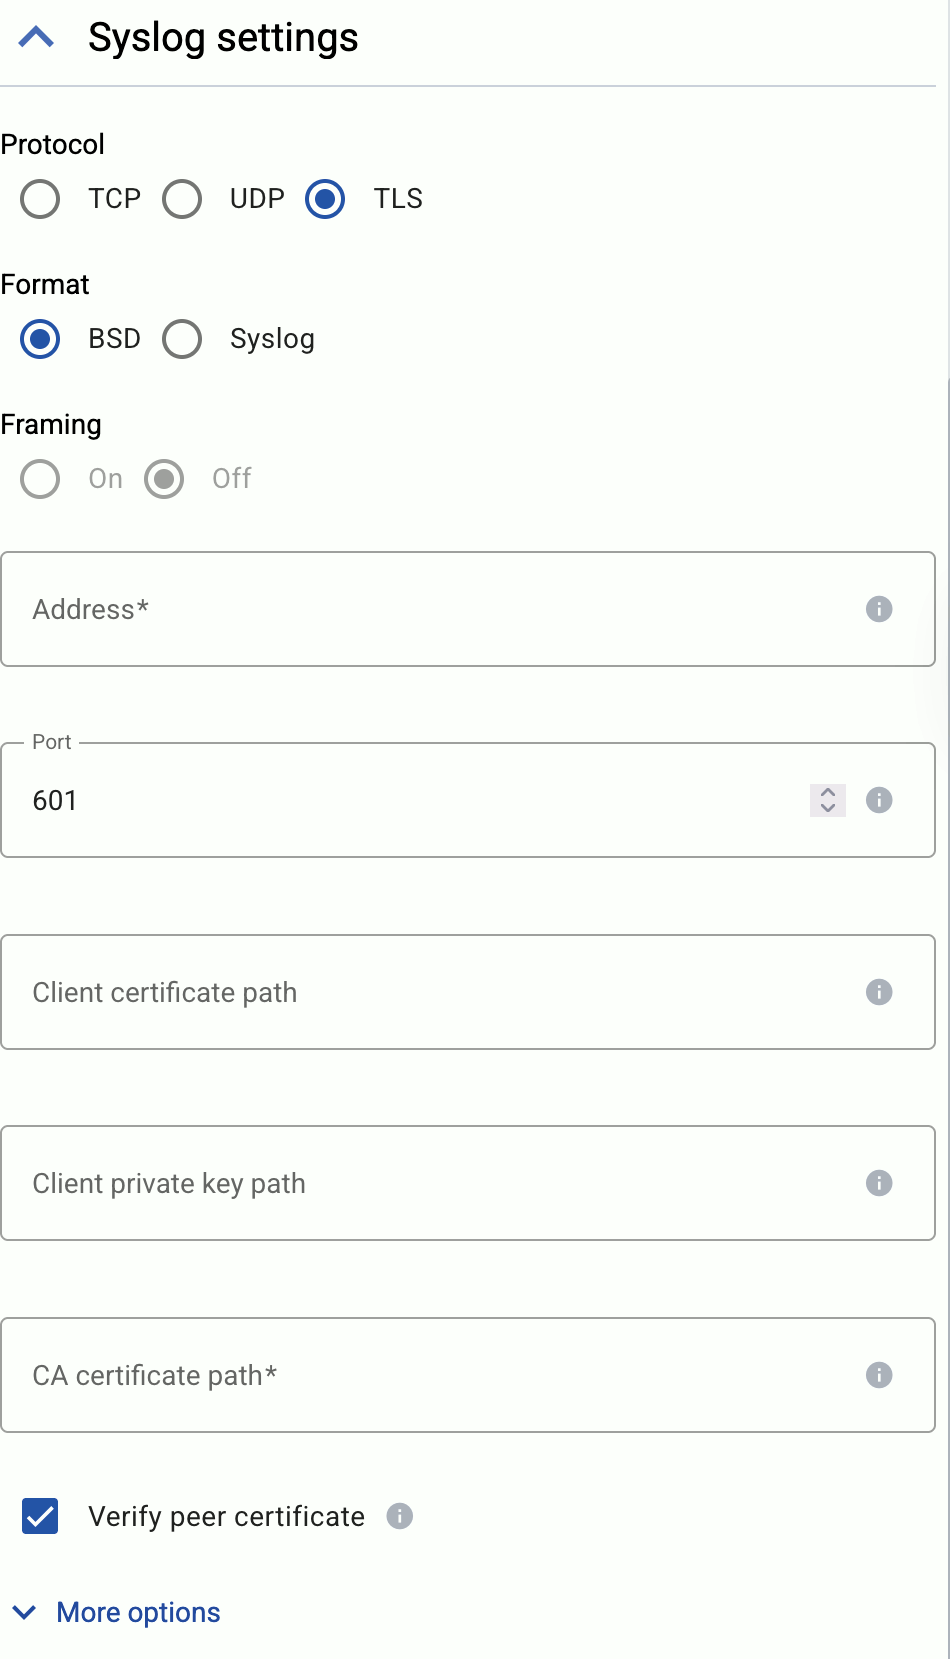
-
Select the syslog format to use: BSD (RFC3164) or Syslog (RFC5424).
-
(Optional) If explicitly needed for your use case, you can configure *Framing manually when using the Syslog (RFC5424) format. Enable framing (On) if the payload contains the length of the message as specified in RFC6587 3.4.1. Disable (Off) for non-transparent-framing RFC6587 3.4.2.
-
If you’ve selected Protocol > TLS, set the TLS-related options.
When using TLS, set the paths for the certificates and keys used for the TLS-encrypted communication with the clients. For details, see Prerequisites.
- Client certificate path: The certificate that AxoRouter shows to the destination server.
- Client private key path: The private key of the client certificate.
- CA certificate path: The CA certificate that AxoRouter uses to verify the certificate of the destination if Verify peer certificate is enabled.
-
Set the Address and the Port of the destination. Usually:
- 514 UDP and TCP for RFC3164 (BSD-syslog) and RFC5424 (IETF-syslog) formatted traffic. AxoRouter automatically recognizes and handles both formats.
- 601 TCP for RFC5424 (IETF-syslog) and RFC3164 (BSD-syslog) formatted traffic. AxoRouter automatically recognizes and handles both formats.
- 6514 TCP for TLS-encrypted syslog traffic.
-
Select Add.
-
-
Create a flow to connect the new destination to an AxoRouter instance.
-
Select Flows.
-
Select Add Flow.
-
Enter a name for the flow, for example,
my-test-flow. -
In the Router Selector field, enter an expression that matches the router(s) you want to apply the flow. To select a specific router, use a name selector, for example,
name = my-axorouter-hostname.You can use any labels and metadata of the AxoRouter hosts in the Router selectors, for example, the hostname of the AxoRouter, or any custom labels.
- If you leave the Router Selector field empty, the selector will match every AxoRouter instance.
- To select only a specific AxoRouter instance, set the
namefield to the name of the instance as selector. For example,name = my-axorouter. - If you set multiple fields in the selector, the selector will match only AxoRouter instances that match all elements of the selector. (There in an AND relationship between the fields.)
-
Select the Destination where you want to send your data. If you don’t have any destination configured, you can select + Add in the destination section to create a new destination now. For details on the different destinations, see Destinations.
- If you don’t have any destination configured, see Destinations.
- If you’ve already created a store, it automatically available as a destination. Note that the Router Selector of the flow must match only AxoRouters that have the selected store available, otherwise you’ll get an error message.
- If you want to send data to another AxoRouter, enable the Show all destinations option, and select the connector of the AxoRouter where you want to send the data.
-
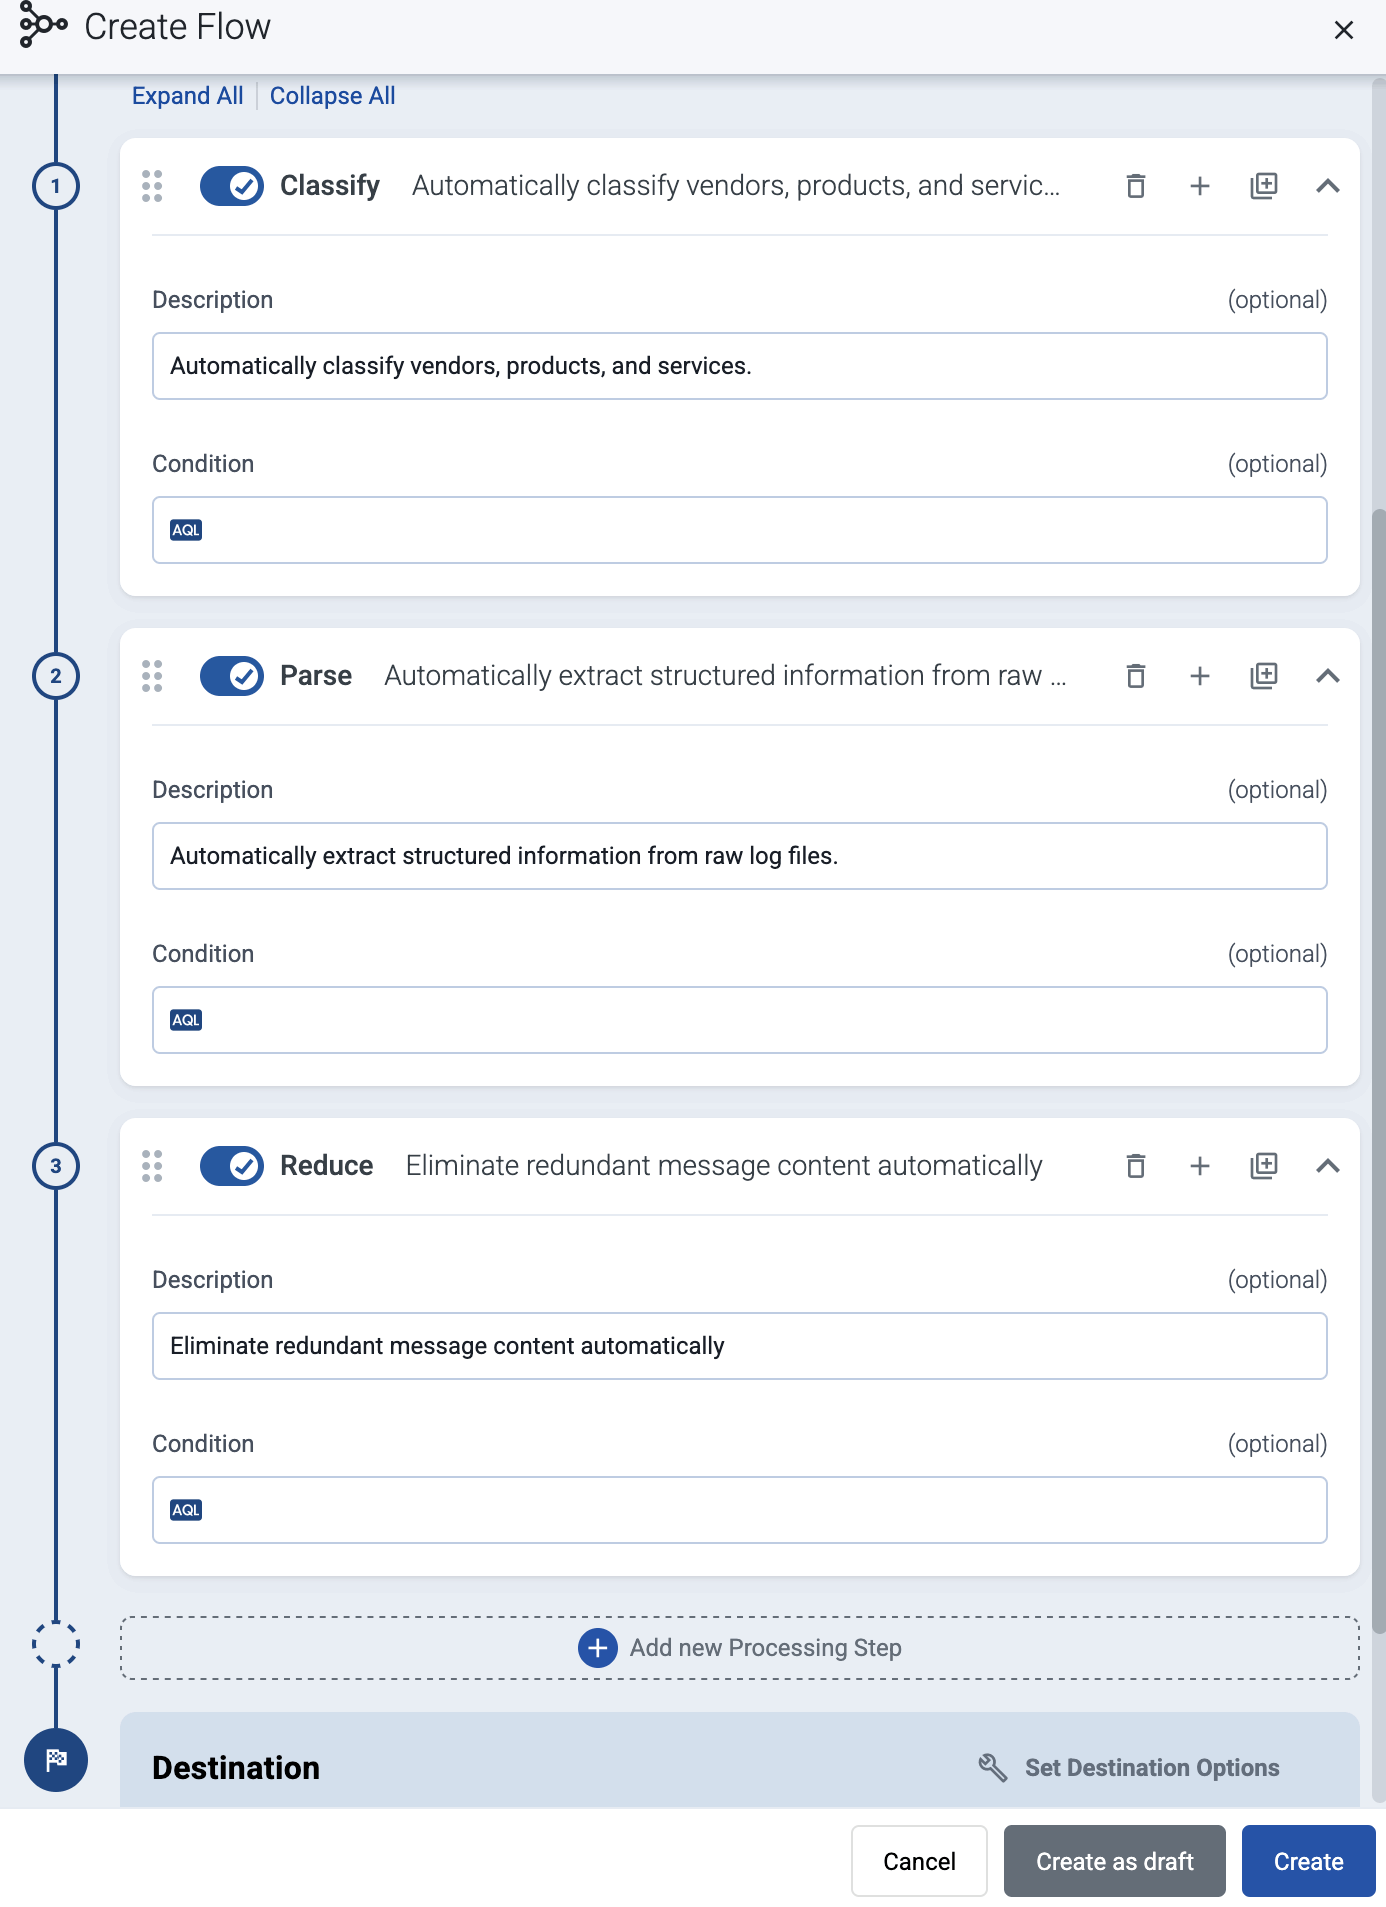
(Optional) To process the data transferred in the flow, select Add New Processing Step. For details, see Processing steps. For example:
- Add a Classify, a Parse, and a Reduce step, in that order, to automatically remove redundant and empty fields from your data.
- To select which messages are processed by the flow, add a Select Messages step, and enter a filter into the AQL Expression field. For example, to select only the messages received from Fortinet FortiGate firewalls, use the
meta.vendor = fortinet AND meta.product = fortigatequery. - Save the processing steps.
-
Select Add.
-
The new flow appears in the Flows list.
-
Protocol-specific destination options
If needed, select More options to set the following when using the TCP or TLS protocol:
- TCP Keepalive Time Interval: The interval (number of seconds) between subsequential keepalive probes, regardless of the traffic exchanged in the connection.
- TCP Keepalive Probes: The number of unacknowledged probes to send before considering the connection dead.
- TCP Keepalive Time: The interval (in seconds) between the last data packet sent and the first keepalive probe.
Advanced options
-
Disk Buffer: Explicitly enable or disable disk buffer on AxoRouter. Default value: Enabled.
AxoRouter can store messages on the local disk if the destination or the network connection to the destination becomes unavailable. AxoRouter automatically sends the stored messages (in the order they were received) to the destination when the connection is reestablished. Note that the disk buffer is separate from AxoStore.
Capacity Bytes: Size of the disk buffer files in bytes. This value applies for each worker. Default value is 100MiB (104857600 bytes), which is also the recommended minimum.
The disk required for using disk buffering is Capacity Bytes*Number of Workers for each destination of AxoRouter.