This is the multi-page printable view of this section.
Click here to print.
Return to the regular view of this page.
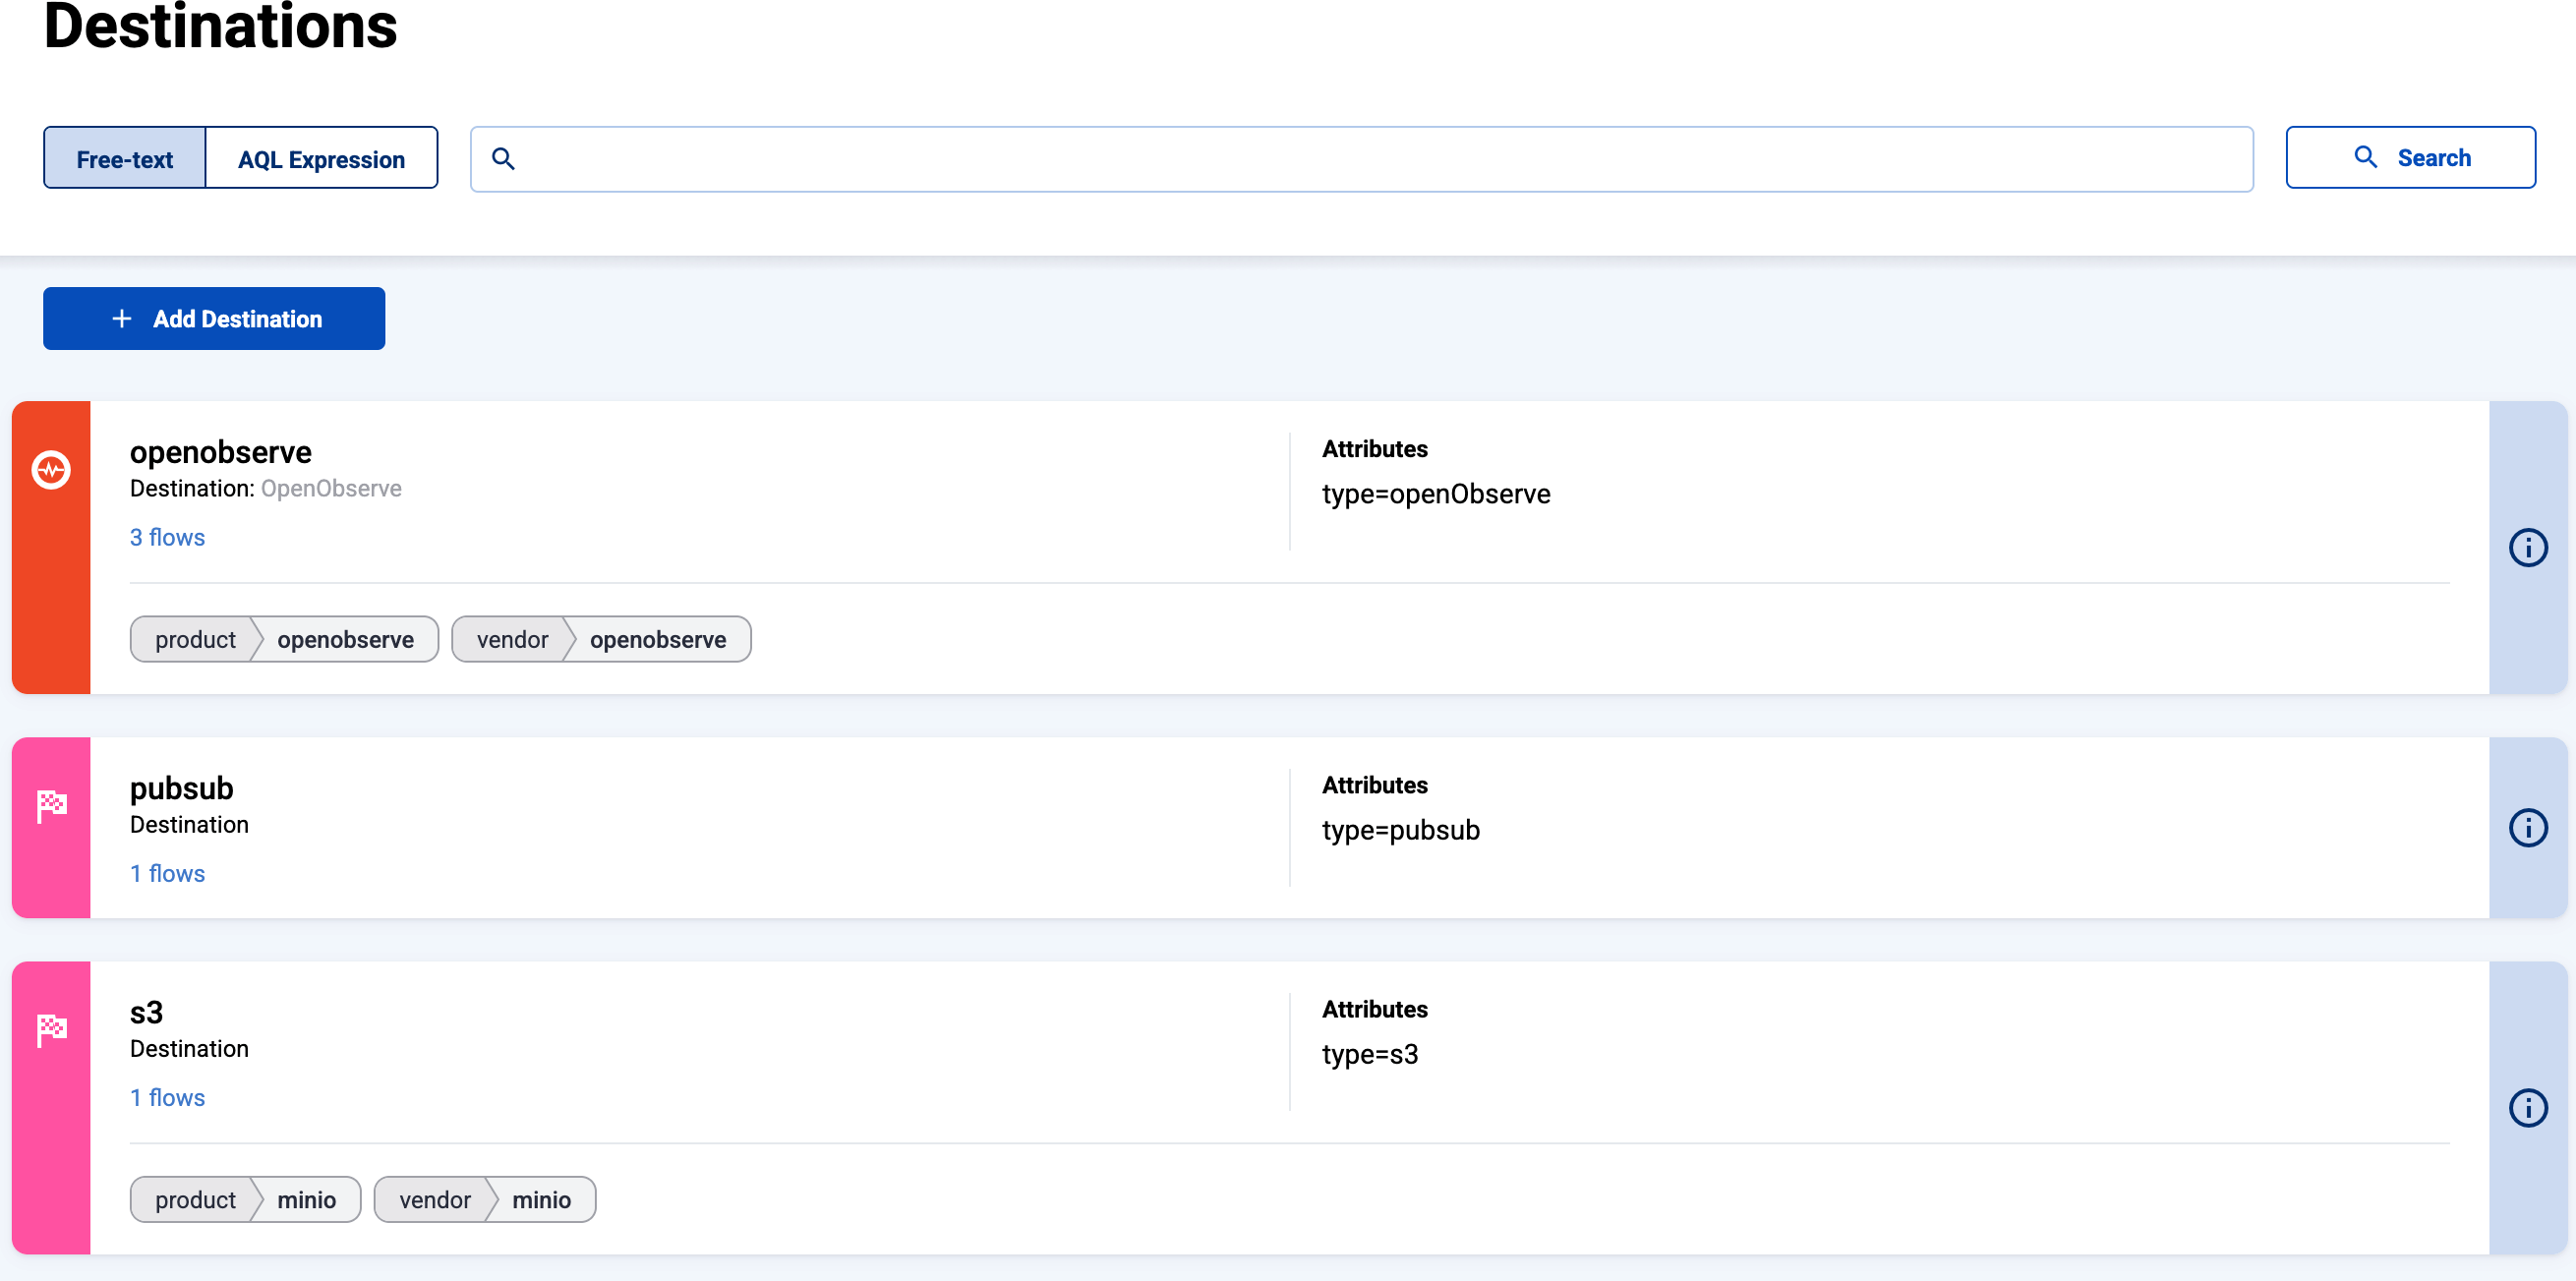
Destinations
The following chapters show you how to configure Axoflow to send your data to specific destinations, like SIEMs or object storage solutions.
-
You can find the list of existing destinations on the Destinations page.
-
To modify an existing destination, select its name from the list, then select Edit.
-
Stores and External Stores are also listed as destinations.
- AxoStore stores logs locally on the AxoRouter that processed the messages.
- External stores use a separately deployed AxoLake or an existing compatible ClickHouse cluster.
To create a new store, see Create Store or Create External Store.
-
To create a new destination, select Add Destination. See the section of the specific destination for details.
1 - Amazon
1.1 - Amazon S3
Amazon S3:
Scalable cloud storage service for storing and retrieving any amount of data via object storage.
To add an Amazon S3 destination to Axoflow, complete the following steps.
Prerequisites
-
An existing S3 bucket configured for programmatic access, and the related ACCESS_KEY and SECRET_KEY of a user that can access it. The user needs to have the following permissions:
kms:Decryptkms:Encryptkms:GenerateDataKeys3:ListBuckets3:ListBucketMultipartUploadss3:AbortMultipartUploads3:ListMultipartUploadPartss3:PutObject
-
To configure Axoflow, you’ll need the bucket name, region (or URL), access key, and the secret key of the bucket.
Steps
-
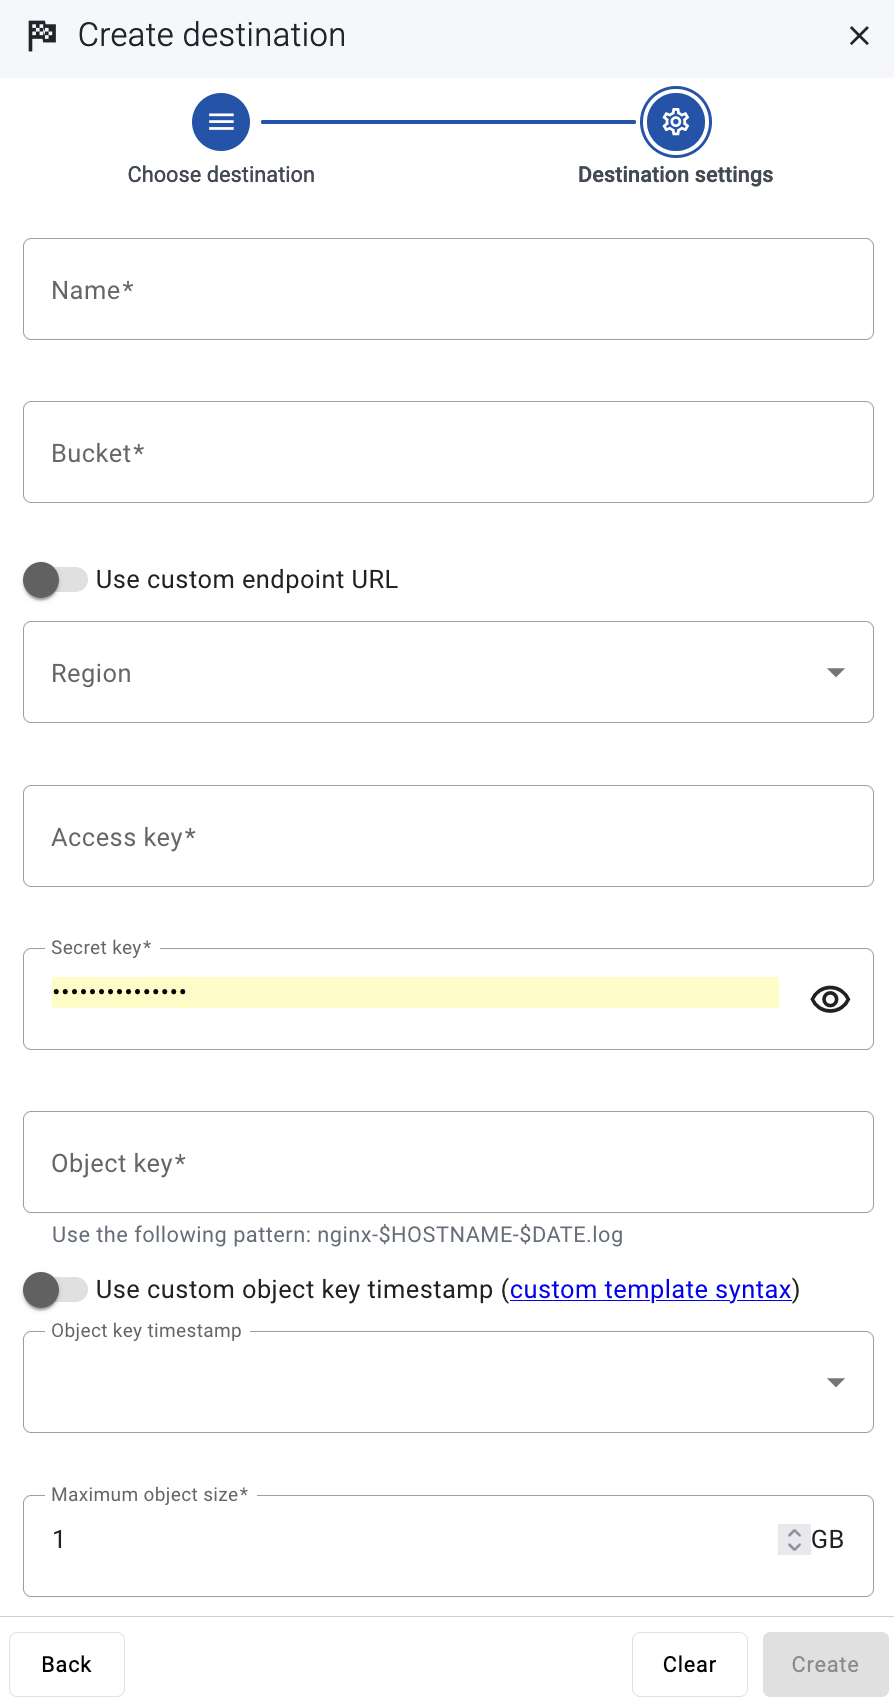
Create a new destination.
- Open the AxoConsole.
- Select Destinations > + Add Destination.
-
Configure the destination.
-
Select Amazon S3.
-
Enter a name for the destination.
-
Enter the name of the bucket you want to use.
-
Enter the region code of the bucket into the Region field (for example, us-east-1.), or select the Use custom endpoint URL option, and enter the URL of the endpoint into the URL field.
-
Enter the Access key and the Secret key for the account you want to use.
-
Enter the Object key (or key name), which uniquely identifies the object in an Amazon S3 bucket, for example: my-logs/${HOSTNAME}/.
You can use AxoSyslog macros in this field.
- Select the Object key timestamp format you want to use, or select Use custom object key timestamp and enter a custom template. For details on the available date-related macros, see the AxoSyslog documentation.
- Set the maximal size of the S3 object. If an object reaches this size, Axoflow appends an index ("-1", “-2”, …) to the end of the object key and starts a new object after rotation.
- Select Add.
-
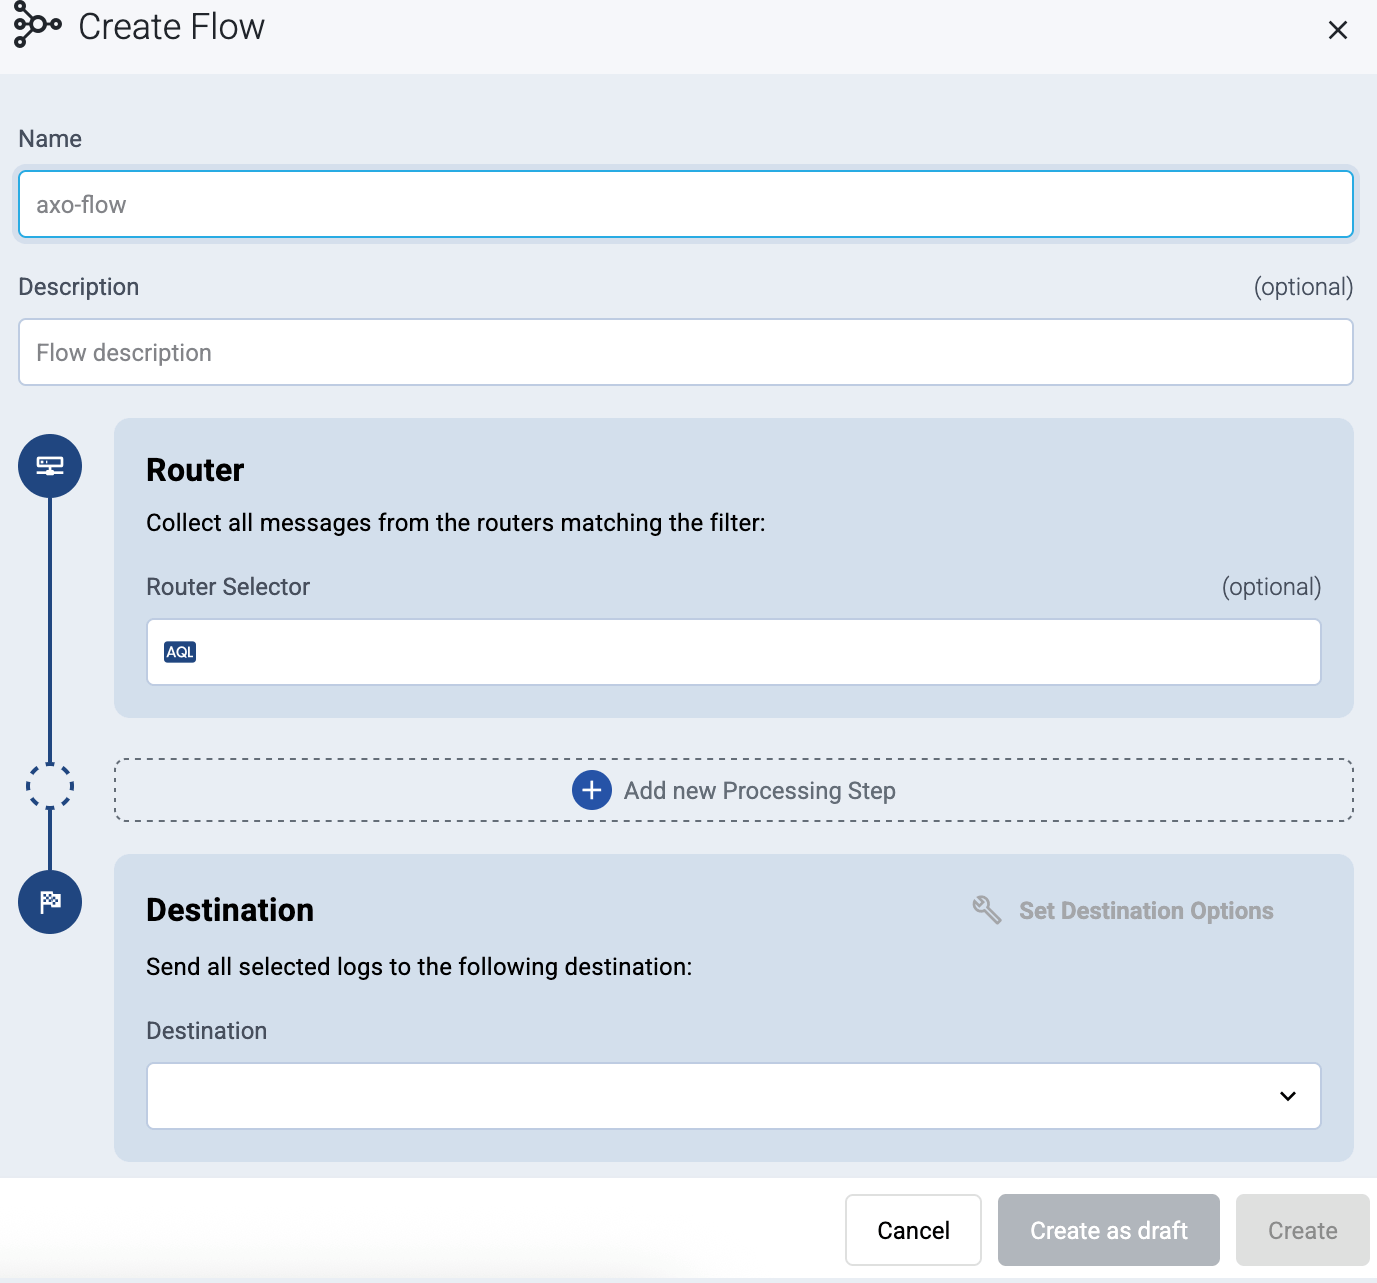
Create a flow to connect the new destination to an AxoRouter instance.
-
Select Flows.
-
Select Add Flow.
-
Enter a name for the flow, for example, my-test-flow.
-
In the Router Selector field, enter an expression that matches the router(s) you want to apply the flow. To select a specific router, use a name selector, for example, name = my-axorouter-hostname.
You can use any labels and metadata of the AxoRouter hosts in the Router selectors, for example, the hostname of the AxoRouter, or any custom labels.
- If you leave the Router Selector field empty, the selector will match every AxoRouter instance.
- To select only a specific AxoRouter instance, set the
name field to the name of the instance as selector. For example, name = my-axorouter.
- If you set multiple fields in the selector, the selector will match only AxoRouter instances that match all elements of the selector. (There in an AND relationship between the fields.)
-
Select the Destination where you want to send your data. If you don’t have any destination configured, you can select + Add in the destination section to create a new destination now. For details on the different destinations, see Destinations.
- If you don’t have any destination configured, see Destinations.
- If you’ve already created a store, it automatically available as a destination. Note that the Router Selector of the flow must match only AxoRouters that have the selected store available, otherwise you’ll get an error message.
- If you want to send data to another AxoRouter, enable the Show all destinations option, and select the connector of the AxoRouter where you want to send the data.

-
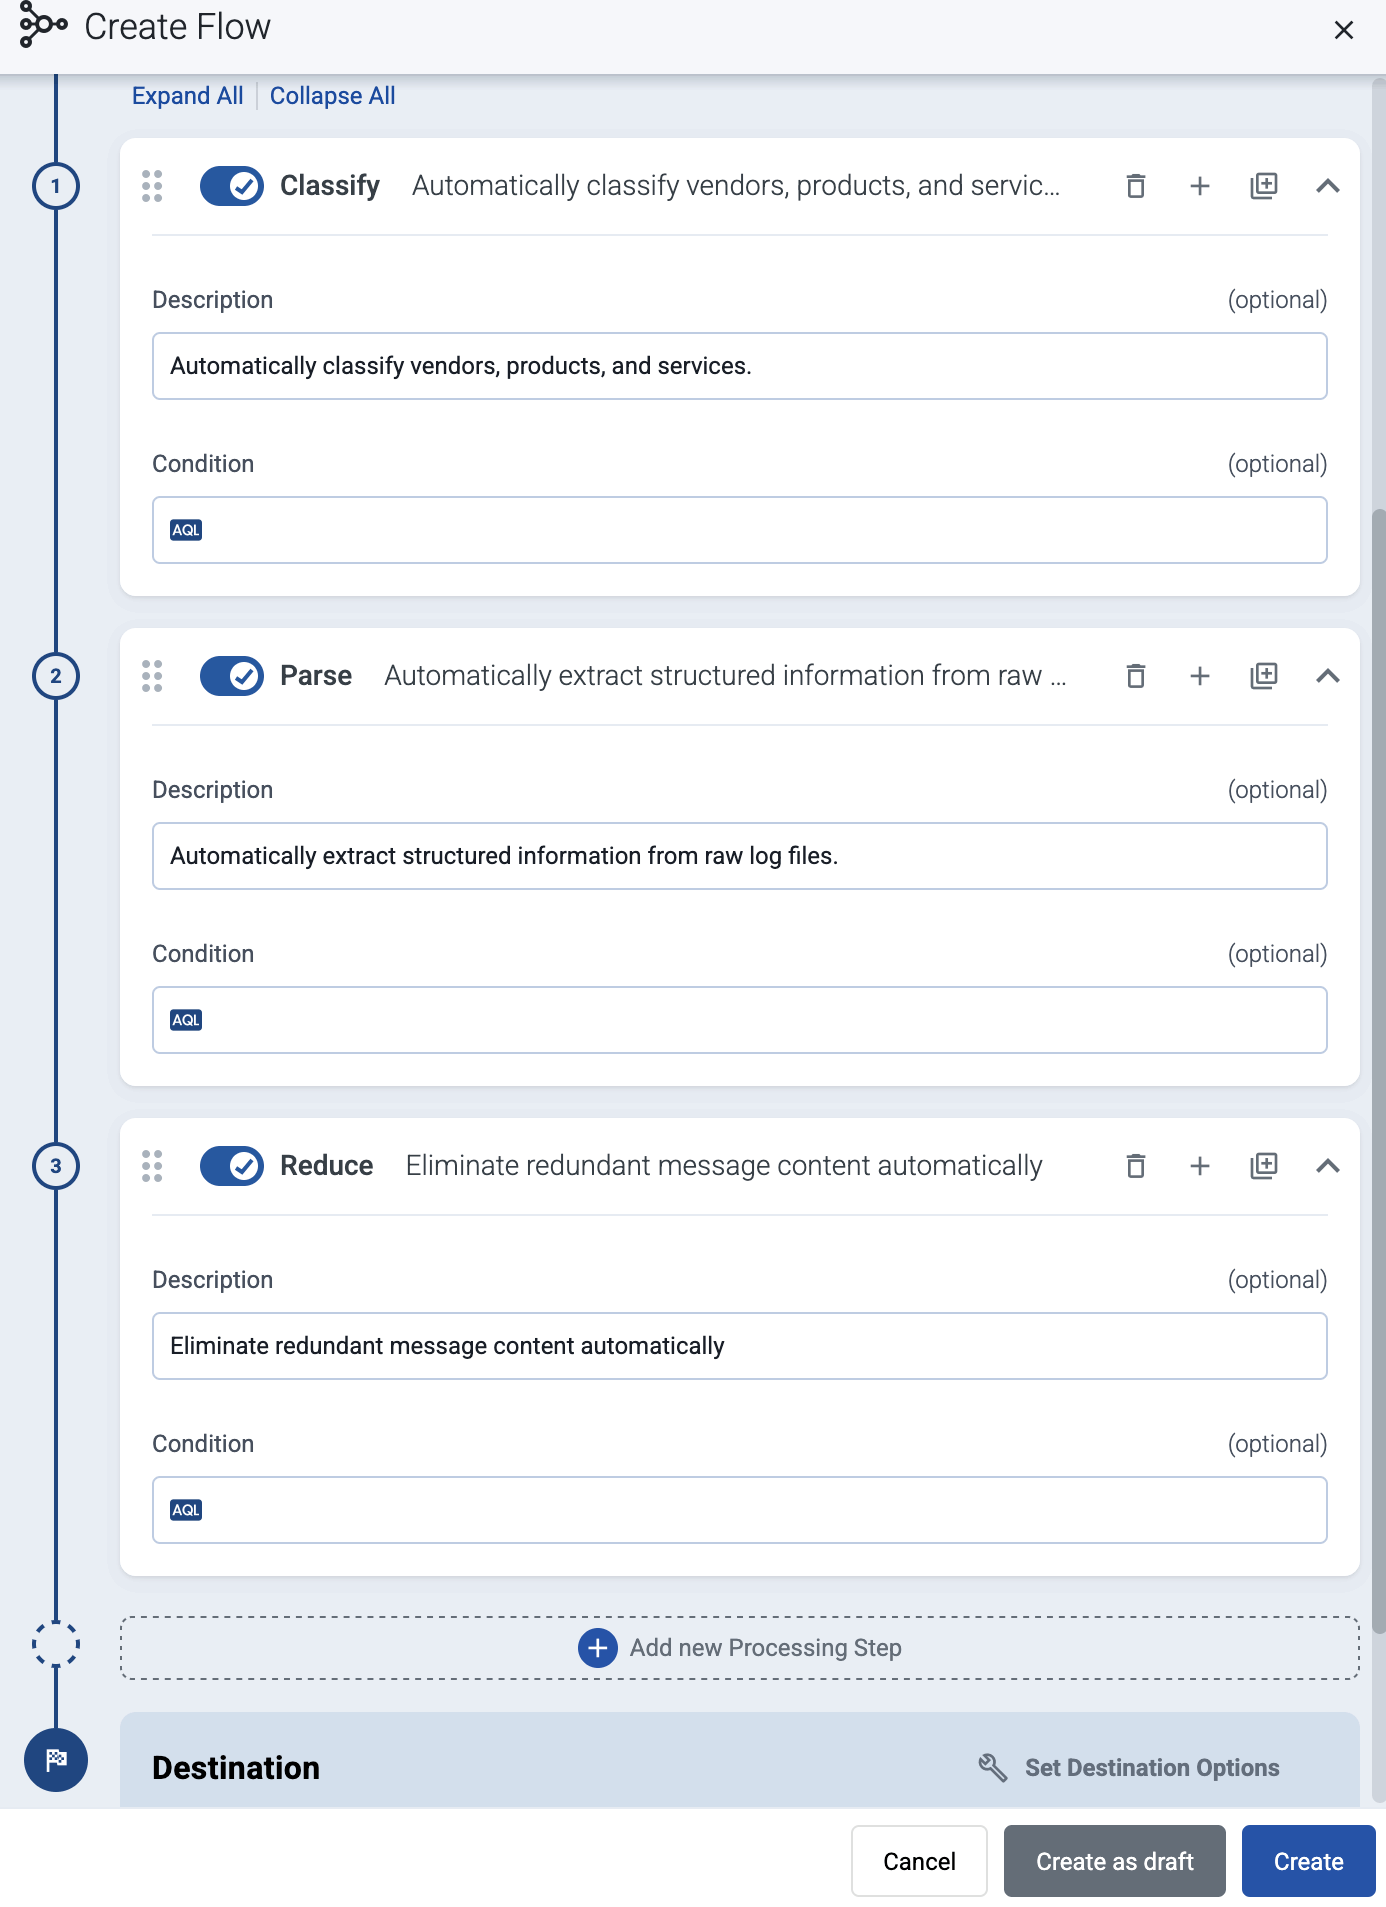
(Optional) To process the data transferred in the flow, select Add New Processing Step. For details, see Processing steps. For example:
- Add a Classify, a Parse, and a Reduce step, in that order, to automatically remove redundant and empty fields from your data.
- To select which messages are processed by the flow, add a Select Messages step, and enter a filter into the AQL Expression field. For example, to select only the messages received from Fortinet FortiGate firewalls, use the
meta.vendor = fortinet AND meta.product = fortigate query.
- Save the processing steps.
-
Select Add.
-
The new flow appears in the Flows list.

You can use the following message fields to modify messages sent to this destination using processing steps.
2 - Apache Kafka
Apache Kafka:
Distributed event streaming platform used for building real-time data pipelines and stream processing.
If you’d like to send data from AxoRouter to this destination, contact our support team for details.
3 - AxoStore
AxoStore is a lightweight, queryable, temporary storage option that stores data locally on the AxoRouter host. AxoConsole provides federated search for every AxoRouter that has AxoStore deployed, so you can simultaneously run queries on every AxoStore.
AxoStore is automatically available for all Axoflow customers, for each AxoRouter node, with 7 days retention, and up to 1TB of storage. For longer retention time or bigger storage, you need an extended AxoStore subscription. Contact us for the details.
To send data to AxoStore, complete the following steps.
Prerequisites
- AxoStore is available only if you’ve deployed a AxoRouter instance with AxoStore enabled. For details, see Install AxoRouter on Linux.
- AxoStore is a local storage on the AxoRouter node. Only data received by the AxoRouter node can be sent to the AxoStore.
- By default, there are no stores defined. See Create Store.
Steps
Create a flow to route data received by AxoRouter to the local AxoStore destination. Note the following points:
- The amount of data you can store in AxoStore and its retention time is limited depending on your Axoflow subscription.
- By default, AxoStore is enabled on every AxoRouter instance. If you’ve disabled it on some instances, make sure that the Router Selector matches only AxoRouter instances that have AxoStore enabled.
For details on creating a flow, see Manage flows.
Access the data
To access the data stored in AxoStore, see Storage. The data is stored according to the following schema: Storage schema.
4 - Clickhouse
If you’d like to send data from AxoRouter to this destination, contact our support team for details.
5 - CrowdStrike
CrowdStrike:
Cloud-native platform for endpoint detection, threat hunting, and security analytics at scale.
If you’d like to send data from AxoRouter to this destination, contact our support team for details.
6 - Dynatrace
Dynatrace:
Unified Observability — Drive business transformation with contextual analytics, AI, and automation.
To add a Dynatrace destination to Axoflow, complete the following steps.
Prerequisites
-
An access token to your Dynatrace instance. The token must have access to the Log ingestion API endpoint.
-
Your AxoRouters that are sending data to Dynatrace must have network access to the following Log Ingestion endpoints:
- For the Cloud collector, when you’re sending data directly to the Dynatrace SaaS:
https://{your-environment-id}.live.dynatrace.com/api/v2/logs/ingest
- For the
ActiveGate collector: https://{your-activegate-domain}:9999/e/{your-environment-id}/api/v2/logs/ingest
If nothing prevents it, we recommend using the Cloud collector.
-
Make sure to configure the limits of your Dynatrace instance to make sure it can ingest the amount of data you’re sending.
Steps
-
Create a new destination.
- Open the AxoConsole.
- Select Destinations > + Add Destination.
-
Configure the destination.
-
Select Dynatrace.
-
Enter a name for the destination.
-
Enter the token you’ve created into the Token field.
-
Select the Dynatrace Bucket type (Logs or Security events) where you want to send the data. Where exactly the data will be stored in Dynatrace depends on your Bucket assignment rules.
-
Select the type of Dynatrace Collector where you want to send the data:
- Cloud: Send data directly to your Dynatrace SaaS subscription.
- ActiveGate: Send data directly to a local ActiveGate endpoint.
- Advanced: Specify a custom URL endpoint.
If nothing prevents it, we recommend using the Cloud collector.
-
Configure the endpoint of the destination, depending on the collector type you’ve selected.
-
(Optional) Set other options as needed for your environments.
- Timeout: The number of seconds to wait for a log-forwarding request to complete, and attempt to reconnect the server if exceeded. If the timeout is exceeded, AxoRouter attempts to reconnect the destination. The default (
0) is unlimited. For more details, see the AxoSyslog documentation.
-
Disk Buffer: Explicitly enable or disable disk buffer on AxoRouter. Default value: Enabled.
AxoRouter can store messages on the local disk if the destination or the network connection to the destination becomes unavailable. AxoRouter automatically sends the stored messages (in the order they were received) to the destination when the connection is reestablished. Note that the disk buffer is separate from AxoStore.
Capacity Bytes: Size of the disk buffer files in bytes. This value applies for each worker. Default value is 100MiB (104857600 bytes), which is also the recommended minimum.
The disk required for using disk buffering is Capacity Bytes*Number of Workers for each destination of AxoRouter.
-
Batch Bytes: Sets the maximum size of payload in a batch. If the size of the messages reaches this value, AxoRouter sends the batch to the destination even if the number of messages is less than the value of the batch lines option.
CAUTION:
When setting Batch Bytes:
- Note that the actual HTTP request will be about 4KB larger because of the request headers.
- Check the configuration of your destination, as SaaS solutions and ingress controllers often limit the maximal size of HTTP requests. If the sum of Batch Bytes and the request headers exceeds this limit, the data will be rejected. (In case of NGINX, with a
client intended to send too large body error message.)
-
Batch Lines: Number of lines sent to the destination in one batch. AxoRouter waits for this number of lines to accumulate and sends them off in a single batch. Increasing this number increases throughput as more messages are sent in a single batch, but also increases message latency. For more details, see the AxoSyslog documentation.
-
Batch Timeout: Maximal time in milliseconds to wait for a batch to be filled before sending it. The default value (-1) means that the batch should be full before sending, which may result in a long wait if the incoming traffic is low. For more details, see the AxoSyslog documentation.
-
Number of Workers: Used for scaling the destination in case of high message load. Specifies the number of worker threads AxoRouter uses for sending messages to the destination. The default is 1. If high message throughput is not a concern, leave it on 1. For maximum performance, increase it up to the number of CPU cores available on AxoRouter. For more details, see the AxoSyslog documentation.
-
Create a flow to connect the new destination to an AxoRouter instance.
-
Select Flows.
-
Select Add Flow.
-
Enter a name for the flow, for example, my-test-flow.
-
In the Router Selector field, enter an expression that matches the router(s) you want to apply the flow. To select a specific router, use a name selector, for example, name = my-axorouter-hostname.
You can use any labels and metadata of the AxoRouter hosts in the Router selectors, for example, the hostname of the AxoRouter, or any custom labels.
- If you leave the Router Selector field empty, the selector will match every AxoRouter instance.
- To select only a specific AxoRouter instance, set the
name field to the name of the instance as selector. For example, name = my-axorouter.
- If you set multiple fields in the selector, the selector will match only AxoRouter instances that match all elements of the selector. (There in an AND relationship between the fields.)
-
Select the Destination where you want to send your data. If you don’t have any destination configured, you can select + Add in the destination section to create a new destination now. For details on the different destinations, see Destinations.
- If you don’t have any destination configured, see Destinations.
- If you’ve already created a store, it automatically available as a destination. Note that the Router Selector of the flow must match only AxoRouters that have the selected store available, otherwise you’ll get an error message.
- If you want to send data to another AxoRouter, enable the Show all destinations option, and select the connector of the AxoRouter where you want to send the data.
-
(Optional) To process the data transferred in the flow, select Add New Processing Step. For details, see Processing steps. For example:
- Add a Classify, a Parse, and a Reduce step, in that order, to automatically remove redundant and empty fields from your data.
- To select which messages are processed by the flow, add a Select Messages step, and enter a filter into the AQL Expression field. For example, to select only the messages received from Fortinet FortiGate firewalls, use the
meta.vendor = fortinet AND meta.product = fortigate query.
- Save the processing steps.
-
Select Add.
-
The new flow appears in the Flows list.
You can use the following message fields to modify messages sent to this destination using processing steps.
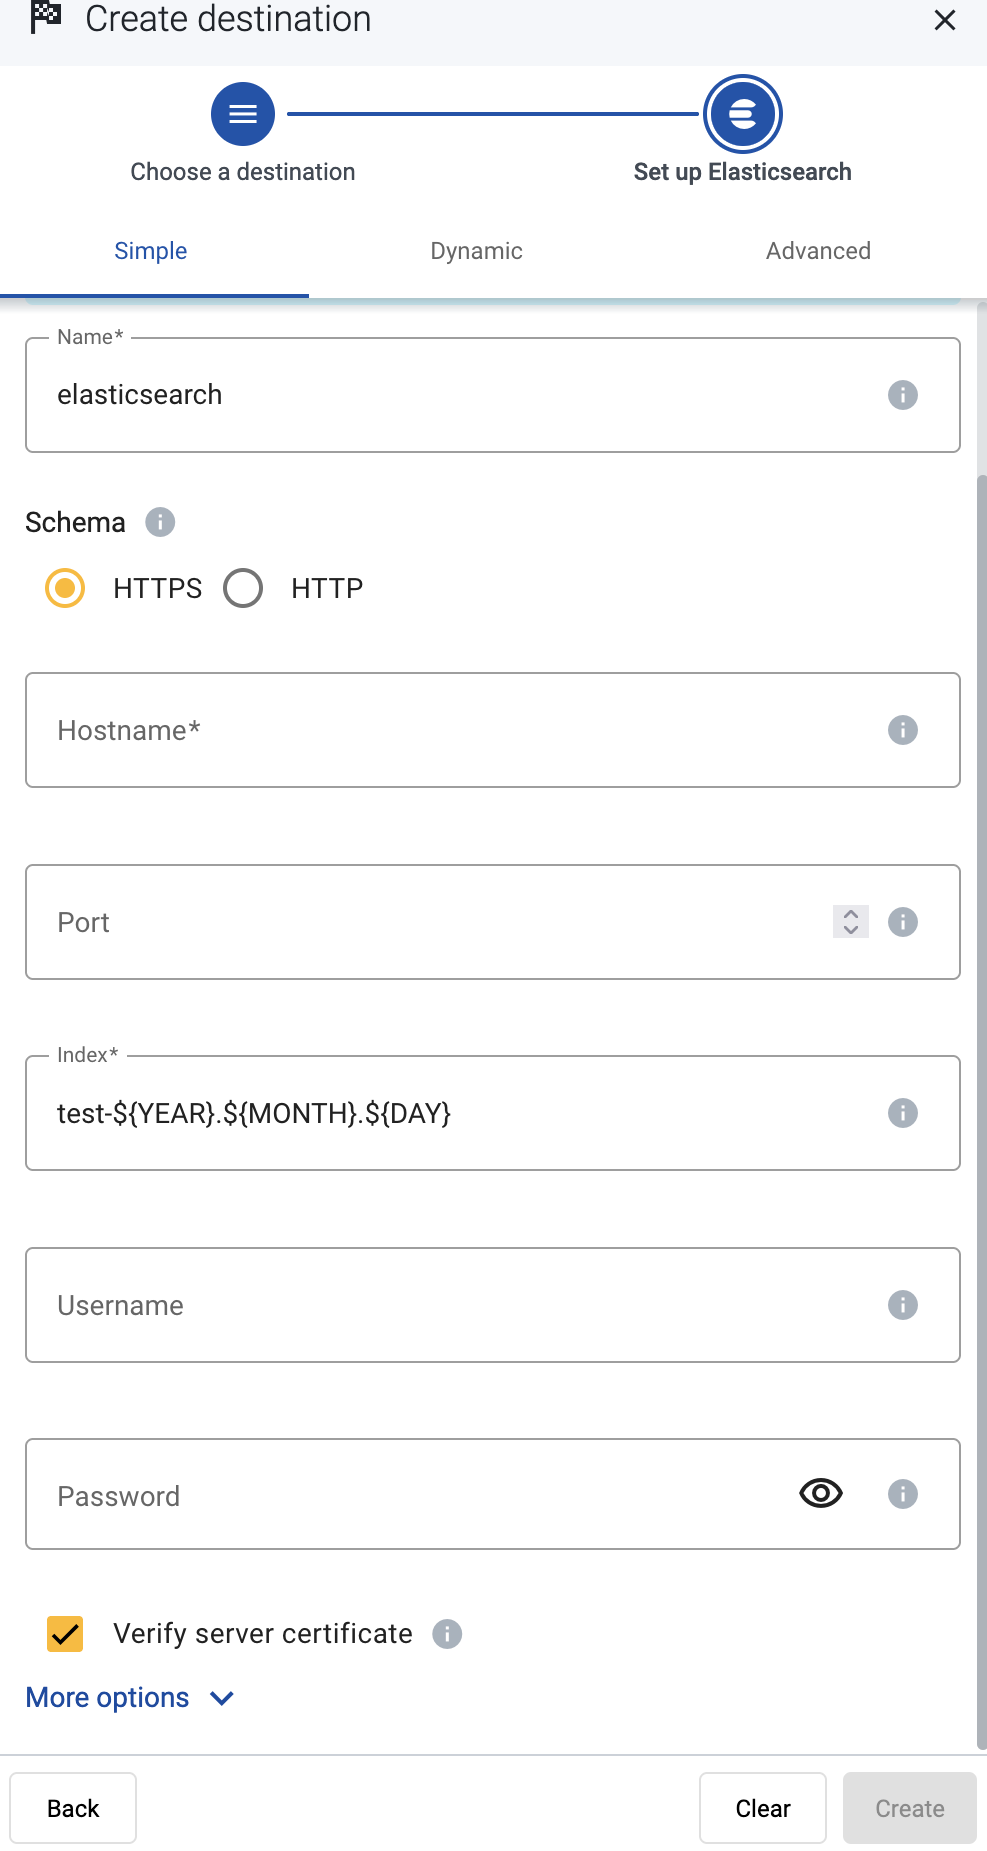
7 - Elastic
7.1 - Elastic Cloud and Elasticsearch
Elastic Cloud and Elasticsearch:
Distributed search and analytics engine for real-time log analysis, observability, and data indexing.
To add an Elasticsearch destination to Axoflow, complete the following steps.
Prerequisites
Steps
-
Create a new destination.
- Open the AxoConsole.
- Select Destinations > + Add Destination.
-
Configure the destination.
-
Select Elasticsearch.
-
Select which type of configuration you want to use:
- Simple: Send all data into a single index.
- Dynamic: Send data to an index based on the content or metadata of the incoming messages (or to a default index).
- Advanced: Allows you to specify a custom URL endpoint.
-
Enter a name for the destination.
-
Configure the endpoint of the destination.
- Advanced: Enter your Elasticsearch URL into the URL field, for example,
http://my-elastic-server:9200/_bulk
- Simple and Dynamic:
- Select the HTTPS or HTTP protocol to use to access your destination.
- Enter the Hostname and Port of the destination.
-
Specify the Elasticsearch index to send the data to.
- Simple: Enter the expression that specifies the Elasticsearch index to use into the Index field, for example:
test-${YEAR}${MONTH}${DAY}. All data will be sent into this index.
- Dynamic and Advanced: Enter the expression that specifies the default index. The data will be sent into this index if no other index is set during the processing of the message (for example, by the processing steps of the Flow).
You can use AxoSyslog macros in this field.
-
Enter the username and password for the account you want to use.
-
(Optional)
By default, Axoflow rejects connections to the destination server if the certificate of the server is invalid (for example, it’s expired, signed by an unknown CA, or its CN and the name of the server is mismatched: the Common Name or the subject_alt_name parameter of the peer’s certificate must contain the hostname or the IP address (as resolved from AxoRouter) of the peer).
Warning
When validating a certificate, the entire certificate chain must be valid, including the CA certificate. If any certificate of the chain is invalid, Axoflow will reject the connection.
If you want to accept invalid certificates (or no certificate) from the destination servers, disable the Verify server certificate option.
-
(Optional) Set other options as needed for your environments.
- Timeout: The number of seconds to wait for a log-forwarding request to complete, and attempt to reconnect the server if exceeded. If the timeout is exceeded, AxoRouter attempts to reconnect the destination. The default (
0) is unlimited. For more details, see the AxoSyslog documentation.
-
Disk Buffer: Explicitly enable or disable disk buffer on AxoRouter. Default value: Enabled.
AxoRouter can store messages on the local disk if the destination or the network connection to the destination becomes unavailable. AxoRouter automatically sends the stored messages (in the order they were received) to the destination when the connection is reestablished. Note that the disk buffer is separate from AxoStore.
Capacity Bytes: Size of the disk buffer files in bytes. This value applies for each worker. Default value is 100MiB (104857600 bytes), which is also the recommended minimum.
The disk required for using disk buffering is Capacity Bytes*Number of Workers for each destination of AxoRouter.
-
Batch Bytes: Sets the maximum size of payload in a batch. If the size of the messages reaches this value, AxoRouter sends the batch to the destination even if the number of messages is less than the value of the batch lines option.
CAUTION:
When setting Batch Bytes:
- Note that the actual HTTP request will be about 4KB larger because of the request headers.
- Check the configuration of your destination, as SaaS solutions and ingress controllers often limit the maximal size of HTTP requests. If the sum of Batch Bytes and the request headers exceeds this limit, the data will be rejected. (In case of NGINX, with a
client intended to send too large body error message.)
-
Batch Lines: Number of lines sent to the destination in one batch. AxoRouter waits for this number of lines to accumulate and sends them off in a single batch. Increasing this number increases throughput as more messages are sent in a single batch, but also increases message latency. For more details, see the AxoSyslog documentation.
-
Batch Timeout: Maximal time in milliseconds to wait for a batch to be filled before sending it. The default value (-1) means that the batch should be full before sending, which may result in a long wait if the incoming traffic is low. For more details, see the AxoSyslog documentation.
-
Number of Workers: Used for scaling the destination in case of high message load. Specifies the number of worker threads AxoRouter uses for sending messages to the destination. The default is 1. If high message throughput is not a concern, leave it on 1. For maximum performance, increase it up to the number of CPU cores available on AxoRouter. For more details, see the AxoSyslog documentation.
-
Select Add.
-
Create a flow to connect the new destination to an AxoRouter instance.
-
Select Flows.
-
Select Add Flow.
-
Enter a name for the flow, for example, my-test-flow.
-
In the Router Selector field, enter an expression that matches the router(s) you want to apply the flow. To select a specific router, use a name selector, for example, name = my-axorouter-hostname.
You can use any labels and metadata of the AxoRouter hosts in the Router selectors, for example, the hostname of the AxoRouter, or any custom labels.
- If you leave the Router Selector field empty, the selector will match every AxoRouter instance.
- To select only a specific AxoRouter instance, set the
name field to the name of the instance as selector. For example, name = my-axorouter.
- If you set multiple fields in the selector, the selector will match only AxoRouter instances that match all elements of the selector. (There in an AND relationship between the fields.)
-
Select the Destination where you want to send your data. If you don’t have any destination configured, you can select + Add in the destination section to create a new destination now. For details on the different destinations, see Destinations.
- If you don’t have any destination configured, see Destinations.
- If you’ve already created a store, it automatically available as a destination. Note that the Router Selector of the flow must match only AxoRouters that have the selected store available, otherwise you’ll get an error message.
- If you want to send data to another AxoRouter, enable the Show all destinations option, and select the connector of the AxoRouter where you want to send the data.
-
(Optional) To process the data transferred in the flow, select Add New Processing Step. For details, see Processing steps. For example:
- Add a Classify, a Parse, and a Reduce step, in that order, to automatically remove redundant and empty fields from your data.
- To select which messages are processed by the flow, add a Select Messages step, and enter a filter into the AQL Expression field. For example, to select only the messages received from Fortinet FortiGate firewalls, use the
meta.vendor = fortinet AND meta.product = fortigate query.
- Save the processing steps.
-
Select Add.
-
The new flow appears in the Flows list.
You can use the following message fields to modify messages sent to this destination using processing steps.
8 - Generic
8.1 - /dev/null
/dev/null:
Blackhole destination for testing or discarding events without storing them.
This is a null destination that discards (drops) every data it receives, but reports that it has successfully received the data. This is useful sometimes for testing and performance measurements, for example, to find out if a real destination is the bottleneck, or another element in the upstream pipeline.
CAUTION:
All data that’s sent to the /dev/null destination only is irrevocably lost.
Steps
-
Create a new destination.
- Open the AxoConsole.
- Select Destinations > + Add Destination.
-
Configure the destination.
-
Select /dev/null.
-
Enter a name for the destination.

-
(Optional): Add custom labels to the destination.
-
Select Add.
-
Create a flow to connect the new destination to an AxoRouter instance.
-
Select Flows.
-
Select Add Flow.
-
Enter a name for the flow, for example, my-test-flow.
-
In the Router Selector field, enter an expression that matches the router(s) you want to apply the flow. To select a specific router, use a name selector, for example, name = my-axorouter-hostname.
You can use any labels and metadata of the AxoRouter hosts in the Router selectors, for example, the hostname of the AxoRouter, or any custom labels.
- If you leave the Router Selector field empty, the selector will match every AxoRouter instance.
- To select only a specific AxoRouter instance, set the
name field to the name of the instance as selector. For example, name = my-axorouter.
- If you set multiple fields in the selector, the selector will match only AxoRouter instances that match all elements of the selector. (There in an AND relationship between the fields.)
-
Select the Destination where you want to send your data. If you don’t have any destination configured, you can select + Add in the destination section to create a new destination now. For details on the different destinations, see Destinations.
- If you don’t have any destination configured, see Destinations.
- If you’ve already created a store, it automatically available as a destination. Note that the Router Selector of the flow must match only AxoRouters that have the selected store available, otherwise you’ll get an error message.
- If you want to send data to another AxoRouter, enable the Show all destinations option, and select the connector of the AxoRouter where you want to send the data.
-
(Optional) To process the data transferred in the flow, select Add New Processing Step. For details, see Processing steps. For example:
- Add a Classify, a Parse, and a Reduce step, in that order, to automatically remove redundant and empty fields from your data.
- To select which messages are processed by the flow, add a Select Messages step, and enter a filter into the AQL Expression field. For example, to select only the messages received from Fortinet FortiGate firewalls, use the
meta.vendor = fortinet AND meta.product = fortigate query.
- Save the processing steps.
-
Select Add.
-
The new flow appears in the Flows list.
8.2 - syslog
syslog:
Standard protocol for system logs. Our source automatically detects, parses, and classifies incoming syslog events without pre-configuration.
The syslog destination forwards your security data in an RFC-3164 or RFC-5424 compliant syslog format, using the UDP, TCP, or TLS-encrypted TCP protocols.
Prerequisites
If you want to enable TLS encryption for this connector to encrypt the communication with the sources, you’ll need to set appropriate keys and certificates.
CAUTION:
Copy the keys and certificates to AxoRouter before starting to configure the connector. Otherwise, you won’t be able to make configuration changes that require reloading the AxoRouter service, including starting log tapping or flow tapping.
Note the following points:
-
Keys and certificates must be in PEM format.
-
If the file contains a certificate chain, the file must begin with the certificate of the host, followed by the CA certificate that signed the certificate of the host, and any other signing CAs in order.
-
You must manually copy these files to their place on the AxoRouter host, currently you can’t distribute them from AxoConsole.
The files must be readable by the axorouter service.
-
The recommended path for certificates is under /etc/axorouter/user-config/ (for example, /etc/axorouter/user-config/tls-key.pem). (If you need to use a different path, you have to append an option like -v /your/path:/your/path to the AXOROUTER_PODMAN_ARGS variable of /etc/axorouter/container.env.)
-
When referring to the key or certificate during when configuring the connector, use absolute paths (for example, /etc/axorouter/user-config/tls-key.pem).
Steps
-
Create a new destination.
- Open the AxoConsole.
- Select Destinations > + Add Destination.
-
Configure the destination.
-
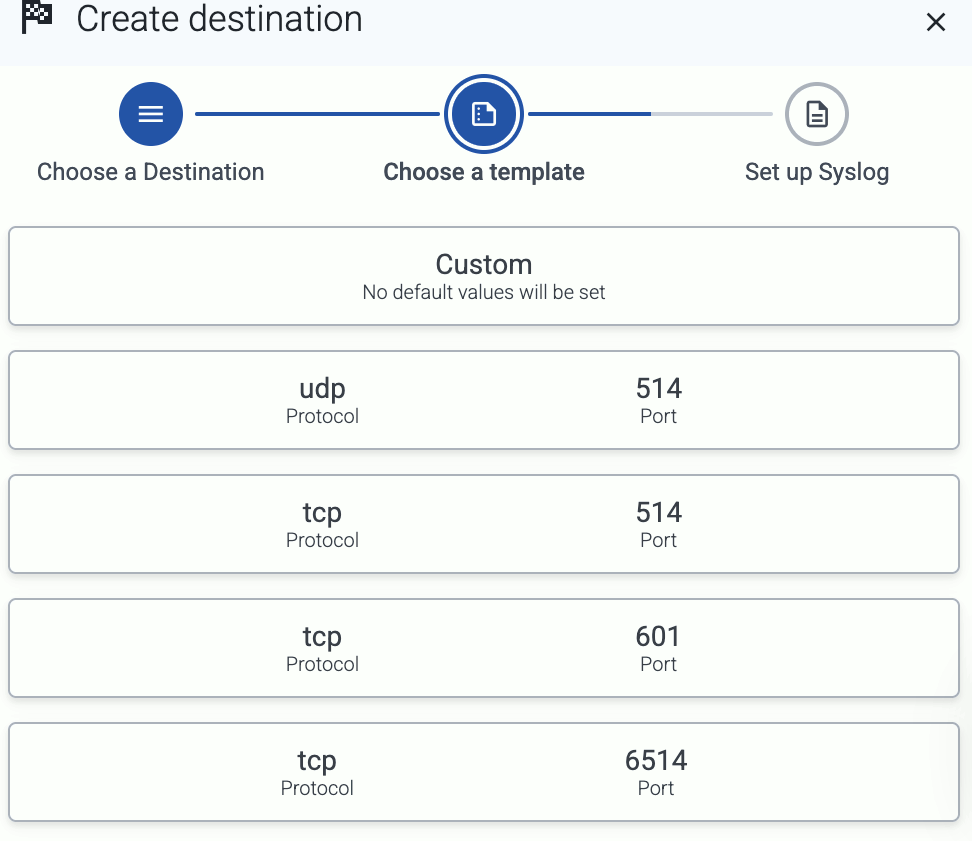
Select Syslog.
-
Select the template to use one of the standard syslog ports and transport protocols—for example, UDP port 514, which is commonly used for the RFC3164 syslog protocol.
To configure a different port, or to specify the protocol elements manually, select Custom.
-
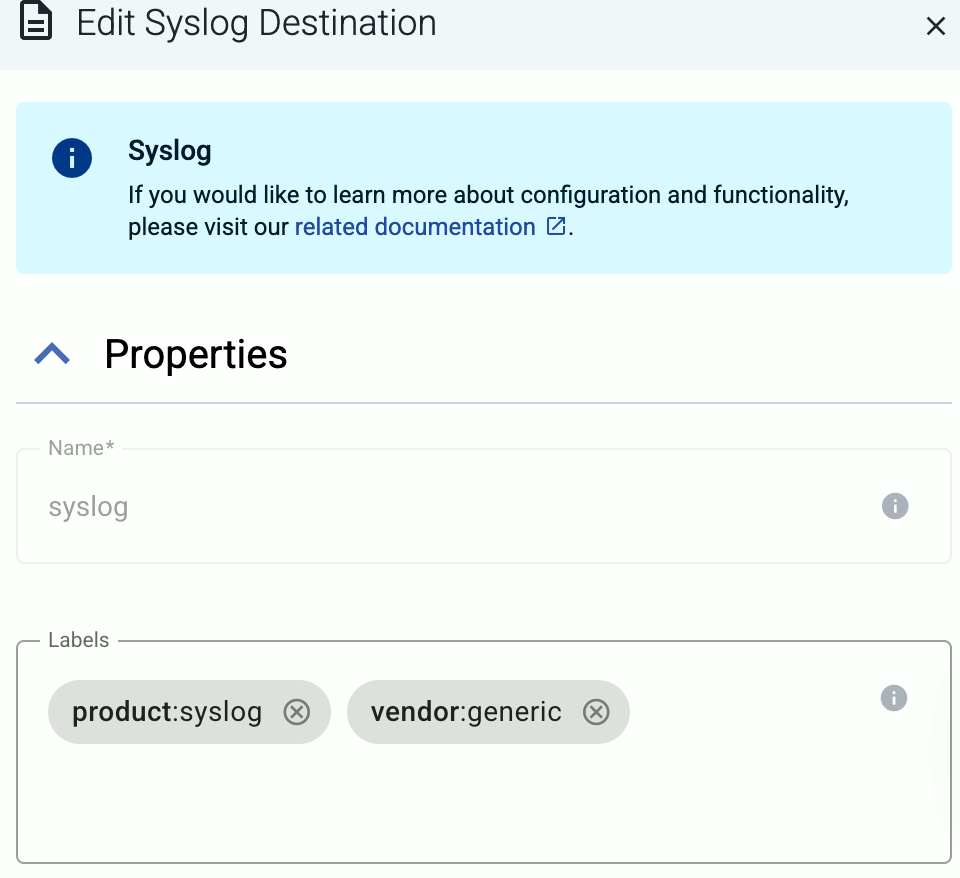
Enter a name for the destination.
-
(Optional): Add custom labels to the destination.
-
Select the protocol to use for sending syslog data: TCP, UDP, or TLS.
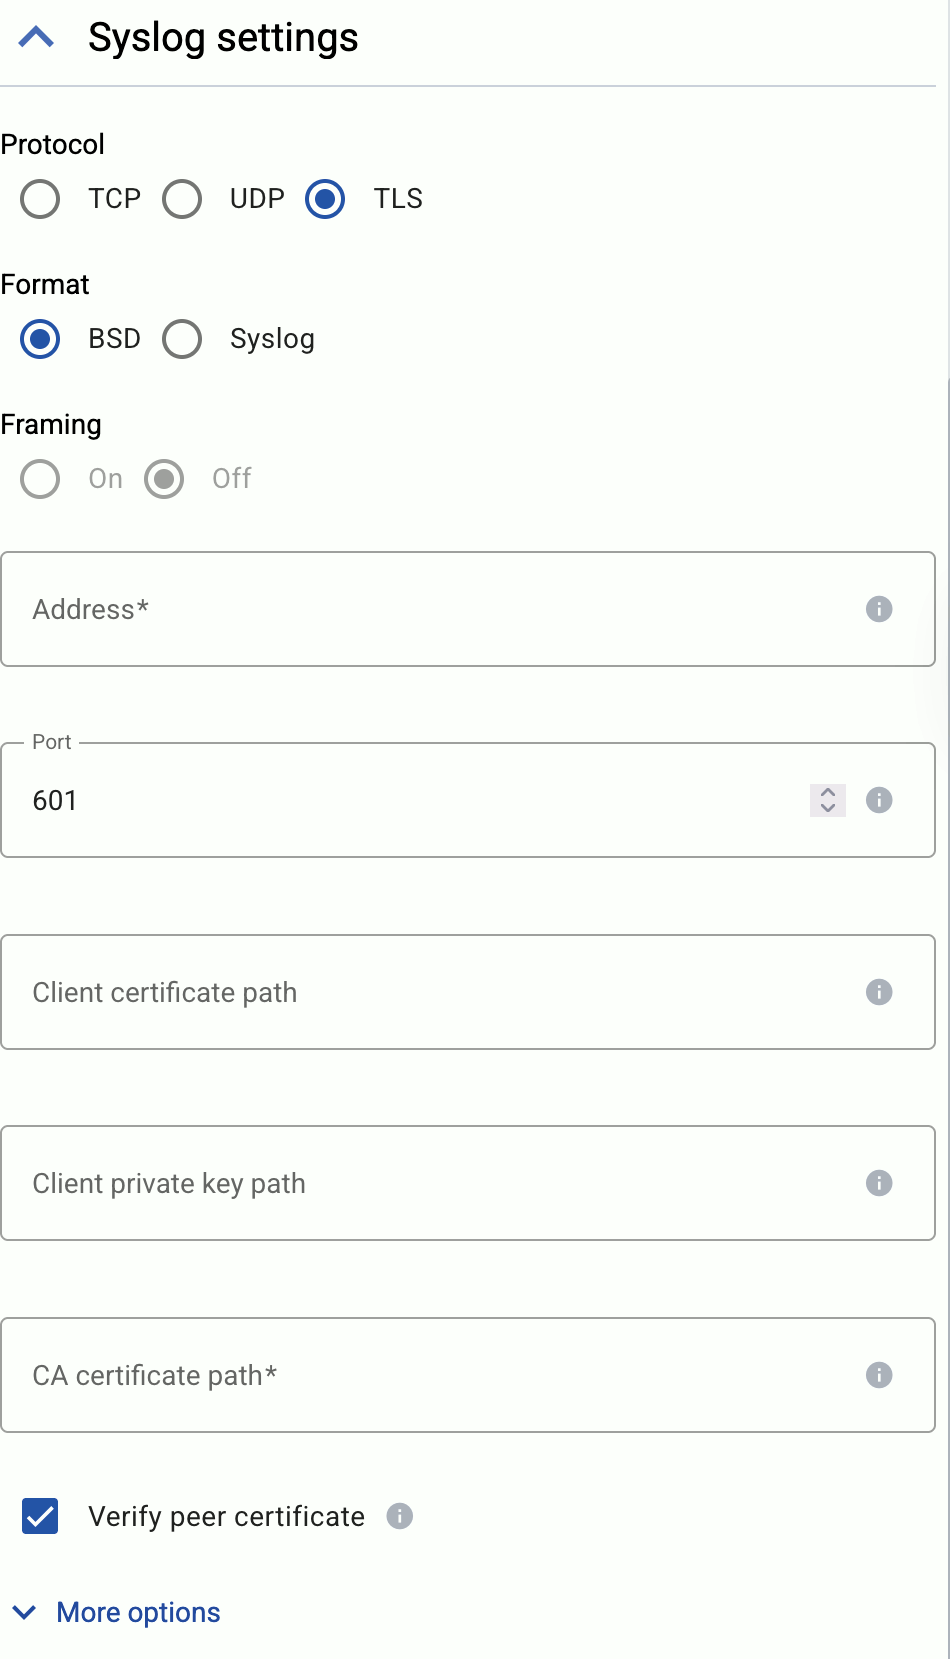
-
Select the syslog format to use: BSD (RFC3164) or Syslog (RFC5424).
-
(Optional) If explicitly needed for your use case, you can configure *Framing manually when using the Syslog (RFC5424) format. Enable framing (On) if the payload contains the length of the message as specified in RFC6587 3.4.1. Disable (Off) for non-transparent-framing RFC6587 3.4.2.
-
If you’ve selected Protocol > TLS, set the TLS-related options.
When using TLS, set the paths for the certificates and keys used for the TLS-encrypted communication with the clients. For details, see Prerequisites.
- Client certificate path: The certificate that AxoRouter shows to the destination server.
- Client private key path: The private key of the client certificate.
- CA certificate path: The CA certificate that AxoRouter uses to verify the certificate of the destination if Verify peer certificate is enabled.
-
Set the Address and the Port of the destination. Usually:
- 514 UDP and TCP for RFC3164 (BSD-syslog) and RFC5424 (IETF-syslog) formatted traffic. AxoRouter automatically recognizes and handles both formats.
- 601 TCP for RFC5424 (IETF-syslog) and RFC3164 (BSD-syslog) formatted traffic. AxoRouter automatically recognizes and handles both formats.
- 6514 TCP for TLS-encrypted syslog traffic.
-
Select Add.
-
Create a flow to connect the new destination to an AxoRouter instance.
-
Select Flows.
-
Select Add Flow.
-
Enter a name for the flow, for example, my-test-flow.
-
In the Router Selector field, enter an expression that matches the router(s) you want to apply the flow. To select a specific router, use a name selector, for example, name = my-axorouter-hostname.
You can use any labels and metadata of the AxoRouter hosts in the Router selectors, for example, the hostname of the AxoRouter, or any custom labels.
- If you leave the Router Selector field empty, the selector will match every AxoRouter instance.
- To select only a specific AxoRouter instance, set the
name field to the name of the instance as selector. For example, name = my-axorouter.
- If you set multiple fields in the selector, the selector will match only AxoRouter instances that match all elements of the selector. (There in an AND relationship between the fields.)
-
Select the Destination where you want to send your data. If you don’t have any destination configured, you can select + Add in the destination section to create a new destination now. For details on the different destinations, see Destinations.
- If you don’t have any destination configured, see Destinations.
- If you’ve already created a store, it automatically available as a destination. Note that the Router Selector of the flow must match only AxoRouters that have the selected store available, otherwise you’ll get an error message.
- If you want to send data to another AxoRouter, enable the Show all destinations option, and select the connector of the AxoRouter where you want to send the data.
-
(Optional) To process the data transferred in the flow, select Add New Processing Step. For details, see Processing steps. For example:
- Add a Classify, a Parse, and a Reduce step, in that order, to automatically remove redundant and empty fields from your data.
- To select which messages are processed by the flow, add a Select Messages step, and enter a filter into the AQL Expression field. For example, to select only the messages received from Fortinet FortiGate firewalls, use the
meta.vendor = fortinet AND meta.product = fortigate query.
- Save the processing steps.
-
Select Add.
-
The new flow appears in the Flows list.
Protocol-specific destination options
If needed, select More options to set the following when using the TCP or TLS protocol:
- TCP Keepalive Time Interval: The interval (number of seconds) between subsequential keepalive probes, regardless of the traffic exchanged in the connection.
- TCP Keepalive Probes: The number of unacknowledged probes to send before considering the connection dead.
- TCP Keepalive Time: The interval (in seconds) between the last data packet sent and the first keepalive probe.
Advanced options
-
Disk Buffer: Explicitly enable or disable disk buffer on AxoRouter. Default value: Enabled.
AxoRouter can store messages on the local disk if the destination or the network connection to the destination becomes unavailable. AxoRouter automatically sends the stored messages (in the order they were received) to the destination when the connection is reestablished. Note that the disk buffer is separate from AxoStore.
Capacity Bytes: Size of the disk buffer files in bytes. This value applies for each worker. Default value is 100MiB (104857600 bytes), which is also the recommended minimum.
The disk required for using disk buffering is Capacity Bytes*Number of Workers for each destination of AxoRouter.
9 - Google
9.1 - BigQuery
Axoflow will soon support sending data to Google BigQuery using a high-performance gRPC-based destination.
Alternatively, you can set up AxoRouter to send data through a Google Pub/Sub destination.
If you’d like to send data from AxoRouter to this destination, contact our support team for details.
9.2 - Google Cloud Pub/Sub
Google Cloud Pub/Sub:
Asynchronous messaging service for ingesting and distributing event data between services and applications.
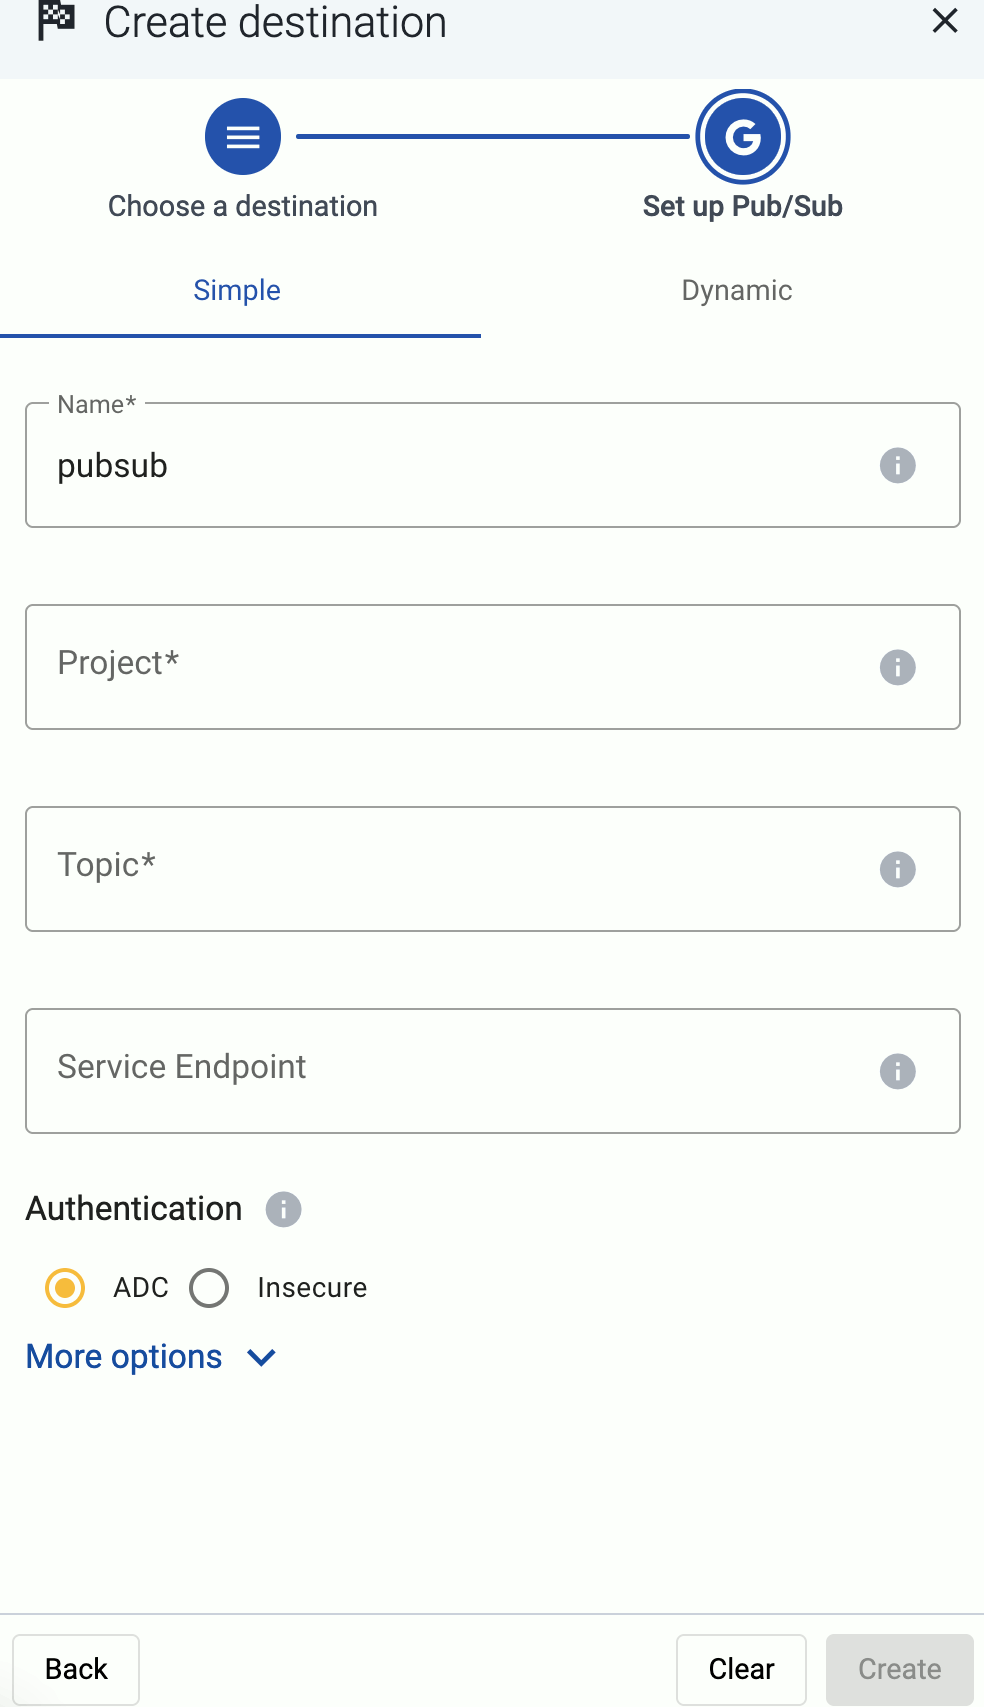
To add a Google Cloud Pub/Sub destination to Axoflow, complete the following steps. Axoflow can send data to Google Cloud Pub/Sub using its gRPC interface.
Prerequisites
For details, see the Google Pub/Sub tutorial.
Steps
-
Create a new destination.
- Open the AxoConsole.
- Select Destinations > + Add Destination.
-
Configure the destination.
-
Select Pub/Sub.
-
Select which type of configuration you want to use:
- Simple: Send all data into a project and topic.
- Dynamic: Send data to a project and topic based on the content or metadata of the incoming messages (or to a default project/topic).
-
Enter a name for the destination.
-
Specify the project and topic to send the data to.
- Simple: Enter the ID of the GCP Project and the Topic. All data will be sent to this topic.
- Dynamic: Enter the expression that specifies the default Project and Topic. The data will be sent here unless it is set during the processing of the message (for example, by the processing steps of the Flow).
You can use AxoSyslog macros in this field.
-
Configure the authentication method to access the GCP project.
-
Automatic (ADC): Use the service account attached to the cloud resource (VM) that hosts AxoRouter.
-
Service Account File: Specify the path where a service account key file is located (for example, /etc/axorouter/user-config/). You must manually copy that file to its place, currently you can’t distribute it from Axoflow.
-
None: Disable authentication completely. Only available when the More options > Service Endpoint option is set.
CAUTION:
Do not disable authentication in production.
-
(Optional) Set other options as needed for your environments.
- Service Endpoint: Use a custom API endpoint. Leave it empty to use the default:
https://pubsub.googleapis.com
-
Disk Buffer: Explicitly enable or disable disk buffer on AxoRouter. Default value: Enabled.
AxoRouter can store messages on the local disk if the destination or the network connection to the destination becomes unavailable. AxoRouter automatically sends the stored messages (in the order they were received) to the destination when the connection is reestablished. Note that the disk buffer is separate from AxoStore.
Capacity Bytes: Size of the disk buffer files in bytes. This value applies for each worker. Default value is 100MiB (104857600 bytes), which is also the recommended minimum.
The disk required for using disk buffering is Capacity Bytes*Number of Workers for each destination of AxoRouter.
-
Batch Bytes: Sets the maximum size of payload in a batch. If the size of the messages reaches this value, AxoRouter sends the batch to the destination even if the number of messages is less than the value of the batch lines option.
CAUTION:
When setting Batch Bytes:
- Note that the actual HTTP request will be about 4KB larger because of the request headers.
- Check the configuration of your destination, as SaaS solutions and ingress controllers often limit the maximal size of HTTP requests. If the sum of Batch Bytes and the request headers exceeds this limit, the data will be rejected. (In case of NGINX, with a
client intended to send too large body error message.)
-
Batch Lines: Number of lines sent to the destination in one batch. AxoRouter waits for this number of lines to accumulate and sends them off in a single batch. Increasing this number increases throughput as more messages are sent in a single batch, but also increases message latency. For more details, see the AxoSyslog documentation.
-
Batch Timeout: Maximal time in milliseconds to wait for a batch to be filled before sending it. The default value (-1) means that the batch should be full before sending, which may result in a long wait if the incoming traffic is low. For more details, see the AxoSyslog documentation.
-
Number of Workers: Used for scaling the destination in case of high message load. Specifies the number of worker threads AxoRouter uses for sending messages to the destination. The default is 1. If high message throughput is not a concern, leave it on 1. For maximum performance, increase it up to the number of CPU cores available on AxoRouter. For more details, see the AxoSyslog documentation.
-
Select Add.
-
Create a flow to connect the new destination to an AxoRouter instance.
-
Select Flows.
-
Select Add Flow.
-
Enter a name for the flow, for example, my-test-flow.
-
In the Router Selector field, enter an expression that matches the router(s) you want to apply the flow. To select a specific router, use a name selector, for example, name = my-axorouter-hostname.
You can use any labels and metadata of the AxoRouter hosts in the Router selectors, for example, the hostname of the AxoRouter, or any custom labels.
- If you leave the Router Selector field empty, the selector will match every AxoRouter instance.
- To select only a specific AxoRouter instance, set the
name field to the name of the instance as selector. For example, name = my-axorouter.
- If you set multiple fields in the selector, the selector will match only AxoRouter instances that match all elements of the selector. (There in an AND relationship between the fields.)
-
Select the Destination where you want to send your data. If you don’t have any destination configured, you can select + Add in the destination section to create a new destination now. For details on the different destinations, see Destinations.
- If you don’t have any destination configured, see Destinations.
- If you’ve already created a store, it automatically available as a destination. Note that the Router Selector of the flow must match only AxoRouters that have the selected store available, otherwise you’ll get an error message.
- If you want to send data to another AxoRouter, enable the Show all destinations option, and select the connector of the AxoRouter where you want to send the data.
-
(Optional) To process the data transferred in the flow, select Add New Processing Step. For details, see Processing steps. For example:
- Add a Classify, a Parse, and a Reduce step, in that order, to automatically remove redundant and empty fields from your data.
- To select which messages are processed by the flow, add a Select Messages step, and enter a filter into the AQL Expression field. For example, to select only the messages received from Fortinet FortiGate firewalls, use the
meta.vendor = fortinet AND meta.product = fortigate query.
- Save the processing steps.
-
Select Add.
-
The new flow appears in the Flows list.
Pub/Sub attributes
You can embed custom attributes as metadata in Pub/Sub messages in the processing steps of the Flow that’s sending data to the Pub/Sub destination.
To do that:
-
Add a FilterX processing step to the Flow.
-
Edit the Statements field of the processing step:
-
Add the meta.pubsub.attributes = json(); line to add an empty JSON object to the messages.
-
Set your custom attributes under the meta.pubsub.attributes key. For example, if you want to include the timestamp as a custom attribute as well, you can use:
meta.pubsub.attributes = {"timestamp": $S_ISODATE};
You can use the following message fields to modify messages sent to this destination using processing steps.
9.3 - Google Security Operations (SecOps)
Google Security Operations (SecOps):
A cloud service designed for enterprises to privately retain, analyze, and search the massive amounts of security and network telemetry they generate.
To add a Google Security Operations (SecOps) destination to Axoflow, complete the following steps.
Prerequisites
Steps
-
Create a new destination.
- Open the AxoConsole.
- Select Destinations > + Add Destination.
-
Configure the destination.
-
Select SecOps.
-
Select which type of configuration you want to use:
- Simple: Send all data into a namespace with a single log type.
- Dynamic: Send data to a namespace with a log type based on the content or metadata of the incoming messages (or to a default namespace/log type).
- Advanced: Specify the full endpoint URL.
-
Enter a name for the destination.

-
Enter the URL endpoint for the destination.
- Simple and Dynamic: Enter base URL for the regional service endpoint to use into the Service Endpoint field, for example,
https://malachiteingestion-pa.googleapis.com for the US region.
- Advanced: Enter the full URL to use for ingesting logs into the Endpoint URL field, for example,
https://malachiteingestion-pa.googleapis.com/v2/unstructuredlogentries:batchCreate.
-
Specify the log type to send the data to.
- Simple and Advanced: Enter the Log type to assign to the data. All data will be assigned the specified log type.
- Dynamic: Enter the Default log type. The data will be sent with the specified log type unless it is set during the processing of the message (for example, by the automatic classification, or the processing steps of the Flow).
You can use AxoSyslog macros in this field.
-
Enter the unique ID of your Google SecOps instance into the Customer ID field.
-
(Optional) Specify the namespace to send the data to. Usually it’s not needed to use namespaces.
- Simple and Advanced: Enter the Namespace where to send the data. All data will be sent to this namespace.
- Dynamic: Enter the Default namespace. The data will be sent into this namespace unless it is set during the processing of the message (for example, by the processing steps of the Flow).
You can use AxoSyslog macros in this field.
-
Configure the authentication method to access the GCP project.
- Automatic (ADC): Use the service account attached to the cloud resource (VM) that hosts AxoRouter.
- Service Account File: Specify the path where a service account key file is located (for example,
/etc/axorouter/user-config/serviceaccount.json). You must manually copy that file to its place, currently you can’t distribute it from Axoflow.
-
(Optional) Set other options as needed for your environments.
- Timeout: The number of seconds to wait for a log-forwarding request to complete, and attempt to reconnect the server if exceeded. If the timeout is exceeded, AxoRouter attempts to reconnect the destination. The default (
0) is unlimited. For more details, see the AxoSyslog documentation.
-
Disk Buffer: Explicitly enable or disable disk buffer on AxoRouter. Default value: Enabled.
AxoRouter can store messages on the local disk if the destination or the network connection to the destination becomes unavailable. AxoRouter automatically sends the stored messages (in the order they were received) to the destination when the connection is reestablished. Note that the disk buffer is separate from AxoStore.
Capacity Bytes: Size of the disk buffer files in bytes. This value applies for each worker. Default value is 100MiB (104857600 bytes), which is also the recommended minimum.
The disk required for using disk buffering is Capacity Bytes*Number of Workers for each destination of AxoRouter.
-
Batch Bytes: Sets the maximum size of payload in a batch. If the size of the messages reaches this value, AxoRouter sends the batch to the destination even if the number of messages is less than the value of the batch lines option.
CAUTION:
When setting Batch Bytes:
- Note that the actual HTTP request will be about 4KB larger because of the request headers.
- Check the configuration of your destination, as SaaS solutions and ingress controllers often limit the maximal size of HTTP requests. If the sum of Batch Bytes and the request headers exceeds this limit, the data will be rejected. (In case of NGINX, with a
client intended to send too large body error message.)
-
Batch Lines: Number of lines sent to the destination in one batch. AxoRouter waits for this number of lines to accumulate and sends them off in a single batch. Increasing this number increases throughput as more messages are sent in a single batch, but also increases message latency. For more details, see the AxoSyslog documentation.
-
Batch Timeout: Maximal time in milliseconds to wait for a batch to be filled before sending it. The default value (-1) means that the batch should be full before sending, which may result in a long wait if the incoming traffic is low. For more details, see the AxoSyslog documentation.
-
Number of Workers: Used for scaling the destination in case of high message load. Specifies the number of worker threads AxoRouter uses for sending messages to the destination. The default is 1. If high message throughput is not a concern, leave it on 1. For maximum performance, increase it up to the number of CPU cores available on AxoRouter. For more details, see the AxoSyslog documentation.
-
Select Add.
-
Create a flow to connect the new destination to an AxoRouter instance.
-
Select Flows.
-
Select Add Flow.
-
Enter a name for the flow, for example, my-test-flow.
-
In the Router Selector field, enter an expression that matches the router(s) you want to apply the flow. To select a specific router, use a name selector, for example, name = my-axorouter-hostname.
You can use any labels and metadata of the AxoRouter hosts in the Router selectors, for example, the hostname of the AxoRouter, or any custom labels.
- If you leave the Router Selector field empty, the selector will match every AxoRouter instance.
- To select only a specific AxoRouter instance, set the
name field to the name of the instance as selector. For example, name = my-axorouter.
- If you set multiple fields in the selector, the selector will match only AxoRouter instances that match all elements of the selector. (There in an AND relationship between the fields.)
-
Select the Destination where you want to send your data. If you don’t have any destination configured, you can select + Add in the destination section to create a new destination now. For details on the different destinations, see Destinations.
- If you don’t have any destination configured, see Destinations.
- If you’ve already created a store, it automatically available as a destination. Note that the Router Selector of the flow must match only AxoRouters that have the selected store available, otherwise you’ll get an error message.
- If you want to send data to another AxoRouter, enable the Show all destinations option, and select the connector of the AxoRouter where you want to send the data.
-
(Optional) To process the data transferred in the flow, select Add New Processing Step. For details, see Processing steps. For example:
- Add a Classify, a Parse, and a Reduce step, in that order, to automatically remove redundant and empty fields from your data.
- To select which messages are processed by the flow, add a Select Messages step, and enter a filter into the AQL Expression field. For example, to select only the messages received from Fortinet FortiGate firewalls, use the
meta.vendor = fortinet AND meta.product = fortigate query.
- Save the processing steps.
-
Select Add.
-
The new flow appears in the Flows list.
You can use the following message fields to modify messages sent to this destination using processing steps.
For example, you can add your custom labels using a Set Fields processing step to meta.destination.google_secops.labels:
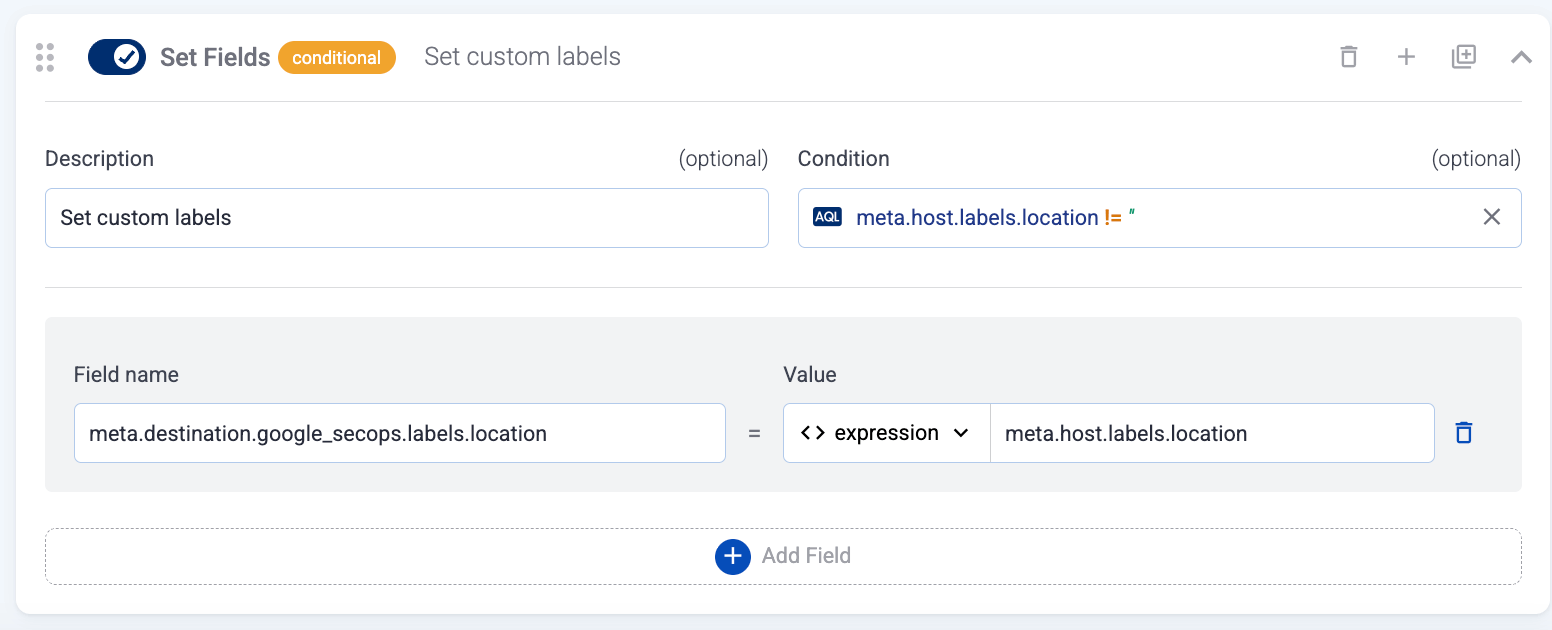
Note that sending custom labels to SecOps can have significant performance impact. Make sure to increase the number of workers (More options > Number of Workers), ideally to have at least one worker for each custom label.
10 - Grafana
10.1 - Grafana Loki
Grafana Loki:
Scalable log aggregation system optimized for storing and querying logs by labels using Grafana.
If you’d like to send data from AxoRouter to this destination, contact our support team for details.
11 - Microsoft
11.1 - Azure Monitor
Sending data to Azure Monitor is practically identical to using the Sentinel destination. Follow the procedure described in Microsoft Sentinel.
11.2 - Microsoft Sentinel
Microsoft Sentinel:
Cloud-native SIEM and SOAR platform for collecting, analyzing, and responding to security threats.
To add a Microsoft Sentinel or Azure Monitor destination to Axoflow, complete the following steps. AxoConsole can configure your AxoRouters to send data to the built-in syslog table of Azure Monitor.
Prerequisites
- An Azure subscription.
- An Enterprise application registration and client secret. You’ll need the Tenant ID, Application ID, and Application Secret of the application to configure the Axoflow destination.
- Entra ID should be configured to allow users to create new application registrations, otherwise Global or Application Administrator role is needed.
- A Log Analytics Workspace in Azure.
- A Data Collection Endpoint (DCE) and a Data Collection Rule (DCR). We can provide you with ARM templates for both the DCE and the DCR, contact our support team for details. For information on how to install these, see the Azure Monitor documentation.
- Permissions assigned to the DCR.
- A Microsoft Sentinel workspace (optional).
Steps
-
Create a new destination.
- Open the AxoConsole.
- Select Destinations > + Add Destination.
-
Configure the destination.
-
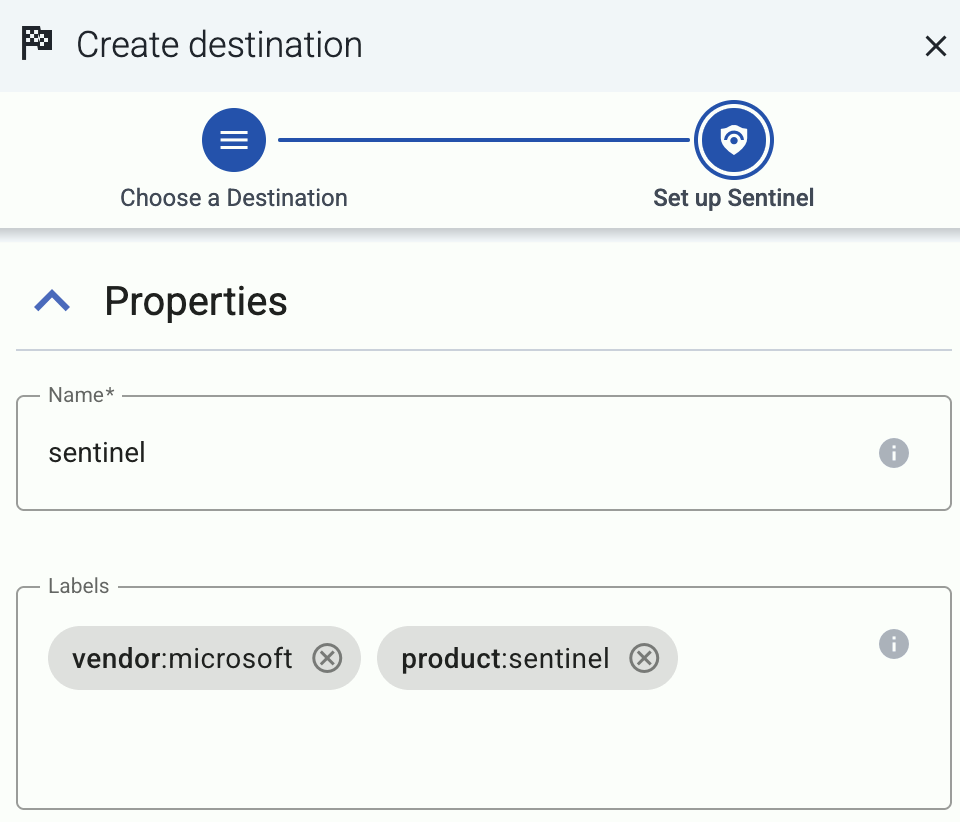
Select Sentinel or Azure Monitor.
-
Enter a name for the destination.
-
Configure the credentials needed for authentication.
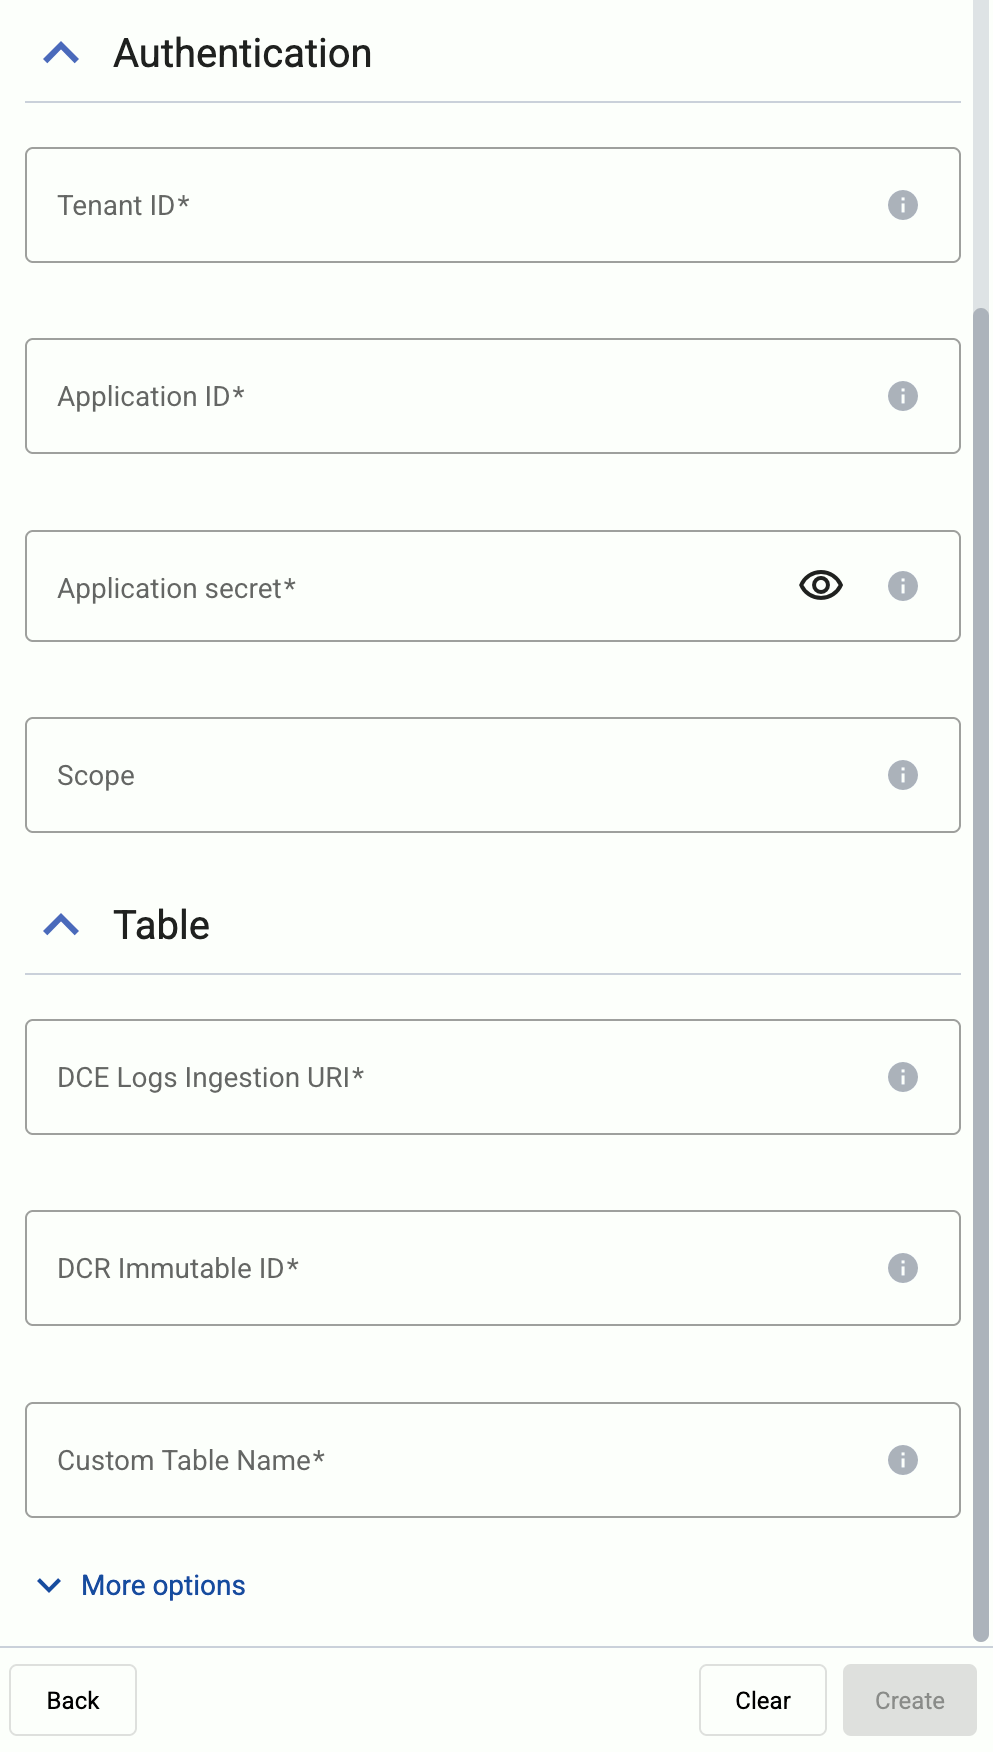
- Tenant ID: Directory (tenant) ID of the environment where you’re sending the data. (Practically everything belongs to the tenant ID: the Entra ID application, the Log analytics workspace, Sentinel, the DCE and the DCR, and so on.)
- Application ID: Application (client) ID of the Microsoft Entra ID application.
- Application secret: The Client secret of the Microsoft Entra ID application.
- Scope: The scope for the authentication token. Usually you can leave empty to use the default value (
https://monitor.azure.com//.default).
-
Specify the details of the table to send the data to.
- DCE Logs Ingestion URI: The URI of your Data Collection Endpoint (DCE).
- DCR Immutable ID: The immutable ID property of the Azure Monitor Data Collection Rule (DCR) where AxoRouter sends the data.
- Stream name: The name of the stream where AxoRouter sends the data. Use
Custom-Syslog-Stream if you are in doubt. It is available in the provided templates and used as the default normalization scheme.
-
Select More options, and set the batch size for sending data to Sentinel. Recommended batch configuration:
- Batch bytes: Set 1000000 (10⁶ bytes) to make sure request body is smaller than the 1MB limit in Sentinel.
- Batch timeout: Set 10000 (10s) to control the delay of log ingestion.
-
(Optional) Set other options as needed for your environments.
- Timeout: The number of seconds to wait for a log-forwarding request to complete, and attempt to reconnect the server if exceeded. If the timeout is exceeded, AxoRouter attempts to reconnect the destination. The default (
0) is unlimited. For more details, see the AxoSyslog documentation.
-
Disk Buffer: Explicitly enable or disable disk buffer on AxoRouter. Default value: Enabled.
AxoRouter can store messages on the local disk if the destination or the network connection to the destination becomes unavailable. AxoRouter automatically sends the stored messages (in the order they were received) to the destination when the connection is reestablished. Note that the disk buffer is separate from AxoStore.
Capacity Bytes: Size of the disk buffer files in bytes. This value applies for each worker. Default value is 100MiB (104857600 bytes), which is also the recommended minimum.
The disk required for using disk buffering is Capacity Bytes*Number of Workers for each destination of AxoRouter.
-
Batch Bytes: Sets the maximum size of payload in a batch. If the size of the messages reaches this value, AxoRouter sends the batch to the destination even if the number of messages is less than the value of the batch lines option.
CAUTION:
When setting Batch Bytes:
- Note that the actual HTTP request will be about 4KB larger because of the request headers.
- Check the configuration of your destination, as SaaS solutions and ingress controllers often limit the maximal size of HTTP requests. If the sum of Batch Bytes and the request headers exceeds this limit, the data will be rejected. (In case of NGINX, with a
client intended to send too large body error message.)
-
Batch Lines: Number of lines sent to the destination in one batch. AxoRouter waits for this number of lines to accumulate and sends them off in a single batch. Increasing this number increases throughput as more messages are sent in a single batch, but also increases message latency. For more details, see the AxoSyslog documentation.
-
Batch Timeout: Maximal time in milliseconds to wait for a batch to be filled before sending it. The default value (-1) means that the batch should be full before sending, which may result in a long wait if the incoming traffic is low. For more details, see the AxoSyslog documentation.
-
Number of Workers: Used for scaling the destination in case of high message load. Specifies the number of worker threads AxoRouter uses for sending messages to the destination. The default is 1. If high message throughput is not a concern, leave it on 1. For maximum performance, increase it up to the number of CPU cores available on AxoRouter. For more details, see the AxoSyslog documentation.
-
Select Add.
-
Create a flow to connect the new destination to an AxoRouter instance.
-
Select Flows.
-
Select Add Flow.
-
Enter a name for the flow, for example, my-test-flow.
-
In the Router Selector field, enter an expression that matches the router(s) you want to apply the flow. To select a specific router, use a name selector, for example, name = my-axorouter-hostname.
You can use any labels and metadata of the AxoRouter hosts in the Router selectors, for example, the hostname of the AxoRouter, or any custom labels.
- If you leave the Router Selector field empty, the selector will match every AxoRouter instance.
- To select only a specific AxoRouter instance, set the
name field to the name of the instance as selector. For example, name = my-axorouter.
- If you set multiple fields in the selector, the selector will match only AxoRouter instances that match all elements of the selector. (There in an AND relationship between the fields.)
-
Select the Destination where you want to send your data. If you don’t have any destination configured, you can select + Add in the destination section to create a new destination now. For details on the different destinations, see Destinations.
- If you don’t have any destination configured, see Destinations.
- If you’ve already created a store, it automatically available as a destination. Note that the Router Selector of the flow must match only AxoRouters that have the selected store available, otherwise you’ll get an error message.
- If you want to send data to another AxoRouter, enable the Show all destinations option, and select the connector of the AxoRouter where you want to send the data.
-
(Optional) To process the data transferred in the flow, select Add New Processing Step. For details, see Processing steps. For example:
- Add a Classify, a Parse, and a Reduce step, in that order, to automatically remove redundant and empty fields from your data.
- To select which messages are processed by the flow, add a Select Messages step, and enter a filter into the AQL Expression field. For example, to select only the messages received from Fortinet FortiGate firewalls, use the
meta.vendor = fortinet AND meta.product = fortigate query.
- Save the processing steps.
-
Select Add.
-
The new flow appears in the Flows list.
You can use the following message fields to modify messages sent to this destination using processing steps.
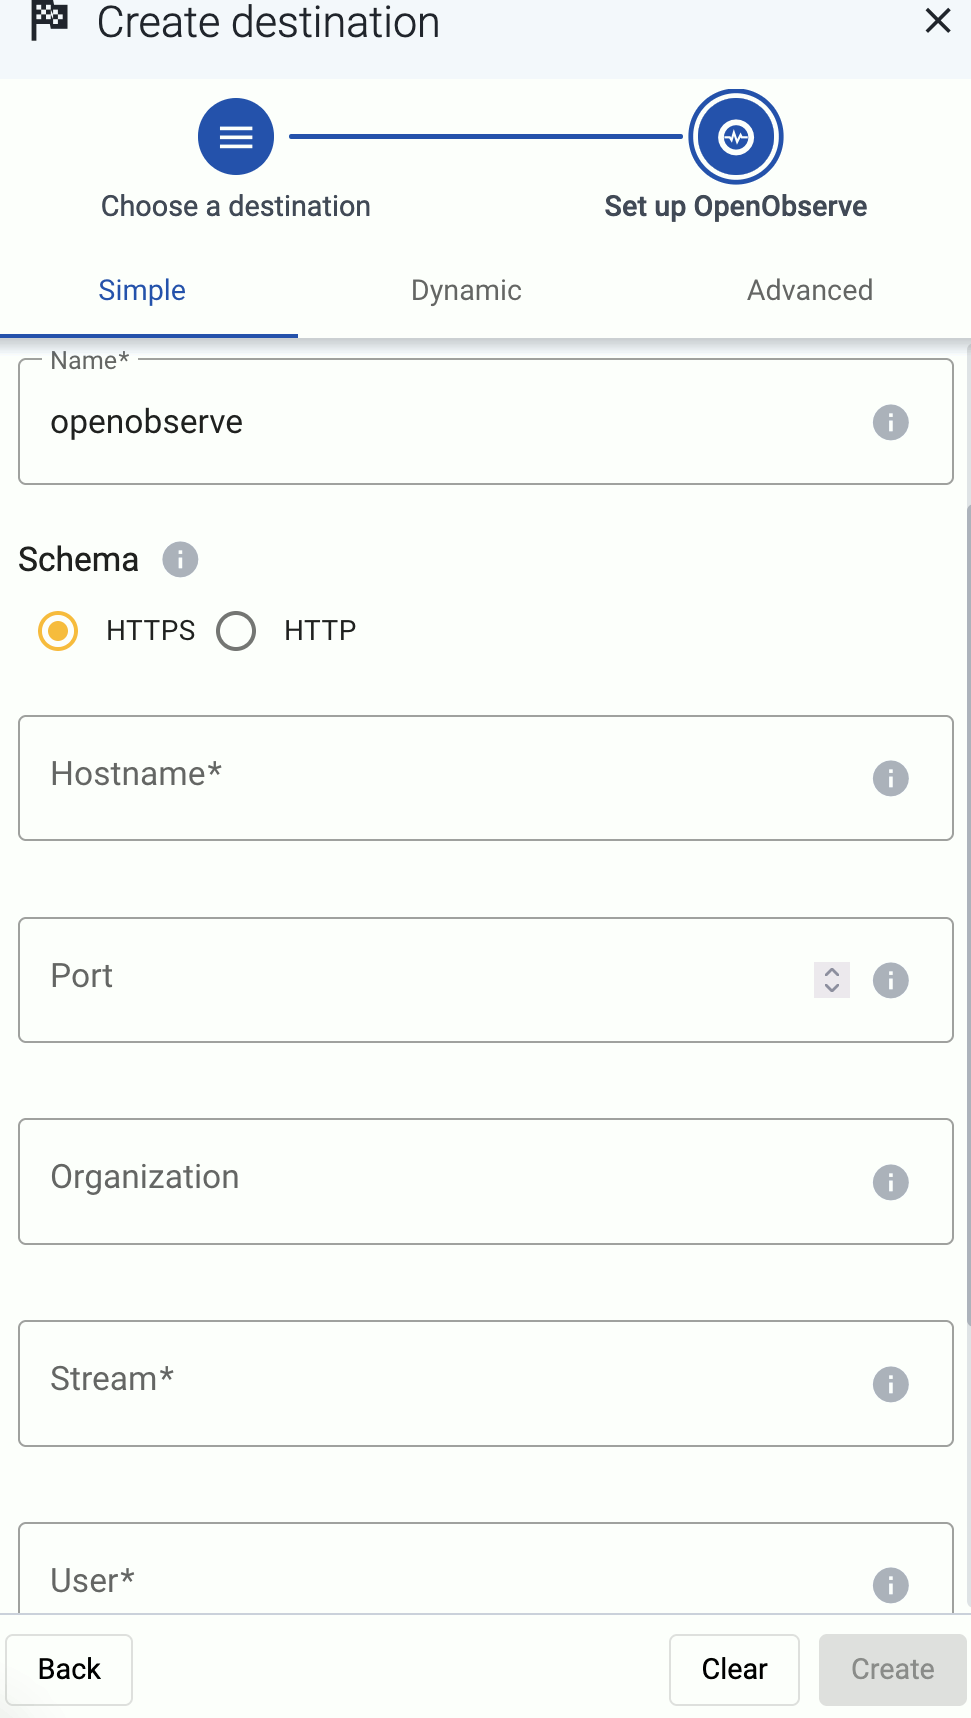
12 - OpenObserve
OpenObserve:
High-performance log analytics platform supporting structured log ingestion, search, and visualization.
To add an OpenObserve destination to Axoflow, complete the following steps.
Prerequisites
Steps
-
Create a new destination.
- Open the AxoConsole.
- Select Destinations > + Add Destination.
-
Configure the destination.
-
Select OpenObserve.
-
Select which type of configuration you want to use:
- Simple: Send all data into a single stream of an organization.
- Dynamic: Send data to an organization and stream based on the content or metadata of the incoming messages (or to the default stream of the default organization).
- Advanced: Allows you to specify a custom URL endpoint.
-
Enter a name for the destination.

-
Configure the endpoint of the destination.
- Advanced: Enter your OpenObserve URL into the URL field, for example,
https://example.com/api/my-org/my-stream/_json
- Simple and Dynamic:
- Select the HTTPS or HTTP protocol to use to access your destination.
- Enter the Hostname and Port of the destination.
-
Specify the OpenObserve stream to send the data to.
- Simple: Enter name of the Organization and the Stream where you want to send the data. All data will be sent into this stream.
- Dynamic: Enter the expression that specifies the default Default Organization and teh Default Stream. The data will be sent into this stream if no other organization and stream is set during the processing of the message (for example, by the processing steps of the Flow).
You can use AxoSyslog macros in this field.
-
Enter the username and password for the account you want to use.
-
(Optional)
By default, Axoflow rejects connections to the destination server if the certificate of the server is invalid (for example, it’s expired, signed by an unknown CA, or its CN and the name of the server is mismatched: the Common Name or the subject_alt_name parameter of the peer’s certificate must contain the hostname or the IP address (as resolved from AxoRouter) of the peer).
Warning
When validating a certificate, the entire certificate chain must be valid, including the CA certificate. If any certificate of the chain is invalid, Axoflow will reject the connection.
If you want to accept invalid certificates (or no certificate) from the destination servers, disable the Verify server certificate option.
-
(Optional) Set other options as needed for your environments.
- Timeout: The number of seconds to wait for a log-forwarding request to complete, and attempt to reconnect the server if exceeded. If the timeout is exceeded, AxoRouter attempts to reconnect the destination. The default (
0) is unlimited. For more details, see the AxoSyslog documentation.
-
Disk Buffer: Explicitly enable or disable disk buffer on AxoRouter. Default value: Enabled.
AxoRouter can store messages on the local disk if the destination or the network connection to the destination becomes unavailable. AxoRouter automatically sends the stored messages (in the order they were received) to the destination when the connection is reestablished. Note that the disk buffer is separate from AxoStore.
Capacity Bytes: Size of the disk buffer files in bytes. This value applies for each worker. Default value is 100MiB (104857600 bytes), which is also the recommended minimum.
The disk required for using disk buffering is Capacity Bytes*Number of Workers for each destination of AxoRouter.
-
Batch Bytes: Sets the maximum size of payload in a batch. If the size of the messages reaches this value, AxoRouter sends the batch to the destination even if the number of messages is less than the value of the batch lines option.
CAUTION:
When setting Batch Bytes:
- Note that the actual HTTP request will be about 4KB larger because of the request headers.
- Check the configuration of your destination, as SaaS solutions and ingress controllers often limit the maximal size of HTTP requests. If the sum of Batch Bytes and the request headers exceeds this limit, the data will be rejected. (In case of NGINX, with a
client intended to send too large body error message.)
-
Batch Lines: Number of lines sent to the destination in one batch. AxoRouter waits for this number of lines to accumulate and sends them off in a single batch. Increasing this number increases throughput as more messages are sent in a single batch, but also increases message latency. For more details, see the AxoSyslog documentation.
-
Batch Timeout: Maximal time in milliseconds to wait for a batch to be filled before sending it. The default value (-1) means that the batch should be full before sending, which may result in a long wait if the incoming traffic is low. For more details, see the AxoSyslog documentation.
-
Number of Workers: Used for scaling the destination in case of high message load. Specifies the number of worker threads AxoRouter uses for sending messages to the destination. The default is 1. If high message throughput is not a concern, leave it on 1. For maximum performance, increase it up to the number of CPU cores available on AxoRouter. For more details, see the AxoSyslog documentation.
-
Create a flow to connect the new destination to an AxoRouter instance.
-
Select Flows.
-
Select Add Flow.
-
Enter a name for the flow, for example, my-test-flow.
-
In the Router Selector field, enter an expression that matches the router(s) you want to apply the flow. To select a specific router, use a name selector, for example, name = my-axorouter-hostname.
You can use any labels and metadata of the AxoRouter hosts in the Router selectors, for example, the hostname of the AxoRouter, or any custom labels.
- If you leave the Router Selector field empty, the selector will match every AxoRouter instance.
- To select only a specific AxoRouter instance, set the
name field to the name of the instance as selector. For example, name = my-axorouter.
- If you set multiple fields in the selector, the selector will match only AxoRouter instances that match all elements of the selector. (There in an AND relationship between the fields.)
-
Select the Destination where you want to send your data. If you don’t have any destination configured, you can select + Add in the destination section to create a new destination now. For details on the different destinations, see Destinations.
- If you don’t have any destination configured, see Destinations.
- If you’ve already created a store, it automatically available as a destination. Note that the Router Selector of the flow must match only AxoRouters that have the selected store available, otherwise you’ll get an error message.
- If you want to send data to another AxoRouter, enable the Show all destinations option, and select the connector of the AxoRouter where you want to send the data.
-
(Optional) To process the data transferred in the flow, select Add New Processing Step. For details, see Processing steps. For example:
- Add a Classify, a Parse, and a Reduce step, in that order, to automatically remove redundant and empty fields from your data.
- To select which messages are processed by the flow, add a Select Messages step, and enter a filter into the AQL Expression field. For example, to select only the messages received from Fortinet FortiGate firewalls, use the
meta.vendor = fortinet AND meta.product = fortigate query.
- Save the processing steps.
-
Select Add.
-
The new flow appears in the Flows list.
You can use the following message fields to modify messages sent to this destination using processing steps.
13 - OpenSearch
OpenSearch:
Open-source search and analytics suite for log ingestion, indexing, dashboards, and alerting.
Axoflow supports sending data to OpenSearch using its HTTP endpoint.
If you’d like to send data from AxoRouter to this destination, contact our support team for details.
14 - Splunk
Splunk:
Ingests, indexes, and visualizes data for monitoring, analysis, and alerting.
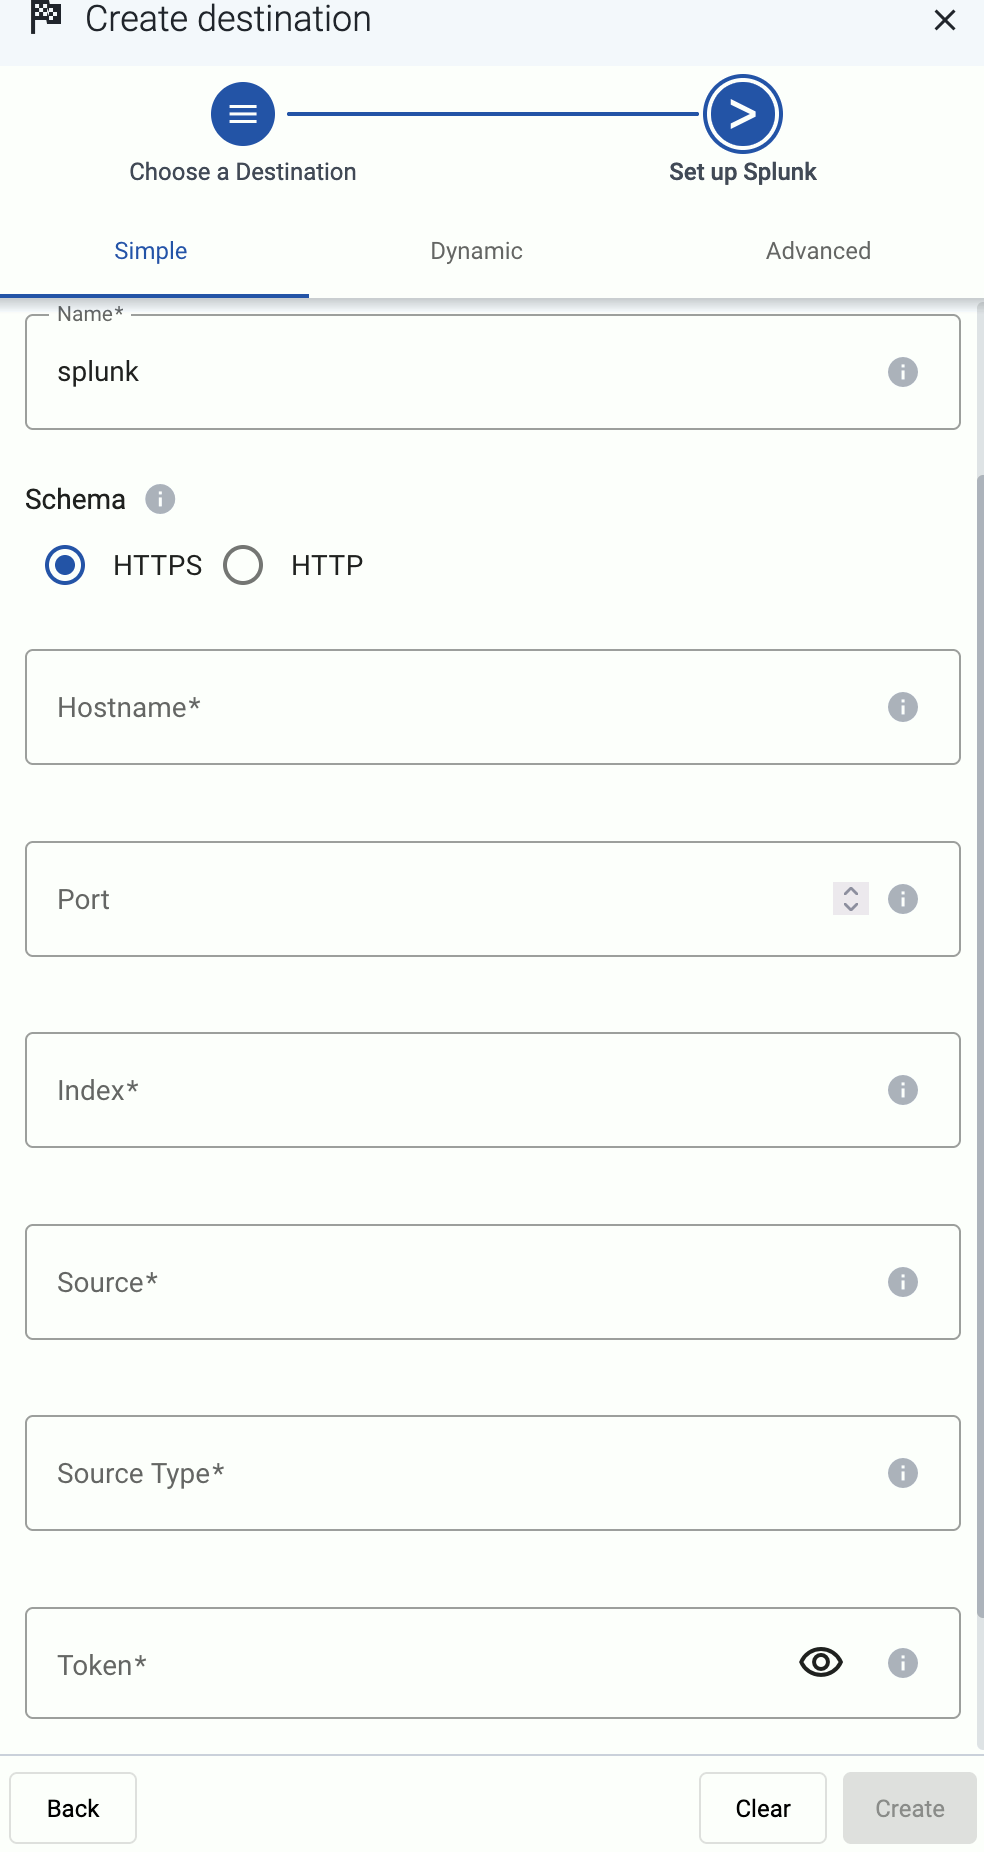
To add a Splunk destination (Splunk Cloud or Splunk Enterprise) to Axoflow, complete the following steps.
Prerequisites
-
Enable the HTTP Event Collector (HEC) on your Splunk deployment if needed. On Splunk Cloud Platform deployments, HEC is enabled by default.
-
Create a token for Axoflow to use in the destination. When creating the token, use the syslog source type.
For details, see Set up and use HTTP Event Collector in Splunk Web.
-
If you’re using AxoRouter, create the indexes where Axoflow sends the log data. Which index is needed depends on the sources you have, but create at least the following event indices: axoflow, infraops, netops, netfw, osnix (for unclassified messages). Check your sources in the Sources section for a detailed lists on which indices their data is sent.
-
If you’ve created any new indexes, make sure to add those indexes to the token’s Allowed Indexes.
Steps
-
Create a new destination.
- Open the AxoConsole.
- Select Destinations > + Add Destination.
-
Configure the destination.
-
Select Splunk.
-
Enter a name for the destination.
-
Select which type of configuration you want to use:
- Simple: Send all data into a single index, with fixed source and source type settings.
- Dynamic: Set index, source, and source type based on the content or metadata of the incoming messages.
- Advanced: Allows you to specify a custom URL endpoint.
-
Configure the endpoint of the destination.
- Advanced: Enter your Splunk URL into the URL field, for example,
https://<your-splunk-tenant-id>.splunkcloud.com:8088 for Splunk Cloud Platform free trials, or https://<your-splunk-tenant-id>.splunkcloud.com for Splunk Cloud Platform instances.
- Simple and Dynamic:
- Select the HTTPS or HTTP protocol to use to access your destination.
- Enter the Hostname and Port of the destination.
-
Specify the Splunk index to send the data to.
- Simple: Enter the expression that specifies the Splunk index to use into the Index field, for example:
netops. All data will be sent into this index.
- Dynamic and Advanced:
- Enter the name of the Default Index. The data will be sent into this index if no other index is set during the processing of the message (based on automatic classification, or by the processing steps of the Flow). Make sure that the index exists in Splunk.
- Enter the Default Source and Default Source Type. These will be assigned to the messages that have no source or source type set during the processing of the message (based on automatic classification, or by the processing steps of the Flow).
-
Enter the token you’ve created into the Token field.
-
Disable the Verify server certificate option unless your deployment has a valid, non-self-signed certificate. Free Splunk Cloud accounts have self-signed certificates.
-
(Optional) Set other options as needed for your environments.
- Timeout: The number of seconds to wait for a log-forwarding request to complete, and attempt to reconnect the server if exceeded. If the timeout is exceeded, AxoRouter attempts to reconnect the destination. The default (
0) is unlimited. For more details, see the AxoSyslog documentation.
-
Disk Buffer: Explicitly enable or disable disk buffer on AxoRouter. Default value: Enabled.
AxoRouter can store messages on the local disk if the destination or the network connection to the destination becomes unavailable. AxoRouter automatically sends the stored messages (in the order they were received) to the destination when the connection is reestablished. Note that the disk buffer is separate from AxoStore.
Capacity Bytes: Size of the disk buffer files in bytes. This value applies for each worker. Default value is 100MiB (104857600 bytes), which is also the recommended minimum.
The disk required for using disk buffering is Capacity Bytes*Number of Workers for each destination of AxoRouter.
-
Batch Bytes: Sets the maximum size of payload in a batch. If the size of the messages reaches this value, AxoRouter sends the batch to the destination even if the number of messages is less than the value of the batch lines option.
CAUTION:
When setting Batch Bytes:
- Note that the actual HTTP request will be about 4KB larger because of the request headers.
- Check the configuration of your destination, as SaaS solutions and ingress controllers often limit the maximal size of HTTP requests. If the sum of Batch Bytes and the request headers exceeds this limit, the data will be rejected. (In case of NGINX, with a
client intended to send too large body error message.)
-
Batch Lines: Number of lines sent to the destination in one batch. AxoRouter waits for this number of lines to accumulate and sends them off in a single batch. Increasing this number increases throughput as more messages are sent in a single batch, but also increases message latency. For more details, see the AxoSyslog documentation.
-
Batch Timeout: Maximal time in milliseconds to wait for a batch to be filled before sending it. The default value (-1) means that the batch should be full before sending, which may result in a long wait if the incoming traffic is low. For more details, see the AxoSyslog documentation.
-
Number of Workers: Used for scaling the destination in case of high message load. Specifies the number of worker threads AxoRouter uses for sending messages to the destination. The default is 1. If high message throughput is not a concern, leave it on 1. For maximum performance, increase it up to the number of CPU cores available on AxoRouter. For more details, see the AxoSyslog documentation.
-
Select Add.
-
Create a flow to connect the new destination to an AxoRouter instance.
-
Select Flows.
-
Select Add Flow.
-
Enter a name for the flow, for example, my-test-flow.
-
In the Router Selector field, enter an expression that matches the router(s) you want to apply the flow. To select a specific router, use a name selector, for example, name = my-axorouter-hostname.
You can use any labels and metadata of the AxoRouter hosts in the Router selectors, for example, the hostname of the AxoRouter, or any custom labels.
- If you leave the Router Selector field empty, the selector will match every AxoRouter instance.
- To select only a specific AxoRouter instance, set the
name field to the name of the instance as selector. For example, name = my-axorouter.
- If you set multiple fields in the selector, the selector will match only AxoRouter instances that match all elements of the selector. (There in an AND relationship between the fields.)
-
Select the Destination where you want to send your data. If you don’t have any destination configured, you can select + Add in the destination section to create a new destination now. For details on the different destinations, see Destinations.
- If you don’t have any destination configured, see Destinations.
- If you’ve already created a store, it automatically available as a destination. Note that the Router Selector of the flow must match only AxoRouters that have the selected store available, otherwise you’ll get an error message.
- If you want to send data to another AxoRouter, enable the Show all destinations option, and select the connector of the AxoRouter where you want to send the data.
-
(Optional) To process the data transferred in the flow, select Add New Processing Step. For details, see Processing steps. For example:
- Add a Classify, a Parse, and a Reduce step, in that order, to automatically remove redundant and empty fields from your data.
- To select which messages are processed by the flow, add a Select Messages step, and enter a filter into the AQL Expression field. For example, to select only the messages received from Fortinet FortiGate firewalls, use the
meta.vendor = fortinet AND meta.product = fortigate query.
- Save the processing steps.
-
Select Add.
-
The new flow appears in the Flows list.
You can use the following message fields to modify messages sent to this destination using processing steps.
15 - Sumo Logic
Sumo Logic:
Cloud-native platform for log management, metrics analysis, and security analytics.
To add a Sumo Logic destination to Axoflow, complete the following steps.
Prerequisites
-
A Sumo Logic account.
-
A HTTP Hosted Collector configured in the Sumo Logic service.
To configure a Hosted Collector, follow the configuration instructions under the Configure a Hosted Collector section on the official Sumo Logic website.
-
The unique HTTP collector code you receive while configuring your Host Collector for HTTP requests.
-
To add custom fields of the messages to Sumo Logic:
- These fields must already exists in your Sumo Logic account. For details, see the Sumo Logic documentation.
- You must configure the HTTP Hosted Collector to process the received fields.
Steps
-
Create a new destination.
- Open the AxoConsole.
- Select Destinations > + Add Destination.
-
Configure the destination.
-
Select Sumo Logic.
-
Enter a name for the destination.
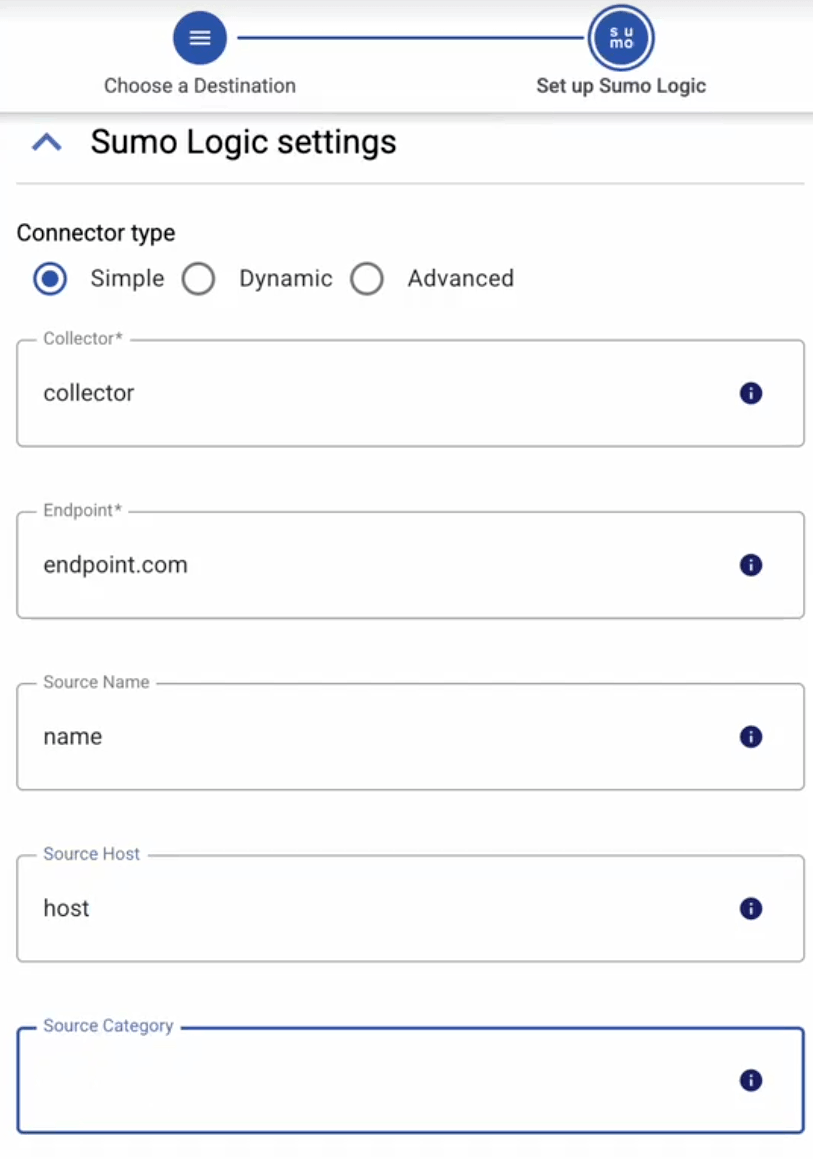
-
Select which type of configuration you want to use:
- Simple: Send all data using a single source host and source category.
- Dynamic: Set source host, name, and category based on the content or metadata of the incoming messages.
-
Configure the endpoint of the destination.
-
Simple:
- Enter the URL of the HTTPS endpoint of your Sumo Logic HTTP Source where data is sent.
- Enter the name of the Source Name. All data will be associated as coming from this source.
- Enter the host identifier (for example, server or container name) that sent the data into the Source Host field. All data will be associated as coming from this source.
- Enter the name of the Source Category. The data will be added to this category in Sumo Logic.
-
Enter the metadata tags that to be assigned to your data by default into the Fields field. Use key-value pairs. Other metadata can be added during the processing of the message (based on automatic classification, or by the processing steps of the Flow). Note the following limits of Sumo Logic fields:
- An HTTP request is limited to 30 fields.
- A field name (key) cannot be longer than 255 characters.
- A value cannot be longer than 200 characters.
- You must configure your Sumo Logic instance to accept and process the received fields.
-
Dynamic:
- Enter the URL of the HTTPS endpoint of your Sumo Logic HTTP Source where data is sent.
- Enter the Default Source Name. The name of the data source. The data will be associated as coming from this source, unless a different one is set during the processing of the message (based on automatic classification, or by the processing steps of the Flow).
- Enter the Default Source Host. The host identifier (for example, server or container name) that sent the data. All data will be associated as coming from this source, unless a different one is set during the processing of the message (based on automatic classification, or by the processing steps of the Flow).
- Enter the name of the Default Source Category. This is a user-defined tag to logically group or filter data in Sumo Logic. The data will added to this category, unless a different one is set during the processing of the message (based on automatic classification, or by the processing steps of the Flow).
-
Enter the metadata tags that to be assigned to your data by default into the Fields field. Use key-value pairs. Other metadata can be added during the processing of the message (based on automatic classification, or by the processing steps of the Flow). Note the following limits of Sumo Logic fields:
- An HTTP request is limited to 30 fields.
- A field name (key) cannot be longer than 255 characters.
- A value cannot be longer than 200 characters.
- You must configure your Sumo Logic instance to accept and process the received fields.
-
(Optional) Set other options as needed for your environments.
- Timeout: The number of seconds to wait for a log-forwarding request to complete, and attempt to reconnect the server if exceeded. If the timeout is exceeded, AxoRouter attempts to reconnect the destination. The default (
0) is unlimited. For more details, see the AxoSyslog documentation.
-
Disk Buffer: Explicitly enable or disable disk buffer on AxoRouter. Default value: Enabled.
AxoRouter can store messages on the local disk if the destination or the network connection to the destination becomes unavailable. AxoRouter automatically sends the stored messages (in the order they were received) to the destination when the connection is reestablished. Note that the disk buffer is separate from AxoStore.
Capacity Bytes: Size of the disk buffer files in bytes. This value applies for each worker. Default value is 100MiB (104857600 bytes), which is also the recommended minimum.
The disk required for using disk buffering is Capacity Bytes*Number of Workers for each destination of AxoRouter.
-
Batch Bytes: Sets the maximum size of payload in a batch. If the size of the messages reaches this value, AxoRouter sends the batch to the destination even if the number of messages is less than the value of the batch lines option.
CAUTION:
When setting Batch Bytes:
- Note that the actual HTTP request will be about 4KB larger because of the request headers.
- Check the configuration of your destination, as SaaS solutions and ingress controllers often limit the maximal size of HTTP requests. If the sum of Batch Bytes and the request headers exceeds this limit, the data will be rejected. (In case of NGINX, with a
client intended to send too large body error message.)
-
Batch Lines: Number of lines sent to the destination in one batch. AxoRouter waits for this number of lines to accumulate and sends them off in a single batch. Increasing this number increases throughput as more messages are sent in a single batch, but also increases message latency. For more details, see the AxoSyslog documentation.
-
Batch Timeout: Maximal time in milliseconds to wait for a batch to be filled before sending it. The default value (-1) means that the batch should be full before sending, which may result in a long wait if the incoming traffic is low. For more details, see the AxoSyslog documentation.
-
Number of Workers: Used for scaling the destination in case of high message load. Specifies the number of worker threads AxoRouter uses for sending messages to the destination. The default is 1. If high message throughput is not a concern, leave it on 1. For maximum performance, increase it up to the number of CPU cores available on AxoRouter. For more details, see the AxoSyslog documentation.
-
Create a flow to connect the new destination to an AxoRouter instance.
-
Select Flows.
-
Select Add Flow.
-
Enter a name for the flow, for example, my-test-flow.
-
In the Router Selector field, enter an expression that matches the router(s) you want to apply the flow. To select a specific router, use a name selector, for example, name = my-axorouter-hostname.
You can use any labels and metadata of the AxoRouter hosts in the Router selectors, for example, the hostname of the AxoRouter, or any custom labels.
- If you leave the Router Selector field empty, the selector will match every AxoRouter instance.
- To select only a specific AxoRouter instance, set the
name field to the name of the instance as selector. For example, name = my-axorouter.
- If you set multiple fields in the selector, the selector will match only AxoRouter instances that match all elements of the selector. (There in an AND relationship between the fields.)
-
Select the Destination where you want to send your data. If you don’t have any destination configured, you can select + Add in the destination section to create a new destination now. For details on the different destinations, see Destinations.
- If you don’t have any destination configured, see Destinations.
- If you’ve already created a store, it automatically available as a destination. Note that the Router Selector of the flow must match only AxoRouters that have the selected store available, otherwise you’ll get an error message.
- If you want to send data to another AxoRouter, enable the Show all destinations option, and select the connector of the AxoRouter where you want to send the data.
-
(Optional) To process the data transferred in the flow, select Add New Processing Step. For details, see Processing steps. For example:
- Add a Classify, a Parse, and a Reduce step, in that order, to automatically remove redundant and empty fields from your data.
- To select which messages are processed by the flow, add a Select Messages step, and enter a filter into the AQL Expression field. For example, to select only the messages received from Fortinet FortiGate firewalls, use the
meta.vendor = fortinet AND meta.product = fortigate query.
- Save the processing steps.
-
Select Add.
-
The new flow appears in the Flows list.
You can use the following message fields to modify messages sent to this destination using processing steps.