This is the multi-page printable view of this section.
Click here to print.
Return to the regular view of this page.
Authentication
AxoConsole supports the following authentication providers for on-premises deployments:
| Provider |
Description |
When to use |
| Built-in (axoidp) |
Axoflow’s built-in identity provider |
Default for all installations. Manages local users with username and password. |
| Dex |
Open-source identity federation layer |
Use when you want to authenticate users with an existing identity system such as LDAP, Google, or GitHub. |
The built-in provider is enabled automatically during installation. To use a different provider, see the relevant section below.
1 - Dex
Dex is an open-source identity federation layer. When you configure AxoConsole to use Dex, Dex handles authentication with your existing identity system and passes user identity back to AxoConsole.
The following connectors are supported:
- LDAP — connect to an LDAP or Active Directory server
- GitHub — authenticate with GitHub OAuth
- Google — authenticate with Google accounts or Google Groups
Switch from the built-in provider to Dex
Configure Dex as the OIDC provider in the /var/lib/rancher/k3s/server/manifests/axoflow-config.yaml file. For example:
chalco:
  oidc:
    enabled: true
    provider: "dex"

axoidp:
  enabled: false

dex:
  enabled: true
After saving the file, k3s automatically applies the changes. Users will be redirected to the Dex login page on next login.
1.1 - GitHub
This section shows you how to use GitHub OAuth2 as an authentication backend for AxoConsole. It is assumed that you already have a GitHub organization. Complete the following steps.
Prerequisites
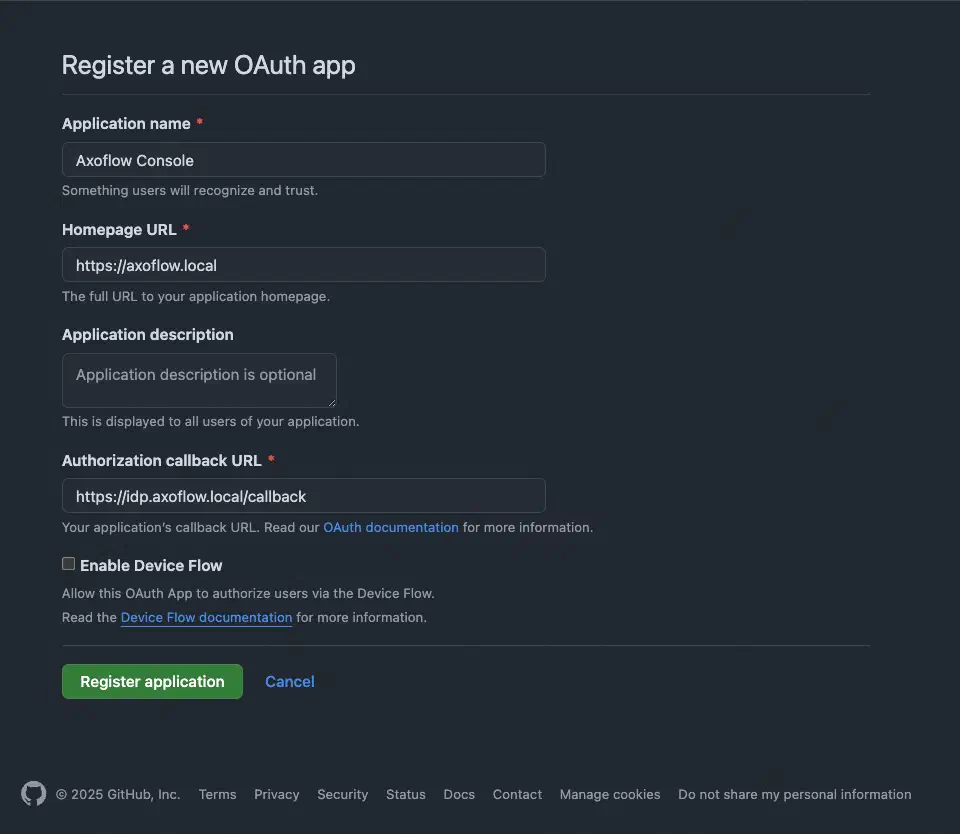
Register a new OAuth GitHub application for your organization. (For testing, you can create it under your personal account.) Make sure to:
-
Set the Homepage URL to the URL of your AxoConsole deployment: https://<your-console-host.your-domain>/callback, for example, https://axoflow-console.example.com.
-
Set the Authorization callback URL to: https://auth.<your-console-host.your-domain>/callback, for example, https://auth.axoflow-console.example.com/callback.
-
Save the Client id of the app, you’ll need it to configure AxoConsole.
-
Generate a Client secret and save it, you’ll need it to configure AxoConsole.
Configuration
-
Configure Dex as the OIDC provider in the /var/lib/rancher/k3s/server/manifests/axoflow-config.yaml file. For example:
chalco:
  oidc:
    enabled: true
    provider: "dex"

axoidp:
  enabled: false

dex:
  enabled: true
-
Configure authentication by editing the spec.dex.config section of the /var/lib/rancher/k3s/server/manifests/axoflow-config.yaml file.
-
(Optional) If you’ve used our earlier example, delete the spec.dex.config.staticPasswords section.
-
Add the spec.dex.config.connectors section to the file, like this:
dex:
  enabled: true
  localIP: $VM_IP_ADDRESS
  config:
    create: true
    connectors:
    - type: github
      # Required field for connector id.
      id: github
      # Required field for connector name.
      name: GitHub
      config:
        # Credentials can be string literals or pulled from the environment.
        clientID: <ID-of-GitHub-application>
        clientSecret: <Secret-of-GitHub-application>
        redirectURI: <idp.your-host.your-domain/callback>
        orgs:
          - name: <your-GitHub-organization>
Note that if you have a valid domain name that points to the VM, you can omit the localIP: $VM_IP_ADDRESS line.
-
Edit the following fields. For details on the configuration parameters, see the Dex GitHub connector documentation.
connectors.config.clientID: The ID of the GitHub OAuth application.connectors.config.clientSecret: The client secret of the GitHub OAuth application.connectors.config.redirectURI: The callback URL of the GitHub OAuth application: https://auth.<your-console-host.your-domain>/callback, for example, https://auth.axoflow-console.example.com/callback.- If you want to fetch every GitHub group, replace the entire
orgs section with the loadAllGroups: true
connectors.config.orgs: List of the GitHub organizations whose members can access AxoConsole. Restrict access to your organization.
-
Configure authorization in the kcp.rbac.roles section of the /var/lib/rancher/k3s/server/manifests/axoflow-config.yaml file.
The following roles are available in AxoConsole by default:
-
IAMadmin: Can manage the roles and permissions to access AxoConsole. Only this role can make changes on the Settings > Roles page. Can see the Identity Provider Admin Panel link, which points to the authentication and administration page of the identity provider used to authenticate on AxoConsole. (Every user can access their own profile page at the identity provider by selecting <their username> > Profile in the top-left.)
-
admin: Has full access to AxoConsole, but has only read access to the Settings > Roles page.
-
infrastructureManager: Can manage the infrastructure (without the permissions to view or tap log contents, or to rehydrate data). Has full access to the following pages: Activity Logs, Alerting, Routers, Sources, Flows, Provisioning, Search Logs. Can tap into service logs which may contain event payload.
-
infrastructureViewer: Similar to infrastructure-manager, but can only view the pages.
-
contentManager: Can view log content and manage content related details like flows (without the permissions to manage infrastructure, but including access to view infrastructure details).
- Has full access to the Rehydration page.
- Can view and modify Flows, but can’t create or delete them.
- Can view Routers, Sources, Search Logs, Analytics.
- Can tap into logs.
-
contentViewer: Can view content like analytics, log search, log tapping (without the permissions to manage or view infrastructure details).
- Can view Search Logs, Analytics.
- Can tap into logs.
If you need other roles, contact the Axoflow support team. Composing other roles is possible as part of a custom integration.
You can use email addresses or GitHub groups to assign your users to AxoConsole user roles.
To use the groups fetched from GitHub, prefix the name of the GitHub group with groups:, and add them to the related roles under kcp.rbac.roles.<role>.groups. For example:
  rbac:
    createRoles: true
    createRoleBindings: true
    roles:
      IAMadmin:
        groups:
          - groups:iamadmin
      admin:
        groups:
          - groups:admins
      contentViewer:
        groups:
          - groups:readonly
-
A specific email address, for example, email:username@example.com
Note
- The user must be able to authenticate to AxoConsole using this email address, so authentication must be properly set up.
- Multiple identity providers may allow authentication with the same email address, possibly with different level of ownership validation.
-
An entire email domain, for example, emaildomain:example.com. Any user who authenticates with an email address belonging to this email domain will have access to the role.
-
A user group. The format of the group depends on the OID provider.
- If you’re using AxoConsole as a SaaS, specify the group in the following format:
cognito:groups:<groupname-retrieved-from-cognito>, for example, cognito:groups:ExampleGoogleSaml:Operator.
- If you’re using an on-prem AxoConsole deployment, specify the group in the following format:
groups:<groupname-retrieved-from-dex> for example, groups:operator.
-
A specific session of an authenticated user, in the following format: user:<oidc-response-subject>, for example: user:42c4e962-f077-705f-138f-f01ba1220c44.
-
Every authenticated user: axoflow:user
For details on authorization settings, see Authorization.
-
Save the file.
-
Restart the dex deployment after changing the connector:
kubectl rollout restart deployment/dex -n axoflow
Expected output:
deployment.apps/dex restarted
-
Open the main page of your AxoConsole deployment in your browser. You’ll be redirected to the GitHub authentication page.
After completing the GitHub authentication you can access AxoConsole.
Getting help
You can troubleshoot common errors by running kubectl logs -n axoflow <dex-container-name>
If you run into problems setting up the authentication or authorization, contact our support team.
1.2 - Google
This section shows you how to use Google OpenID Connect as an authentication backend for AxoConsole. It is assumed that you already have a Google organization and Google Cloud Console access. Complete the following steps.
Prerequisites
-
To use Google authentication, AxoConsole must be deployed on a publicly accessible domain name (the $BASE_HOSTNAME must end with a valid top-level domain, for example, .com or .io.)
-
Configure OpenID Connect and create an OpenID credential for a Web application.
- Make sure to set the Authorized redirect URIs to:
https://auth.<your-console-host.your-domain>/callback, for example, https://auth.axoflow-console.example.com/callback.
- Save the Client ID of the app and the Client secret of the application, you’ll need them to configure AxoConsole.
For details on setting up OpenID Connect, see the official documentation.
Google group membership
To use group memberships when assigning your users to AxoConsole user roles, you have to configure a service account to retrieve group memberships. Otherwise, you can use email domains. To set up a proper service account, complete the following steps.
- Set up a service account with Domain-Wide Delegation.
- Save the JSON key file that contains the authentication information for the service account. You’ll need it later.
- Delegate the
https://www.googleapis.com/auth/admin.directory.group.readonly scope to the service account. Do not delegate any other scope.
- Enable the Admin SDK.
You’ll also need the email address of a Google Workspace user with a minimum of the Groups Reader Role assigned. The service account will impersonate this user when making calls to the admin API.
Configuration
-
Configure Dex as the OIDC provider in the /var/lib/rancher/k3s/server/manifests/axoflow-config.yaml file. For example:
chalco:
  oidc:
    enabled: true
    provider: "dex"

axoidp:
  enabled: false

dex:
  enabled: true
-
Configure authentication by editing the spec.dex.config section of the /var/lib/rancher/k3s/server/manifests/axoflow-config.yaml file.
-
(Optional) If you’ve used our earlier example, delete the spec.dex.config.staticPasswords section.
-
Add the spec.dex.config.connectors section to the file, like this:
connectors:
- type: google
  id: google
  name: Google
  config:
    # Connector config values starting with a "$" will read from the environment.
    clientID: <ID-of-Google-application>
    clientSecret: <Secret-of-GitHub-application>

    # Dex's issuer URL + "/callback"
    redirectURI: <idp.your-host.your-domain/callback>

    # Set the value of `prompt` query parameter in the authorization request
    # The default value is "consent" when not set.
    promptType: consent

    # Google supports whitelisting allowed domains when using G Suite
    # (Google Apps). The following field can be set to a list of domains
    # that can log in:
    #
    hostedDomains:
    - <your-domain>

    # For group membership authorization:
    #serviceAccountFilePath: "/etc/dex/sa-file/service-account.json"
    #domainToAdminEmail:
      #"*": <impersonated-group-reader-email-address>
-
Edit the following fields. For details on the configuration parameters, see the Dex Google connector documentation.
connectors.config.clientID: The ID of the Google application.connectors.config.clientSecret: The client secret of the Google application.connectors.config.redirectURI: The callback URL of the Google application: https://auth.<your-console-host.your-domain>/callback, for example, https://auth.axoflow-console.example.com/callback.connectors.config.hostedDomains: The domain where AxoConsole is deployed, for example, example.com. Your users must have email addresses for this domain at Google.
-
If you’ll use Google group memberships for authorization, uncomment the serviceAccountFilePath and domainToAdminEmail sections. Replace <impersonated-group-reader-email-address> with the email address you created in Google group memberships prerequisites.
    # For group membership authorization:
    serviceAccountFilePath: "/etc/dex/sa-file/service-account.json"
    domainToAdminEmail:
      "*": <impersonated-group-reader-email-address>
-
Configure authorization in the kcp.rbac.roles section of the /var/lib/rancher/k3s/server/manifests/axoflow-config.yaml file.
The following roles are available in AxoConsole by default:
-
IAMadmin: Can manage the roles and permissions to access AxoConsole. Only this role can make changes on the Settings > Roles page. Can see the Identity Provider Admin Panel link, which points to the authentication and administration page of the identity provider used to authenticate on AxoConsole. (Every user can access their own profile page at the identity provider by selecting <their username> > Profile in the top-left.)
-
admin: Has full access to AxoConsole, but has only read access to the Settings > Roles page.
-
infrastructureManager: Can manage the infrastructure (without the permissions to view or tap log contents, or to rehydrate data). Has full access to the following pages: Activity Logs, Alerting, Routers, Sources, Flows, Provisioning, Search Logs. Can tap into service logs which may contain event payload.
-
infrastructureViewer: Similar to infrastructure-manager, but can only view the pages.
-
contentManager: Can view log content and manage content related details like flows (without the permissions to manage infrastructure, but including access to view infrastructure details).
- Has full access to the Rehydration page.
- Can view and modify Flows, but can’t create or delete them.
- Can view Routers, Sources, Search Logs, Analytics.
- Can tap into logs.
-
contentViewer: Can view content like analytics, log search, log tapping (without the permissions to manage or view infrastructure details).
- Can view Search Logs, Analytics.
- Can tap into logs.
If you need other roles, contact the Axoflow support team. Composing other roles is possible as part of a custom integration.
To assign Google groups to AxoConsole roles, add the groups of your users to the related roles under kcp.rbac.roles.<role>.groups.
  rbac:
    createRoles: true
    createRoleBindings: true
    roles:
      IAMadmin:
        groups:
          - groups:iamadmin@example.com
      admin:
        groups:
          - groups:admin@example.com
      contentViewer:
        groups:
          - groups:readonly@example.com
-
A specific email address, for example, email:username@example.com
Note
- The user must be able to authenticate to AxoConsole using this email address, so authentication must be properly set up.
- Multiple identity providers may allow authentication with the same email address, possibly with different level of ownership validation.
-
An entire email domain, for example, emaildomain:example.com. Any user who authenticates with an email address belonging to this email domain will have access to the role.
-
A user group. The format of the group depends on the OID provider.
- If you’re using AxoConsole as a SaaS, specify the group in the following format:
cognito:groups:<groupname-retrieved-from-cognito>, for example, cognito:groups:ExampleGoogleSaml:Operator.
- If you’re using an on-prem AxoConsole deployment, specify the group in the following format:
groups:<groupname-retrieved-from-dex> for example, groups:operator.
-
A specific session of an authenticated user, in the following format: user:<oidc-response-subject>, for example: user:42c4e962-f077-705f-138f-f01ba1220c44.
-
Every authenticated user: axoflow:user
For details on authorization settings, see Authorization.
-
Save the file.
-
If you’re using Google groups to assign user roles, complete the following steps.
-
Run the following command to delete the dex-google-service-account secret. This is a placeholder secret that you’ll re-create with valid values in the next step.
kubectl -n axoflow delete secret dex-google-service-account
-
Re-create the secret using the JSON key of the Google service account you’ve created in Google group membership.
kubectl -n axoflow create secret dex-google-service-account --from-file <path-to-the-JSON-key>
Expected output:
secret/dex-google-service-account created
-
Edit the /var/lib/rancher/k3s/server/manifests/axoflow-config.yaml file and set the dex.googleServiceAccount.create option to false.
-
Restart the dex deployment after changing the connector:
kubectl rollout restart deployment/dex -n axoflow
Expected output:
deployment.apps/dex restarted
-
Open the main page of your AxoConsole deployment in your browser. You’ll be redirected to the Google authentication page.
After completing the Google authentication you can access AxoConsole.
Getting help
You can troubleshoot common errors by running kubectl logs -n axoflow <dex-container-name>
If you run into problems setting up the authentication or authorization, contact our support team.
1.3 - LDAP
This section shows you how to use LDAP as an authentication backend for AxoConsole. In the examples we used the public demo service of FreeIPA as an LDAP server. It is assumed that you already have an LDAP server in place. Complete the following steps.
-
Configure Dex as the OIDC provider in the /var/lib/rancher/k3s/server/manifests/axoflow-config.yaml file. For example:
chalco:
  oidc:
    enabled: true
    provider: "dex"

axoidp:
  enabled: false

dex:
  enabled: true
-
Configure authentication by editing the spec.dex.config section of the /var/lib/rancher/k3s/server/manifests/axoflow-config.yaml file.
-
(Optional) If you’ve used our earlier example, delete the spec.dex.config.staticPasswords section.
-
Add the spec.dex.config.connectors section to the file, like this:
CAUTION:
This example shows a simple configuration suitable for testing. In production environments, make sure to:
- configure TLS encryption to access your LDAP server
- retrieve the bind password from a vault or environment variable. Note that if the bind password contains the
$ character, you must set it in an environment variable and pass it like bindPW: $LDAP_BINDPW.
    dex:
      enabled: true
      localIP: $VM_IP_ADDRESS
      config:
        create: true
        connectors:
        - type: ldap
          name: OpenLDAP
          id: ldap
          config:
            host: ipa.demo1.freeipa.org
            insecureNoSSL: true
            # This would normally be a read-only user.
            bindDN: uid=admin,cn=users,cn=accounts,dc=demo1,dc=freeipa,dc=org
            bindPW: Secret123
            usernamePrompt: Email Address
            userSearch:
              baseDN: dc=demo1,dc=freeipa,dc=org
              filter: "(objectClass=person)"
              username: mail
              # "DN" (case sensitive) is a special attribute name. It indicates that
              # this value should be taken from the entity's DN not an attribute on
              # the entity.
              idAttr: uid
              emailAttr: mail
              nameAttr: cn
            groupSearch:
              baseDN: dc=demo1,dc=freeipa,dc=org
              filter: "(objectClass=groupOfNames)"
              userMatchers:
                # A user is a member of a group when their DN matches
                # the value of a "member" attribute on the group entity.
              - userAttr: DN
                groupAttr: member
              # The group name should be the "cn" value.
              nameAttr: cn
-
Edit the following fields. For details on the configuration parameters, see the Dex LDAP connector documentation.
connectors.config.host: The hostname and optionally the port of the LDAP server in “host:port” format.connectors.config.bindDN and connectors.config.bindPW: The DN and password for an application service account that the connector uses to search for users and groups.connectors.config.userSearch.bindDN and connectors.config.groupSearch.bindDN: The base DN for the user and group search.
-
Configure authorization in the kcp.rbac.roles section of the /var/lib/rancher/k3s/server/manifests/axoflow-config.yaml file.
The following roles are available in AxoConsole by default:
-
IAMadmin: Can manage the roles and permissions to access AxoConsole. Only this role can make changes on the Settings > Roles page. Can see the Identity Provider Admin Panel link, which points to the authentication and administration page of the identity provider used to authenticate on AxoConsole. (Every user can access their own profile page at the identity provider by selecting <their username> > Profile in the top-left.)
-
admin: Has full access to AxoConsole, but has only read access to the Settings > Roles page.
-
infrastructureManager: Can manage the infrastructure (without the permissions to view or tap log contents, or to rehydrate data). Has full access to the following pages: Activity Logs, Alerting, Routers, Sources, Flows, Provisioning, Search Logs. Can tap into service logs which may contain event payload.
-
infrastructureViewer: Similar to infrastructure-manager, but can only view the pages.
-
contentManager: Can view log content and manage content related details like flows (without the permissions to manage infrastructure, but including access to view infrastructure details).
- Has full access to the Rehydration page.
- Can view and modify Flows, but can’t create or delete them.
- Can view Routers, Sources, Search Logs, Analytics.
- Can tap into logs.
-
contentViewer: Can view content like analytics, log search, log tapping (without the permissions to manage or view infrastructure details).
- Can view Search Logs, Analytics.
- Can tap into logs.
If you need other roles, contact the Axoflow support team. Composing other roles is possible as part of a custom integration.
- Add the names of the LDAP groups to the related roles under
kcp.rbac.roles.<role>.groups. In the following example, the managers group gets administrator role, and the readonly group gets read-only access to AxoConsole.
  rbac:
    createRoles: true
    createRoleBindings: true
    roles:
      IAMadmin:
        groups:
          - groups:iamadmin
      admin:
        groups:
          - groups:managers
      contentViewer:
        groups:
          - groups:readonly
-
A specific email address, for example, email:username@example.com
Note
- The user must be able to authenticate to AxoConsole using this email address, so authentication must be properly set up.
- Multiple identity providers may allow authentication with the same email address, possibly with different level of ownership validation.
-
An entire email domain, for example, emaildomain:example.com. Any user who authenticates with an email address belonging to this email domain will have access to the role.
-
A user group. The format of the group depends on the OID provider.
- If you’re using AxoConsole as a SaaS, specify the group in the following format:
cognito:groups:<groupname-retrieved-from-cognito>, for example, cognito:groups:ExampleGoogleSaml:Operator.
- If you’re using an on-prem AxoConsole deployment, specify the group in the following format:
groups:<groupname-retrieved-from-dex> for example, groups:operator.
-
A specific session of an authenticated user, in the following format: user:<oidc-response-subject>, for example: user:42c4e962-f077-705f-138f-f01ba1220c44.
-
Every authenticated user: axoflow:user
For details on authorization settings, see Authorization.
-
Save the file.
-
Restart the dex deployment after changing the connector:
kubectl rollout restart deployment/dex -n axoflow
Expected output:
deployment.apps/dex restarted
Getting help
You can troubleshoot common errors by running kubectl logs -n axoflow <dex-container-name>
If you run into problems setting up the authentication or authorization, contact our support team.