These sections show you how to configure on-premises and Kubernetes deployments of AxoConsole to use different authentication backends.
1 - GitHub
This section shows you how to use GitHub OAuth2 as an authentication backend for AxoConsole. It is assumed that you already have a GitHub organization. Complete the following steps.
Prerequisites
Register a new OAuth GitHub application for your organization. (For testing, you can create it under your personal account.) Make sure to:
-
Set the Homepage URL to the URL of your AxoConsole deployment:
https://<your-console-host.your-domain>/callback, for example,https://axoflow-console.example.com. -
Set the Authorization callback URL to:
https://auth.<your-console-host.your-domain>/callback, for example,https://auth.axoflow-console.example.com/callback.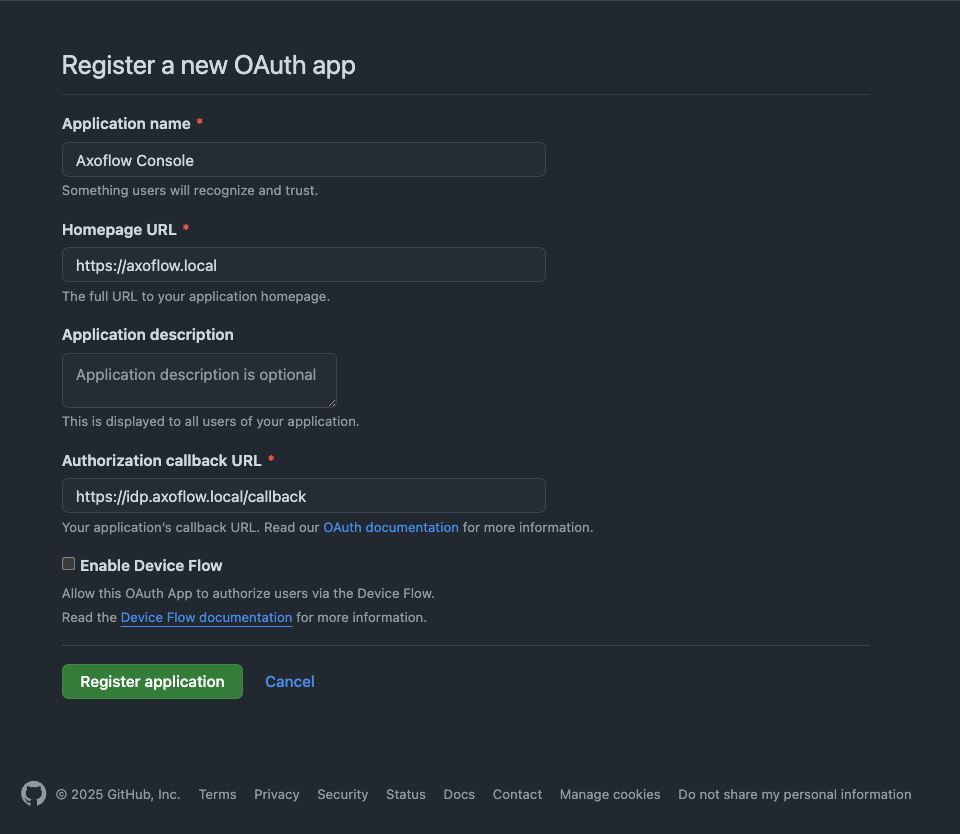
-
Save the Client id of the app, you’ll need it to configure AxoConsole.
-
Generate a Client secret and save it, you’ll need it to configure AxoConsole.
Configuration
-
Configure authentication by editing the
spec.dex.configsection of the/var/lib/rancher/k3s/server/manifests/axoflow.yamlfile.-
(Optional) If you’ve used our earlier example, delete the
spec.dex.config.staticPasswordssection. -
Add the
spec.dex.config.connectorssection to the file, like this:dex: enabled: true localIP: $VM_IP_ADDRESS config: create: true connectors: - type: github # Required field for connector id. id: github # Required field for connector name. name: GitHub config: # Credentials can be string literals or pulled from the environment. clientID: <ID-of-GitHub-application> clientSecret: <Secret-of-GitHub-application> redirectURI: <idp.your-host.your-domain/callback> orgs: - name: <your-GitHub-organization>Note that if you have a valid domain name that points to the VM, you can omit the
localIP: $VM_IP_ADDRESSline. -
Edit the following fields. For details on the configuration parameters, see the Dex GitHub connector documentation.
connectors.config.clientID: The ID of the GitHub OAuth application.connectors.config.clientSecret: The client secret of the GitHub OAuth application.connectors.config.redirectURI: The callback URL of the GitHub OAuth application:https://auth.<your-console-host.your-domain>/callback, for example,https://auth.axoflow-console.example.com/callback.connectors.config.orgs: List of the GitHub organizations whose members can access AxoConsole. Restrict access to your organization.
-
-
Configure authorization in the
spec.pomerium.policysection of the/var/lib/rancher/k3s/server/manifests/axoflow.yamlfile.- List the primary email addresses of the users who have read and write access to AxoConsole under the
emailssection. - List the primary email addresses of the users who have read-only access to AxoConsole under the
readOnly.emailssection.
NoteUse the primary GitHub email addresses of your users, otherwise the authorization will fail.policy: emails: - username@yourdomain.com domains: [] groups: [] claim/groups: [] readOnly: emails: - readonly-username@yourdomain.com domains: [] groups: [] claim/groups: []For details on authorization settings, see Authorization.
- List the primary email addresses of the users who have read and write access to AxoConsole under the
-
Save the file.
-
Restart the dex deployment after changing the connector:
kubectl rollout restart deployment/dex -n axoflowExpected output:
deployment.apps/dex restarted -
Open the main page of your AxoConsole deployment in your browser. You’ll be redirected to the GitHub authentication page.
After completing the GitHub authentication you can access AxoConsole.
Getting help
You can troubleshoot common errors by running kubectl logs -n axoflow <dex-container-name>
If you run into problems setting up the authentication or authorization, contact our support team.
2 - Google
This section shows you how to use Google OpenID Connect as an authentication backend for AxoConsole. It is assumed that you already have a Google organization and Google Cloud Console access. Complete the following steps.
Prerequisites
-
To use Google authentication, AxoConsole must be deployed on a publicly accessible domain name (the
$BASE_HOSTNAMEmust end with a valid top-level domain, for example,.comor.io.) -
Configure OpenID Connect and create an OpenID credential for a Web application.
- Make sure to set the Authorized redirect URIs to:
https://auth.<your-console-host.your-domain>/callback, for example,https://auth.axoflow-console.example.com/callback. - Save the Client ID of the app and the Client secret of the application, you’ll need them to configure AxoConsole.
For details on setting up OpenID Connect, see the official documentation.
- Make sure to set the Authorized redirect URIs to:
Configuration
-
Configure authentication by editing the
spec.dex.configsection of the/var/lib/rancher/k3s/server/manifests/axoflow.yamlfile.-
(Optional) If you’ve used our earlier example, delete the
spec.dex.config.staticPasswordssection. -
Add the
spec.dex.config.connectorssection to the file, like this:connectors: - type: google id: google name: Google config: # Connector config values starting with a "$" will read from the environment. clientID: <ID-of-Google-application> clientSecret: <Secret-of-GitHub-application> # Dex's issuer URL + "/callback" redirectURI: <idp.your-host.your-domain/callback> # Set the value of `prompt` query parameter in the authorization request # The default value is "consent" when not set. promptType: consent # Google supports whitelisting allowed domains when using G Suite # (Google Apps). The following field can be set to a list of domains # that can log in: # hostedDomains: - <your-domain> -
Edit the following fields. For details on the configuration parameters, see the Dex Google connector documentation.
connectors.config.clientID: The ID of the Google application.connectors.config.clientSecret: The client secret of the Google application.connectors.config.redirectURI: The callback URL of the Google application:https://auth.<your-console-host.your-domain>/callback, for example,https://auth.axoflow-console.example.com/callback.connectors.config.hostedDomains: The domain where AxoConsole is deployed, for example,example.com. Your users must have email addresses for this domain at Google.
-
-
Configure authorization in the
spec.pomerium.policysection of the/var/lib/rancher/k3s/server/manifests/axoflow.yamlfile.- List the email addresses of the users who have read and write access to AxoConsole under the
emailssection. - List the email addresses of the users who have read-only access to AxoConsole under the
readOnly.emailssection.
NoteThe email addresses of your users must have the same domain as the one set under `connectors.config.hostedDomains`, otherwise the authorization will fail.policy: emails: - username@yourdomain.com domains: [] groups: [] claim/groups: [] readOnly: emails: - readonly-username@yourdomain.com domains: [] groups: [] claim/groups: []For details on authorization settings, see Authorization.
- List the email addresses of the users who have read and write access to AxoConsole under the
-
Save the file.
-
Restart the dex deployment after changing the connector:
kubectl rollout restart deployment/dex -n axoflowExpected output:
deployment.apps/dex restarted -
Open the main page of your AxoConsole deployment in your browser. You’ll be redirected to the Google authentication page.
After completing the Google authentication you can access AxoConsole.
Getting help
You can troubleshoot common errors by running kubectl logs -n axoflow <dex-container-name>
If you run into problems setting up the authentication or authorization, contact our support team.
3 - LDAP
This section shows you how to use LDAP as an authentication backend for AxoConsole. In the examples we used the public demo service of FreeIPA as an LDAP server. It is assumed that you already have an LDAP server in place. Complete the following steps.
-
Configure authentication by editing the
spec.dex.configsection of the/var/lib/rancher/k3s/server/manifests/axoflow.yamlfile.-
(Optional) If you’ve used our earlier example, delete the
spec.dex.config.staticPasswordssection. -
Add the
spec.dex.config.connectorssection to the file, like this:CAUTION:
This example shows a simple configuration suitable for testing. In production environments, make sure to:
- configure TLS encryption to access your LDAP server - retrieve the bind password from a vault or environment variable. Note that if the bind password contains the `$` character, you must set it in an environment variable and pass it like `bindPW: $LDAP_BINDPW`.dex: enabled: true localIP: $VM_IP_ADDRESS config: create: true connectors: - type: ldap name: OpenLDAP id: ldap config: host: ipa.demo1.freeipa.org insecureNoSSL: true # This would normally be a read-only user. bindDN: uid=admin,cn=users,cn=accounts,dc=demo1,dc=freeipa,dc=org bindPW: Secret123 usernamePrompt: Email Address userSearch: baseDN: dc=demo1,dc=freeipa,dc=org filter: "(objectClass=person)" username: mail # "DN" (case sensitive) is a special attribute name. It indicates that # this value should be taken from the entity's DN not an attribute on # the entity. idAttr: uid emailAttr: mail nameAttr: cn groupSearch: baseDN: dc=demo1,dc=freeipa,dc=org filter: "(objectClass=groupOfNames)" userMatchers: # A user is a member of a group when their DN matches # the value of a "member" attribute on the group entity. - userAttr: DN groupAttr: member # The group name should be the "cn" value. nameAttr: cn -
Edit the following fields. For details on the configuration parameters, see the Dex LDAP connector documentation.
connectors.config.host: The hostname and optionally the port of the LDAP server in “host:port” format.connectors.config.bindDNandconnectors.config.bindPW: The DN and password for an application service account that the connector uses to search for users and groups.connectors.config.userSearch.bindDNandconnectors.config.groupSearch.bindDN: The base DN for the user and group search.
-
-
Configure authorization in the
spec.pomerium.policysection of the/var/lib/rancher/k3s/server/manifests/axoflow.yamlfile.- List the names of the LDAP groups whose members have read and write access to AxoConsole under
claim/groups. (Groupmanagersin the example.) - List the names of the LDAP groups whose members have read-only access to AxoConsole under
readOnly.claim/groups. (Groupemployeein the example.)
  policy:
    emails: []
    domains: []
    groups: []
    claim/groups:
      - managers
    readOnly:
      emails: []
      domains: []
      groups: []
      claim/groups:
        - employee
For details on authorization settings, see Authorization.
- List the names of the LDAP groups whose members have read and write access to AxoConsole under
-
Save the file.
-
Restart the dex deployment after changing the connector:
kubectl rollout restart deployment/dex -n axoflowExpected output:
deployment.apps/dex restarted
Getting help
You can troubleshoot common errors by running kubectl logs -n axoflow <dex-container-name>
If you run into problems setting up the authentication or authorization, contact our support team.